
How To Set Up a No-Code Jira-Notion Integration
Do you know what your developers are up to? Whether you’re working in a tech company or an organization with a software development arm, you’ll need to collaborate with developers. These collaborators are some of the most specialized, hard-working people you can find, but their work is often the most siloed. But because their work is so essential, people throughout the command chain need updates on development work. This article will help you prepare faster reports, as well as keep teams in sync between Notion and Jira with Unito’s 2-way integration.
New to Unito? Check out our Jira + Notion integration overview. Otherwise read on below to find out how you can sync Jira issues to Notion pages automatically in real-time.
By the end of this guide you’ll have set up a simple Notion Jira integration that:
- Creates new Jira issues automatically based on trigger conditions in Notion
- Populates specific Jira issues with data from your Notion pages with 2-way updates
- Syncs data from your Jira issues back to Notion
In this Notion Jira integration article:
- Prepare Notion and Jira for Unito’s integration
- Step 1: Connect Notion and Jira to Unito
- Step 2: Set a flow direction between Notion and Jira
- Step 3: Set conditions to specify which issues to sync from Jira to Notion
- Step 4: Link fields between Jira issues and Notion pages
- Step 5: Launch your Jira to Notion integration
- Use Case: Building a development report in Notion
- What’s Next?
Before connecting Jira and Notion to Unito:
Prepare your Notion database for Unito’s 2-Way integration
You can sync pages from any Notion database in your account as long as you have “edit permission” in that database. Here’s an example of how databases appear in Unito:

Click here for instructions on how to set up each Notion page to sync with Unito
Add Unito 2-way Sync as a connection for each page you want to include in your flows.
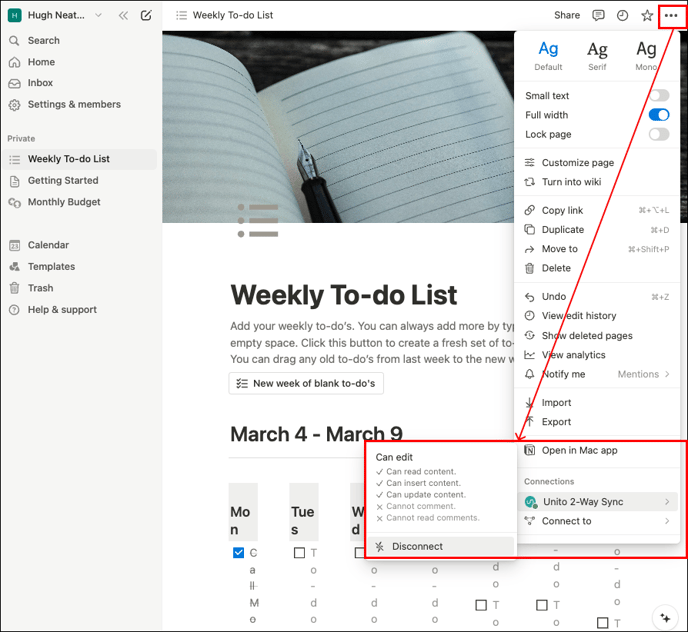
Otherwise, Unito won’t be able to detect your databases in Notion. Here’s more from Notion’s knowledge base on adding connections.
Troubleshooting your Notion integration
If you need help setting up your Notion integration, you can browse this guide on adding Notion to Unito or you can find a more general overview of this Notion integration here.
Note: Only one Notion user per workspace can connect to Unito. So make sure you create a Notion user specifically for Unito and give it access to all pages and databases in your workspace.
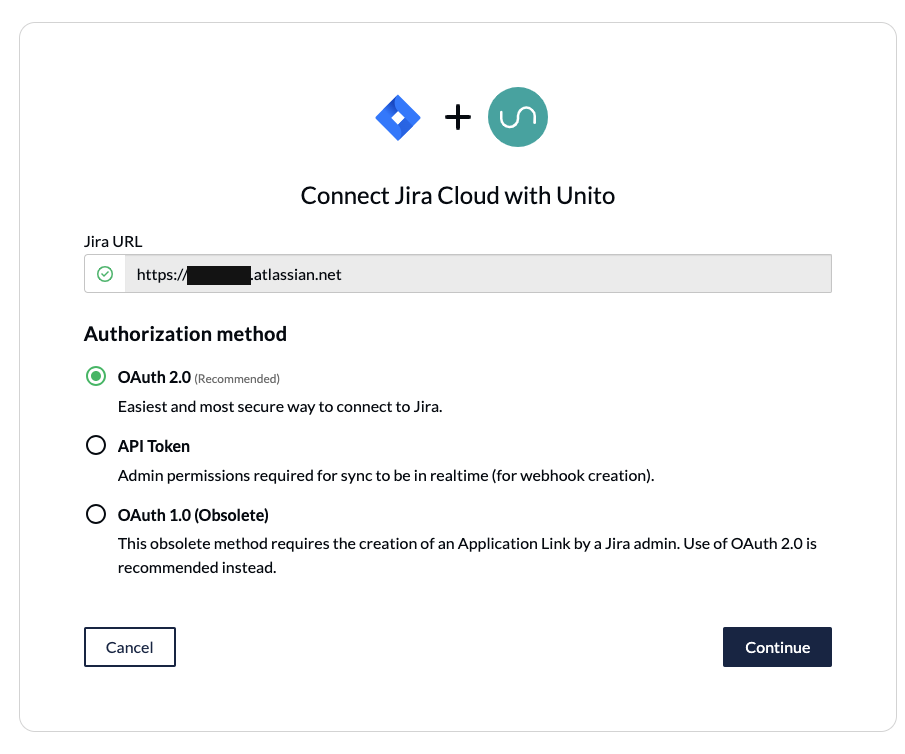
Configure Jira for Unito access
If you’re connecting Jira to Unito via OAuth2, then there are no extra steps to sync your Notion data other than the on-screen instructions when adding your account for the first time:
Here’s a separate guide on how to connect a local Jira Server on-premise to Unito. You can also connect your server via ngrok.
Here’s how to configure Jira if you aren’t using OAuth2 (click to expand)
There are a few steps involved before we can set up a two-way sync with Unito, but we promise it’s worthwhile. The benefit of eliminating manual tasks for your team indefinitely far outweighs the time it takes to set up your automation rules now. So let’s dive in.
- The Jira account connected to Unito must have administrator access with global permissions.
- Here’s a guide if you need help to configure Jira for Unito access before building your flow. Specifically you’ll need to:
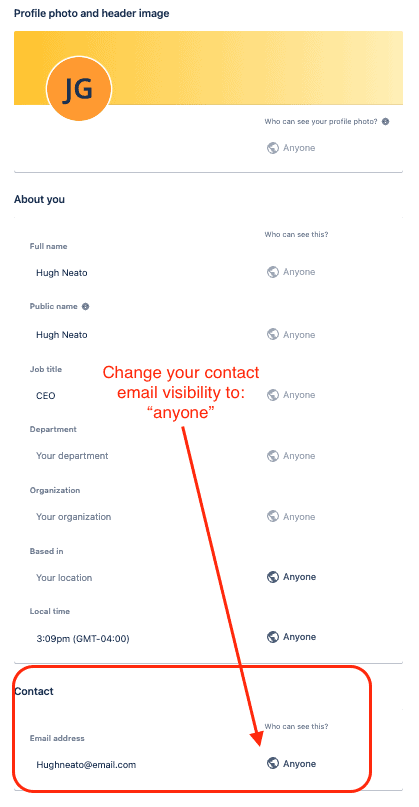
- Set your Jira contact email visibility to anyone from your Jira profile page.
- Then, set up an application link in Jira so that your issues can sync to Notion.
Step 1: Connect Notion and Jira to Unito
- Login the Unito App and click + Create Flow.
- Now, click Start Here to connect your tools. Follow the on-screen instructions to authorize Jira and Notion. If you need help with, here’s a breakdown of every permission needed by Unito.
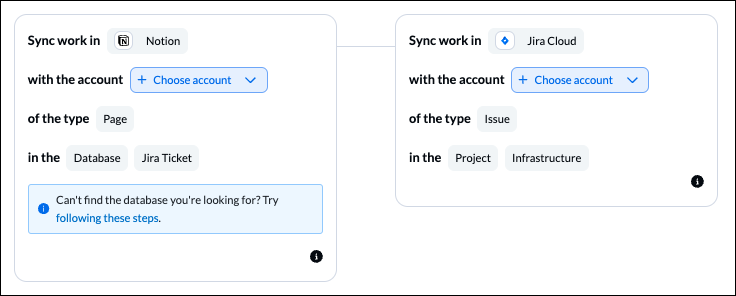
- Next, select +Add a tool to this flow in either column. Then, +Choose account to specify the Jira project and Notion page you plan on syncing. The order in which you connect them doesn’t matter.
- Click Confirm.
Step 2: Tell Unito where to automatically create Notion pages or Jira issues
Now it’s time to set up flow direction.
For most use cases, a two-way flow is useful for keeping your work apps or tools updated in real-time by automatically creating new work items in Notion and Jira based on activity in the other.

If you choose a one-way flow direction, you’ll have a source tool and a destination tool. Manually created work items (pages or issues) in the source tool will automatically appear in the destination through Unito.
A two-way flow direction (as pictured above) will allow manual activity in either tool to create items (Notion pages or Jira issues) in the other.
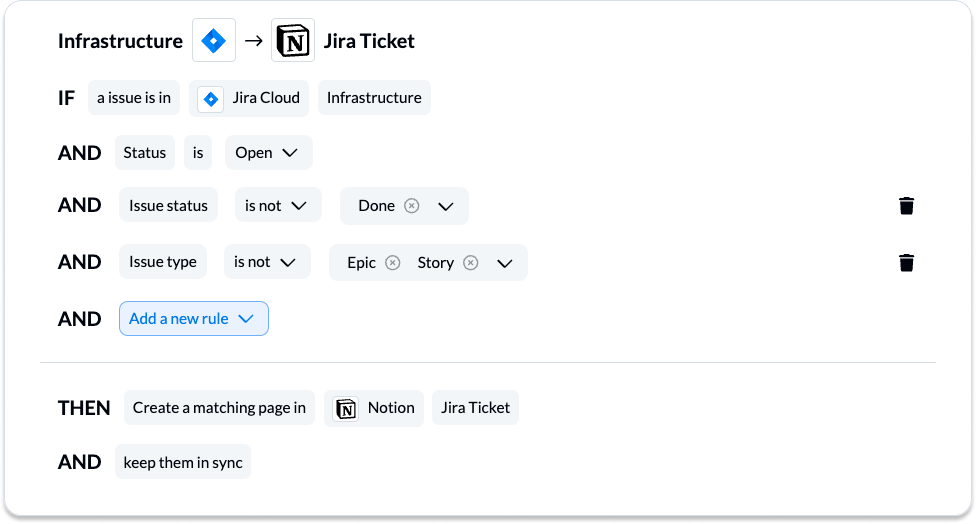
Step 3: Apply rules to sync only specific Jira issues or Notion pages
After choosing flow direction, you can set up rules to filter out Jira issues you don’t want to see in your report. You could filter out issues with specific assignees or labels, for instance. This part is entirely up to you. In our demo, we’ve chosen to sync specific issue types from Jira to Notion.
Select Add a new rule to begin. Here’s an example of rules to sync Jira issues to Notion:
And here’s another example of rules to sync Notion pages to Jira:
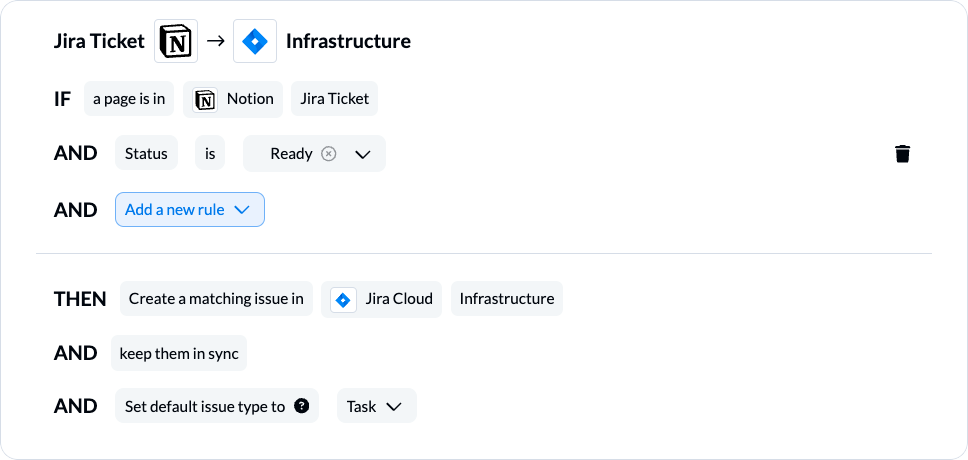
Find out more about setting rules at our Help Center.
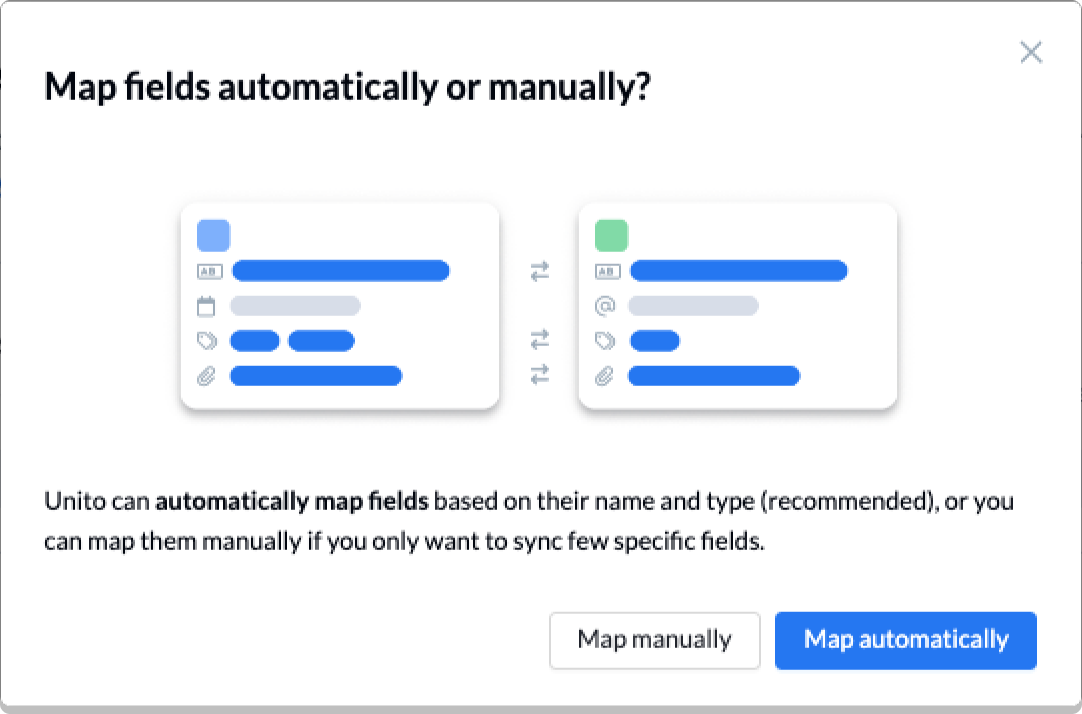
Step 4: Link fields between Jira issues and Notion pages
Fields represent the details of your Jira issues and Notion rows. This includes: assignee, issue number, due dates, status, label, etc. Typically we can either auto-map our fields or go with a DIY approach. Due to limitations in Notion, we’ll need to map our fields manually.
Now it’s time to customize your field mappings. Click on + Add mapping to pick individual fields in Jira that will sync over to Notion. If you’re using our Notion template for Jira, then your Notion fields are already named after their counterparts in Jira. Here’s what our completed set of field mappings looks like:
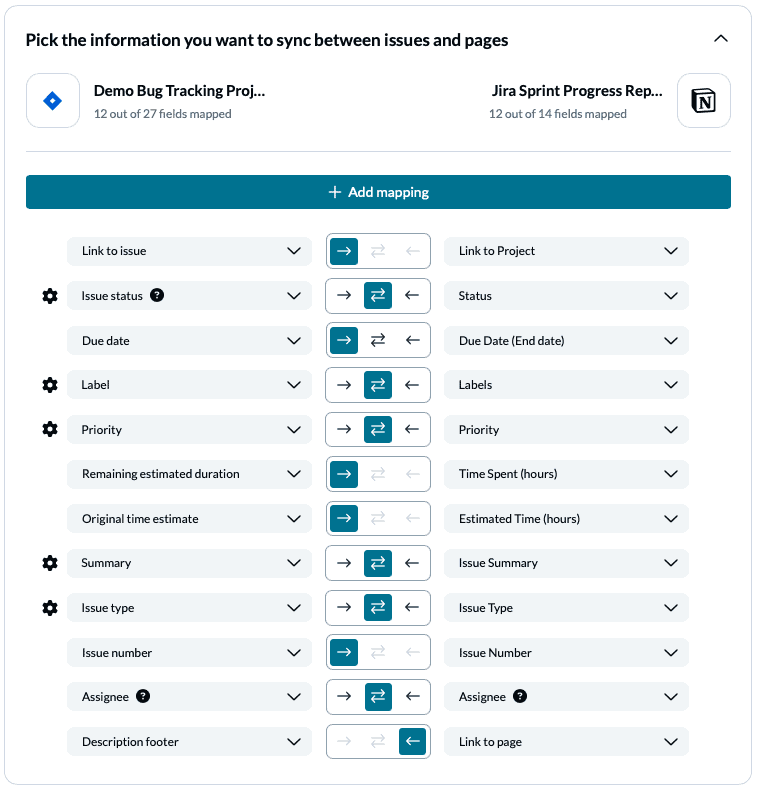
Any field with a gear (or cog) icon allows you to specify individual values for fields with multi- or single-select options, such as: status, priority, label, etc.
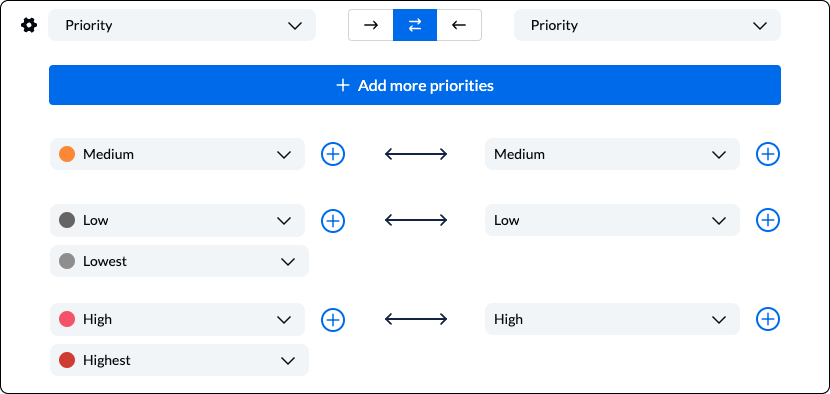
Note: If you don’t configure your fields as pictured above, then your flow will refer to your default rules when syncing. This is especially relevant if you plan on syncing statuses in Unito.
Exact mappings might vary for your use case, but this is generally what you want.
Your fields should be mapped for two-way updates. Even if you don’t want new Jira issues to be created when you add new rows in Notion, you still want everything kept updated in both directions. This allows stakeholders to change labels, add comments, and more in Notion, knowing everything will be synced over to Jira.
Here’s another example of field mappings between Jira and Notion
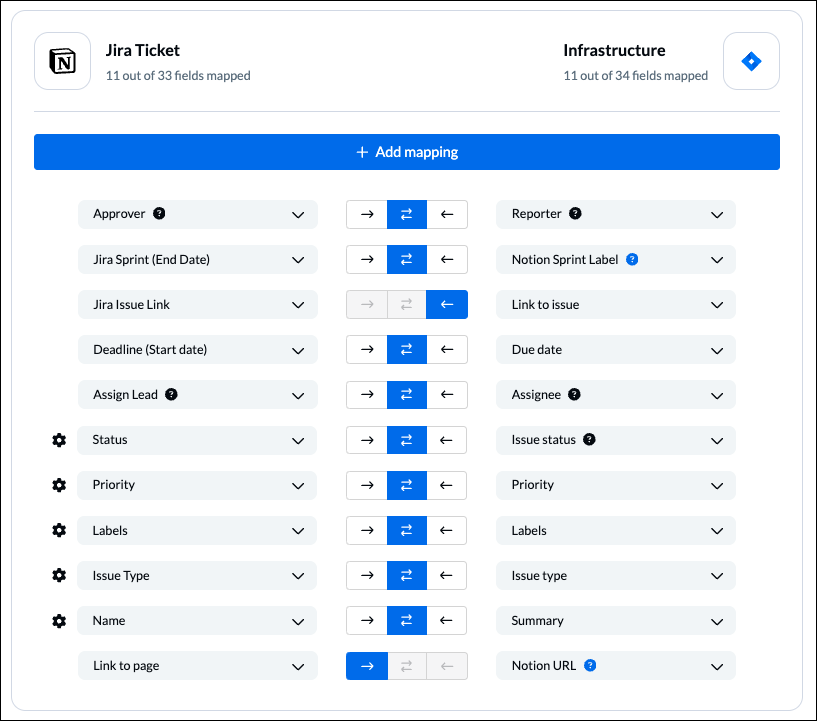
You can learn more about field mappings here.
Click Confirm when you’re ready to continue.
Step 5: Save, close, and launch your Jira to Notion integration
And that’s it! Just like that, you’ve built a two-way flow to automate issue creation between Jira projects with Unito!
If you’ve followed the steps above, your flow will now:
- Create new rows in Notion based on Jira issues matching your set of rules.
- Keep those issues and Notion rows updated automatically in a live two-way sync.
Here’s a side-by-side look at our demo’s Jira issue synced to Notion with Unito based on the rules and field mappings above:
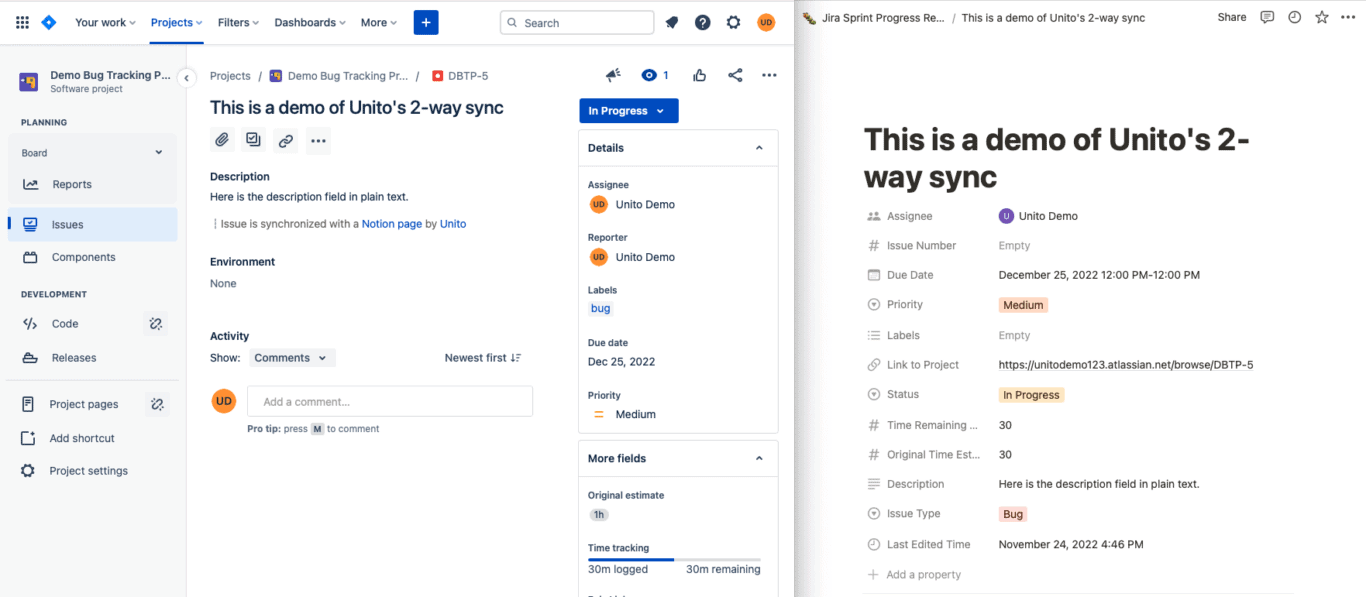
Right: Notion
Once all your fields are mapped, you’re done! You can launch your flow and watch as Jira issues get synced over to Notion. Build flows for other Jira projects, and you could have a single Notion database become a report for everything your development team is doing.
Ready to automate your reports?
Meet with our team to see what Unito can do for your workflow.
Essential Unito features for this use case
One-way create, two-way update
That’s the term we use to define the flow we just set up in the previous steps. By customizing your flow with this feature, you make sure all information is kept updated across both tools without the creation of new work items. This is especially important if you sync multiple Jira projects to a single Notion database — otherwise you’ll get Jira issues traveling from project to project.
Custom fields
Jira uses custom fields to give users more control over their projects. With Unito, you can sync these fields from Jira to other tools — and back — so that you don’t lose the customizability of your tools. Find out which plans enable you to sync custom fields on Unito’s pricing page.
Advanced mappings
For many integration solutions, you’re a bit stuck with what the tools give you. That makes it tough to truly recreate the environment from one tool in the other. Unito lets you customize your field mappings so that isn’t the case. When you’re using a flexible tool like Notion, that’s essential.
Building a development report in Notion
Because Notion is so flexible, you can build your report any way you want. Or you can use the template we’ve already created specifically for this use case. The columns in this template replicate the most valuable Jira fields to give you a better idea of what’s going on. Let’s go over them.
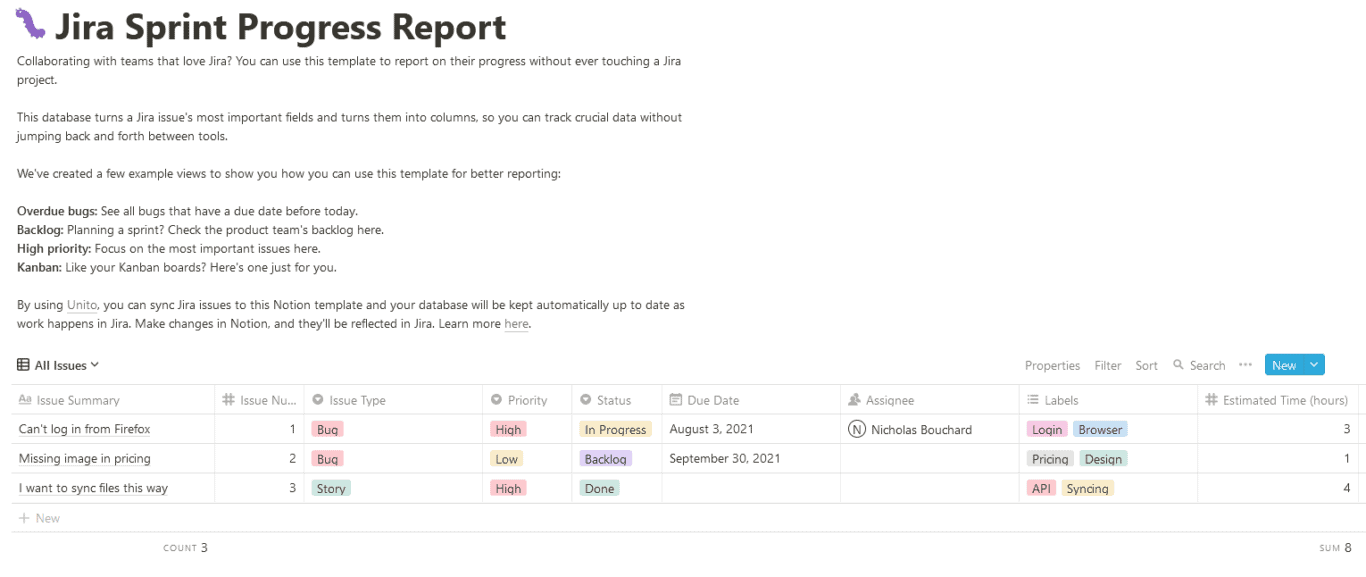
- Issue summary: A title field in Notion that will pick up the name of a specific Jira issue.
- Issue number: Issue numbers are used as shorthand in Jira for quick reference. In Notion, this is a number field.
- Issue type: There are four main types of issues in Jira. Tasks represent pieces of work that need doing, while bugs are for tenacious software problems. Epics and stories are used to direct software work. This is a select field in Notion.
- Priority: How important is this issue? Another select field, here.
- Status: How’s progress on the issue? This select field in Notion can also be used to create columns for a Kanban board.
- Due date: When’s it due? A date field.
- Assignee: See who’s responsible for a specific issue using a person field.
- Labels: A multi-select field that can be used in a myriad of ways, like determining which part of a software project is touched by an issue.
- Estimated and time spent: Two number fields used to see how much work is going into specific issues.
- Link to project: This URL field will let you go to an issue’s Jira project in a single click.
Once you’ve found your way around this database, you can also create alternate views for your use case. You can filter by specific fields, sort issues how you like, and more. We’ve created a few alternate views for demonstration purposes, like the Overdue Bugs view, which automatically filters Notion rows that have due dates earlier than the current date.

What’s next after setting up this Jira Notion integration with Unito?
- Unito’s flow duplication feature lets you copy existing flows, keeping your rules, mappings, and many other settings intact. This allows you to sync multiple Jira projects to a master without starting each flow from scratch.
- Browse some of the best free Notion templates and sync multiple Notion pages together.
- Promote collaboration between technical and non-technical teams by setting up a Unito flow to:
- Sync Jira with Asana
- Link Jira issues with Trello cards
- Connect Jira projects to Wrike
- Connect projects between Jira and Jira Service Management
- Sync tasks between Jira and monday.com
- Sync jira issues between multiple projects
- Connect Jira and HubSpot
- Link Jira to Azure DevOps
- Merge issues between Jira and GitHub
- Sync Jira issues to Airtable
- Link tasks between Jira and ClickUp
- Send Jira issues to an Excel spreadsheet
- Export Jira to Google Sheets
- Connect Jira Service Management to ServiceNow
- Send tickets from Zendesk to Jira
- Connect Jira to Smartsheet
- Sync Jira and Salesforce
- Here’s a guide to integrate GitLab and Jira with Unito.
- Connect Notion to Google Calendar, Notion and monday.com, Airtable to Notion, Notion to Asana, or Notion and GitHub.
- Build an automated ticket escalation queue from Jira Service Management to Jira Cloud.
Why report on development work from Jira to Notion?
Developers are incredibly siloed. Their tools are intensely specialized, and they’re not usually a good fit for other teams. That means developers usually have their own tool stack, while the rest of the organization uses a separate work hub.
Without the right integration, working with developers can be tough. You need to use emails, meetings, or chat messages just to get in touch with them. If you’re an individual collaborator who needs updates on a specific task, you can probably get by. If you’re a stakeholder with dozens of things to take care of, you don’t have time to crawl through emails for the right update.
In Unito’s Report on Reporting, 82% of people surveyed said their reports led to actionable insights at least most of the time. With the right report, a development team can easily communicate updates, workload, and find the weaknesses in their workflows. But reporting involves a ton of manual work, it means consolidating data from multiple sources, and it’s a huge time-sink.
Why integrate Notion and Jira with Unito?
Mainly because this combo means you don’t have to build manual reports.
Notion might just be one of the most flexible work management tools out there. Users can build wikis, databases, spreadsheets, project management platforms, and more. With its simple interface, you don’t have to be a technical user to get the most out of this platform. For this use case, a Notion database is a simple way to collect information from Jira and turn it into a quickly digestible overview.
Unito is a no-code tool with the deepest two-way integrations on the market. Build flows between tools and you can sync crucial data back and forth between them. No more copy-pasting and no more status meetings. Unito enables you to build powerful reports in Notion that are automatically updated with information from Jira or other work tools.