How To Set Up a No-Code HubSpot-Jira Integration
If you have teams working in HubSpot and Jira simultaneously, then this is the guide you’ve been looking for. Getting details in and out of either tool and into the other can be agonizing when you’re working with large volumes of data.
So let’s figure out how to break out of data siloes and stop performing manual updates in HubSpot and Jira. Unito is your solution for freeing up the project manager’s schedule with automated 2-way sync!
These step-by-step instructions will show you how anyone can automatically send HubSpot tasks, tickets or deals to Jira with Unito’s 2-way integration. In just a few minutes, you’ll have a no-code workflow that keeps your teams in HubSpot and Jira in sync without human error or excessive manual input.
Watch this HubSpot Jira integration in action:
In this article:
- Setup in Jira
- Step 1: Connect Jira Cloud and HubSpot to Unito
- Step 2. Choose a flow direction for creating new issues, tickets, tasks or deals
- Step 3. Filter out unrelated data from syncing by setting rules
- Step 4: Link fields between Jira and HubSpot
- Step 5: Launch your HubSpot Jira integration
- What’s next after you sync Jira and HubSpot?
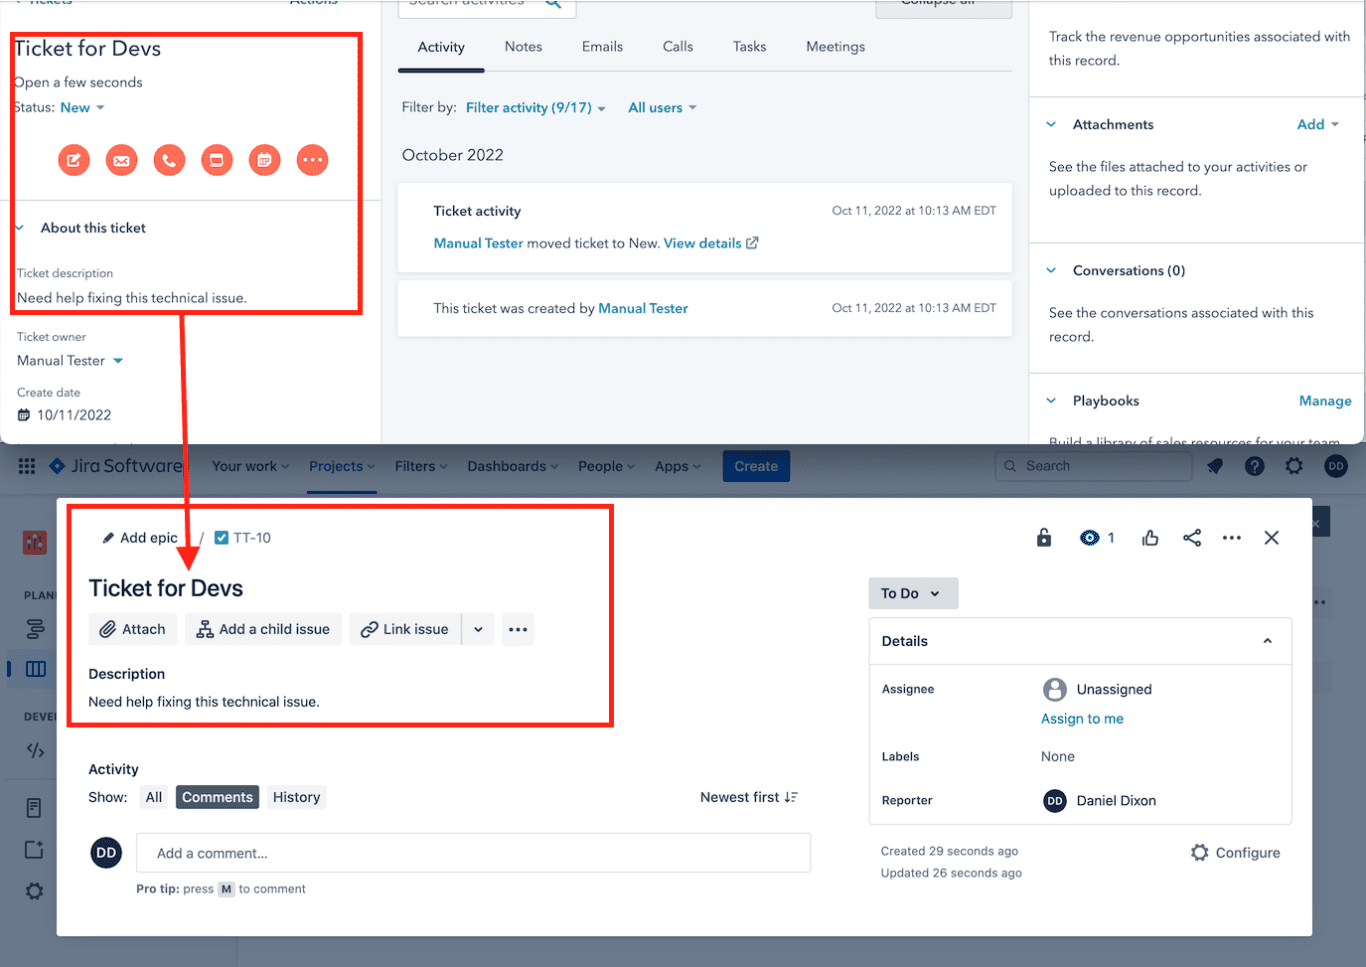
This flow has two goals:
- Create new issues in Jira Cloud based on HubSpot tickets that have been flagged for escalation.
- Maintain a live ticketing queue between HubSpot and Jira that functions automatically in real-time without maintenance.
Setup in Jira
If you’re connecting Jira to Unito via OAuth2, then simply follow the on-screen instructions when adding your account for the first time: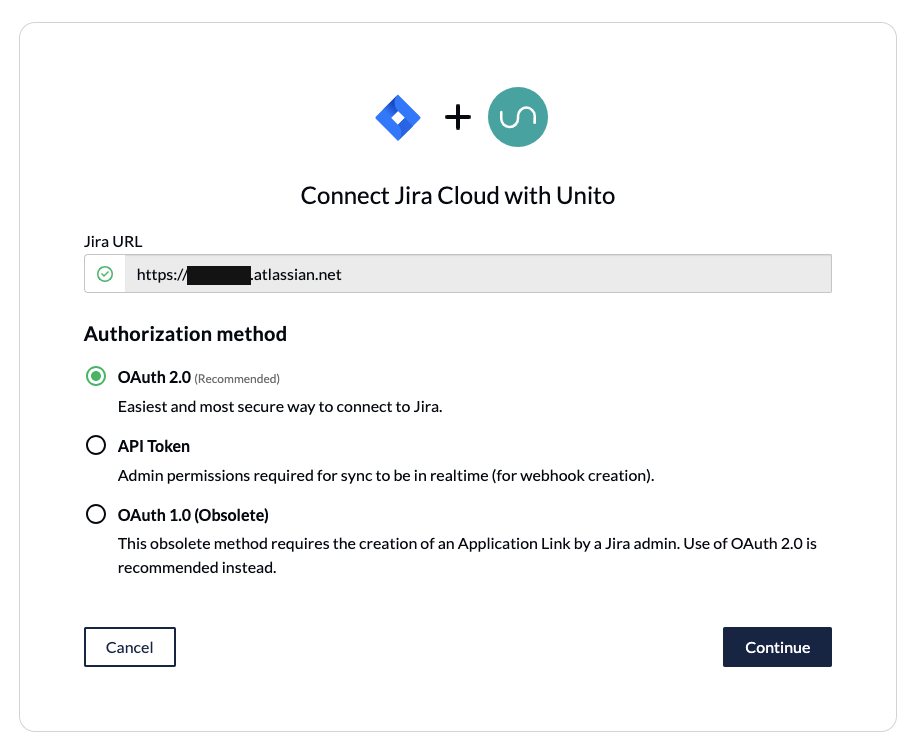
Here’s a separate guide on how to connect a local Jira Server on-premise to Unito. You can also connect your server via ngrok.
Here’s how to configure Jira if you aren’t using OAuth2 (click to expand)
There are a few steps involved before we can set up a two-way sync with Unito, but we promise it’s worthwhile. The benefit of eliminating manual tasks for your team indefinitely far outweighs the time it takes to set up your automation rules now. So let’s dive in.
- The Jira account connected to Unito must have administrator access with global permissions.
- Here’s a guide if you need help to configure Jira for Unito access before building your flow. Specifically you’ll need to:
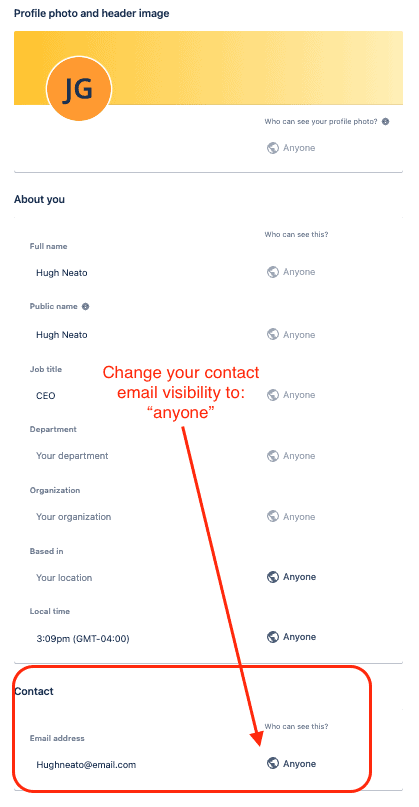
- Set your Jira contact email visibility to anyone from your Jira profile page.
- Then, set up an application link in Jira so that your issues can sync to HubSpot.
Step 1: Connect Jira Cloud and HubSpot to Unito
- Sign up for Unito if you haven’t already.
- Open the Unito App and select +Create Flow.
- Next, click Start Here to connect your tools.
- Select +Add a tool to this flow in either column
- Then, +Choose account to specify the Jira and HubSpot projects you plan on syncing.
- Click Confirm.
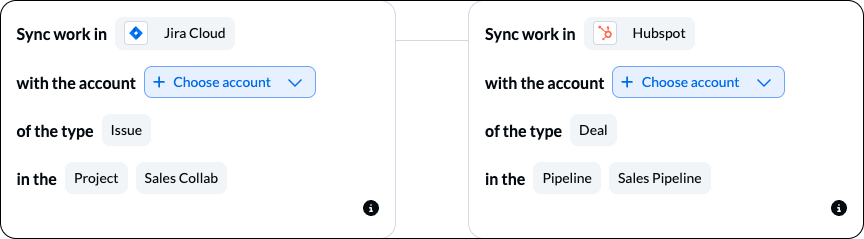
Note: Since we’re automating the issue escalation process, make sure you select the Jira Cloud project that will host all the issues you’d like to sync from HubSpot. If you have more than one project to sync with HubSpot, you can duplicate this flow afterwards.
Step 2. Choose a flow direction for creating new issues, tickets, tasks or deals
- Click on the arrow that points to your Jira project. This will create new issues in Jira for the development team based on certain actions taken in HubSpot, which we’ll explain in the next step.
- Click Confirm.
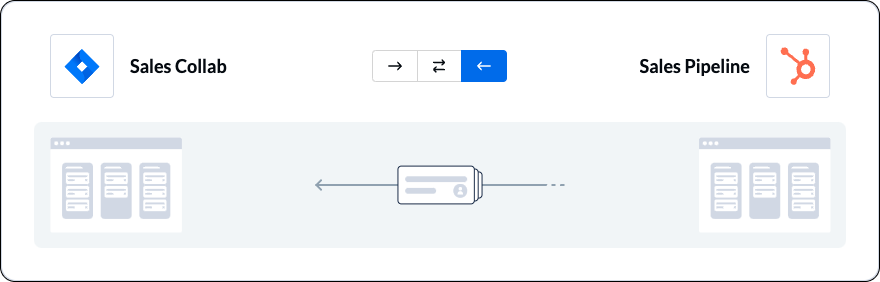
Learn more about flow direction in Unito.
Step 3. Filter out unrelated data from syncing by setting rules
- Select Add a new rule to apply conditions to your flow. In our case, we selected the “Negotiation” stage. Only HubSpot deals marked with that stage will sync to Jira.
- Select Confirm.
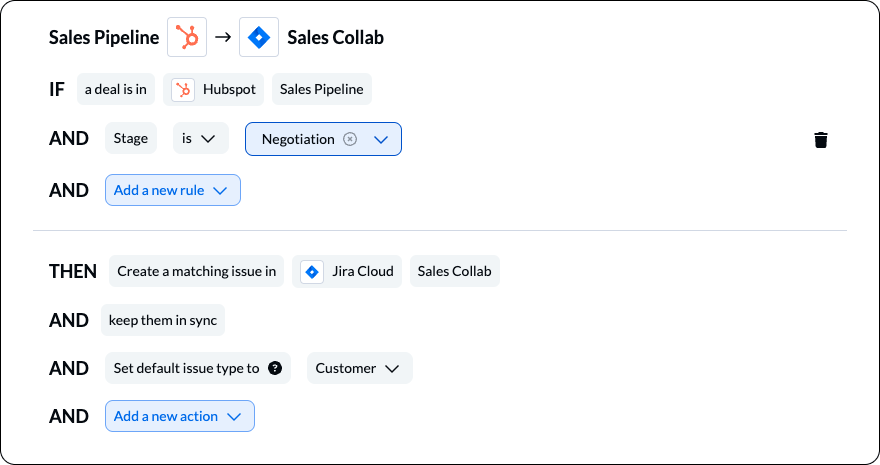
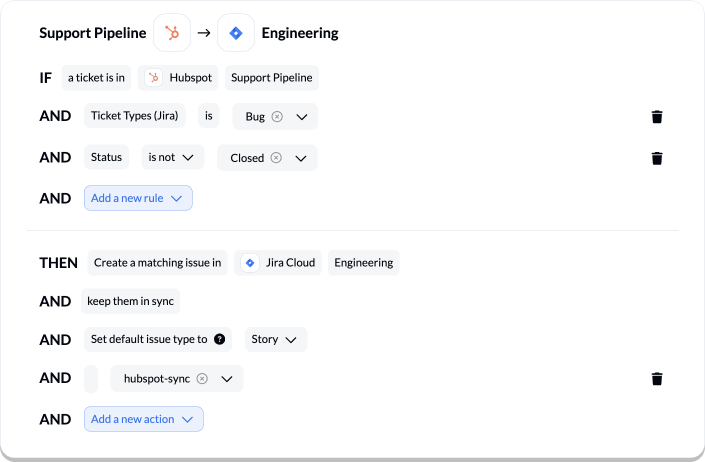
In another example, we’ve told Unito to only create Jira Cloud issues based on HubSpot tickets if their status isn’t “closed” and the custom field Ticket Types (Jira) is set to “Bug”.
Learn more about building rules here.
Step 4: Link fields between Jira and HubSpot
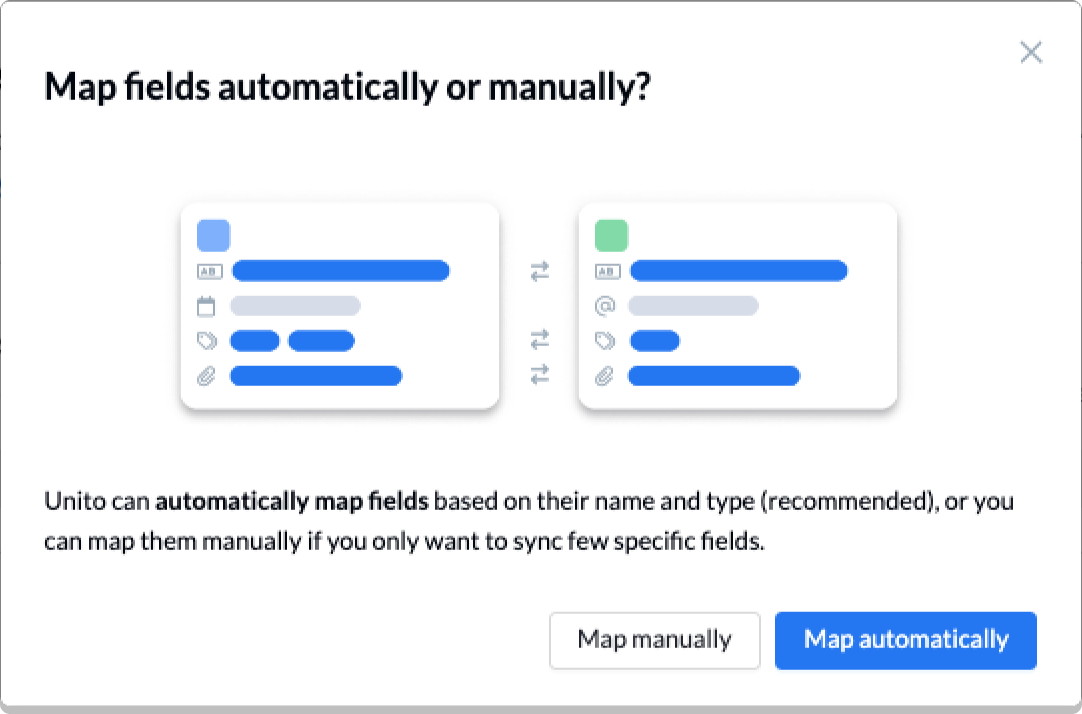
Next, you can set individual relationships between fields in HubSpot and Jira. Most fields can be assigned their own sync direction which determines how real-time updates occur. But first, select Map automatically to begin your field mapping table with a prebuilt template.
To add a new pair of fields, select + Add mapping, then Select a field in both HubSpot and Jira. Here is our demo’s completed set of field mappings:
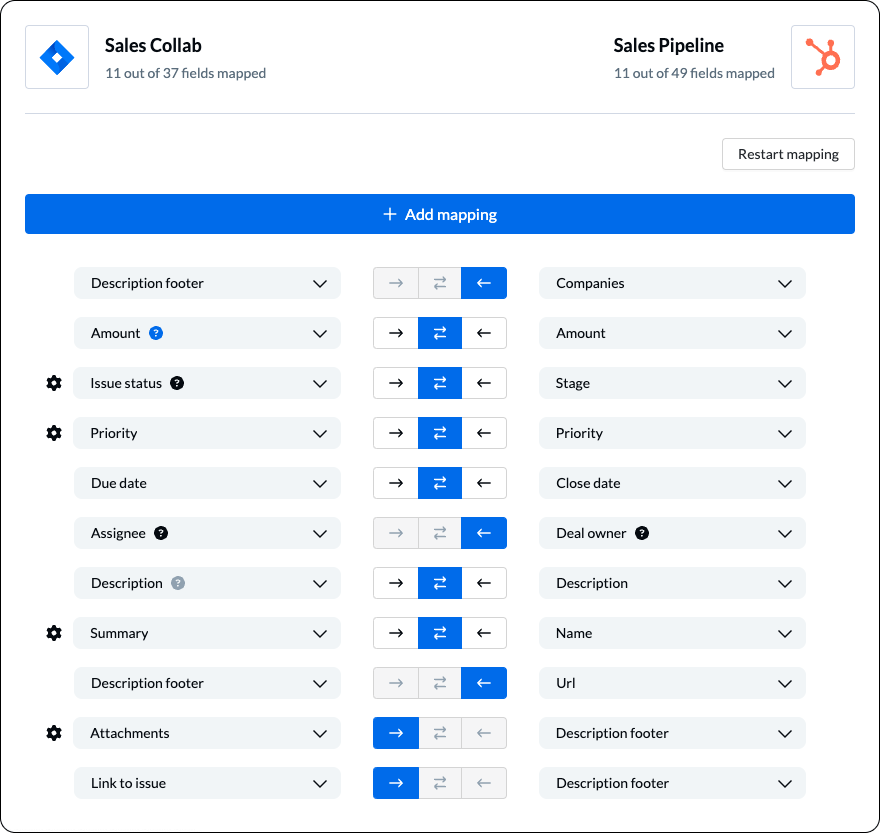
The blue question mark icon indicates custom fields created in that tool. The gear (or cog) icon indicates configurable fields with additional options to match your use case.
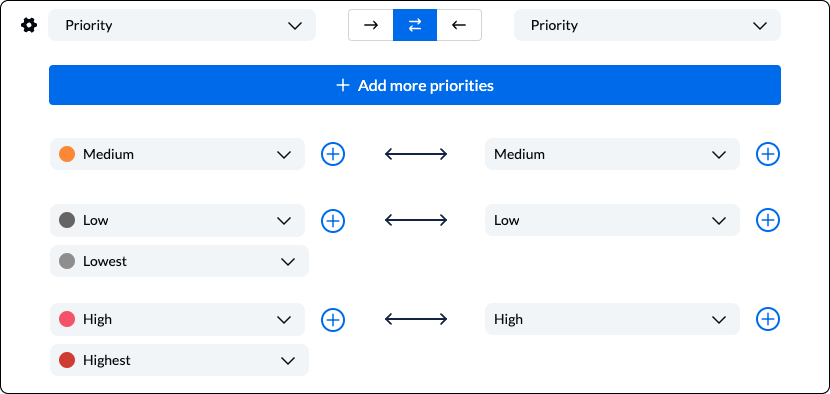
Configuring field values in HubSpot and Jira
If you see a gear (or cog) icon beside a field, that means you can modify specific values within that field for additional customization. These are all based on your own custom fields, labels, titles etc.

In the case of status fields (such as priority, labels, tags, etc.) you can link individual options between tools so that Unito knows how to update that field automatically. If you don’t configure these fields, then your flow will refer to your default rules when syncing.
Learn more about field mappings here.
Click Confirm when you’re ready to proceed.
Step 5: Launch your HubSpot Jira integration
The only thing left to do is decide whether or not to sync historical work items. You can make this decision from your flow’s overview page, or edit your rules as mentioned above.
If you’ve followed the steps above, your flow will now:
- Create a new Jira issue based on your activity in HubSpot.
- Keep those HubSpot deals, tickets or tasks in sync with Jira issues automatically.
Ready to optimize ticket escalation?
Meet with our team to see what Unito can do for your workflows.
Why build a ticket escalation queue with Unito?
Connecting HubSpot and Jira with Unito simplifies and streamlines the process of assigning work for your teams across both tools. If you have one squad in Jira and another in HubSpot, it enables them to collaborate without having someone jump back and forth between apps. Instead, tickets created in HubSpot instantly become Jira issues that are kept in sync through Unito’s real-time two-way integration.
It can save valuable time by eliminating manual input for software development teams, engineers, product managers, project management, and anyone else who uses Jira. Instead of having your highly-skilled team members perform minor updates or copy-paste redundant messages, they can automate that work to focus on priorities.
This integration can also be used to align customer support and development teams, share issue status, due dates, descriptions, and other fields between Jira instances for better collaboration. You can cut that wasted time out of your day with a simple code-free 2-way integration that turns HubSpot tickets into Jira issues and vice versa with automated updates from end-to-end.
What’s next after you sync Jira and HubSpot with Unito?
Duplicate your flow
Unito’s flow duplication feature lets you copy existing flows, keeping your rules, mappings, and many other settings intact. This allows you to sync multiple Jira projects or epics to a master without starting each flow from scratch.
Discover more Unito use cases for your tools
- Promote collaboration between technical and non-technical teams by syncing Jira with Trello or Asana.
- Read a case study from a Unito user who did just that.
- Learn how to sync Trello cards between multiple boards with Unito.
- Connect monday.com tasks to HubSpot
- Send HubSpot deals to Airtable.
- Or follow a similar guide to:
- Sync Jira to Notion
- Sync Jira with Asana
- Link Jira issues with Trello cards
- Connect Jira projects to Wrike
- Connect projects between Jira and Jira Service Management
- Sync tasks between Jira and monday.com
- Sync jira issues between multiple projects
- Link Jira to Azure DevOps
- Merge issues between Jira and GitHub
- Sync Jira issues to Airtable
- Link tasks between Jira and ClickUp
- Send Jira issues to an Excel spreadsheet
- Export Jira to Google Sheets
- Connect Jira Service Management to ServiceNow
- Send tickets from Zendesk to Jira
- Connect Jira to Smartsheet
- Here’s a guide to integrate GitLab and Jira with Unito.
- Sync Jira and Salesforce