How to Automatically Sync Jira Issues or Tasks Between Multiple Projects with 2-Way Updates
This walkthrough will guide you through the process of setting up a two-way sync between multiple Jira projects with Unito. After completing the steps outlined in this article, you’ll have a simple no-code Jira integration that automatically creates Jira tasks or issues in one project based on tasks or issues in another and keeps them synced together. So changes in one Jira project will appear in the other automatically as you work.
Overview
- Tools: Jira
- Use cases: Software development, product management, task management
- Great for: Developers, engineers, project managers, product managers
Unito’s two-way sync integration for Jira allows users of any technical background, from product managers to software developers and team leads, to sync Jira issues between projects. This integration syncs updates back and forth across your Jira workspace, creates new work items, and can even automate repetitive actions. This in-depth guide shows you how that’s done.
Need more from your integrations?
Unito Advanced Sync supports both tools mentioned in this walkthrough. Available with enterprise plans, Advanced Sync gives you unparalleled control over your integrations. This includes:
- An updated flow builder, which gives you direct access to all custom and native objects available in a tool’s API.
- Mixed hierarchies support, which syncs parent-child relationships between different work item types.
- Item matching, which identifies and syncs existing work items in another tool instead of creating duplicates.
- Lookups support, which sync non-hierarchical associations like assignees, dropdown fields, dependencies, and related items.
Advanced Sync can support more complex workflows, maintain relationships between different bits of data, handle massive data volume, and master flows that automatically centralize governance across tools.
Want to know more about the differences between Advanced Sync and Unito’s classic flow builder? Check out this guide.
Here’s a demo of Unito’s integration for Jira + Azure DevOps
Even though Azure DevOps is (obviously) a very different product than Jira, this video demonstration gives you a good idea of how this software development use case functions with Unito:
Setup in Jira
If you’re connecting Jira to Unito via OAuth2, then simply follow the on-screen instructions when adding your account for the first time: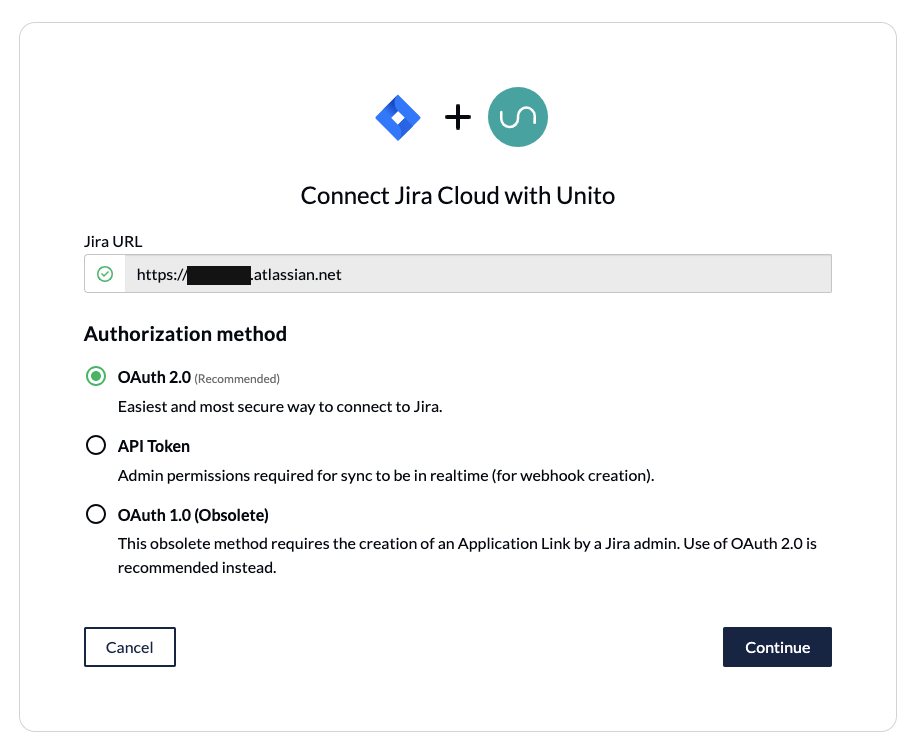
Here’s a separate guide on how to connect a local Jira Server on-premise to Unito. You can also connect your server via ngrok.
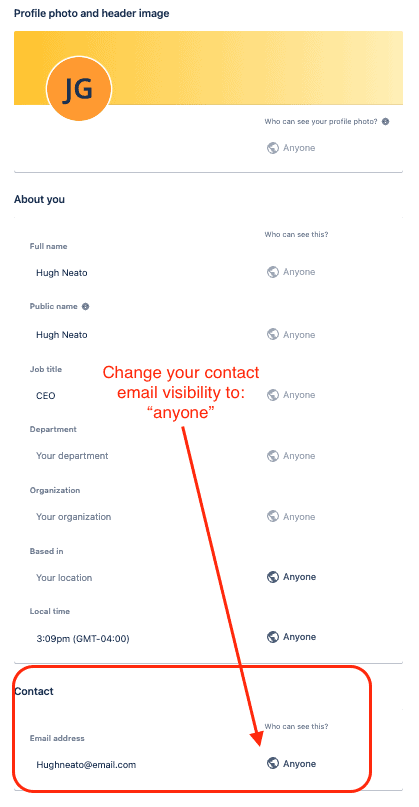
If you’re connecting to Jira Cloud without OAuth2, you’ll need to set your Jira contact email visibility to anyone from your Jira profile page. Then, set up an application link in Jira so that your issues can sync between projects.
Here’s how to configure Jira if you aren’t using OAuth2 (click to expand)
- The Jira account connected to Unito must have administrator access with global permissions.
- Here’s a guide if you need help to configure Jira for Unito access before building your flow. Specifically you’ll need to:
- Set your Jira contact email visibility to anyone from your Jira profile page.
- Then, set up an application link in Jira so that your issues can sync.
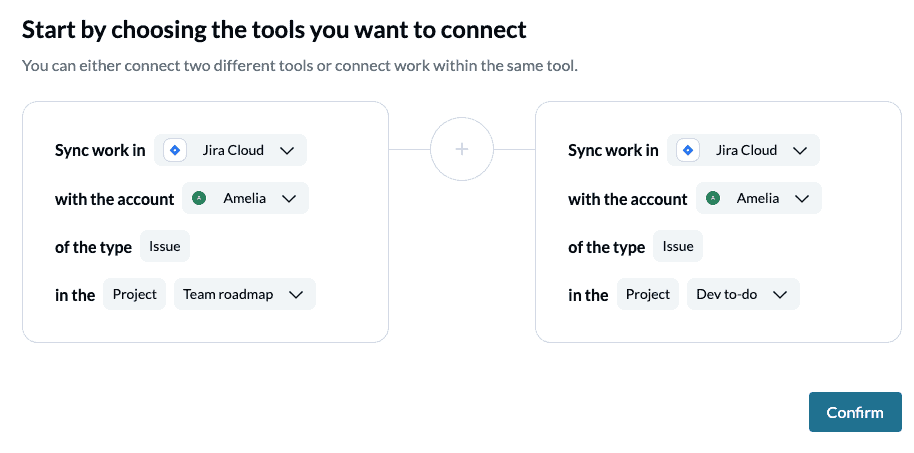
Step 1: Connect each Jira Cloud project to Unito
- Login the Unito App and click + Create Flow.
- Now, click Start Here to connect your tools.
- Next, select +Add a tool to this flow in either column. Then, +Choose account to specify the Jira projects you plan on syncing. The order in which you connect them doesn’t matter.
- Click Confirm.
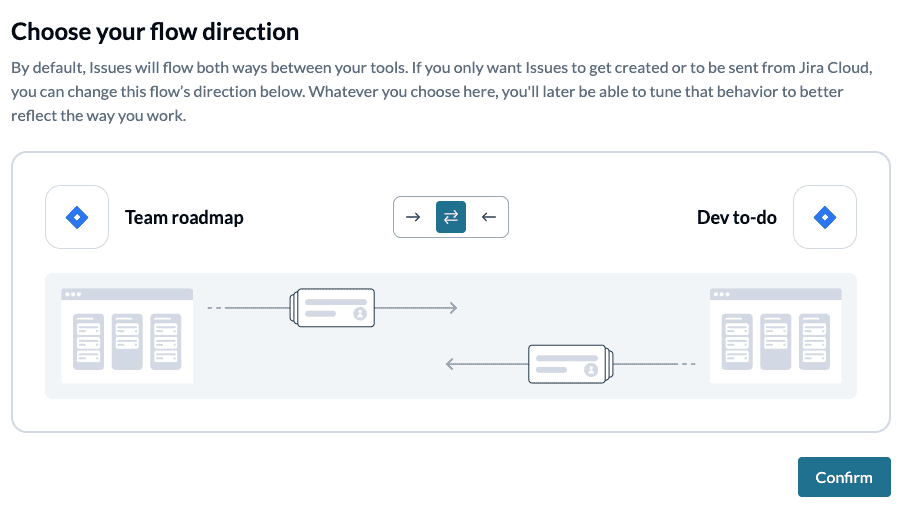
Step 2. Choose a flow direction for creating new issues or tasks
This step tells Unito where to create new Jira issues. Next, we’ll tell Unito when to create those issues. For now, simply choose the direction you prefer, and select confirm.
- Two-way flow direction: issues originating in either Jira project will appear in the other automatically.
- One-way flow direction: only issues originating from one Jira project will appear in the other automatically and not vice versa.
Step 3. Filter out unrelated data from syncing by setting rules
- Select Add a new rule and search for the label you want Unito to look for when it syncs issues between projects.
- Select Confirm.
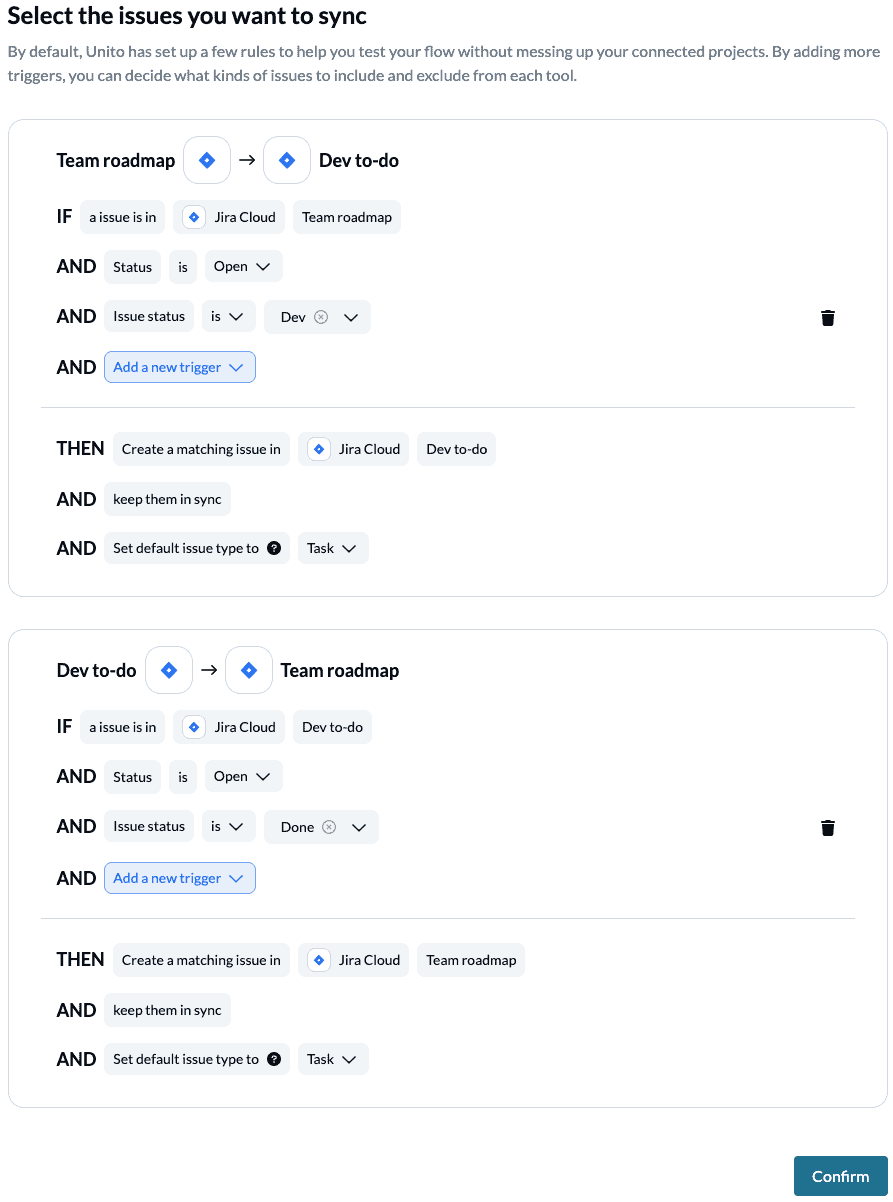
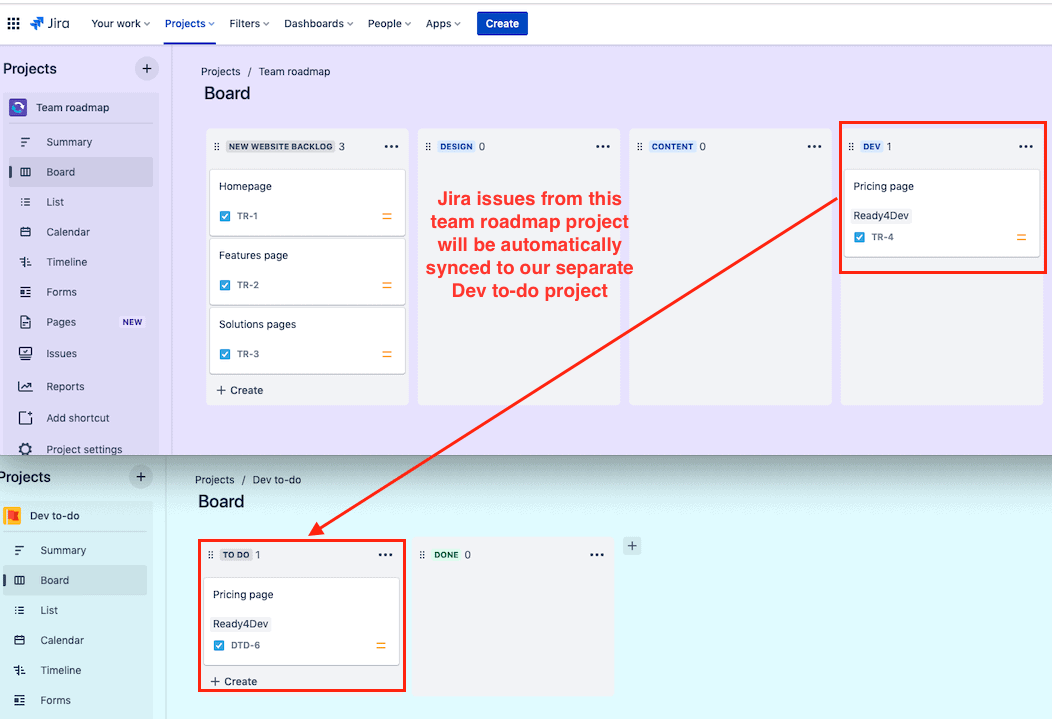
Meanwhile, if an issue in the Dev to-do project is marked “Done” then it should appear in the Team roadmap project as a completed task.
This is a basic set of rules that sends specific issues from one Jira project to another. When you’re ready , we encourage you to explore your own, more advanced set of rules that better suit your needs.
Learn more about setting rules here.

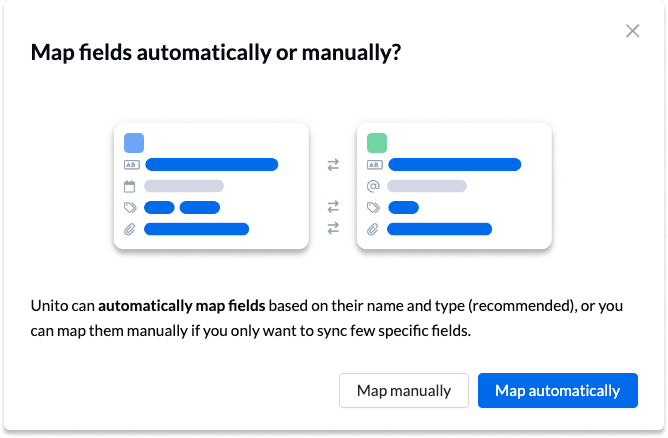
Step 4: Link fields between Jira projects
Fields represent the details of each Jira issue, ticket, or task. This includes: assignee, issue number, attachments, comments, due dates, status, label, etc. Unito can auto-map your fields if you prefer to begin with a template, or you can try a DIY approach.
Each field mapping is fairly intuitive: subtasks map to subtasks, issue type to issue type, etc. Each field mapping can have its own directional sync. This is useful in case you’d like to restrict changes in a particular field from affecting the other Jira project.
Any field mapping with a gear/cog icon can be modified to further customize your integration. For example, we can specify to Unito how issue status in one project relates to issue status in the other.
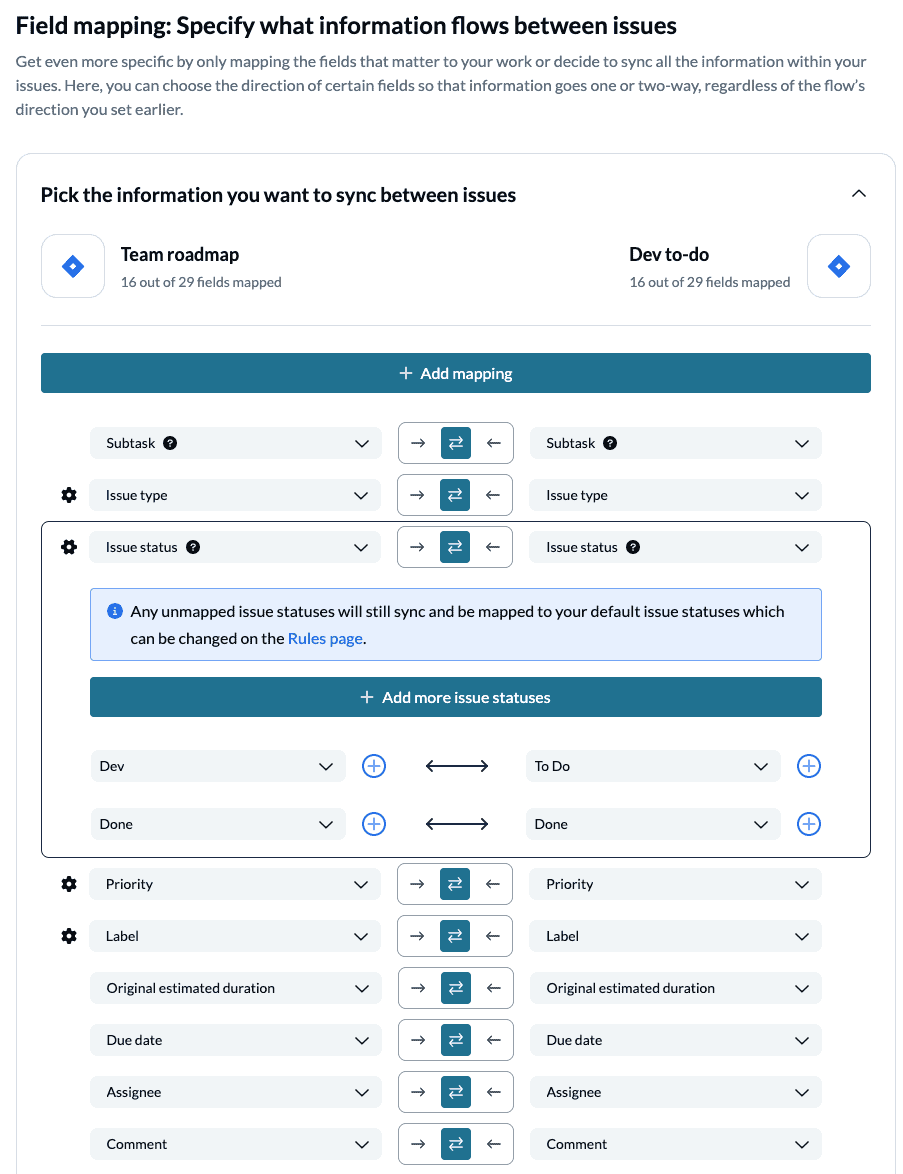
Any icon with a gear next to it can be modified further. Click on the gear (or cog) to view a drop-down menu of possible statuses/selections. Make sure to pair up the options in one Jira project that you want linked to another.
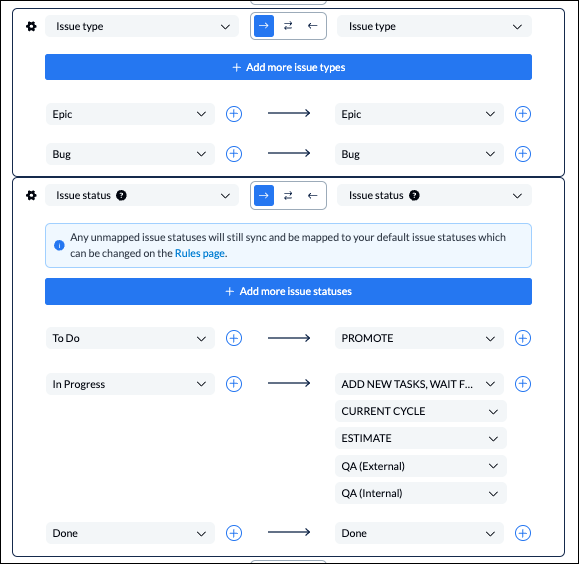
You can learn more about field mappings here.
Click Confirm.
Step 5: Launch your Jira to Jira integration
And that’s it! Just like that, you’ve built a two-way flow to automate issue creation between Jira projects with Unito!
If you’ve followed the steps above, your flow will now:
- Create new Jira issues in your secondary project whenever an issue in your primary is labelled according to your rules.
- Keep those issues in a live two-way sync.
Ready to streamline development work?
Meet with our team to see what Unito can do for your workflows.
What’s next after you sync multiple Jira projects with Unito?
There are many different reasons and ways to sync task/issue data with Unito. Think of this article as inspiration for your use case, whatever it may be. If you’d like to browse through more of our Jira articles before you start automating, you can check out our beginner’s guide to Jira, this overview of Jira for project managers, or version control 101.
- Unito’s flow duplication feature lets you copy existing flows, keeping your rules, mappings, and many other settings intact. This allows you to sync multiple Jira projects to a master without starting each flow from scratch.
- Read a case study from a Unito user who did just that.
- Or follow a similar guide to:
- Sync Jira to Notion
- Sync Jira with Asana
- Link Jira issues with Trello cards
- Connect Jira projects to Wrike
- Connect projects between Jira and Jira Service Management
- Sync tasks between Jira and monday.com
- Connect Jira and HubSpot
- Link Jira to Azure DevOps
- Merge issues between Jira and GitHub
- Sync Jira issues to Airtable
- Link tasks between Jira and ClickUp
- Send Jira issues to an Excel spreadsheet
- Export Jira to Google Sheets
- Connect Jira Service Management to ServiceNow
- Send tickets from Zendesk to Jira
- Connect Jira to Smartsheet
- Sync Jira and Salesforce
- Here’s a guide to integrate GitLab and Jira with Unito.
FAQ: Sync multiple Jira projects
Why sync issues between multiple Jira projects?
Syncing issues between Jira projects is a smart next step for any professional who’s ready to up their workflow automation game. This integration will allow you to:
- Create a new issue in one Jira project based on open issues in another based on the labels you apply:
- Send those same Jira issues back to your master project as soon as they’re marked done.
Here’s what our synced Jira projects will look like after connecting them with Unito:
Who should sync Jira issues between multiple projects with Unito?
Any active Jira user or project manager can obviously benefit from this kind of advanced integration. Typically Jira Cloud is most popular in the software, professional services, media, education, or healthcare industries. In terms of teams, you’ll find Jira users working in DevOps, software development, reporting, project management, etc.
The nice thing about this flow is that it’s simple and repeatable. When you’re finished with this guide, we’ll show you how to easily duplicate it in Unito to sync additional Jira projects. That can be extremely useful if you have one main hub from which you’d like to oversee and delegate tasks in multiple other projects.
Plus, syncing issues between multiple Jira projects with Unito saves time for anyone manually checking on ticket progress. Key details of your issues stay in sync automatically so users in either project can access the same information without switching tabs.
How can you sync two projects in Jira?
While Jira automations allow you to push Jira issues to different projects within the same Jira instance, if you want to sync Jira projects, you need an integration solution. Unito’s two-way integration for Jira is the best way to keep your Jira projects in sync. It allows you to keep data up to date in separate projects easily, in real-time.
Can a Jira issue be linked to multiple projects?
Absolutely! Jira linked issues are a built-in Jira feature that lets you set up a connection between Jira issues in two projects. It’s not quite the issue synchronization you’ll find in integration platforms like Unito, but it’s a good way to keep updates flowing between issues without using any third-party apps.
How can you monitor multiple projects in Jira?
There are a few ways you can monitor multiple projects in Jira, like adding projects to a company-managed board or building a custom dashboard. But Unito’s integration is one of the best ways to do this. That’s because you can sync all Jira issues you want to track to a single Jira project or even a project or board in a different tool. Sync Jira projects to a spreadsheet in Sheets or Excel, a project management tool like Asana, and more.
How can you link multiple projects in Jira?
While some Jira versions allow you to link projects through some obscure workarounds, the best way to do this is with a third-party integration solution like Unito. With a single Unito flow, you can synchronize Jira projects in real-time, keeping everyone in the loop without jumping back and forth between them. You can do this across any number of Jira projects, even in different Jira instances.