How To Set Up a No-Code Airtable-Jira Integration
In this guide, we’ll show you how to sync Airtable records to Jira with automated 2-way updates whenever changes occur. This simple Airtable Jira integration takes just minutes to set up and can be performed by anyone on your team, no coding knowledge required. Our demo use case will show you how to send Airtable records into Jira as tasks, but you can apply the same steps and principles to any use case you have in mind between these powerful tools. We’ll connect our Jira instance and Airtable base with Unito’s no-code sync platform.
Note: Unito supports Jira Work Management, Software Cloud, Data Center, and Service Management. If you’re new to Unito you can check out our Airtable + Jira integration overview before coming back here to connect your tools.
In this article:
- Setup in Jira and Airtable
- Step 1: Connect Jira and Airtable to Unito
- Step 2. Set a flow direction for creating new issues or records
- Step 3. Set rules to filter data between Jira and Airtable
- Step 4. Link fields between Airtable and Jira
- Step 5. Launch your Airtable Jira integration
Here’s a side-by-side look at an Airtable record synced to a matching Jira task with Unito:

This Jira-Airtable integration has two goals:
- Create new tasks in Jira based on records in Airtable with specific statuses.
- Keep those tasks and records in a two-way real-time sync so that changes in either tool will appear in the other.
Setup in Jira and Airtable
Connect to Jira via OAuth2
If you’re connecting Jira to Unito via OAuth2, then simply follow the on-screen instructions when adding your account for the first time: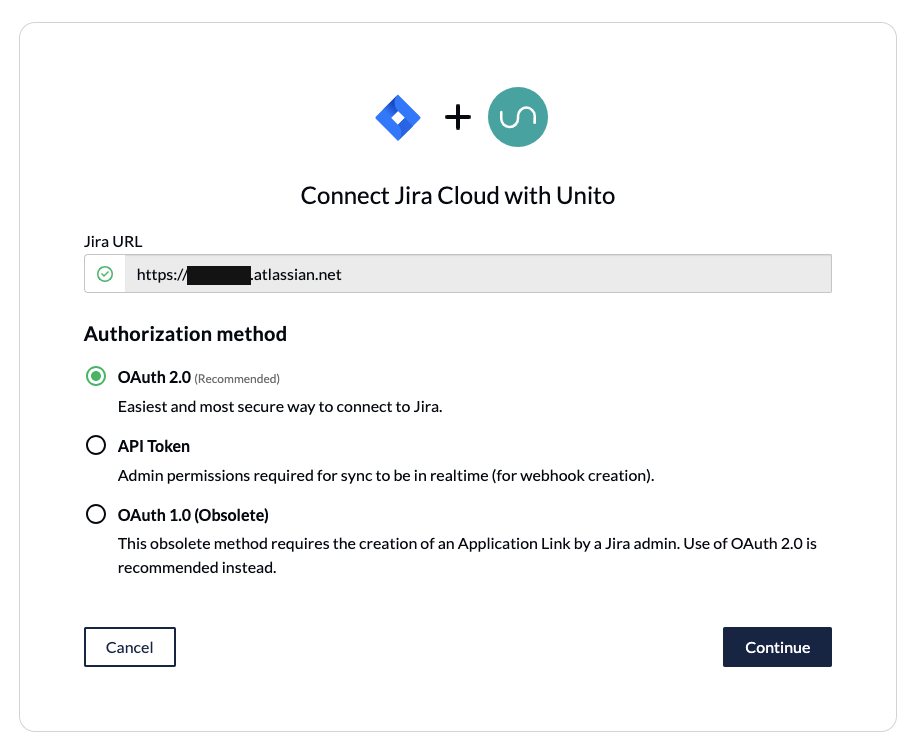
Here’s a separate guide on how to connect a local Jira Server on-premise to Unito. You can also connect your server via ngrok.
Here’s how to configure Jira if you aren’t using OAuth2 (click to expand)
There are a few steps involved before we can set up a two-way sync with Unito, but we promise it’s worthwhile. The benefit of eliminating manual tasks for your team indefinitely far outweighs the time it takes to set up your automation rules now. So let’s dive in.
- The Jira account connected to Unito must have administrator access with global permissions.
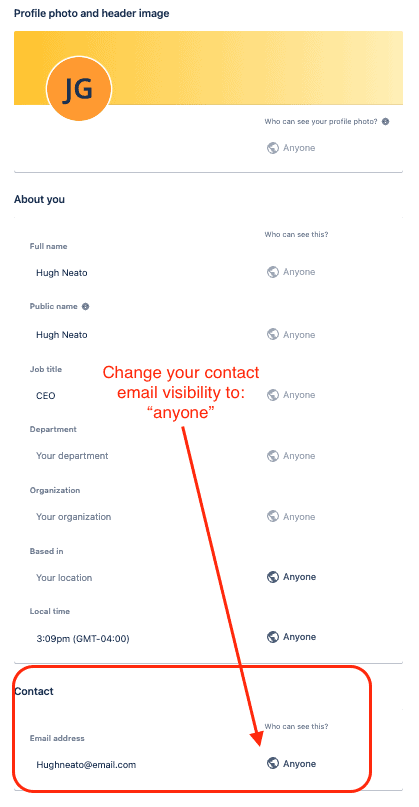
- Here’s a guide if you need help to configure Jira for Unito access before building your flow. Specifically you’ll need to:
- Set your Jira contact email visibility to anyone from your Jira profile page.
- Then, set up an application link in Jira so that your issues can sync to Asana.
Airtable setup: Add a Last Modified Time field as your last column
Data from Airtable can only sync if your table includes a Last Modified Time field, not to be confused with Last Modified By. You can change the name or not, but this field won’t be mapped by Unito. It is required, however, for your flow to function as intended.

Now you’re ready to build a flow in Unito!
Step 1: Connect Jira and Airtable to Unito
- Log in to the Unito App and click +Create Flow.
- Then, click Start Here to connect your tools.
- Select +Add a tool to this flow in either column, and connect your apps. Now, +Choose account to specify the account you want to use.
- From the next drop-down menu, type in the name of the folder or table you want to connect.
- Repeat steps 3 and 4 to connect your other tool with Unito.
- Click Confirm.

If this is your first time connecting Airtable to Unito you’ll have to go through a quick authorization process:
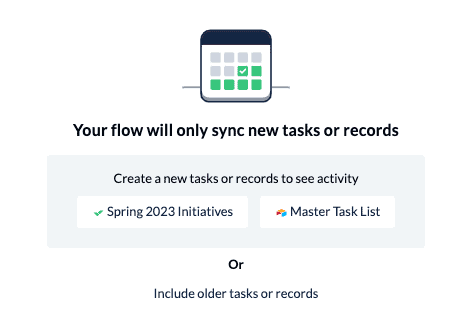
Step 2. Set a flow direction for creating new issues or records
Flow direction determines how new work items (e.g., tasks or records) are created by Unito. That means you can decide whether to new Jira tasks should create Airtable records, vice versa, or both simultaneously.

Select Confirm when you’ve chosen a flow direction.
Step 3. Set rules to filter data between Jira and Airtable
Your rules determine which records or tasks sync with Unito. If you chose a two-way flow, you’ll have to set rules for both directions. In our demo, we only have one set of rules since we’re sending data from Airtable to Jira.
Select Add a new rule to begin setting up your rules. There can be some variability here, depending on your particular setup in each tool.

The easiest way to set a trigger from Airtable is through a single-select field. In our demo, we’ve told Unito to only create new Jira tasks based on the above statuses. We’ve also removed the creation date filter to sync all historical work items.
You can learn more about setting up rules here.
Step 4. Link fields between Airtable and Jira
Unito turns the details of your Jira tasks and Airtable records into mappable fields that can be synced between tools.
In Airtable, these fields are based on the names of each column, while in Jira they can be any task or issue detail: assignee, summary, attachment, description, etc. Even your custom fields can sync with Unito!
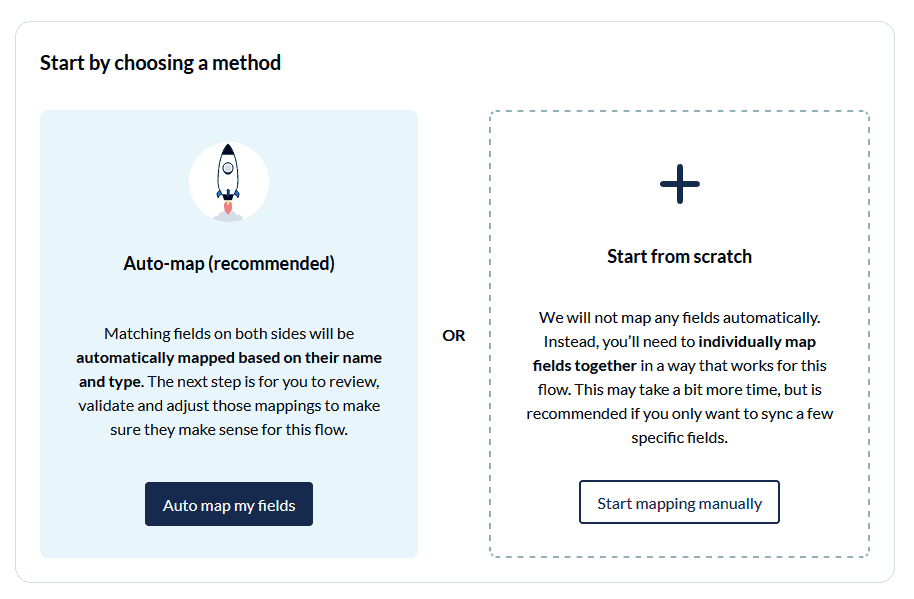
First, you’ll be asked whether you want to set up your field mappings from scratch or let Unito do this automatically. Since your fields in Airtable are all custom fields based on your own tagging structure, you’ll have to start from scratch.
Most fields will automatically be mapped for two-way updates, but you can modify them individually if you prefer one-way updates in some cases. With two-way updates, changes made in either tool will automatically update the other. A one-way update restricts changes to a single direction.
Select +Add Mapping, then Select a field in both tools to pair the fields together.

Any field with a gear/cog icon can be further modified with precise mappings for each value. Usually this relates to a field with multiple options, such as a drop-down list.
In the above example we’ve told Unito that our “Send for review” status in Airtable equals the “ToReview” label in Jira, “Revisions Needed” equals “Revisions-Requested” and so forth. This way, if we change the status or label in one tool, we’ll see that change reflected in the other.
Click Confirm to proceed.
Find out more about setting field mappings.
Step 5. Launch your Airtable Jira integration
And that’s it! You’ve just build a flow between Airtable and Jira. Congratulations! If you haven’t removed the creation date filter from your rules, you can test your flow with a new task or record to make sure you’ve created the 2-way Jira Airtable integration you expected. Otherwise go ahead and tell Unito to sync all historical work items.
If you followed the steps above, your flow will now automatically create new Jira tasks based on specific Airtable records, and keep our chosen fields up to date in both tools.
If you have any questions, please don’t hesitate to reach out and let us know.
Ready to optimize your project management?
Meet with our team to see what Unito can do for your workflows.
What’s next after setting up a two-way integration between Jira and Airtable?
Try out these Airtable templates and sync them with Unito to match your use case:
- Plan a project health report
- Organize a marketing budget
- Create a content catalog
- Create an employee resource database
- Report on resource management
- Browse more Airtable templates
If you want to know what else you can do with Unito, here’s some inspiration to help you power up your workflows.
- Duplicate this flow to sync other Jira projects to Airtable.
- Try following a similar workflow to sync Airtable with Asana.
- Browse our collection of Airtable and Jira integration resources for other use cases.
- Or follow a similar guide to:
- Sync Jira to Notion
- Sync Jira with Asana
- Link Jira issues with Trello cards
- Connect Jira projects to Wrike
- Connect projects between Jira and Jira Service Management
- Sync tasks between Jira and monday.com
- Sync jira issues between multiple projects
- Connect Jira and HubSpot
- Link Jira to Azure DevOps
- Merge issues between Jira and GitHub
- Link tasks between Jira and ClickUp
- Send Jira issues to an Excel spreadsheet
- Export Jira to Google Sheets
- Connect Jira Service Management to ServiceNow
- Send tickets from Zendesk to Jira
- Connect Jira to Smartsheet
- Sync Jira and Salesforce
- Here’s a guide to integrate GitLab and Jira with Unito.