How To Integrate Jira and monday.com
In this guide, you’ll learn how to sync tasks from boards in monday.com with issues in Jira using Unito’s no-code integration. By connecting these tools, you’ll be able to ensure that all your teams can work together, no matter which tool they prefer. No manual updates and no copy-pasting necessary.
You can use this integration for much more than that too, like connecting version control tools to your project management platform of choice, your CRM to a contact management tool, and more.
Here’s a demo showing how this workflow can sync Jira to Trello (the steps for syncing with monday.com are identical):
Here’s more information about Unito’s monday.com Jira integration, which supports Jira Software, Jira Service Management, Jira Work Management, and Jira Data Center.
In this guide:
- Tools: Jira and monday.com
- Use cases: Software development, product management, task management
- Great for: Developers, engineers, project managers, product managers

Two ways to sync monday.com tasks with Jira issues through Unito’s 2-way integration
Directly from your monday.com board
If you plan on doing most of your work from monday.com, then the Unito app for monday.com is your best choice. It’s ideal if you prefer creating Unito flows (integrations) directly from monday.com as your primary tool. Here are the steps necessary to access the platform from your boards:
Unito’s standalone sync platform
If you prefer greater flexibility and options for customization when building flows, or if you plan on connecting a variety of other tools, you may prefer Unito’s standalone sync platform.
Whichever option you choose will allow you to access the same Unito dashboard to build flows. You’ll also need to configure your Jira account for Unito access to continue (steps described below).
Setup in Jira and monday.com
Configure Jira for Unito access
If you’re connecting Jira to Unito via OAuth2, then simply follow the on-screen instructions when adding your account for the first time. There are no extra steps to sync your monday.com tasks: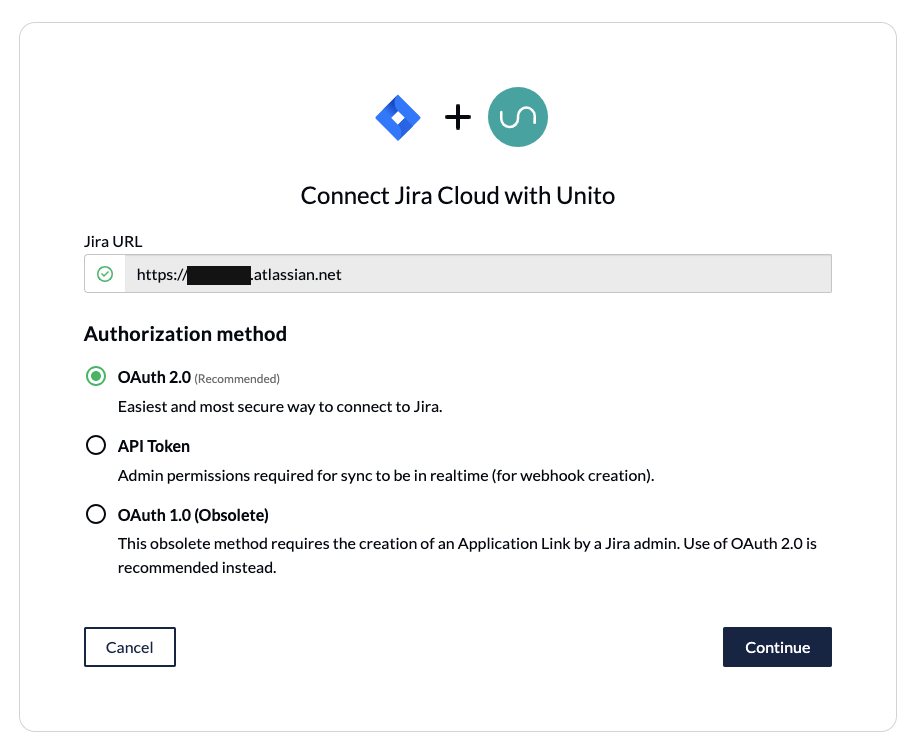
Here’s a separate guide on how to connect a local Jira Server on-premise to Unito. You can also connect your server via ngrok.
Here’s how to configure Jira if you aren’t using OAuth2 (click to expand)
- The Jira account connected to Unito must have administrator access with global permissions.
- Here’s a guide if you need help to configure Jira for Unito access before building your flow. Specifically you’ll need to:
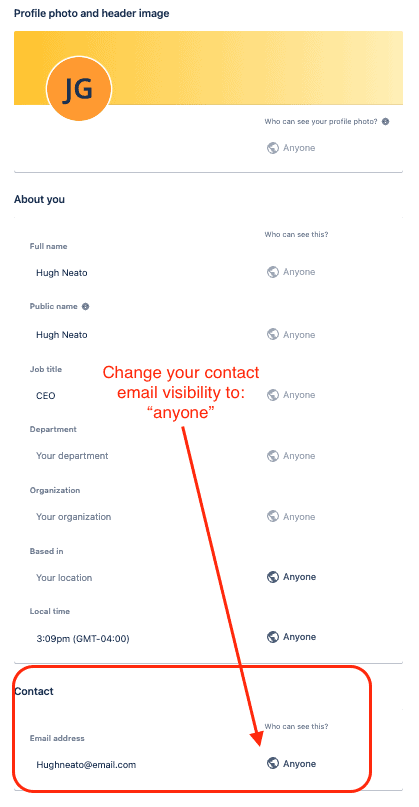
- Set your Jira contact email visibility to anyone from your Jira profile page.
- Then, set up an application link in Jira so that your issues can sync to monday.com tasks
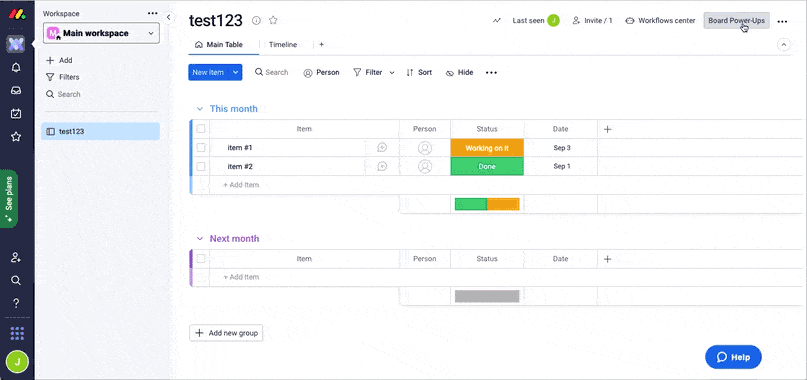
Add Unito to your monday.com workspace
Click here if you need help finding Unito in the monday.com marketplace
- Login to your monday.com account
- Then, select Board Power-Ups > Apps Marketplace
- Type Unito in the search field
- Click on the Unito app, then Add to your account
- Now, hit Install, verify your workspace and board and Add Feature
- Authorize monday.com then Authorize again (the first button authorizes monday.com in Unito, while the second authorizes Unito in monday.com)
- Click Got it.
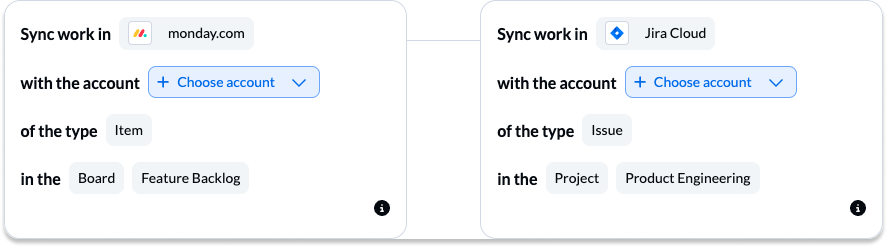
Step 1: Connect Jira and monday.com to Unito
Starting from either the Unito interface, the embedded version in Jira or monday.com:
- Click +Create flow or Start Here if you’re already on the tool selection screen.
- Select +Add a tool to this flow in either column.
- Note: The same steps apply whether you’re conThe same steps apply whether you’re connecting Jira Software, Jira Data Center, Jira Service Management or Jira Work Management.
- Then +Choose account to specify the Jira project and monday.com board you plan on syncing.
- Click Confirm.
Step 2. Choose a flow direction for creating new issues or tasks
Flow direction determines how new work items (tasks, tickets or issues) are created by Unito automatically: from Jira to monday, from monday to Jira, or both simultaneously.
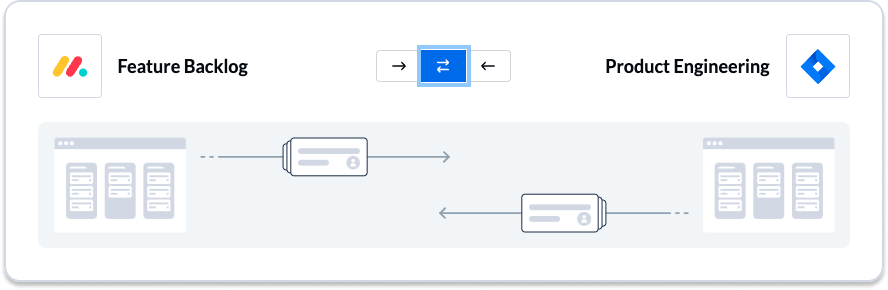
Flow direction example: a one-way flow from Jira to monday.com would automatically create new monday.com tasks when you create new issues in Jira, but not the other way around. In contrast, a two-way flow would automatically create new work items in both tools.
Select Confirm when you’ve chosen a flow direction.
Step 3: Filter out unrelated tasks or issues with rules
By default, Unito will sync all items or issues between your board and project. But you can set rules to filter out unrelated data from syncing if you want to.
Click Add a new rule to choose fields that Unito will look for to sync (or not sync) your items.
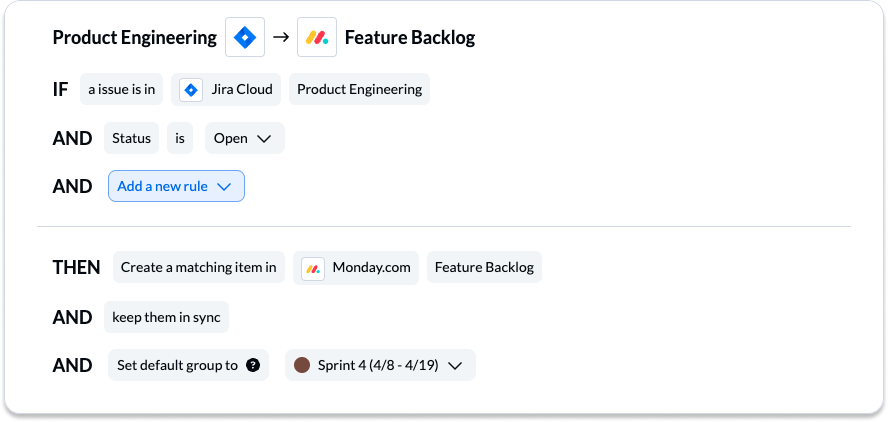
If you selected a 2-way flow direction, you’ll need to set rules for each direction of your flow.
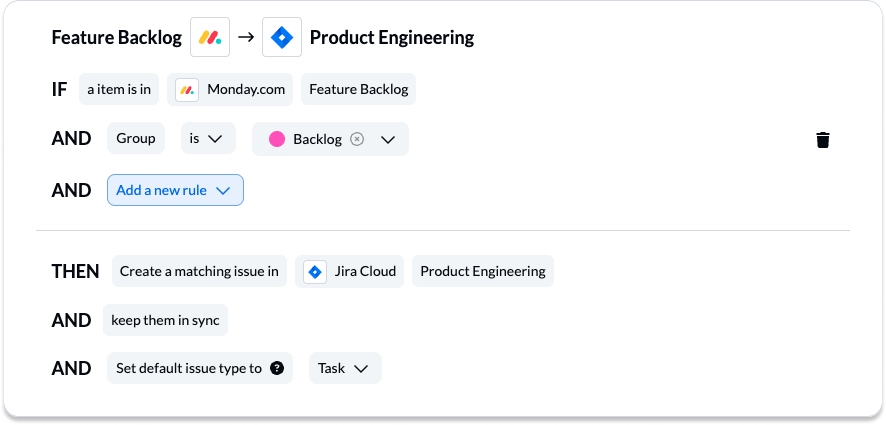
You can learn more about setting up rules here.
Step 4: Link fields between Jira and monday.com
In this step, you’ll be linking together fields between Jira and monday.com and deciding the direction of real-time updates.
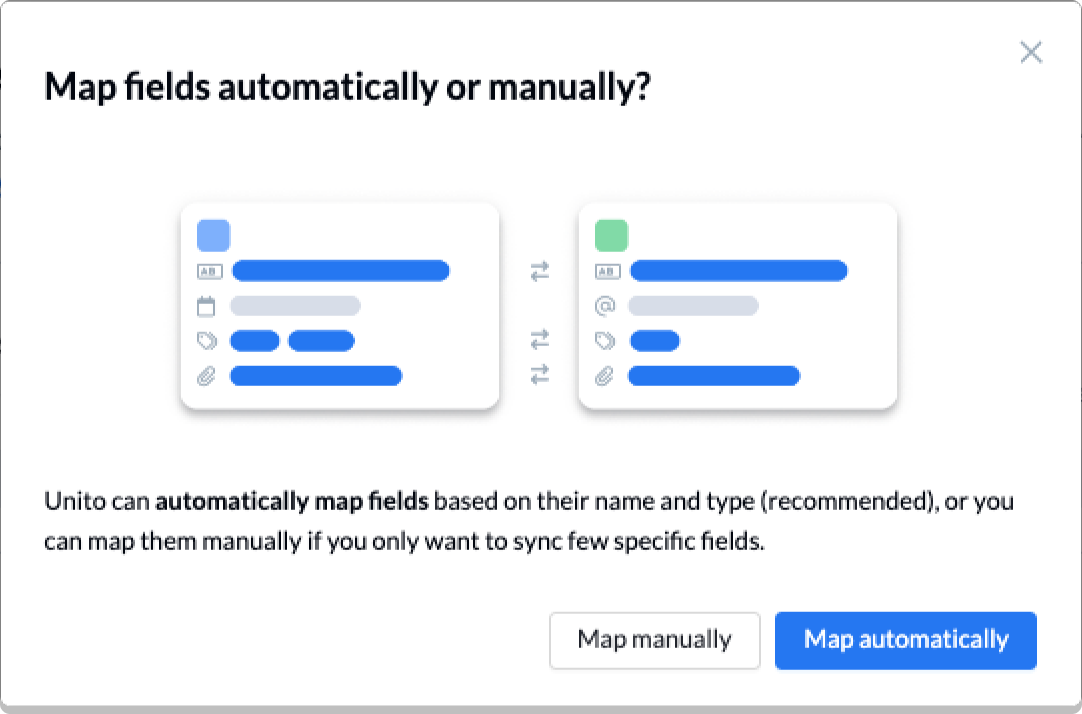
Select +Add mapping, then Select a field in both tools to pair them together. The directional arrows in the middle determine how real-time updates occur.
Here’s an example of our demo template showing field mappings between Jira and monday.com:
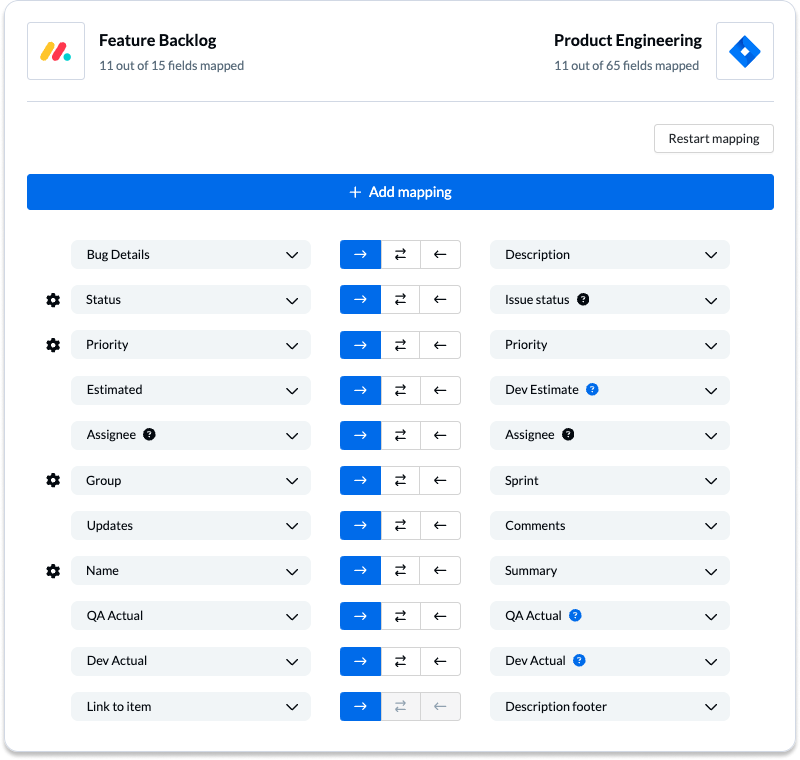
What do the arrows mean? The arrows indicate the direction of real-time updates. That means if and how manual changes to one field will automatically update the paired field in your other tool.
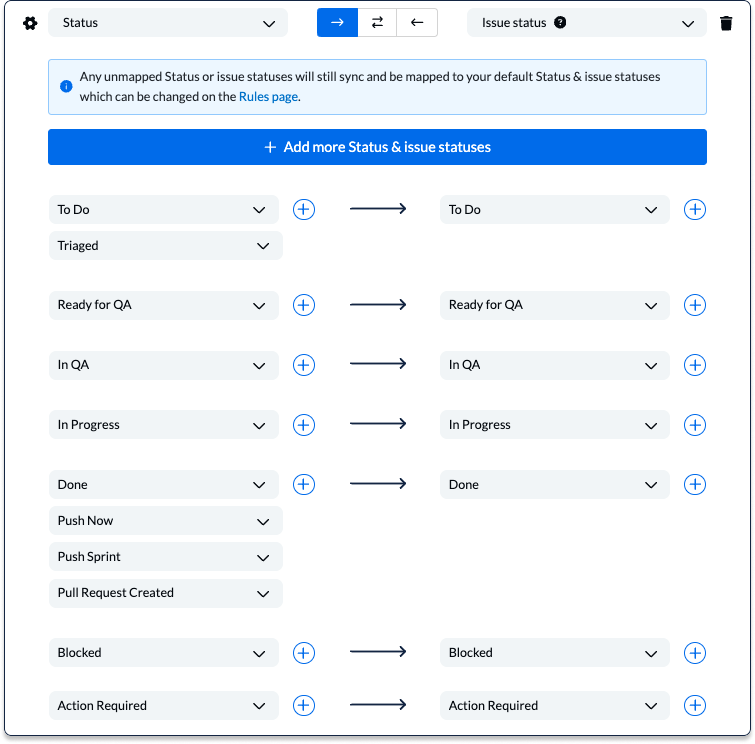
Field configurations
You can choose any field with a gear icon to map them further. Usually, this will apply to fields like labels, which have multiple options.

Syncing multi-select or single-select fields
If you don’t configure your status fields as pictured below, then your flow will refer to your default rules when syncing.
Step 5: Launch your monday.com Jira integration
And that’s it! You’ve just built a flow between Jira and monday.com. Congratulations!
If you followed the steps above, your flow will now:
- Automatically create new work items in one tool when they’re created in the other.
- Keep fields up to date in both tools.
If you have any questions, please don’t hesitate to reach out and let us know.
What’s next after integrating monday.com with Jira using Unito?
Now that you’ve set up your integration between monday.com and Jira, you can replicate this process to connect all kinds of boards and projects across all your workflows. Otherwise, here are some other ways you can use Unito with monday.com and Jira.
You can duplicate this flow to build a more powerful workflow by sending monday.com tasks to other Jira projects for different purposes, perhaps one for bug fixes and another for feature requests.
Need some inspiration? Here’s how the team at B&H Photo uses a ClickUp Jira workflow to collaborate on dev work.
- Automatically create follow-up tasks in monday.com from a Notion CRM.
- Sync Google Calendar events to your monday.com boards.
- Export monday.com data to Google Sheets
- Delegate tasks from monday.com to Asana, Trello, or HubSpot
- Sync Intercom conversations with monday.com tasks
- Or follow a similar guide to:
- Sync Jira to Notion
- Sync Jira with Asana
- Link Jira issues with Trello cards
- Connect Jira projects to Wrike
- Connect projects between Jira and Jira Service Management
- Sync jira issues between multiple projects
- Connect Jira and HubSpot
- Link Jira to Azure DevOps
- Merge issues between Jira and GitHub
- Sync Jira issues to Airtable
- Link tasks between Jira and ClickUp
- Send Jira issues to an Excel spreadsheet
- Export Jira to Google Sheets
- Connect Jira Service Management to ServiceNow
- Send tickets from Zendesk to Jira
- Connect Jira to Smartsheet
- Sync Jira and Salesforce
- Here’s a guide to integrate GitLab and Jira with Unito.
Ready to optimize development work?
Meet with our team to see what Unito can do for your workflows.
FAQ: Jira monday.com integration
Why sync Jira with monday.com?
Do you find yourself switching back and forth between Jira and monday.com projects to support team members who prefer one over the other? Or perhaps you’re tired of copy pasting the same information back and forth to generate new tasks?
monday.com is a great platform for task management with a wide variety of features and functionality designed to support project managers across industries. But, when it comes to scripting, coding, and general software development work, there’s no getting around the need for a tool like Jira. Jira is geared towards issue tracking, agile methodology, time tracking and offers a range of products to help meet your needs: Jira Data Center, Jira Service Management, Jira Work Management and more.
Optimize efficiency with no-code 2-way sync
Integrating Jira and monday.com can help teams that aren’t familiar with Jira collaborate more effectively with a development team. This can be especially useful for project managers trying to manage technical and non-technical projects at the same time without needing to switch back and forth between each tool. You can triage development requests from monday.com to Jira, align on feedback, or extend visibility to stakeholders.
You can also use this workflow to streamline software development management; the ticketing progress; or to align comments, assignees, custom fields, and more.
Streamlining Workflows with Unito’s No-Code Integration
This monday.com Jira Integration can also be useful in setting up a more efficient way of working across complex initiatives and work with remote teams more easily. Instead of having to wait hours or days for updates to come through manually, you’ll see live updates in whichever tool you prefer.
Embrace the power of a united workflow
Other benefits of this monday.com Jira integration include:
- Eliminating manual updates: No more switching between tools for project updates! Creating a monday.com task manually will automatically create a new Jira task or issue and vice versa, depending on your setup in Unito.
- Faster and more accurate issue reporting: With your workflow synced through Unito, everything updates in real-time without the risk of human error. So bugs and feature requests can be directly synced between platforms, ensuring developers have the context they need for a rapid response.
- Support for agile development processes: Syncing monday.com boards to Jira sprints enables teams between tools to work in their preferred interface while staying aligned and on track.
- Enhanced interdepartmental visibility: If your stakeholders don’t like reviewing work in one tool or the other, you can share visibility with this workflow and even enable feedback.
How do I get the most out of a monday.com Jira integration?
- Create, assign, and track development-related tasks within monday.com. Changes will then automatically sync to Jira.
- Visualize Jira progress using dashboards, Gantt charts and Kanban boards in monday.com.
- Extend visibility even further or optimize reporting by connecting Jira and/or monday.com to a spreadsheet in Google Sheets or Microsoft Excel.
Who should integrate monday.com and Jira with Unito?
Imagine a scenario where developers push code changes in Jira, which are immediately reflected in the project’s documentation on monday.com. Stakeholders can address concerns, add input, and stay updated in real-time. This kind of 2-way sync is more than just a feature—it’s a way of working that can break down barriers between teams.
Unito offers a simple and user-friendly experience without added complexity, allowing you to easily navigate through various workflows. Any team that relies on Jira can benefit, including:
- Tech Companies: Streamline bug tracking, feature requests, and communication between technical and non-technical teams.
- Agencies: Keep clients informed of development progress within monday.com while your devs work comfortably in Jira.
- Cross-functional Teams: Ensure everyone has a shared view of project status, regardless of their preferred work management platform.
Instead of asking someone to work in an unfamiliar interface, you could simply create a task in monday.com or Jira with details about the request and watch that information turn into a synced task or ticket automatically.
The ideal candidates for this type of integration include:
- Teams with a mixed toolset: If developers are tied to Jira, but other teams (project management, client-facing, etc.) prefer the monday.com interface, a Unito integration bridges that gap.
- Teams seeking enhanced collaboration: When the flow of information between tools is a bottleneck, the automation provided by Unito fosters cross-team collaboration.
- Teams focused on efficiency: Manual updating between platforms is not only time-consuming but also prone to error. Unito’s bi-directional sync reduces these issues.
Does this integration provide centralized information for remote teams?
Yes! Stay aligned with updates automatically reflected in both tools, regardless of where team members are working. Remote and distributed teams particularly benefit from the Jira monday.com integration, as it allows them to:
- Manage tasks and collaborate on code within a single platform
- Reduce the need to switch between different platforms
- Ensure that all team members are always on the same page, no matter their location.
How does Unito enhance a Jira monday.com integration?
Unito enhances a Jira monday.com integration by enabling real-time synchronization of tasks and issues, offering no-code setup, and providing a centralized platform for project management and development, making it particularly useful for remote teams.
Why do I need to link fields between monday.com and Jira?
The act of linking fields between Jira and monday.com doesn’t just sync your data, it also harmonizes it. Unito enables real-time data synchronization between fields including:
- task title or summary
- description
- status
- priority
- due date
- comments
- assignees
Your data can be synchronized to maintain consistency across platforms—ensuring that no matter where you are working or when you visit, you have the full, updated picture with custom views.