How to Integrate Jira Zendesk with 2-Way Sync
One of our account executives was on a call in April 2024 with a director of client services for a large organization that was handling over 4,000 Zendesk tickets and Jira issues at any given time. This director had a team of approximately 300 IT technicians in 130 assignment groups and they struggled to put together a cohesive, efficient workflow to get tickets between Zendesk and Jira effectively. While these technicians were manually copy-pasting updates between tools or in a shared spreadsheet, the leadership team quickly realized they were losing time – lots of it due to this inefficient process.
This story is fairly common for teams using multiple tools for handling customer tickets such as Zendesk, Jira, ServiceNow and others. So if you’re experiencing the same struggles, here’s a simpler way to handle customer tickets or incidents at scale by syncing Zendesk and Jira with Unito’s 2-way integration.
In this guide:
- Tools: Zendesk and Jira
- Use cases: Ticket escalation, product management, software development
- Great for: Product managers, IT, customer success, software developers, project management
Setup in Zendesk and Jira
To sync your tickets, we’ll show you how to build a flow in Unito. A flow represents the connection between tools in which Unito automatically creates Jira issues or Zendesk tickets based on your team’s manual activity.
A note about permissions: the platform can only operate within the same permissions as the user who authorizes Jira and Zendesk in Unito. So if you’re able to create new tickets or issues, then Unito can too through the rules you set in your flow.
Questions about security? Unito is SOC 2 Type II certified and compliant with international data privacy regulation including GDPR and CCPA, among others.
Here’s a separate guide on how to connect a local Jira Server on-premise to Unito. You can also connect your server via ngrok.
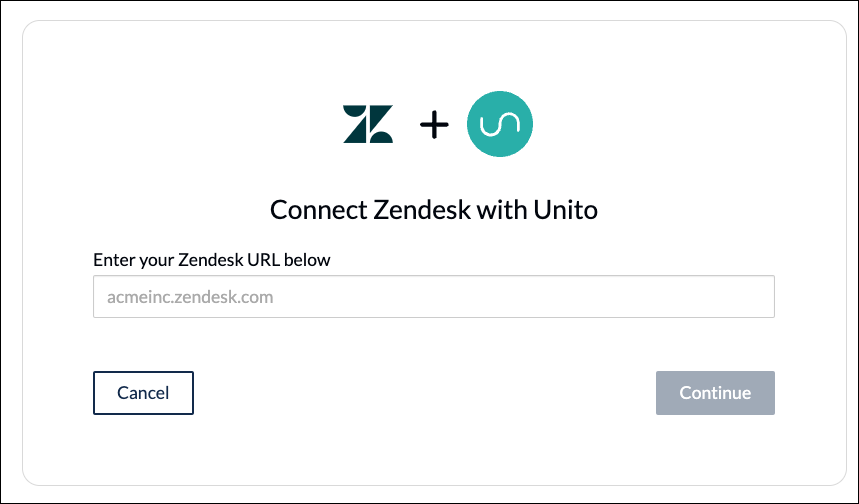
Connecting Zendesk to Unito for the first time
All you need to connect Zendesk to Unito is your Zendesk URL.
Setup in Jira
If you’re connecting Jira to Unito via OAuth2, then there are no extra steps to sync your Zendesk tickets other than following the on-screen instructions when adding your account for the first time:
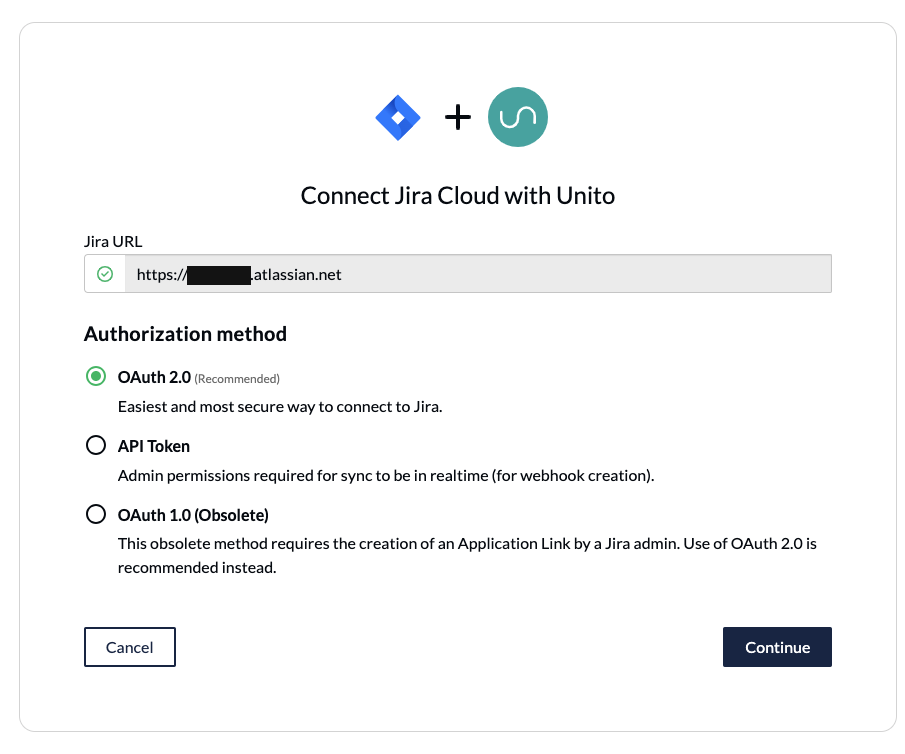
If you’re NOT connecting Jira with OAuth2, you’ll need to follow a few extra steps (click to expand)
Here’s how to configure Jira if you aren’t using OAuth2 (click to expand)
- The Jira account connected to Unito must have administrator access with global permissions.
- Then, you’ll need to:
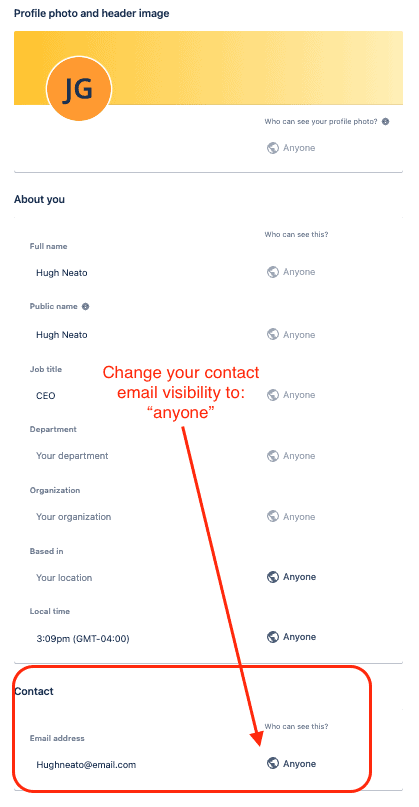
- Change your Jira contact email visibility to anyone from your Jira profile page.
- Set up an application link in Jira so that your issues can sync to Zendesk tickets.
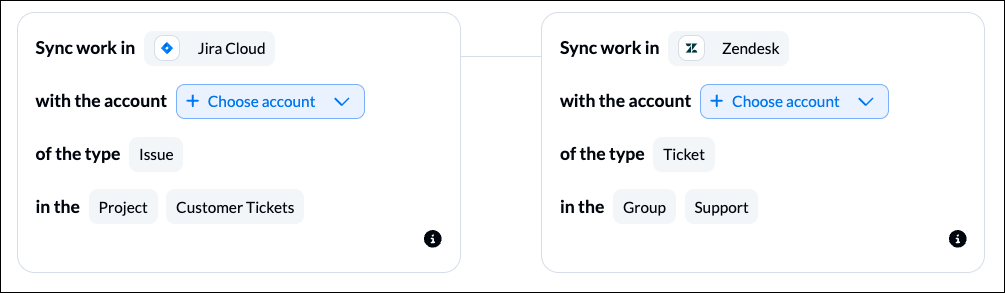
Step 1. Connect Zendesk and Jira to Unito
- Sign up for Unito if you haven’t already!
- Navigate to the Unito App and select +Create Flow.
- Select Start Here to connect Zendesk and Jira.
- Then +Choose account to specify the projects in each tool you plan on syncing.
- Click Confirm.
You can either type in the name of your project or scroll through the list to find the one you want to connect. Only tickets from those specific projects will sync in this particular flow. Afterwards, you can duplicate this flow and change to another project or project to go through this process faster.
Read more about connecting tools to Unito.
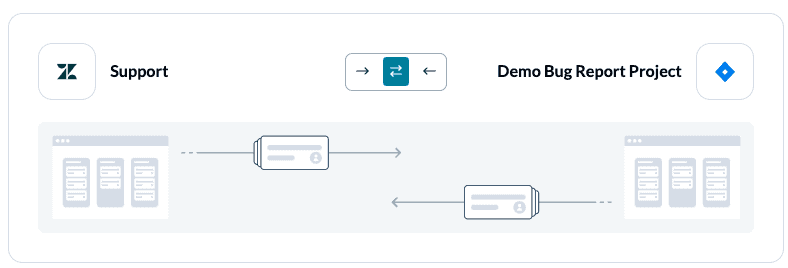
Step 2. Choose a flow direction for creating new tickets or issues
Your no-code Unito flow lets you automatically create new Zendesk tickets or Jira issues based on manual activity. So in the example below, when someone on your team creates a new ticket in Zendesk, Unito will automatically creates a linked Jira issue.
If you choose a one-way flow at this stage, you can still apply 2-way sync to individual fields in Step 4.
When is the best time to create a 2-way flow? Choose a 2-way flow direction if you have tickets in a specific Zendesk project that you want added to a specific Jira project and issues in Jira that you want added to that same project in Zendesk.
Read more about flow direction.
Step 3. Filter out unrelated tickets from syncing by setting rules
Now, we can set up rules to determine which manual actions in your tools will automatically create new Zendesk tickets or Jira issues.
This is extremely useful for filtering out unrelated data from syncing, particularly if your Zendesk projects contain large volumes of data. You’ll want to apply rules that filter out all but the most essential tickets or issues.
We recommend syncing tickets or issues based on your custom drop-down fields in Zendesk or single-select fields in Jira, since those will always be unique to your project and use case.
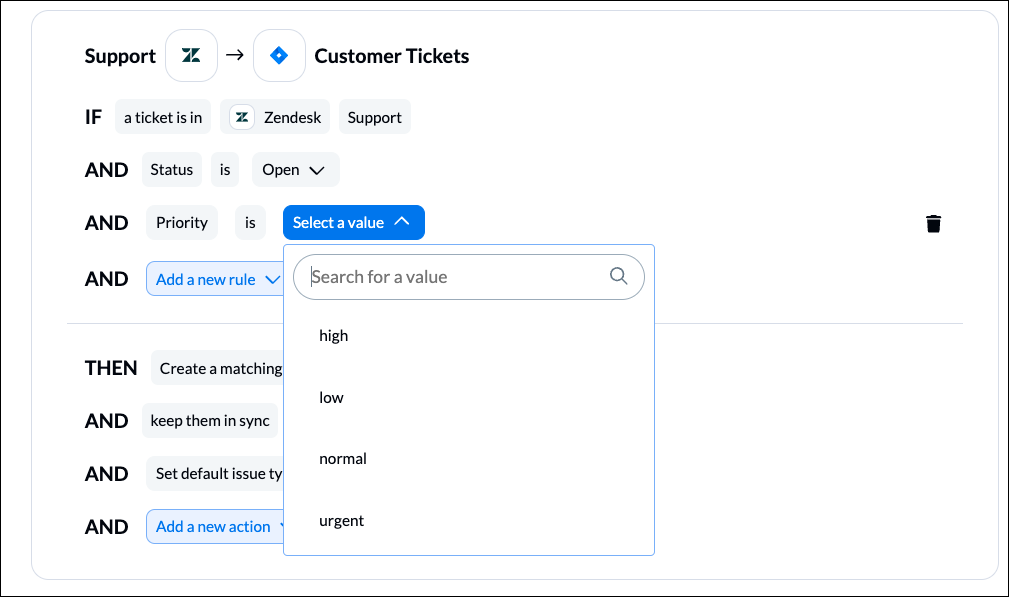
Issues and tickets that match your rules will stay in sync with Unito. As soon as the rules no longer apply, that item will stop syncing.
Find out more about setting rules in Unito.
Step 4. Link fields between Zendesk tickets and Jira issues
This is where you tell Unito which fields in Zendesk to link with similar fields in Jira so that manual changes in one affect the other automatically.
When you first open this screen, you’ll be presented with two options. Select Auto-map to begin with a pre-built template that can later be modified.
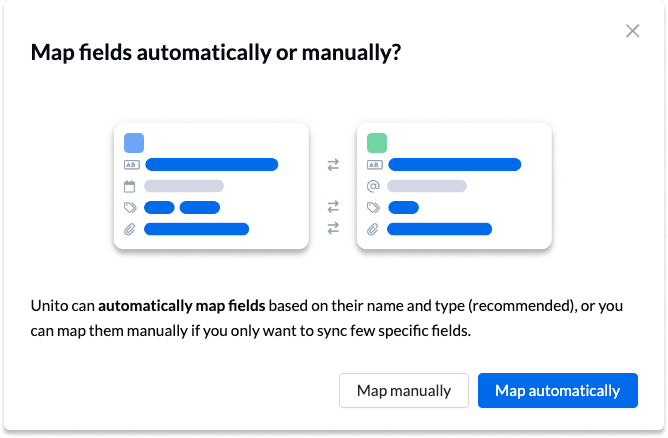
Click + Add mapping to add a new pair of fields to be synced. Then, click Select a field for each tool, and find the appropriate field to map.
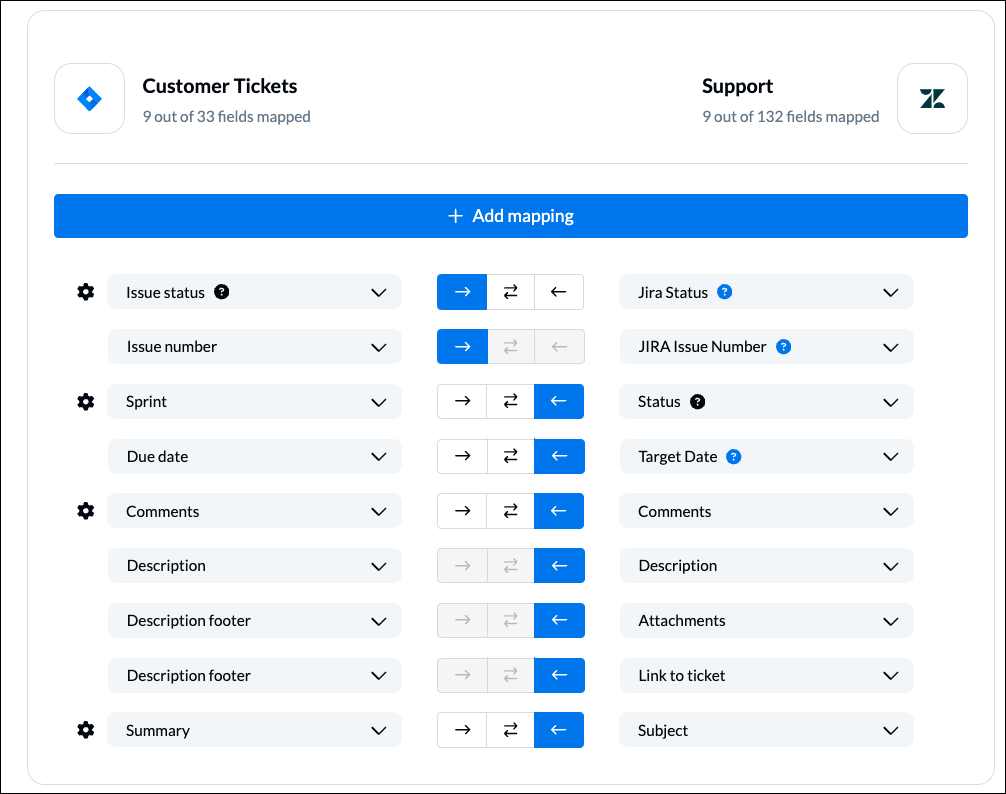
Tip: If you aren’t sure where to put data from one tool when it syncs over to the other, you can always add it to the Description Footer, e.g., Issue ID to Description footer in the example above.
Useful Links for this section:
- Here’s how to use custom fields in Zendesk.
- How to create a custom field in Jira.
- Find out more about setting field mappings.
Step 5. Launch your Zendesk Jira integration
If you’ve followed the steps above, your flow will now:
- Add a new issue in Jira when a ticket is created in Zendesk based on the rules set in Step 3.
- Keep Zendesk tickets and Jira issues in sync as long as they match the conditions of your rules.
Our use case was for a one-way flow direction, but you can easily apply the same steps to a different one-way flow from Jira to Zendesk or a bi-directional flow between both tools. In each case, you can still set 2-way updates between your tickets and issues.
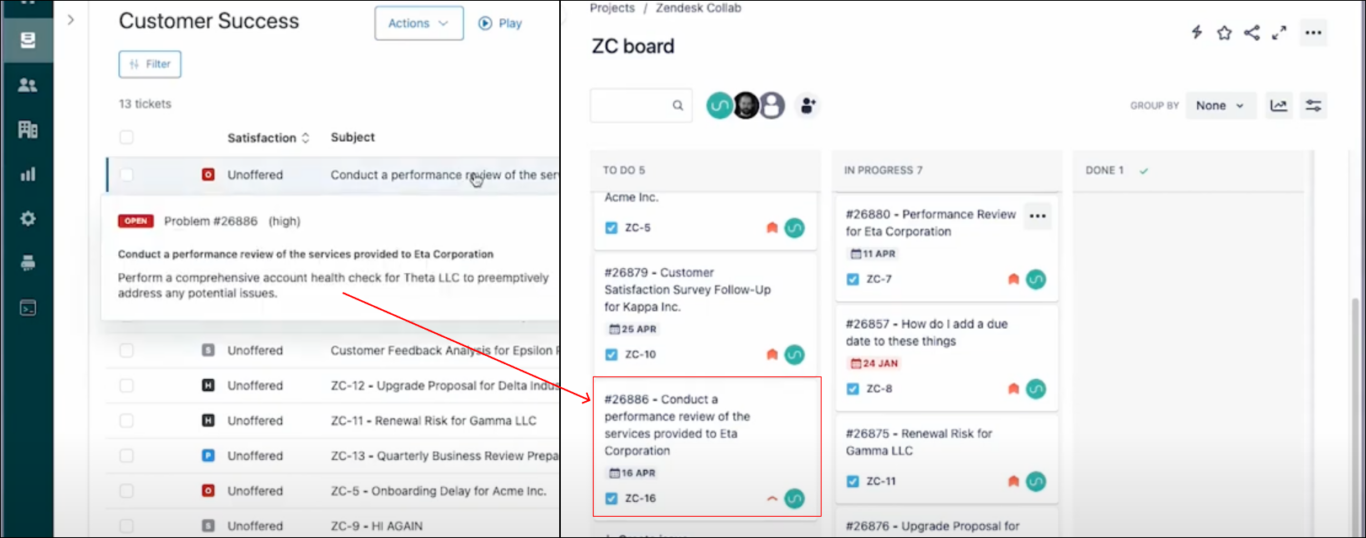
Here’s a quick snapshot of our synced Zendesk ticket and Jira issue, highlighting a few of the fields that are being kept in sync:
If you have any questions, don’t hesitate to reach out and let us know.
Ready to optimize your support work?
Meet with our team to see what Unito can do for your workflows.
What’s next after you sync Zendesk and Jira with Unito?
- Learn how to duplicate this flow for additional use cases
- Follow our guides to connect Zendesk and Wrike or Zendesk and Slack.
- Read a technical overview of Unito’s Zendesk integration
- Browse Unito’s Jira documentation
- Need some inspiration? Here’s how the team at B&H Photo uses a ClickUp Jira workflow to collaborate on dev work.
- Or follow a similar guide to:
- Connect Zendesk to Azure DevOps
- Sync Jira to Notion
- Sync Jira with Asana
- Link Jira issues with Trello cards
- Connect Jira projects to Wrike
- Connect projects between Jira and Jira Service Management
- Sync tasks between Jira and monday.com
- Sync jira issues between multiple projects
- Connect Jira and HubSpot
- Link Jira to Azure DevOps
- Merge issues between Jira and GitHub
- Sync Jira issues to Airtable
- Link tasks between Jira and ClickUp
- Send Jira issues to an Excel spreadsheet
- Export Jira to Google Sheets
- Connect Jira Service Management to ServiceNow
- Connect Jira to Smartsheet
- Sync Jira and Salesforce
- Here’s a guide to integrate GitLab and Jira with Unito.
FAQ: Jira Zendesk integration
More about this Zendesk Jira integration
Unito is SOC 2 Type II Compliant and adheres to international data regulation standards, including GDPR and the CCPA.

What are some examples of use cases for this Jira Zendesk integration?
Here are just a few scenarios where connecting Zendesk and Jira could greatly enhance your IT operations:
Customer Support & ITSM
- Problem: Customer issues get stuck waiting for developers, and manual updates between tools are a time drain.
- Solution: Escalate tickets directly from Zendesk to Jira Service Management, Zendesk to Azure DevOps, Zendesk to GitHub, or Zendesk to Gitlab.
Workhubs <-> Zendesk
- Problem: Your support team feels disconnected from daily work in a project management tool as manual updates create delays and frustration.
- Solution: Turn tickets into tasks by syncing Zendesk to Asana, Zendesk to Trello, Zendesk to HubSpot, Zendesk to ClickUp, Zendesk to Wrike, etc. to keep both systems in sync effortlessly.
Performance tracking and reporting
- Problem: As a CS or ITSM team lead, I want to be able to track my team’s efficiency, response time and number of escalations in a spreadsheet.
- Solution: Send tickets from your project to a spreadsheet by syncing Zendesk to Google Sheets, Zendesk to Microsoft Excel, Zendesk to Smartsheet, Zendesk to Airtable).
Why sync Zendesk to Jira?
Here are just a few reasons Unito customers have wanted to sync tickets to issues:
- Cut out copy pasting: This is a struggle that goes against the status quo. Who doesn’t love a little ctrl+c followed by ctrl+v? But how often are you doing this each day? It may be fine for a few dozen tickets once in a while, but when your organization starts handling issue, tickets or incidents in large volumes, it’s only a matter of time before carpel tunnel catches up with you!
- Visibility: Can you see me now? Somewhere in your process and workflows, there are scrum masters, product owners, project managers, or stakeholders who need to know what’s going on and make sure resources are aligned. Getting that kind of oversight is much easier when your data is consolidated (or shared) in a single space.
- Keep everyone in the tool(s) they like and away from the ones they don’t: If you haven’t experienced this problem, you may not fully grasp the severity of it. But there are some tools made for software teams and others that aren’t. Don’t force your programmers or devs into an unfamiliar tool, or worse – don’t send non-technical teammates into highly complex interfaces. Instead, you can split the difference (and cut costs from your SaaS tool licenses) by keeping everyone in their preferred environment and simply sync relevant work with Unito.
What’s involved in building a flow with Unito?
There are four main steps to any Unito flow: