How to Connect Wrike and Zendesk with Automated 2-Way Sync
This guide will show you how to sync Zendesk tickets with Wrike tasks automatically without writing a single line of code. It’s as simple as setting a few simple triggers in a workflow automation platform such as Unito. From there, you’ll have eyes in Wrike on any new Zendesk tickets that need support from other teams. Triggers can include specific events, assignees, customers, request types, even custom fields you’ve set up yourself. That’s the real value at the end of the day: being able to sync work between tools, including your own unique, specific fields that may vary from project to project or team to team.
New to Unito? Here’s an overview of our Zendesk-Wrike integration. But if you’re ready to start syncing tickets and tasks, read on below.
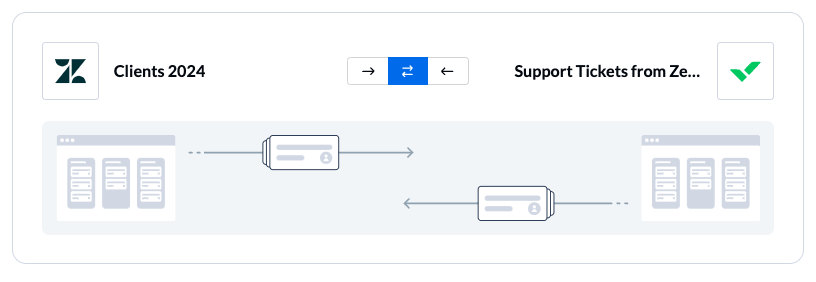
Here’s a quick peek at our demo sync between Wrike and Zendesk:
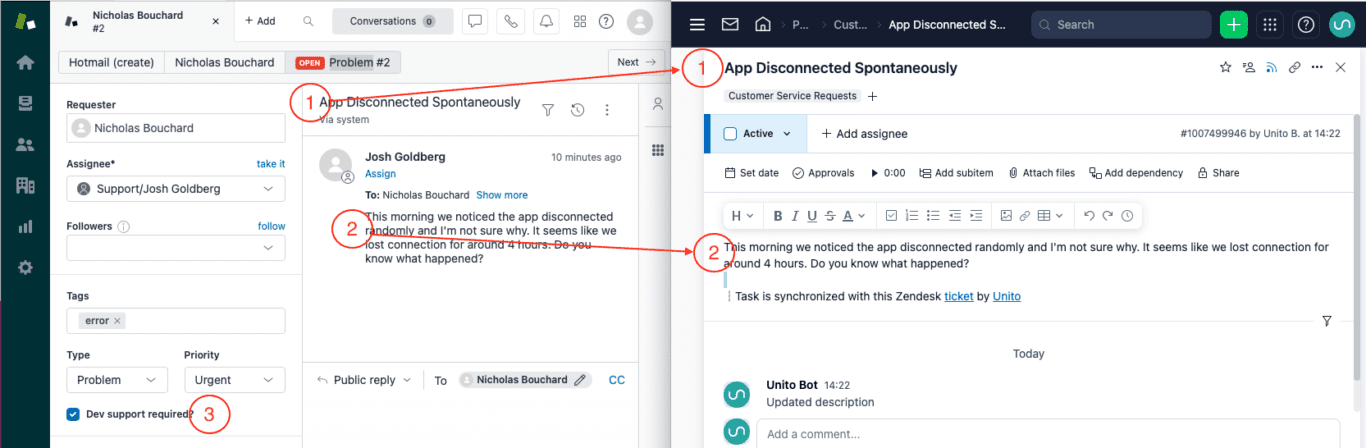
2) Description to Description
3) Our custom field: “dev support required?” as a trigger – in this case, only tickets with checked boxes in this custom field will sync through Unito
Watch a Unito product demo sync Zendesk tickets
In this guide:
- Tools: Wrike and Zendesk
- Use cases: Ticket escalation, product management, task management, marketing reporting, account management
- Great for: Marketers, sales, customer success, RevOps
For Zendesk users: Although this guide focuses on Wrike and Zendesk, you can still apply the same steps and principles to any of Unito’s Zendesk integrations for project managers, including Asana, Trello, monday.com, ClickUp, Jira and more.
By the end of this walkthrough, you’ll be able to:
- Automatically create Wrike tasks based on specific Zendesk tickets and keep both in a real-time, two-way sync.
- Create Zendesk tickets based on specific Wrike tasks and keep both in a real-time, two-way sync.
- Sync custom fields between Wrike and Zendesk or apply them as automation triggers.
Before syncing Zendesk tickets and Wrike tasks with Unito:
- (optional) read an overview of our Zendesk + Wrike integration to learn about other use cases and which fields are compatible between these powerful tools.
- Wrike users with a Business plan or higher can actually build flows through the Wrike Sync add-on directly within the Wrike interface.
- Zendesk users should be logged in to their account before connecting it to Unito the first time. Be sure to use the same browser for both accounts.
Step 1. Connect Zendesk and Wrike to Unito
Navigate to the Unito App (or continue from Wrike after installing the add-on if you prefer) and select +Create Flow. On the next screen, select Start Here to connect Zendesk and Wrike. Choose the accounts you wish to connect to Unito. Then, specify a single Wrike folder or project, and Zendesk group.
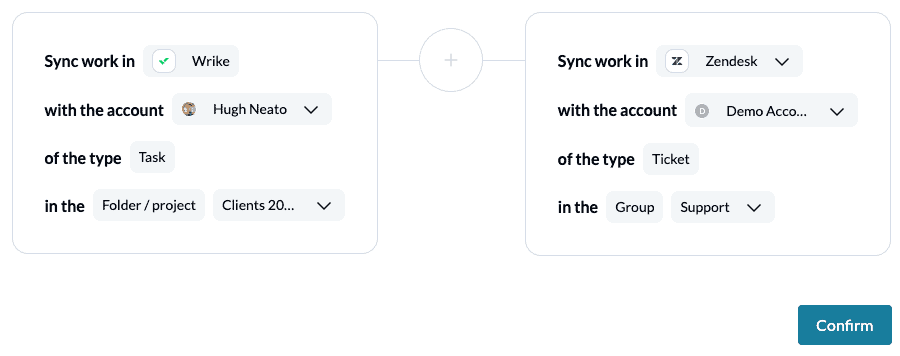
When you’re ready, select Confirm.
Step 2. Create new tasks or tickets automatically with flow direction
This step tells Unito where to automatically create new work items (tickets or tasks). With a two-way flow, you can set rules to create Zendesk tickets based on Wrike tasks and vice versa.
In our demo, we chose a one-way flow from Zendesk to Wrike so that only new tickets will create new tasks, and not the other way around. Later, we’ll be able to set a two-way flow between the individual fields of our tasks and tickets.
Select Confirm when you’ve chosen a flow direction.
Learn more about flow directions.
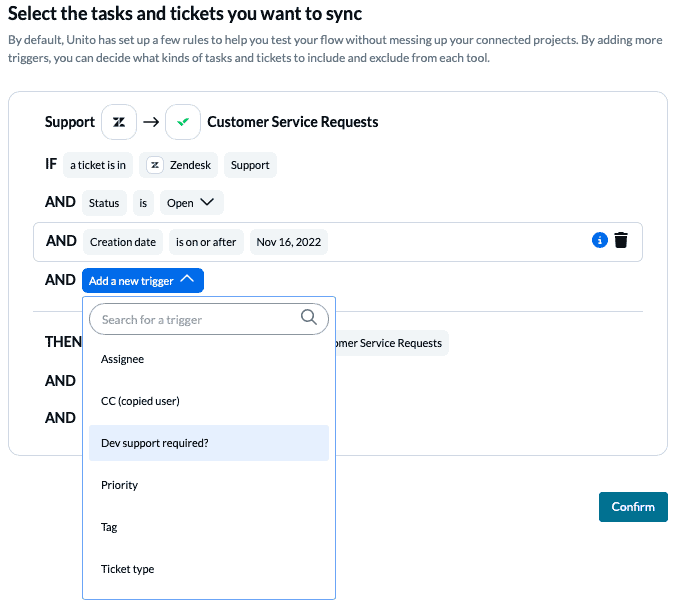
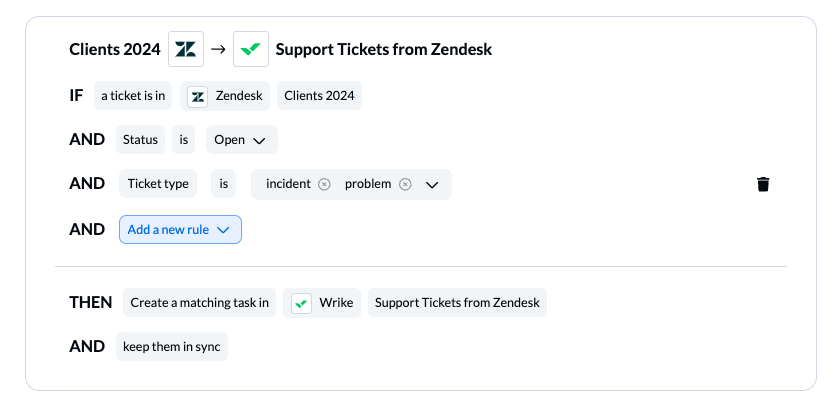
Step 3. Filter unrelated tasks or tickets with rules
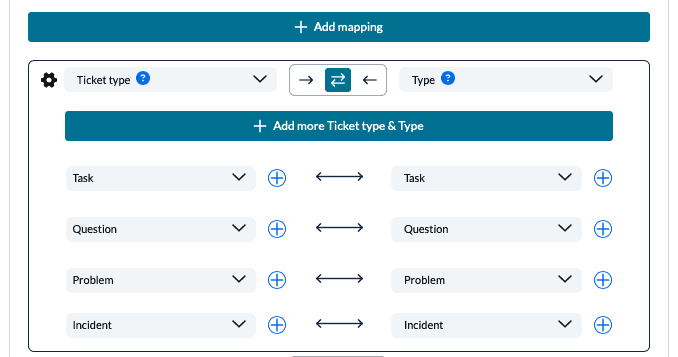
This is where we can set up triggers to determine how, which, and where tickets or tasks will be created. If you wish, you can even include custom fields as triggers for work item creation. Below is an example of rules to send Zendesk tickets to wrike:
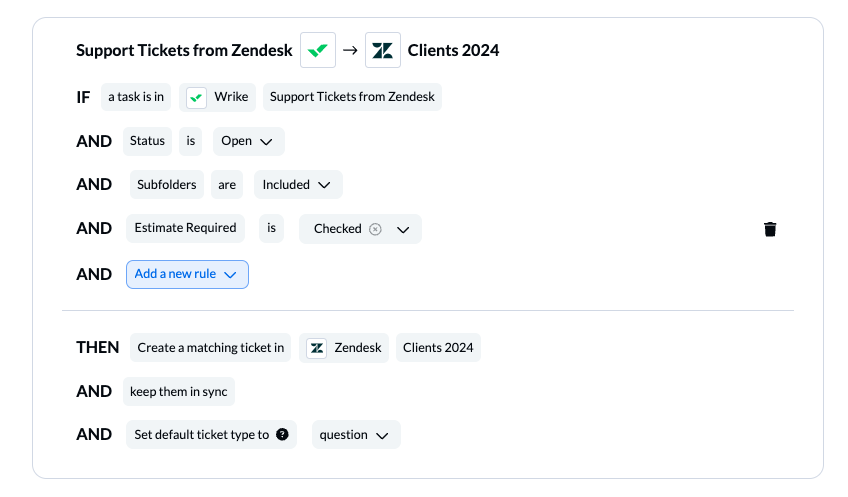
If you chose a 2-way flow direction, you’ll also need a set of rules to decide how items will be created in the opposite direction. Here’s our demo example of rules to send Wrike tasks into Zendesk:
Find out more about setting rules.
Step 4. Link fields between Wrike and Zendesk
Next, you’ll be asked whether you want to set up your fields from scratch or let Unito do so automatically. If you select map automatically you can change any mappings you want or add custom fields.
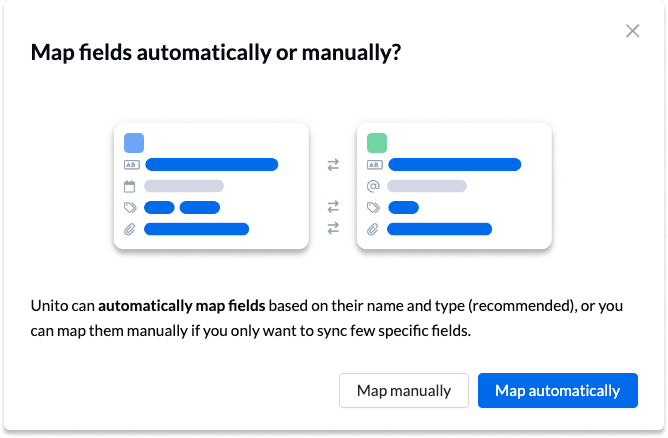
Select + Add mapping, then Select a field in both Zendesk and Wrike to pair two fields together.
Choosing fields allows you to carefully select which details are synced between Zendesk and Wrike. Each field can be synced one-way in either direction or bidirectionally. Here’s what Unito’s auto-mapped set of fields looks like:
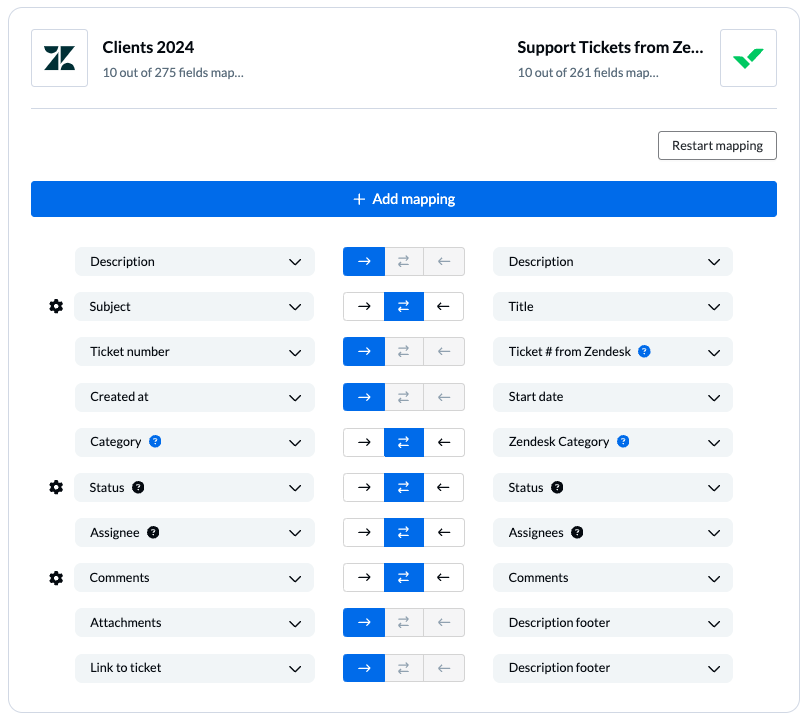
Unito truly shines when it comes to custom fields – identifiable by the blue question mark icon.
Learn more about Field Mappings
Click Confirm to proceed.
Step 5. Launch your Wrike Zendesk integration
And that’s it! You’ve just completed a flow between Zendesk and Wrike. Congratulations! If you have any questions, don’t hesitate to reach out and let us know.
Now that you’ve set up your integration between Wrike and Zendesk, you can duplicate this workflow to sync ticket or task information for other use cases within your organization.
What’s next after integrating Wrike and Zendesk with Unito?
- Power your reporting workflows by syncing Wrike tasks to Google Sheets or Microsoft Excel
- Connect Wrike with Jira or Trello to collaborate across project management tools
- Send Wrike task details to Airtable and back
- Learn more about Wrike Sync by Unito
- Set up a CRM integration by syncing Wrike tasks with Salesforce.
- Follow similar guides to connect Zendesk and Jira or Zendesk and Slack, or Zendesk and Azure DevOps
- Send Miro cards to Wrike to save time copy-pasting your favourite ideas from a brainstorm.
Why sync Zendesk tickets with Wrike tasks?
Provide customers with faster, more efficient support
The biggest benefit to automatically syncing Wrike tasks with Zendesk tickets is to save time when your team needs it the most.
Let’s face it: if your customers have issues, they need to be resolved as quickly as possible. If a customer success representative needs help from other teams, it takes time to reach out, file a request, explain the situation, etc.
Dispatch tasks based on tickets automatically based on criteria selected by you
Unito cuts through that tedious process by enabling you to assign tasks immediately based on the conditions of your flow (the specific steps implemented, rules, and chosen fields of your personalized integration).
You could tell Unito to assign tasks in Wrike to specific users in specific folders or projects instantly if a Zendesk ticket meets certain conditions you select in your flow.
It’s hard to express how much freedom you have to customize and specify what those conditions might be, especially when custom fields come into play.
In our demo, we kept things simple – we just created a checkbox as a custom field in Zendesk labelled: “dev support required?” Only tickets with that box checked can then sync to a specific Wrike folder instantly. That’s just one example of how and why Unito’s flexibility and versatility can come in handy.