
How To Set Up a No-Code Salesforce-Wrike Integration
This guide will show you how to easily integrate Salesforce with Wrike to sync opportunities, contacts, cases, or tasks in real-time. By the end you’ll be able to save your sales team hours of work by automating the creation of new Wrike tasks based on your Salesforce activity, or vice versa.
That’s the power of two-way automation: you can send data to or from either of these popular work management tools. The first step is to figure out what you’re trying to accomplish and who you want to collaborate with.
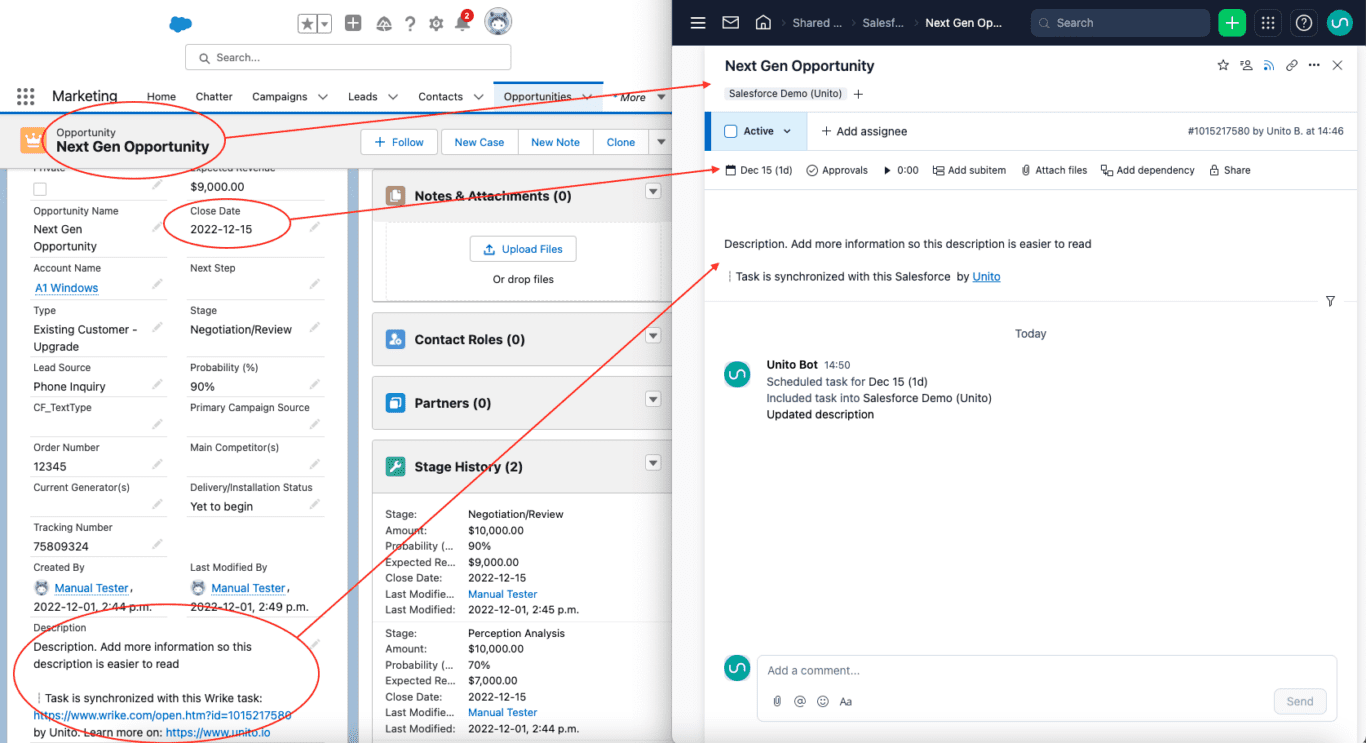
Here’s a quick peek at a demo of this Wrike to Salesforce integration:
Unito can turn Salesforce objects into Wrike tasks and vice versa with a few simple instructions that anyone can set up in minutes.
In this article:
- Step 1. Connect Salesforce and Wrike to Unito
- Step 2. Set a flow direction
- Step 3. Pick rules to filter tasks from syncing
- Step 4. Link fields between Wrike and Salesforce
- Step 5. Launch your Wrike to Salesforce integration
- What’s next after you sync Wrike and Salesforce with Unito?
2 ways to sync Wrike tasks to Salesforce
Directly from Wrike
You can connect your Wrike projects or folders directly through Wrike Sync without leaving your project management tool.
Unito’s standalone sync platform
If you prefer greater flexibility and options for configuration when building flows, or if you plan on connecting a variety of other tools, you may prefer Unito’s standalone sync platform.
NOTE: Whichever option you choose will allow you to access the same Unito dashboard to build flows.
You may also want to create a planning folder in Wrike to act as a workspace for anything you want to plan, track and coordinate. Move or tag any relevant Wrike projects over to your planning folder. This will, of course, include the Jira projects we’ll be syncing.
Before you connect Wrike and Salesforce to Unito
- You can create a Unito account by signing up, searching in the Salesforce AppExchange or by adding Unito to your Wrike workspace.
- (optional) read our overviews of Wrike and Salesforce to better understand the capabilities of each integration.
Although this guide will demonstrate Unito’s integration between Wrike tasks and Salesforce opportunities, you can adapt the steps within to also sync Salesforce tasks or contacts, with support for cases coming soon!
New to Unito? Here’s an overview of our Salesforce-Wrike integration. But if you’re ready to start syncing opportunities and tasks, read on below.
By the end of this walkthrough, you’ll be able to:
- Automatically create Wrike tasks based on specific Salesforce opportunities (or other Salesforce objects) and keep both in a real-time, two-way sync.
- Create Salesforce opportunities, contacts, or tasks based on specific Wrike tasks and keep both in a real-time, two-way sync.
- Sync custom fields between Wrike and Zendesk or apply them as automation triggers.
Step 1. Connect Salesforce and Wrike to Unito
- Continue from your Wrike interface or navigate to the Unito App and +Create Flow.
- Click Start Here to connect your Wrike project or folder, and Salesforce organization.
- Choose the accounts you want to connect.
- When you connect each tool for the first time, make sure to authorize both in Unito in order for your tasks, opportunities, or contacts to sync properly.
- Specify which account, board, and project you wish to sync through Unito. Here is an example of our completed tool connection screen:
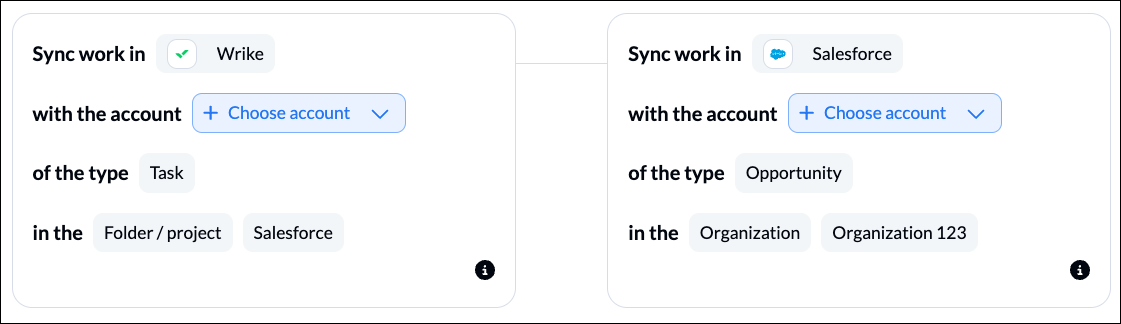
When you’re ready, click Confirm.
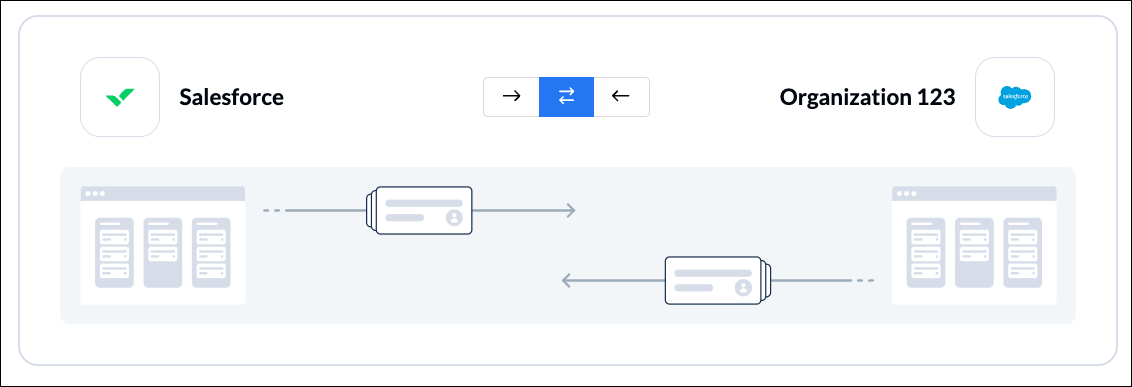
Step 2. Set a flow direction between Wrike and Salesforce
This step tells Unito where to automatically create work items (tasks, opportunities, or contacts) based on your manual activity: in Wrike, Salesforce or both.
Later, we can tell Unito to keep those work items in a two-way, real-time sync.
Step 3. Set rules to sync specific Wrike tasks and Salesforce objects
Unito lets you set configurable rules to filter out specific work items from your flow between Wrike and Salesforce. So if you only want a specific group of tasks, opportunities, or contacts to appear in your other tool, you can decide that here.
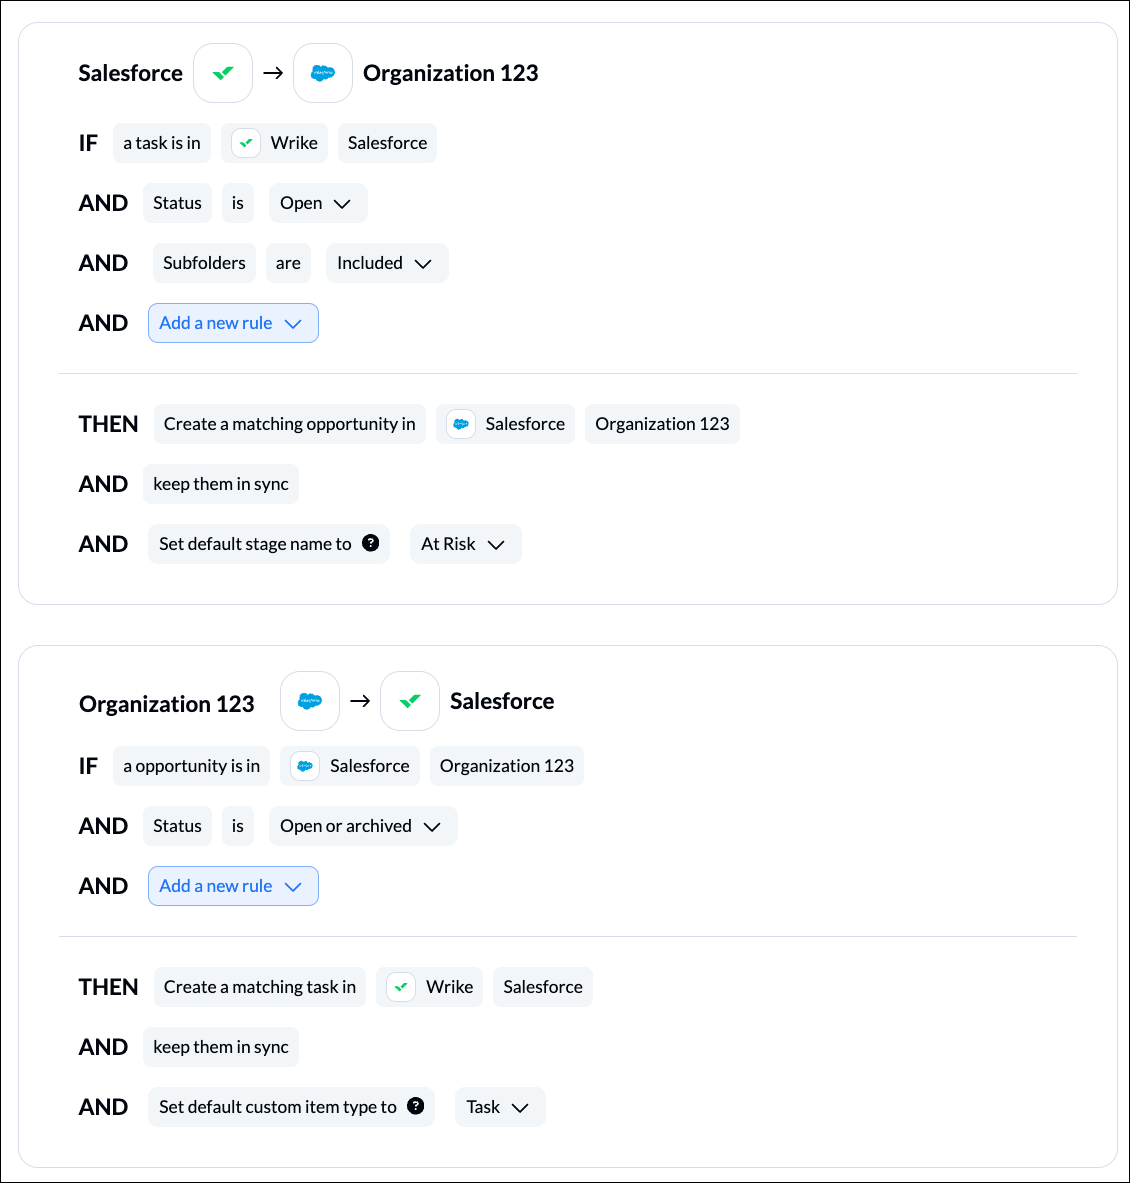
You can add filters by most fields, although fields with multiple selectable options (e.g., Salesforce stages) are especially effective.
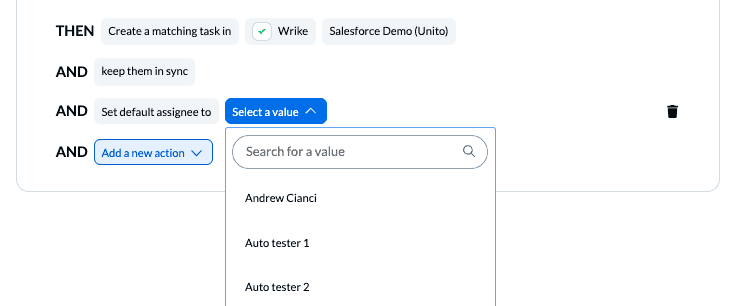
Further down we can even specify where a task should go, who it should be assigned to and more:
Find out more about setting rules.
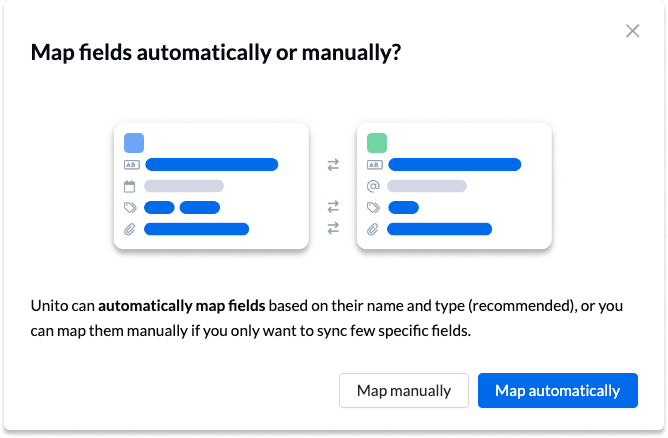
Step 4. Link fields between Salesforce and Wrike
When you first reach this screen, you’ll see two options. If you select map automatically, Unito will pre-populate a list of suggested field mappings which you can then adjust.
Now, select + Add mapping to sync additional fields. Then, click Select a field. After you’ve chosen a field in the first board, Unito will suggest compatible matches in the second after you click on the drop-down menu.
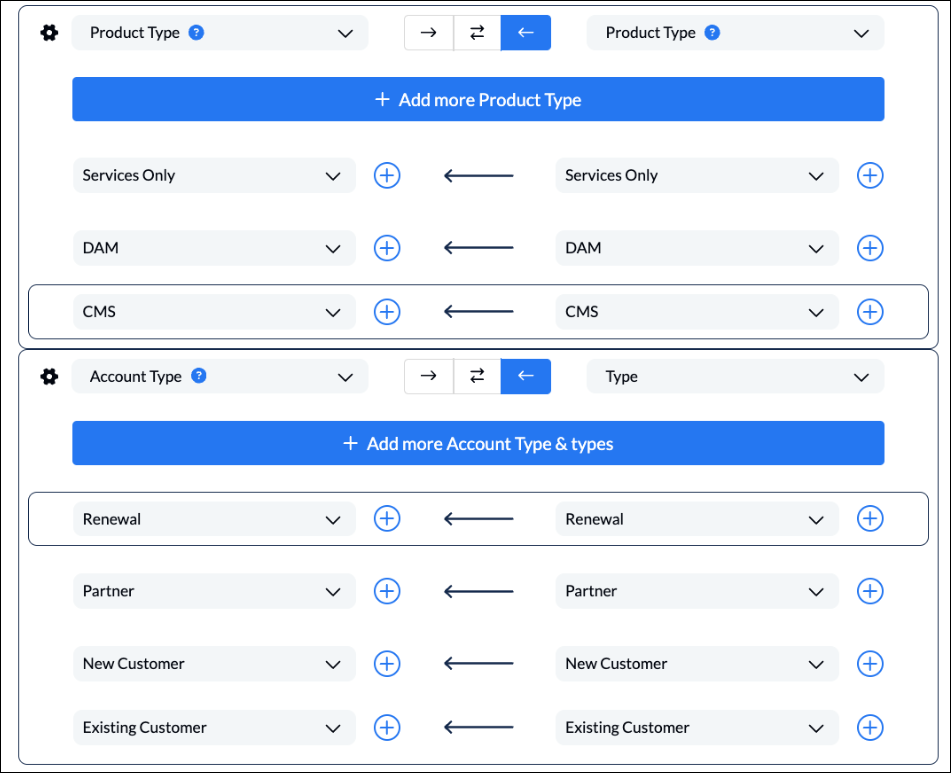
Field configurations
Every field above with a blue question mark indicates a custom field that was created in each respective tool. This is how Unito can help users optimize their workflows and do what no other integration or automation solution can.
Any field with a cog/gear icon be further configured to map values for multi-select fields (e.g., status, priority, etc…):
Here’s more general information about field mappings. Here’s how to further configure your field mappings in Unito.
Step 5. Launch your Wrike to Salesforce integration
And that’s it! That’s all you need to connect Salesforce with Wrike to sync tasks, opportunities or contacts with Unito. Congratulations! If you have any questions, don’t hesitate to reach out to our team by clicking the little chat box in the lower-right corner of your screen.
Ready to streamline your pipeline?
Meet with our team to see what Unito can do for your workflows.
What’s next after you sync Wrike and Salesforce with Unito?
- Learn more about our Salesforce opportunities integration here. You can also Duplicate this flow to sync more tasks, opportunities, or contacts between Salesforce and Wrike.
- Power your reporting workflows by syncing Wrike tasks to Google Sheets or Microsoft Excel
- Connect Wrike with Jira or Trello to collaborate across project management tools.
- Sync Wrike task details to Airtable and back.
- Learn more about Wrike Sync by Unito.
- Collaborate on customer tickets in Zendesk from your Wrike interface.
- Send Miro cards to Wrike to save time copy-pasting your favourite ideas from a brainstorm.
- Or if you found this guide useful, you can find similar articles on how to sync:
Why integrate Wrike with Salesforce?
Automation saves time, effort and expense
Salesforce is an incredibly popular, versatile CRM with tons of add-ons, products, and options to help you achieve your business goals. But if sales reps need help from another department, like professional services team working in Wrike, how do they communicate?
Perhaps a project manager has access to Wrike and Salesforce accounts to jump back and forth, or maybe everyone does. If that’s the case though, how much is your organization spending on unnecessary additional licenses?
Maybe they communicate and collaborate via Slack, another instant messaging service, via email or text.
All of those channels can become pitfalls where information gets lost, people lose track of the latest information, and delays pile up. For your sales reps — and the customer — that can become a problem that snowballs very quickly.
Set up a two-way workflow that turns opportunities into tasks and vice versa
An automated workflow circumvents human error, delays, and other obstacles by keeping both teams in sync from their preferred interfaces. Sales reps continue to work in Salesforce, while your professional services team or project managers stay in Wrike.
Each opportunity can become a Wrike task (or vice versa) and changes in either app can appear instantly in the other so no one needs to be manually notified or updated as work progresses.
Setting up that automated workflow may sound daunting, most third-party platforms require someone with technical expertise, a lengthy implementation schedule, and a big budget.
But the beauty of a no-code solution, such as Unito, is that you can skip those headaches by automating the flow of data on your own with guides like this one!
Sending Salesforce opportunity details into Wrike through Unito is as straightforward as setting a few simple triggers that tell the platform which opportunities to sync, and where in Wrike to send them. It’s all point-and-click and we’re here to help if you have any questions.
FAQ: Wrike and Salesforce integration
Can you integrate Wrike and Salesforce?
Absolutely! The two best ways to do this are:
- Unito’s standalone platform, which is described in this guide.
- The built-in Wrike Sync add-on, which combines many functionalities of the standalone platform in an app you can use right in your Wrike projects.
Both these options create a true two-way integration between Salesforce and Wrike, meaning any work happening in one tool will automatically transfer to the other.
What are the benefits of this integration for sales teams?
Salesforce is great for managing day-to-day sales tasks and tracking your pipeline’s performance. But there’s crucial information scattered throughout your Wrike projects sales teams need to depend on. With this integration, you can make that information available to them without any extra manual work. Add details to any Salesforce object from Wrike tasks automatically and sync sales data back.
How do cross-functional teams benefit?
Sales teams usually spend most of their time in Salesforce, but they’ll often need to send updates or requests for support to other teams. If those teams work in Wrike, this integration will allow everyone to know exactly what’s going on without leaving their tool of choice.