
How to Sync Wrike Tasks to Airtable Records With Automated 2-Way Updates
In this guide, you’ll learn how to sync Wrike with Airtable in order to sync records to tasks within folders through Unito’s two-way, no-code integration. It saves time by eliminating the need to copy-paste details between apps, expedite reporting, and more. If you have a team in Wrike and a team in Airtable, each can work together without leaving their interface of choice as tasks and records update in real-time. If you’re new to Unito you can check out our Airtable + Wrike integration overview before coming back here to connect your tools.
This Airtable-Wrike integration has two goals:
- Create new records in Airtable based on Wrike tasks with specific tags assigned to them.
- Keep those tasks and records in a two-way real-time sync so that changes in either tool will appear in the other.
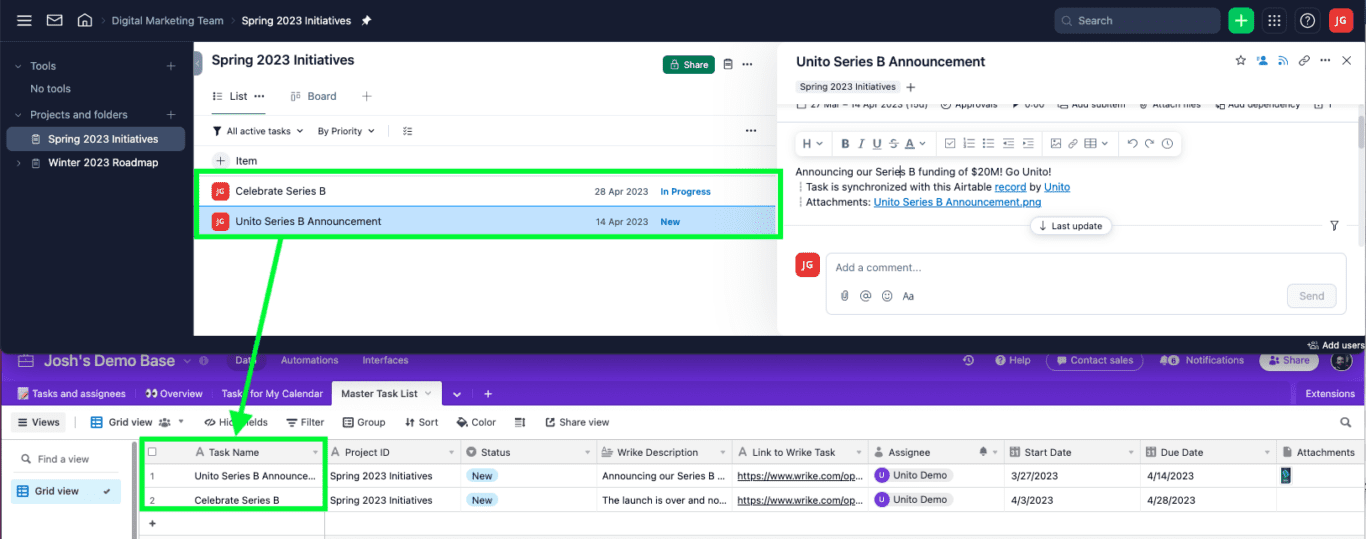
Here’s what our synced Airtable records and Wrike tasks look like after connecting them through Unito:
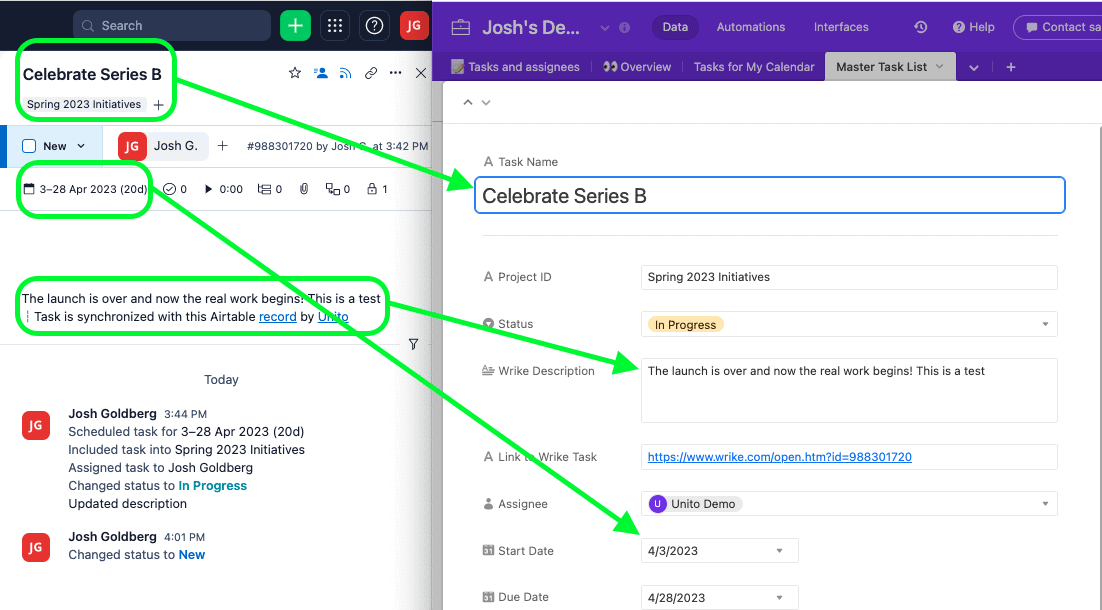
Right: Airtable record;
In Green: fields mapped from Wrike to Airtable in our demonstration.
Watch this Wrike integration sync tasks to Airtable records
In this guide:
- Tools: Wrike and Airtable
- Use cases: Task management, project reporting, data migration
- Great for: Data analysts, project managers, stakeholders and executives
Why sync Airtable and Wrike with Unito?
Integrating Airtable and Wrike with Unito eliminates the need to copy/paste details from one place to the other, drastically reduces the risk of human error, and can help your team work smarter. Airtable is fantastic for record-keeping and building comprehensive databases; while Wrike is a leading tool for project management. Unito gives you the best of both worlds with the help of two-way automation and a simple set of rules.
Put simply, you can automatically turn Wrike tasks into Airtable records and vice versa, with both kept up-to-date in real-time once your Unito flow is set up.
Syncing Airtable with Wrike through Unito will enable you to:
- Ensure your bases and projects are continually kept up-to-date in real-time without copy pasting between them;
- Keep teams in either tool informed about progress automatically;
- Assign tasks in Wrike based on new records in Airtable
Typically, you tell Unito to look for specific triggers, such as tags, assignees, projects, status etc. By including those triggers in your rules, you ensure that only those kinds of tasks or records will sync between Airtable and Wrike.
Before you connect Airtable and Wrike to Unito
If you’re working directly in Wrike, you’ll need to add Wrike Sync in order to sync tasks with Airtable records.
You’ll also need to add a Last Modified Time field in Airtable.
Add a Last Modified Time field as your last column in Airtable
From your Airtable base, click + to add a column, scroll down the list and look for Last Modified Time. Not to be confused with Last Modified By. They’re different fields with similar sounding names, so don’t mix them up. You can give it a name, or not, but this field won’t be mapped by Unito. It is required, however, for your flow to function as intended.

TL;DR – Make sure your Airtable has a Single-line text field called Title and a Last Modified Time field.
Now you’re ready to build a flow in Unito!
Step 1: Connect Wrike and Airtable to Unito
- Log in to the Unito App or continue from Wrike and click +Create Flow.
- Then, click Start Here to connect your tools.
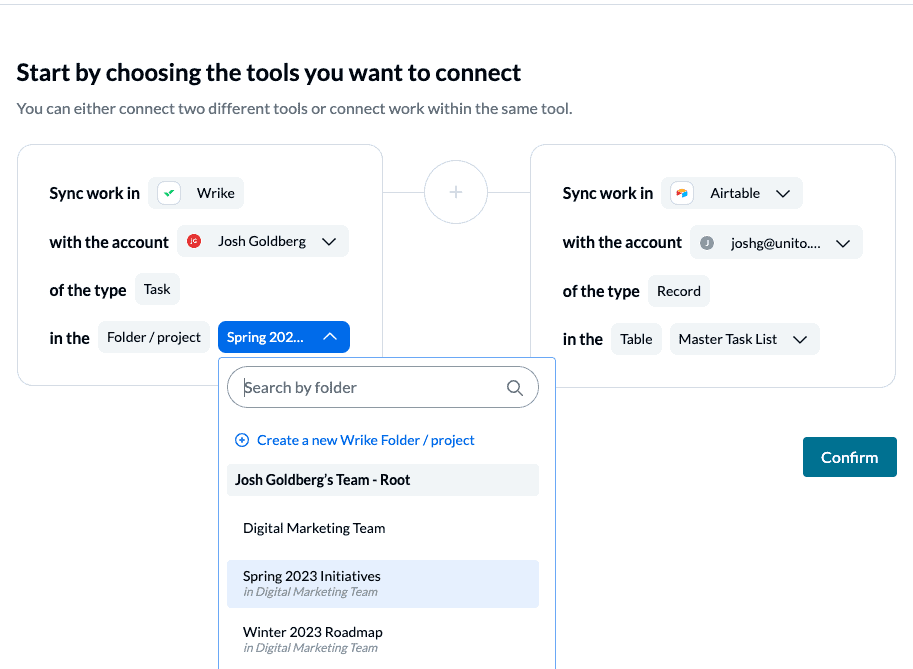
- Select +Add a tool to this flow in either column, and connect your apps. Now, +Choose account to specify the account you want to use.
- From the next drop-down menu, type in the name of the folder or table you want to connect.
- Repeat steps 3 and 4 to connect your other tool with Unito.
- Click Confirm.
If this is your first time connecting Airtable to Unito you’ll have to go through a quick authorization process:
Step 2: Set flow direction for new Wrike tasks or Airtable records
Flow direction determines how new work items (e.g., tasks or records) are created by Unito. That means you can decide whether to have new Wrike tasks turn into Airtable records, vice versa, or both simultaneously. Just keep in mind that with a two-way flow, you’ll need to set precise rules for each direction. Our demo will show you a two-way flow direction but feel free to pick an option that best suits your current needs.
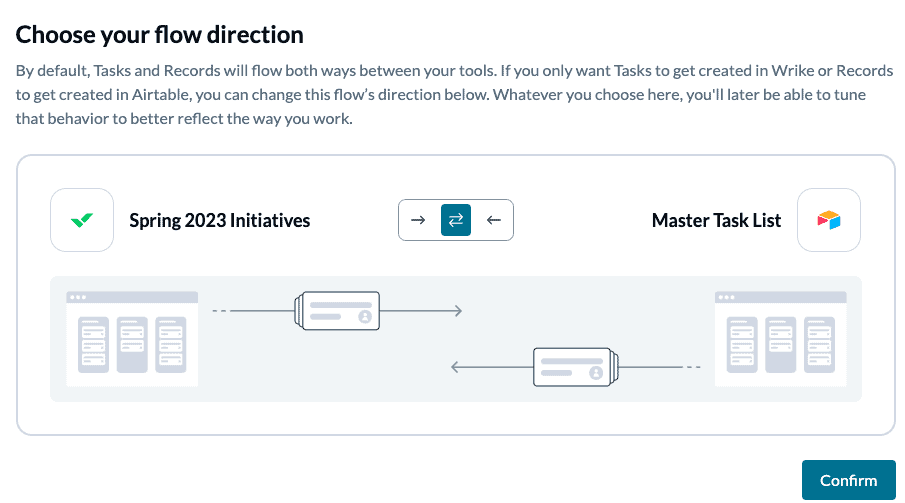
Select Confirm when you’ve chosen a flow direction.
Step 3: Set rules to filter data between Wrike and Airtable
This is where you can set up triggers to determine which actions taken in Airtable or Wrike will create new work items in the other. With a two-way flow, we’ll set up rules for each direction.
Select Add a new trigger to begin setting up your rules. There can be some variability here, depending on your particular setup in each tool.

The easiest way to set a trigger from Airtable is through a single-select field. In our demo, we’ve told Unito to only create new Wrike tasks based on Airtable records with the status “Kickoff”.
You can learn more about setting up rules here.
Step 4: Set up field mappings between Airtable and Wrike
Unito turns the details of your Wrike tasks and Airtable records into mappable fields that can be synced between tools. In Airtable, these fields are based on the names of each column, while in Wrike they can be any tasks detail: assignee, task name, project name, description, etc.
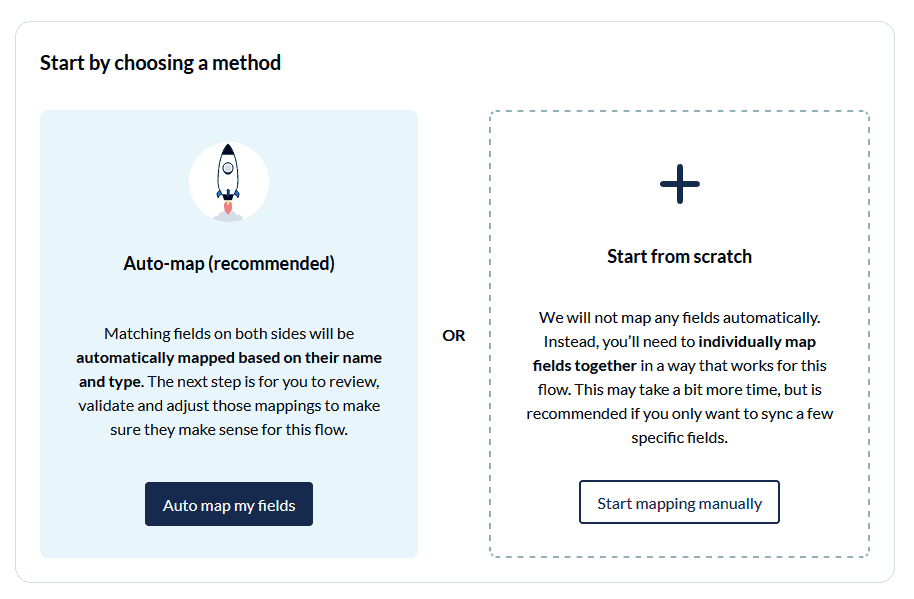
First, you’ll be asked whether you want to set up your field mappings from scratch or let Unito do this automatically. Since your fields in Airtable are all custom fields based on your own tagging structure, you’ll have to start from scratch.
Most fields will automatically be mapped for two-way updates, but you can modify them individually if you prefer one-way updates in some cases. With two-way updates, changes made in either tool will automatically update the other. A one-way update restricts changes to a single direction.
Select +Add Mapping, then Select a field in both tools to pair the fields together.
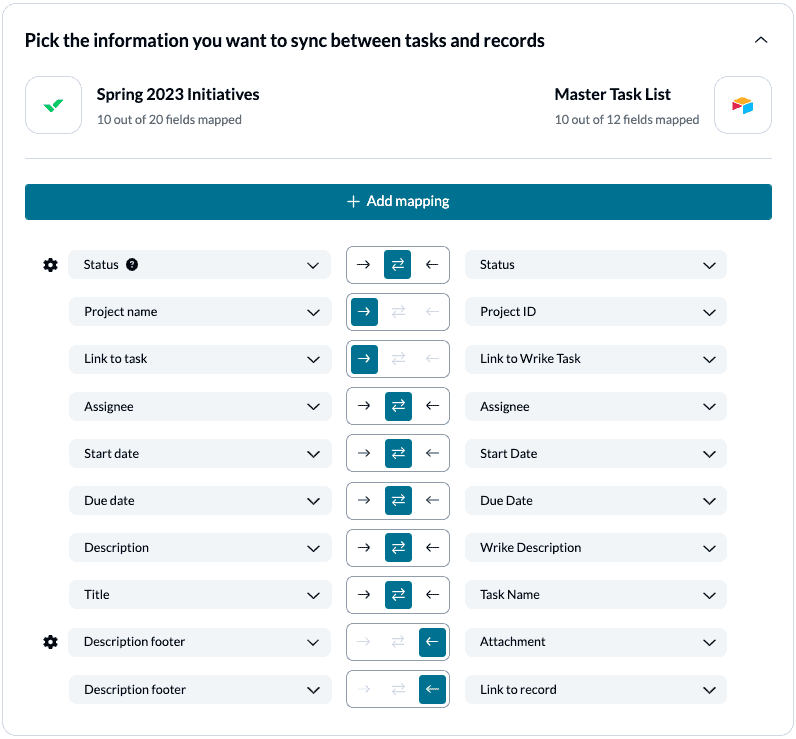
Any field with a gear/cog icon can be further modified with precise mappings for each value. Usually this relates to a field with multiple options, such as a drop-down list.
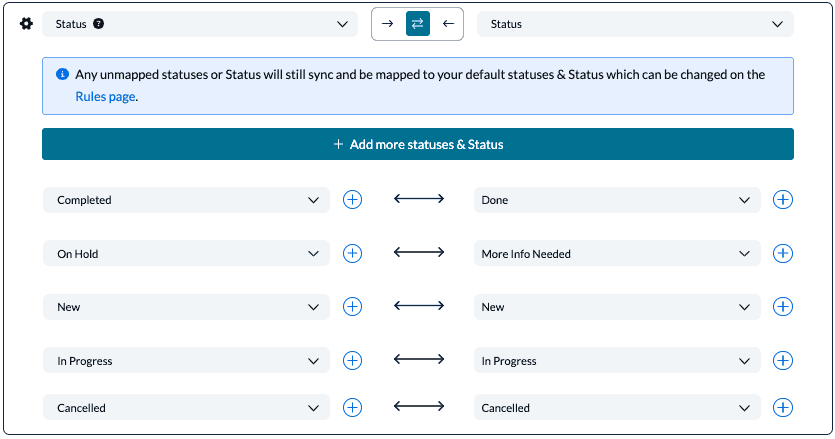
Click Confirm to proceed.
Find out more about setting field mappings.
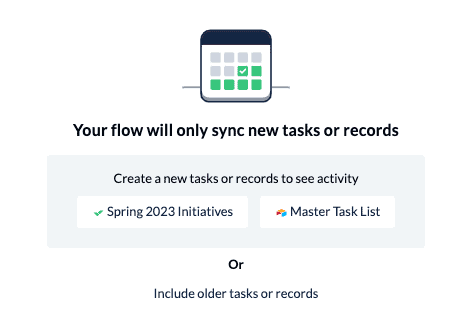
Step 5: Save, close, and launch your flow!
And that’s it! You’ve just build a flow between Airtable and Wrike. Congratulations! You can now test your flow with a new task or record to make sure you’ve created the flow you expected, or go ahead and tell Unito to sync all historical work items.
Here’s a look at our synced table and project:
If you followed the steps above, your flow will now:
- Automatically create new Airtable records and Wrike tasks based on specific activity in the other.
- Keep fields up to date in both tools.
- If you have any questions, please don’t hesitate to reach out and let us know.
What’s next after setting up a two-way integration between Wrike and Airtable?
Try out these Airtable templates and sync them with Unito to match your use case:
- Plan a project health report
- Organize a marketing budget
- Create a content catalog
- Create an employee resource database
- Report on resource management
- Browse more Airtable templates
If you want to know what else you can do with Unito, here’s some inspiration to help you power up your workflows.
- Duplicate this flow to sync other Wrike folders to Airtable.
- Why not learn how to sync Airtable to Google Sheets or Microsoft Excel with Unito?
- Find out how you can sync multiple Airtable bases to each other with Unito.
- Integrate Notion pages with Airtable bases.
- Connect Wrike with Jira or Trello to collaborate across project management tools
- Collaborate on customer tickets in Zendesk from your Wrike interface.
- Send Miro cards to Wrike to save time copy-pasting your favourite ideas from a brainstorm.
- Set up a CRM integration by syncing Wrike tasks with Salesforce.