How to Sync Airtable Records Between Multiple Bases With Automated 2-Way Updates
In this guide, you’ll learn how to sync records from multiple Airtable bases using Unito’s two-way no-code integration. By connecting Airtable bases this way, you can guarantee that any database you use as a single source of truth is actually up-to-date and true. No manual updates needed and no copy-pasting. Because you can use an Airtable base for just about anything, being able to sync records between them can power all sorts of workflows.
New to Unito? Here’s a bit more information about our Airtable-Airtable integration.
You can use this integration to streamline project management tasks, software development work, BizOps processes, and so much more. We even have a series of useful templates to give you some inspiration.
Any of these Airtable templates can be synced with Unito to match your use case:
- Plan a project health report
- Organize a marketing budget
- Create a content catalog
- Create an employee resource database
- Report on resource management
You can go here to find more Airtable templates.
Watch this Airtable integration sync multiple bases in real-time
In this guide:
- Tool: Airtable
- Use cases: Task management, project reporting, data migration, marketing reporting
- Great for: Project managers, data analysts, product managers, consultants, marketers
Why sync Airtable bases with Unito?
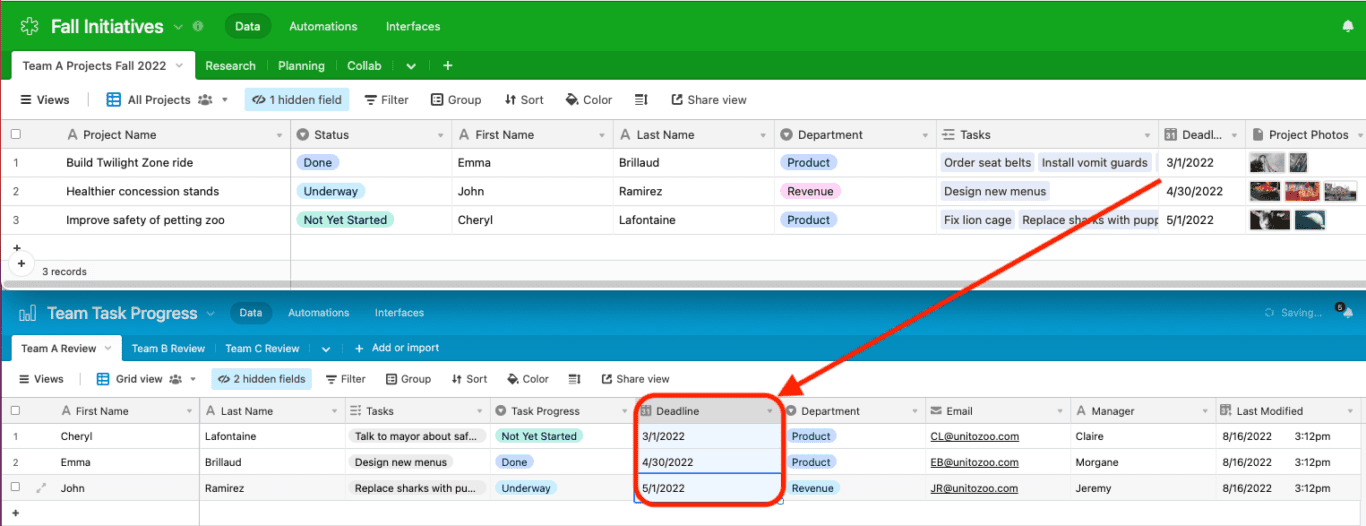
The biggest difference between Unito and other options (including Airtable itself) is the power of real-time 2-way syncing between records. Changes in one record will appear in the other based on the rules you choose in Unito.
Airtable is a great way to keep track of all sorts of information. But its native features aren’t great for keeping everything up to date in multiple bases at once.
Project managers who use Airtable for task management can automatically sync those tasks to any number of other bases. That means each team member can have their own personal to-do list tracked in a base without their manager losing sight of what everyone’s doing.
If you use Airtable primarily to store and process data, you need to manage multiple data sources. With a Unito integration, you don’t have to worry about that data being outdated the moment it leaves its source.
No matter how you use Airtable, your workflows will benefit from a Unito flow.
Before you connect Airtable to Unito
- Read an overview of Unito’s Airtable integration, including mappable field types, limitations, and more.
- Generate an API key in Airtable so you can connect it to Unito.
- Make sure your Airtable has a Single-line text field called Title and a Last Modified Time field.

Step 1: Connect Airtable to Unito
Navigate to the Unito app and select + Create Flow. On the next screen, select Start Here to connect Airtable with Unito. Choose the Airtable account you want to use, then pick the Airtable bases you want to sync.
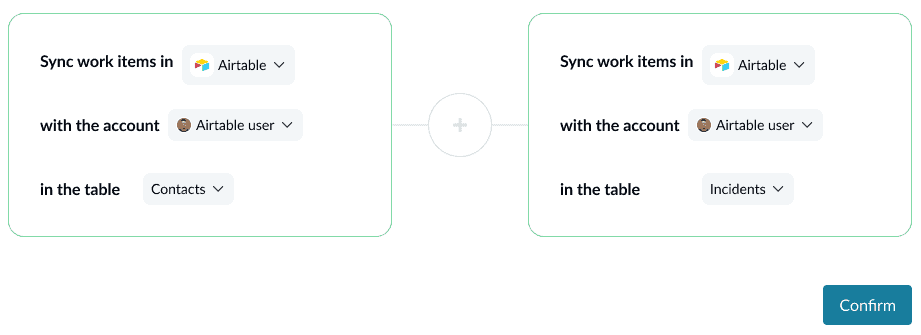
When you’re ready, select Confirm.
Here’s a quick guide on how to connect Airtable to Unito for the first time:
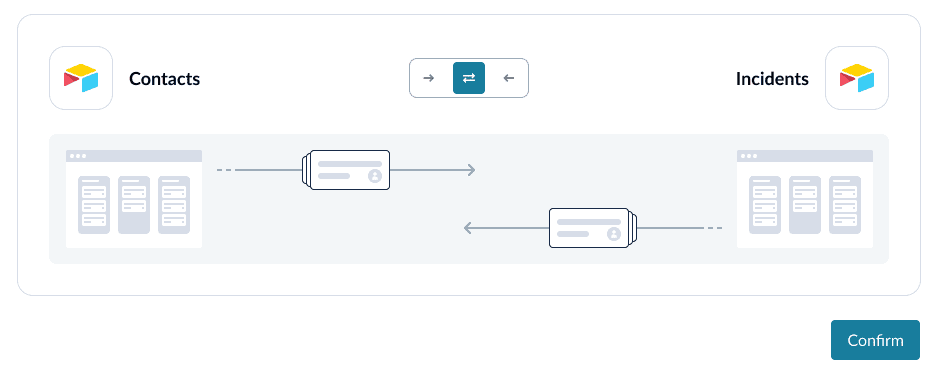
Step 2: Set flow direction between Airtable bases
Flow direction determines how new Airtable records are created by Unito. What does that mean? If we’re connecting an Airtable base called Contacts with one called Incidents, flow direction will affect which one gets new records from the other. For instance, a one-way flow from Contacts to Incidents would automatically create new records in the Incidents table each time you create a new record in Contacts, but not the other way around. In contrast, a two-way flow would automatically create new records in both directions.
Note: Later, you’ll be able to add field mappings to determine which fields will be kept updated in both bases — regardless of the flow direction you set here.
Select Confirm when you’ve chosen a flow direction.
Step 3: Set rules to filter data between Airtable bases
This is where you can set up triggers to determine which actions taken in one Airtable base will create new records in another base. In a two-way flow, you can set up rules for both bases.
Select Add a new trigger to begin setting up your rules. There can be some variability here, depending on your particular setup in each base.
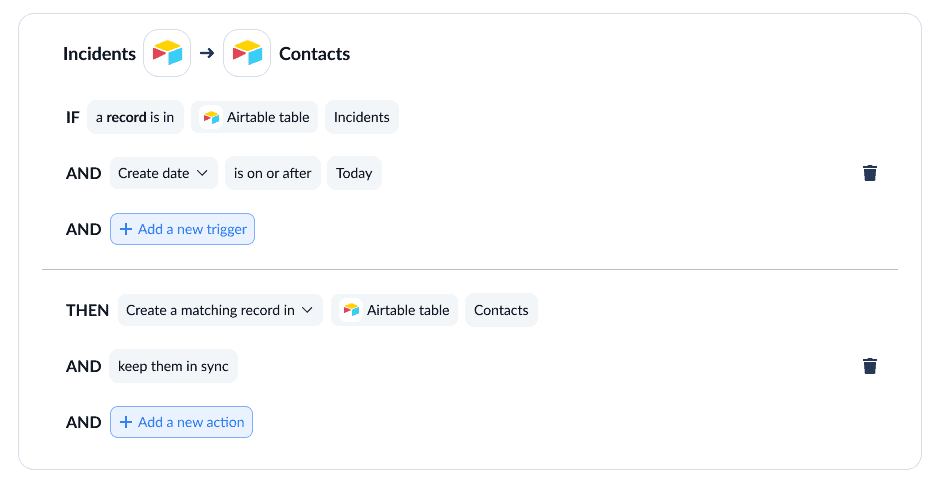
Rules can filter data using almost any field, from dropdowns to text and duration.
You can learn more about setting up rules here.
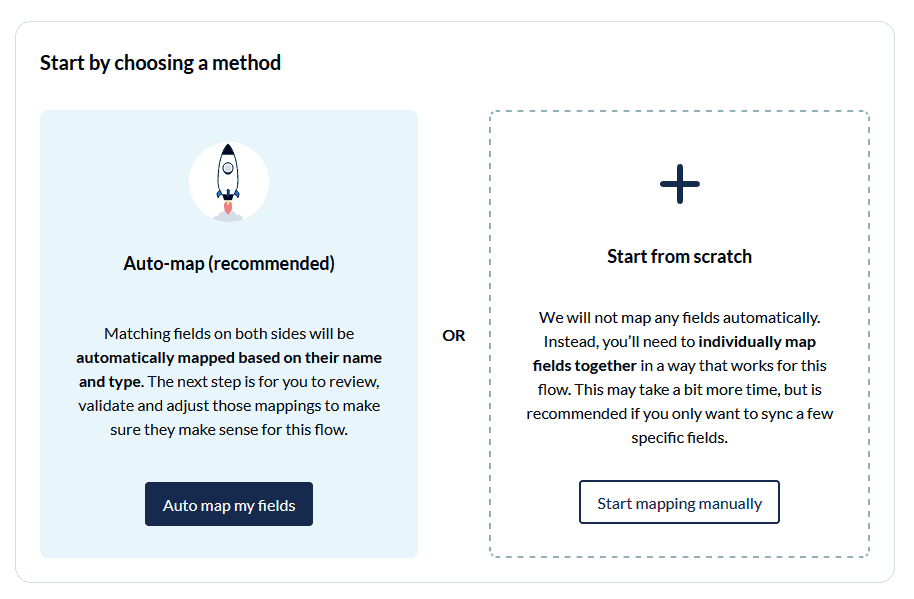
Step 4: Set up field mappings between Airtable bases
Fields represent the details of your Airtable records. Text, dropdowns, dates, and emails are all examples of fields you can map using Unito.
First, you’ll be asked whether you want to set up your field mappings from scratch or let Unito do this automatically. If you select the auto-map option, you can still change any mappings afterwards. If you prefer a DIY approach, start from scratch.
Your fields will be automatically mapped for two-way updates, but you can modify each individually if you prefer one-way updates in some cases. With two-way updates, changes made in either base will automatically update the other. A one-way update restricts changes to a single direction.
Select +Add mapping, then Select a field in both bases to pair the fields together.

You can choose any field with a gear icon to map them further. Usually, this will apply to fields like dropdowns, which have multiple options.
Click Confirm when you’re satisfied with your field mappings.
Step 5: Save, close, and launch your flow!
And that’s it! You’ve just built a flow between Airtable bases. Congratulations!
If you followed the steps above, your flow ill now:
- Automatically create new Airtable records.
- Keep your Airtable fields up to date in both bases.
If you have any questions, please don’t hesitate to reach out and let us know.
What’s next after setting up a two-way Airtable integration?
If you want to know what else you can do with Unito, here’s some inspiration to help you power up your workflows:
- Duplicate this flow to set up similar workflows with any number of Airtable bases.
- Why not learn how to sync Airtable to Microsoft Excel or Google Sheets with Unito?
- Delegate work or report on tasks between Airtable and Trello.
- Browse our catalog of Airtable guides and templates.