
How to Automatically Export and Sync Airtable to Excel in 2025
This guide will show you how to export Airtable records to Microsoft Excel (and vice versa) automatically through Unito’s 2-way no-code integration for spreadsheets. By integrating an Airtable database with Microsoft Excel, you can easily guarantee that every table you export (and import) will become a reliable, updated source of truth at all times.
What does this Excel Airtable integration do?
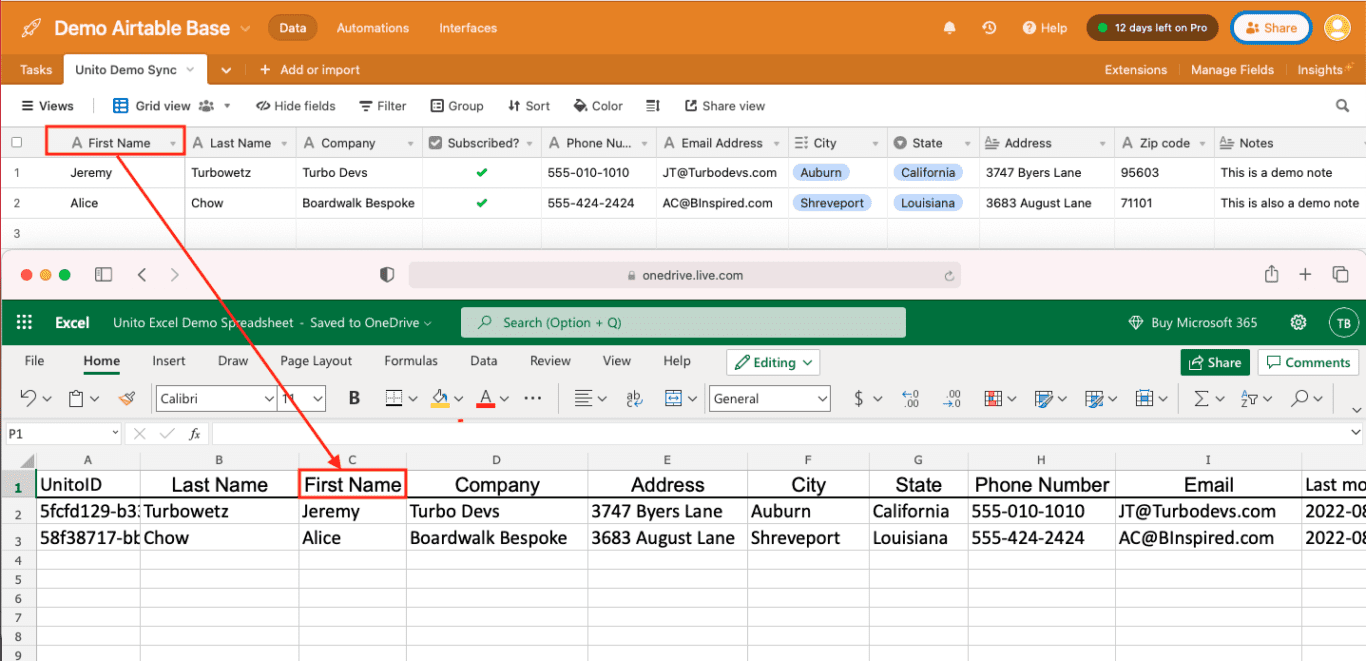
Unito can create rows in Microsoft Excel or Airtable based on column information from the other. It maps those columns as custom fields based on the titles you give each column. In other words, your header row tells Unito what counts as a mappable field, and what doesn’t.
By exporting to or from Airtable and Excel, our rows will become items in sync and the columns will be considered mappable fields.
In this guide:
- Tools: Airtable and Microsoft Excel
- Use cases: Project reporting, data migration
- Great for: Data analysts, project managers, stakeholders and executives
Why export Airtable to Microsoft Excel?
As mentioned above, whether you plan to export from Airtable to Excel, or to export from Excel to Airtable, the steps below can be adjusted according to your needs.
Airtable is fantastic at tracking and storing all kinds of details or data points. But it’s not always easy to share that data with colleagues, stakeholders, contractors or other contacts.
Avoid the struggles of exporting and importing CSVs or manual data entry
Either they don’t know their way around the tool, you can’t provide access unless they’re also paying Airtable subscribers, or perhaps you just prefer to share details in a more flexible, familiar spreadsheet.
So you can either export the CSV from Airtable, then import into Excel manually, or if you’re truly adventurous (and tech-savvy) you could pull information from Airtable into Excel via power-Query.
Both of those options can be time-consuming and leave room for human error. Plus, once your data is out of Airtable, it’s obsolete as soon as anyone adds a record, deletes something or edits anything.
Watch this Airtable integration sync with Google Sheets
Although Google Sheets and Microsoft Excel are different apps, the general steps and principles in this integration apply to both. Here’s a quick demonstration:
Feel free to adapt the steps in this guide to suit your spreadsheet use case easily. We also have a guide covering how to export airtable to google sheets.
Common use cases for syncing Airtable to Excel:
Collate data across multiple databases into a single workbook or hub
Whether you’re looking to consolidate information for sales, operations, finance or any other business team, it’s helpful to have everything in one place.
Merging the most important data points from several places into a single master table will save you hours of research and referencing. By exporting your Airtable to Excel, you can re-format and structure your spreadsheet, delete duplicate entires, and connect disparate information through Excel’s powerful formulas.
Coordinate reporting with other teams
Integrating Airtable and Excel with an automation platform can enable you to easily refresh data instantly and provide stakeholders, team mates, or other contacts with the most recent information. You can even share aggregated Excel reports with different departments who don’t use Airtable.
Do more, faster with 2-way automation for databases
Then there’s 2-way automation with a platform such as Unito is that it allows you to quickly export records from Airtable into a spreadsheet while keeping everything up-to-date in real-time. Unito allows you to set an automation flow direction for how spreadsheet cells are synced as well as individual flow directions for each field. That means in addition to automating cell creation in Excel (or Google Sheets), you can also keep individual rows continually updated -or not- based on how you like to work.
So if you’re someone who prefers Airtable for storing and processing data, but wants to share information in Excel, you’ve come to the right place. Instead of having to manage multiple data sources, you can work in your interface of choice: Microsoft Excel or Airtable. Also, just FYI: the steps included in this guide easily apply to other spreadsheet tools as well, including Google Sheets, Smartsheet and others.
Before you connect Microsoft Excel and Airtable to Unito
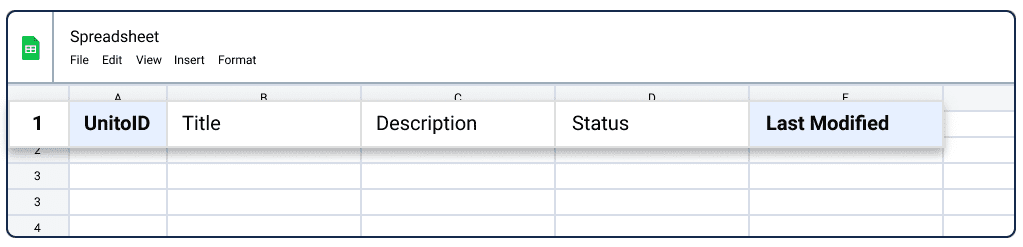
- Turn the first row of each synced table into a header row with clearly defined titles. Unito will then turn the titles of your header row into mappable fields.
- Install the Unito add-in for Microsoft Excel.
- Add a Last Modified Time field as your last column in Airtable.

Microsoft Excel: Create a table header
Go to www.office.com and open Excel Online, then find your spreadsheet. Make sure each column in the first row is clearly labelled with whatever titles you want to map to or from Airtable. If you don’t know how to categorize the data you want synced, you can start with this Microsoft Excel template.
Microsoft Excel: Install the Unito add-in
Now, go to www.office.com and open Excel Online.
- Then, from your spreadsheet click on File, then Get Add-ins.
- In the next screen click STORE and type Unito into the search box.
- Click Add and follow the on-screen instructions to install the Unito add-in.

Follow the on-screen instructions to add Unito to your Microsoft workspace.
Once the add-in is installed, click Insert the two columns in this sheet.
You’ll see UnitoID and Last Modified. Only columns between those two will sync with Unito. Having them columns in your table header is essential for this integration to function as intended. You can hide them, but don’t delete or modify those columns.
Step 1: Connect Airtable and Microsoft Excel to Unito
Navigate to the Unito app and select + Create Flow. Then, select Start Here to connect Airtable and Microsoft Excel with Unito. Let’s connect Airtable first.
Select +Add a tool to this flow and look for Airtable.
Now, +Connect a new Airtable account.
If this is your first time connecting Airtable to Unito, you’ll need to authorize Unito and select the bases you wish to sync:
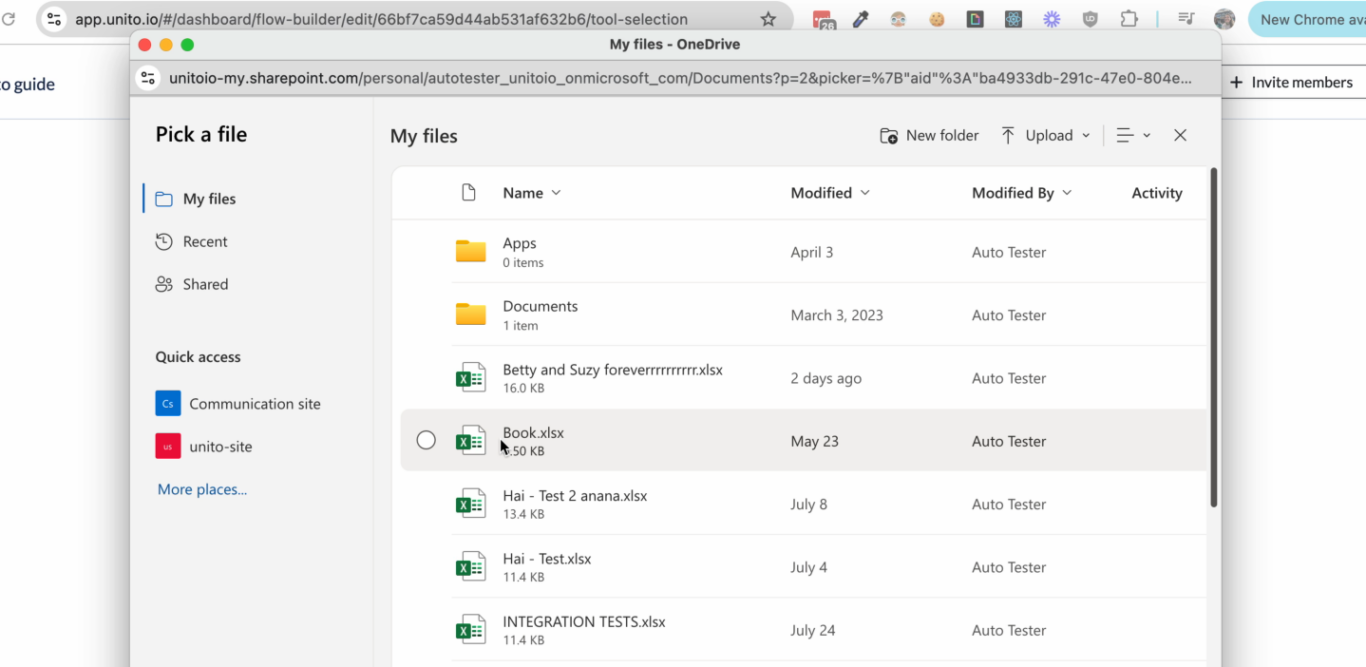
Next up, follow the same process for Microsoft Excel. You can pull up your Excel spreadsheet by hitting Select workbook and picking the spreadsheet you want to sync.
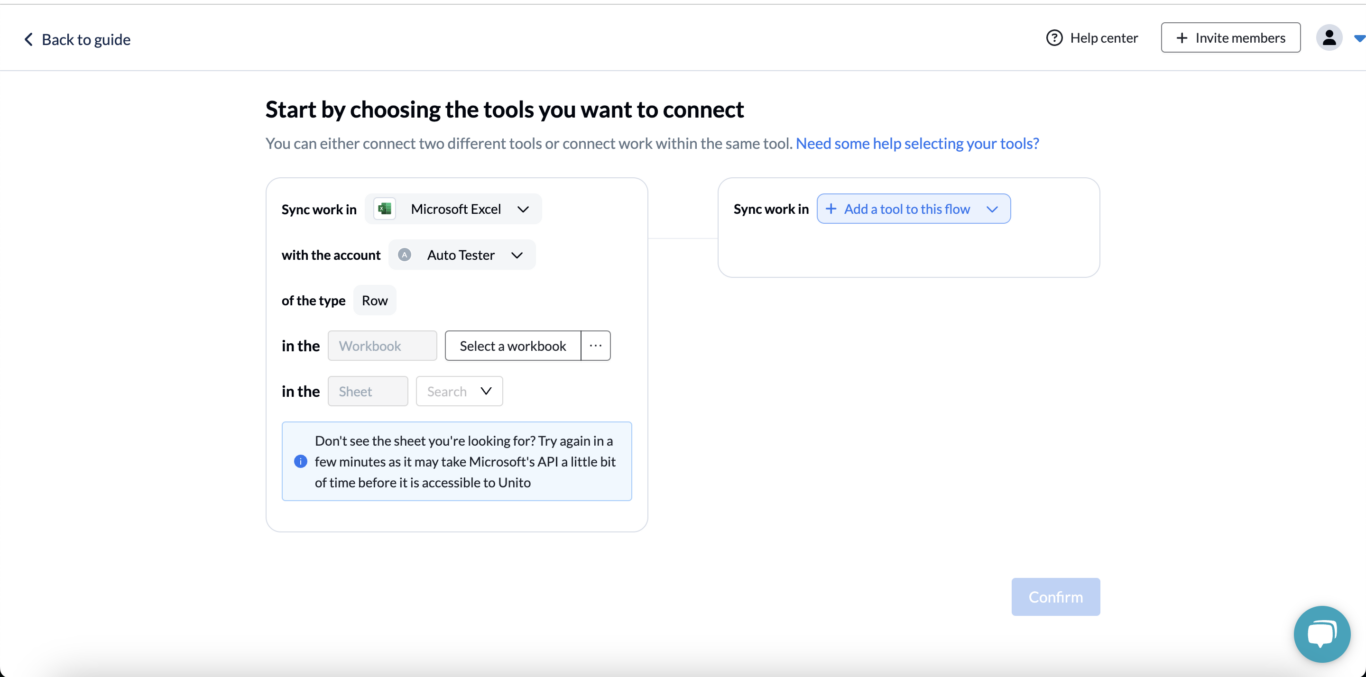
When you’re ready, select Confirm.
Step 2: Set flow direction between Airtable and Microsoft Excel
Flow direction determines how new Airtable records or Microsoft Excel rows are created by Unito. For this demo, we’ll choose a one-way flow from Airtable to Microsoft Excel.

Note: Later, you’ll be able to add field mappings to determine which fields will be kept updated in regardless of the flow direction you set here.
Select Confirm when you’ve chosen a flow direction.
Step 3: Choose which data to export from Airtable to Excel
This is where you can set up triggers to determine which actions taken in Airtable or Microsoft Excel will create new records or rows in the other. Since our demo is demonstrating a one-way flow, we only need to set rules from Airtable to Microsoft Excel.
Select Add a new trigger to begin setting up your rules. There can be some variability here, depending on your particular setup.
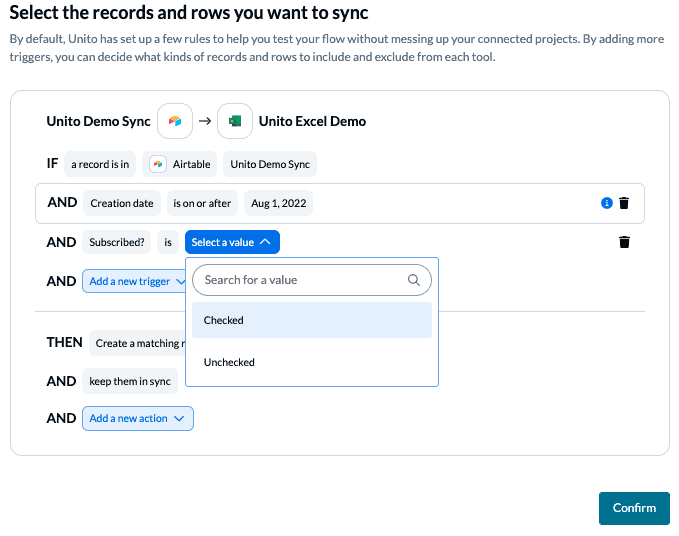
Rules can filter data using almost any field, from dropdowns to text and duration. We’ll choose priority, assuming we’re syncing tasks, and choose tasks of all priority levels for demo purposes.
You can learn more about setting up rules here.
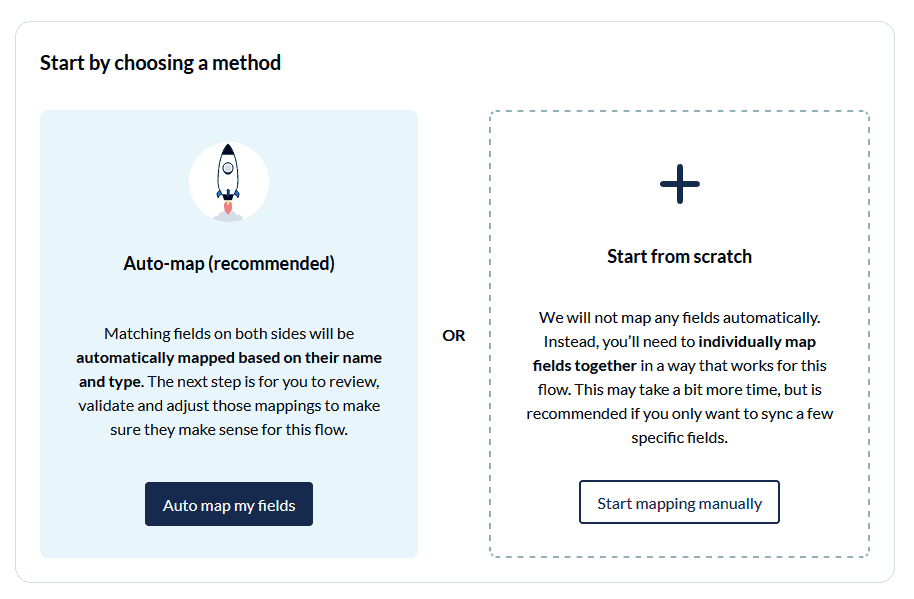
Step 4: Pick fields (columns) to keep in sync between Airtable and Excel
Fields represent the details of your spreadsheet rows. Text, dropdowns, dates, and emails are all examples of fields you can map using Unito.
First, you’ll be asked whether you want to set up your field mappings from scratch or let Unito do this automatically. If you select the auto-map option, you can still change any mappings afterwards. If you prefer a DIY approach, start from scratch.
When working with data tools that are entirely composed of custom fields such as Airtable and Microsoft Excel, you should choose Start from scratch since Unito won’t be able to guess what your custom fields should sync to.
Each field will be automatically mapped for two-way updates, but you can modify each individually if you prefer one-way updates in some cases. With two-way updates, changes made in either tool will automatically update in the other. A one-way update restricts to changes to a single direction.
Select +Add mapping, then Select a field in both bases to pair the fields together.
You can choose any field with a gear icon to map them further. Usually, this will apply to fields like dropdowns, which have multiple options.
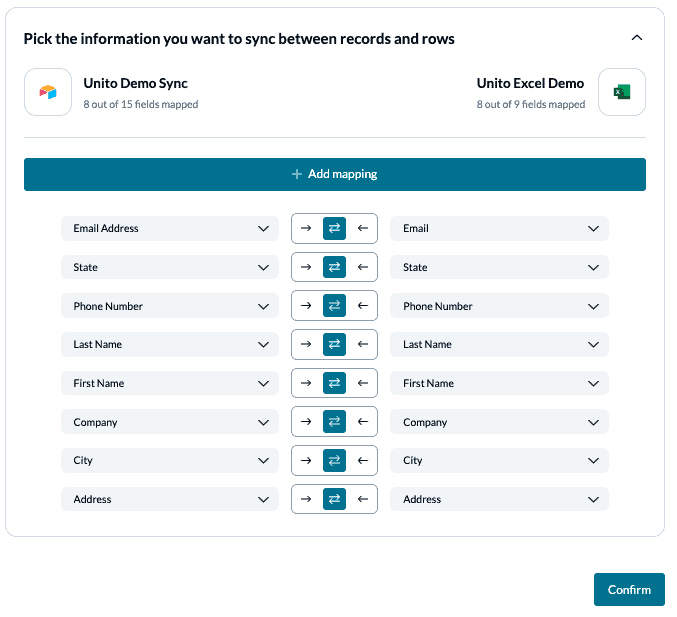
Note: If you change a column name in a synced spreadsheet, be sure to update your flow’s field mappings in Unito or else your data will stop syncing.
Click Confirm when you’re satisfied with your field mappings.
Step 5: Save, close, and launch your data export from Airtable to Excel!
And that’s it! You’ve just built a flow between Asana and Microsoft Excel. Congratulations!
If you followed the steps above, your flow ill now:
- Automatically create new Microsoft Excel rows based on specific Airtable records
- Keep those rows and records updated in real-time.
If you have any questions, please don’t hesitate to reach out and let us know.

What’s next after exporting from Airtable to Excel?
If you want to know what else you can do with Unito, here’s some inspiration to help you power up your workflows:
- Duplicate this flow to set up similar workflows with any number of Airtable bases.
- Why not learn how to sync Airtable to Google Sheets with Unito?
- Find out how you can sync multiple Airtable bases to each other with Unito.
- Integrate Notion pages with Airtable bases.
- Delegate work or report on tasks between Airtable and Trello or send deals from HubSpot to Airtable.
- Connect Airtable to Azure DevOps or other software development tools.
- Follow a similar guide to sync Trello and Excel, Microsoft Excel with ClickUp, Excel and monday.com, Excel and Wrike, Excel and Google Sheets, and Jira with Excel.
- Learn more about Unito’s Airtable Excel integration.
You can also try out these Airtable templates and sync them with Unito to match your use case: