
How to Sync Trello Cards with Microsoft Excel for Faster Reporting
This step-by-step guide will show you how to import data from specific boards in Trello with Microsoft Excel spreadsheets automatically. To do this, we’ll connect Trello and Excel Online to Unito in order to facilitate and expedite the automated integration that turns new Trello cards into spreadsheet rows whenever new cards are created based on parameters set in Unito.
Note that this can also be used to manage a Trello import from Excel, turning spreadsheet rows into Trello cards.
This automated workflow doesn’t require an IT department or coding knowledge to setup since Unito is designed with a point-and-click interface so anyone can integrate Trello and Excel relatively easily.
It can save you hours of manual input for any type of project report you have in mind so you don’t have to import cards manually. Instead Unito will import cards automatically with two-way live updates whenever changes occur in connected Trello boards or Excel online spreadsheets.
Here’s a demo of Unito’s Microsoft Excel integration
Although Asana’s interface differs from Trello, the same steps and principles apply to syncing tasks to Excel sheets with Unito.
Syncing Trello cards to Microsoft Excel with Unito enables you to automatically:
- Populate a spreadsheet with Trello card details, including: title, member, label, due date, status, description footer, checklist, and custom fields.
- Create new cards in Trello based on Microsoft Excel rows with specified fields.
Put another way, your Microsoft Excel rows will become Trello cards and your columns will become fields.
In this guide:
- Tools: Trello and Microsoft Excel
- Use cases: Task management, project reporting, data migration
- Great for: Data analysts, project managers, stakeholders and executives
Before syncing Trello cards to Microsoft Excel:
- Read Unito’s integration overviews of Trello and Microsoft Excel to better understand the capabilities and limitations of each.
- Install the Unito add-in for Microsoft Excel (explained below).
- Create a header row in your spreadsheet with titles you’ll link to Trello card fields. If you need help getting started, you can use this free Microsoft Excel template we’ve designed.
Add Unito to your Trello Board (optional)
This step is for users who wish to add Unito as a Power-Up to an existing or new board in Trello. You can skip this process if you’ve already installed Unito or you’ve logged in directly to our app. Otherwise, click here if you need help adding Unito as a Trello Power-Up.
Add a header row to your spreadsheet
Unito syncs fields between Trello and Microsoft Excel spreadsheets based on the first row of your spreadsheet. A simple way to do this is to name each column after the fields you’re syncing from Trello (e.g., title, member, description, etc.).
How to install the Unito add-in to Microsoft Excel
Now, go to www.office.com and open Excel Online.
- Then, from your spreadsheet click on File, then Get Add-ins.
- In the next screen click STORE and type Unito into the search box.
- Click Add and follow the on-screen instructions to install the Unito add-in.

Follow the on-screen instructions to add Unito to your Microsoft workspace.
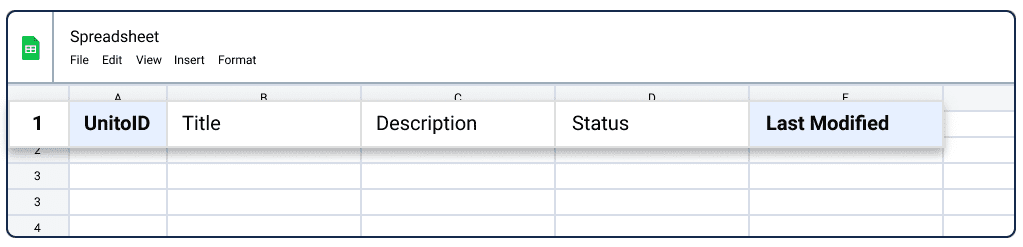
Once the add-in is installed, click Insert the two columns in this sheet.
You’ll see UnitoID and Last Modified. Only columns between those two will sync with Unito. Having them columns in your table header is essential for this integration to function as intended. You can hide them, but don’t delete or modify those columns.
Step 1. Connect Trello and Microsoft Excel with Unito
- Now you can either go to the Unito App and click +Create Flow or continue from your Trello workspace once you’ve added the app.
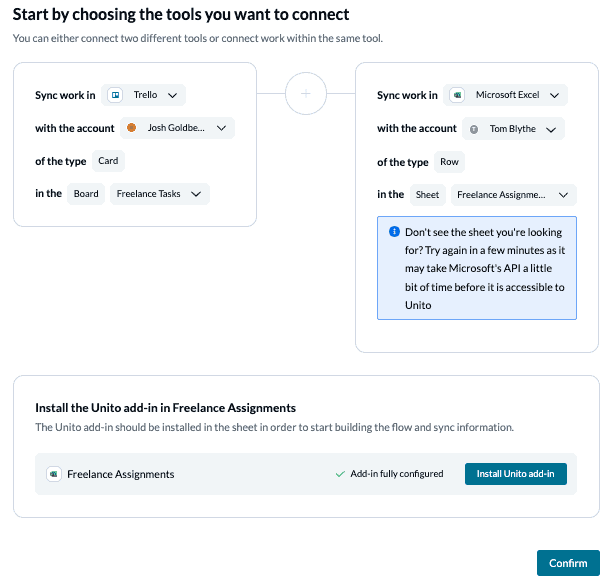
- Click Start Here to connect your tools.
- Select +Add a tool to this flow in either column and connect Trello. Then click +Choose account to specify the Trello account you want to use.
- Pick the Trello board you want to connect to Unito.
- Repeat steps 3 and 4 to connect Microsoft Excel.
- Click Confirm.
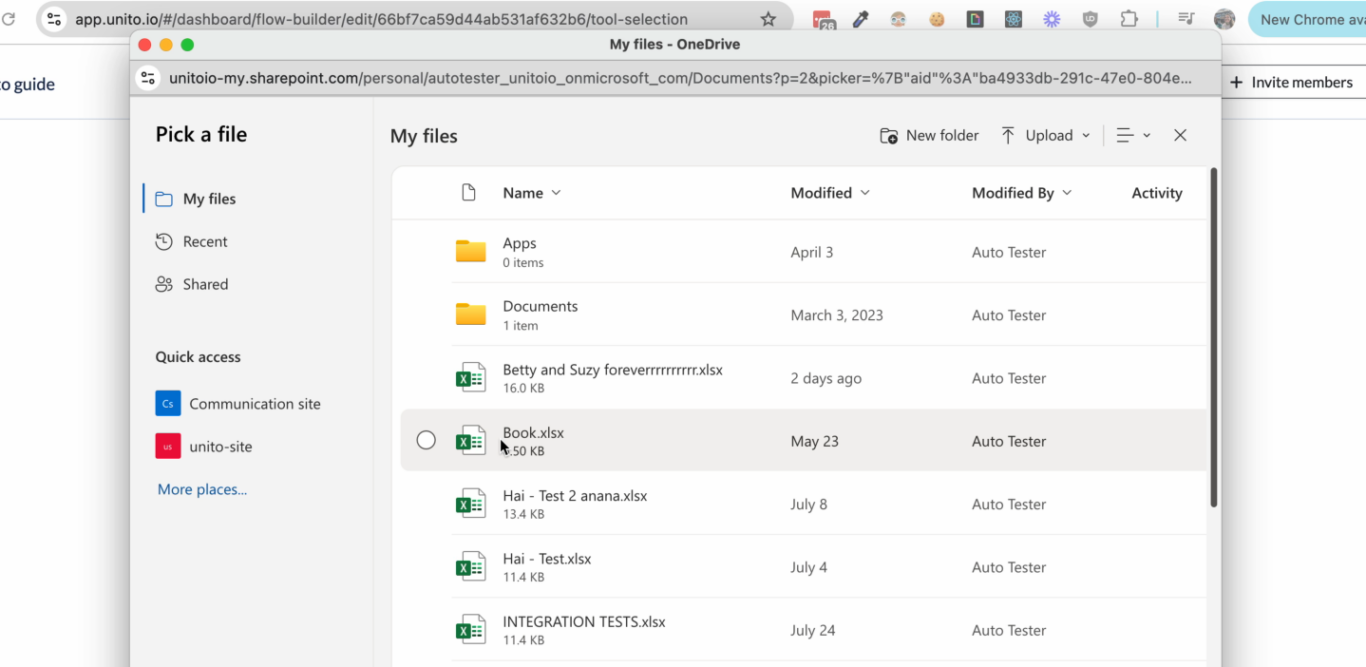
You can pull up your Excel spreadsheet by hitting Select workbook and picking the spreadsheet you want to sync.
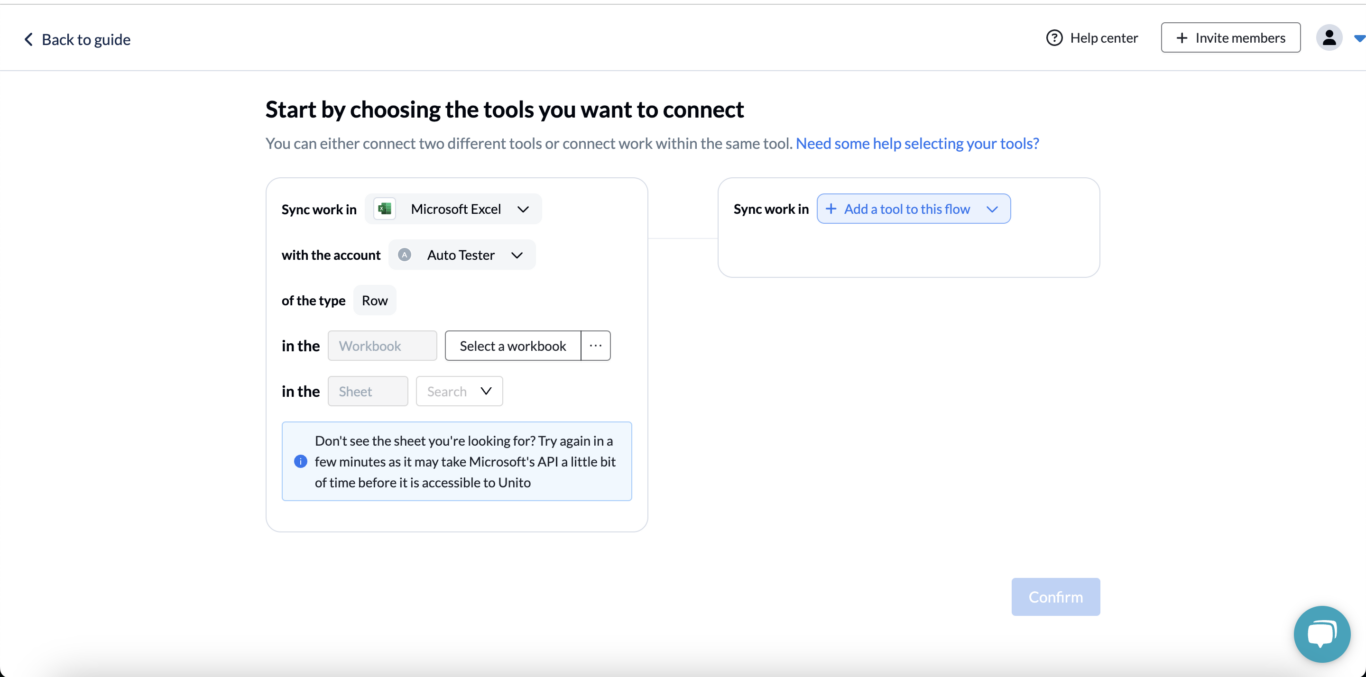
When you’re ready, click Confirm.
Step 2. Choose a flow direction for creating new cards or rows
This step is where you decide whether to import cards into Excel spreadsheets, create Trello cards based on spreadsheet activity or both.
Since our demo use case is about building a report in a spreadsheet to review project data, we’ll choose a one-way flow direction from Trello to Excel spreadsheets.
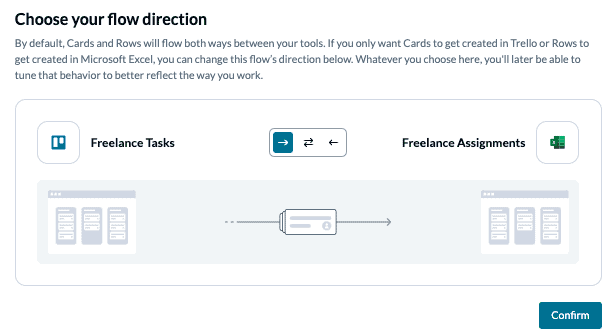
Click Confirm when you’ve chosen a flow direction.
Step 3: Set rules to filter data between Trello and Excel
This step determines how rows and/or Trello card data is created by Unito. The default setting will create work items (cards or rows) in your destination tool based on the source selected in step 2.
For this demo, we’ve told the system to create a matching row in Microsoft Excel for every card in our Trello board with a label matching the names of our freelancers.
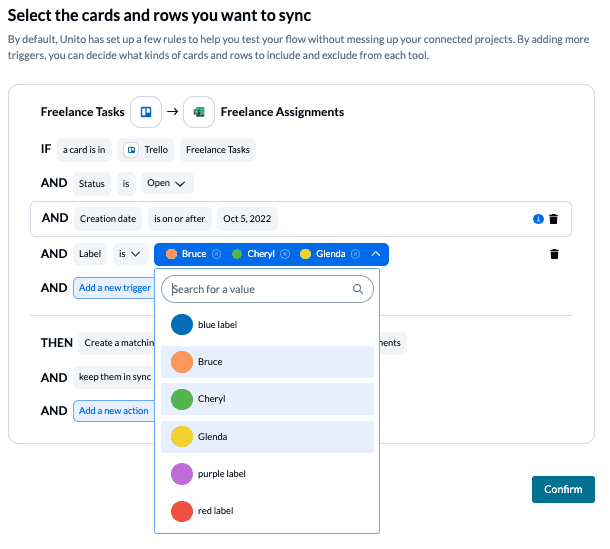
Unito will only sync a new Trello card to Excel unless you remove the “creation date” condition (pictured below). This is a safeguard so you can test your flow before applying it to all your cards or projects.
NOTE: These triggers are intended to help you keep only the most relevant information in sync to avoid oversharing unnecessary details. You can customize your Trello labels to be even more precise about what kind of data is shared with Excel.
Find out more about setting rules.
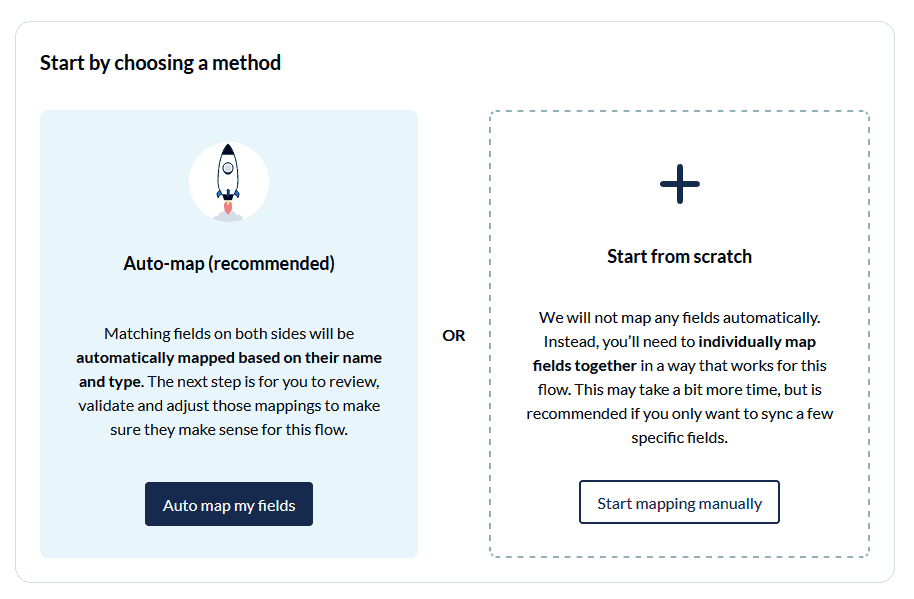
Step 4: Link fields between Excel and Trello
Fields represent the details of your spreadsheet rows and Trello cards. Here you can establish triggers to determine which actions in Trello or Excel tool will generate new cards or cells.
First, you’ll be asked whether you want to set up your field mappings from scratch or let Unito do this automatically. Since we have to name all of our fields in Excel you’ll need to choose the manual option.
Most fields will be automatically mapped for two-way updates, but you can modify each individually if you prefer one-way updates in some cases. For example, you may not want changes in Excel to refresh data in your Trello cards.
Select +Add mapping, then Select a field in both bases to pair the fields together. Here’s a simplified version of our Trello to Excel fields:
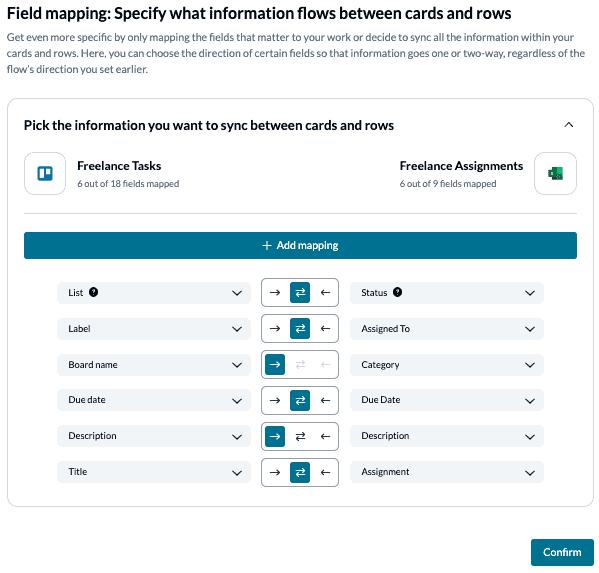
Note: If you change a column name in a synced spreadsheet, be sure to update your flow’s field mappings in Unito or else your data will stop syncing.
Click Confirm when you’re satisfied with your field mappings to proceed.
Find out more about setting field mappings.
Step 5. Launch your Trello Excel Integration
And that’s it! Follow the remaining instructions to complete your flow and it should start syncing momentarily. Congratulations!
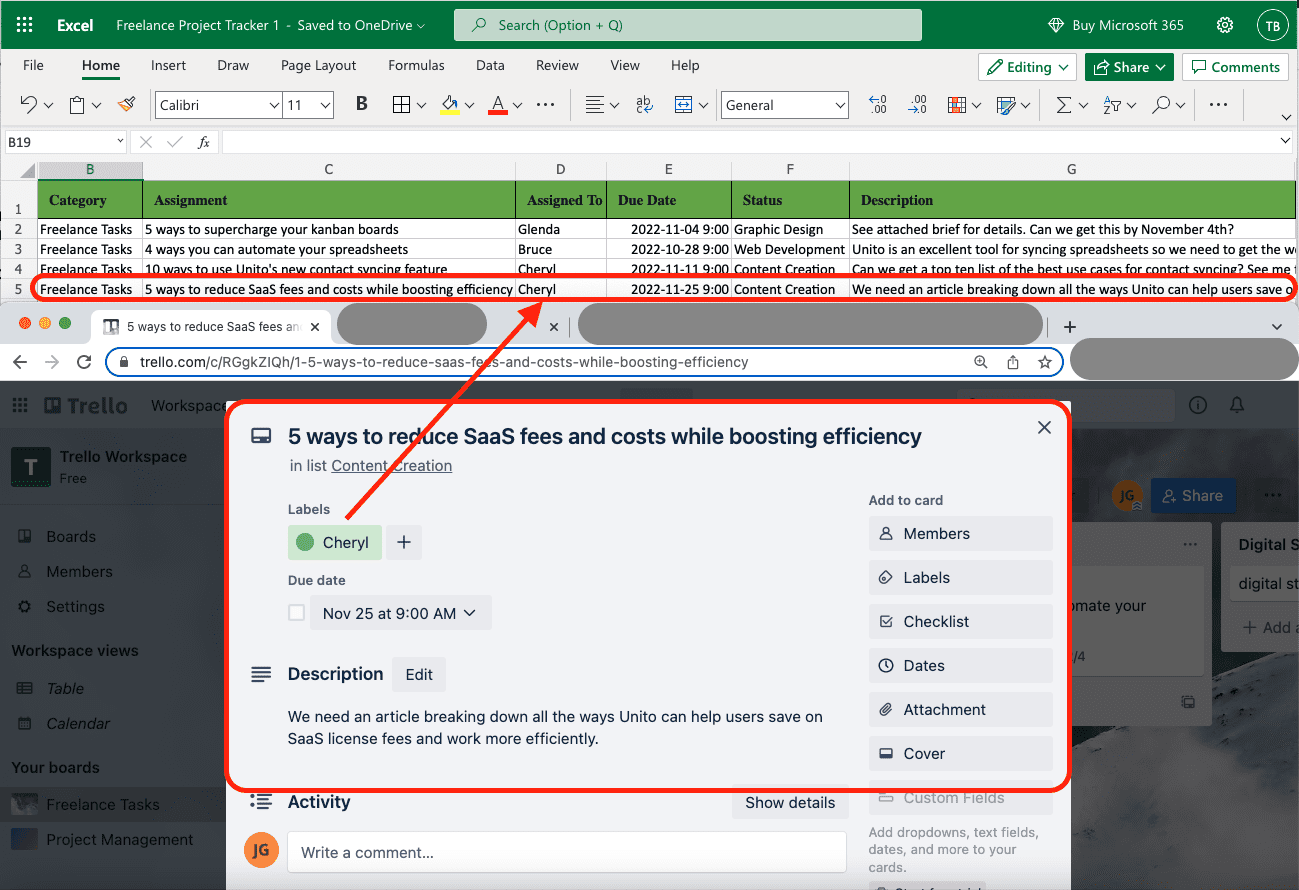
If you’ve followed the steps above, your flow will now create a row in Microsoft Excel whenever a new card is added in your connected Trello boards based on the rules we set in Step 3. Here’s what our synced Excel spreadsheet looked like next to our Trello board:
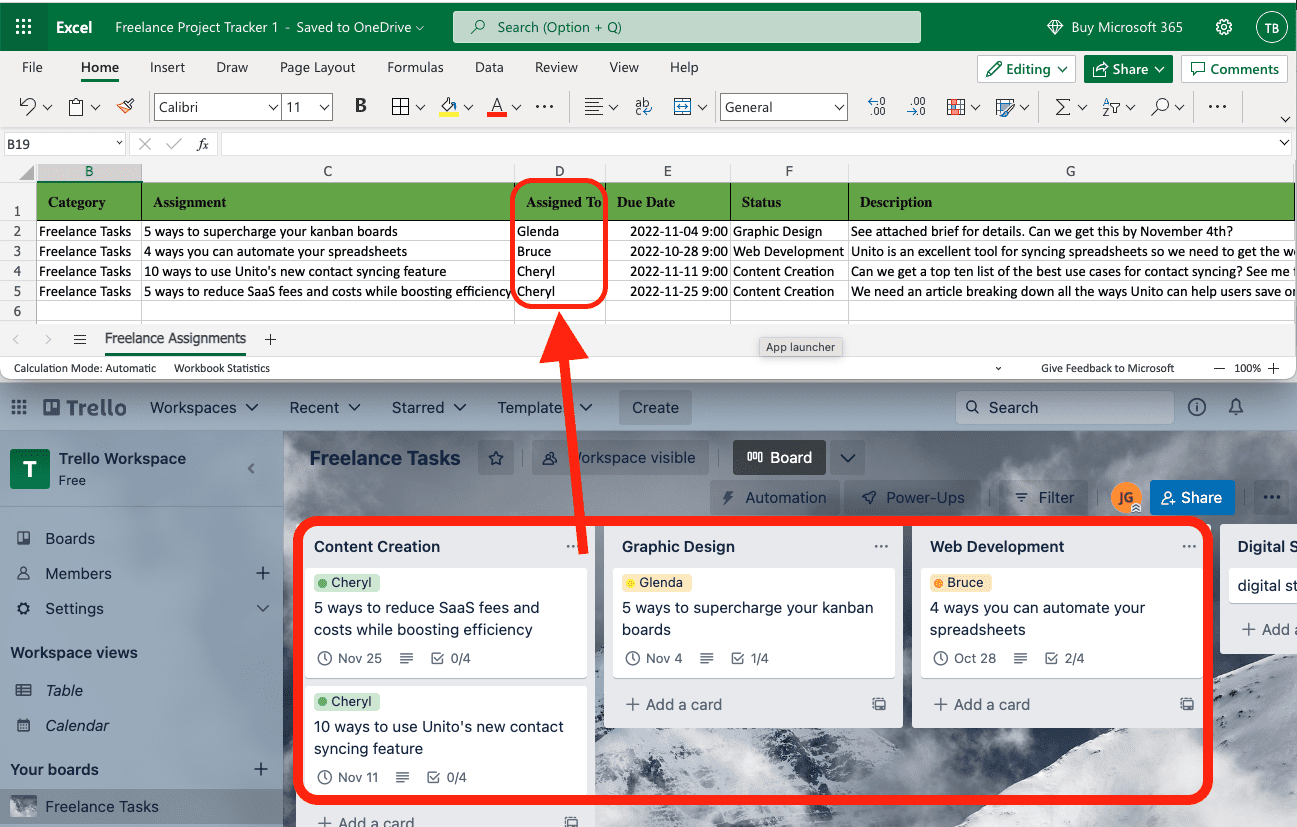
Here’s what our synced spHere’s what our synced spreadsheet looks like after we import cards from Trello:
Frequently Asked Questions about Unito’s Trello Excel Integration
Why connect Trello to Microsoft Excel with Unito?
This automated two-way flow will help you save time that would otherwise be spent copy-pasting key Trello data to or from your Excel sheet. Beyond that the use cases depend on your role and specific reporting needs.
Import Trello cards to Excel files for any reporting or project management use case
The specific use case we’ll demonstrate in our demo below will show you how to review tasks assigned to freelance contractors in Trello from Excel, but it can be easily modified to suit any use case including reporting or project management.
Unito will sync the fields of your Trello cards, including custom fields, into specific columns in your spreadsheet. So you need to decide in advance which columns should contain your card titles, descriptions, lists, labels, due dates, etc. All of these are considered fields in Unito that can be synced to any column you choose.
Examples of Unito use cases for this Trello Excel integration:
- Improved project management workflows with a simplified Trello review process in Excel to review due dates, blockers, progress and other Trello activity
- Build a report for stakeholders
- Share Trello updates with other teams using a simplified, yet flexible Excel spreadsheet
Unito’s Trello Excel integration enables you to take advantage of the flexibility of JSON and the analytical capabilities of pivot tables to seamlessly sync and analyze Trello data from Excel spreadsheets to drive decision-making and enhance productivity.
By connecting Trello data to Microsoft Excel spreadsheets with Unito, you also eliminate the need to jump back and forth between tabs to double-check your data since everything will be automatically kept up-to-date in real-time. As your team updates cards in Trello, your spreadsheet will update itself through Unito.
Can Unito integrate Microsoft Excel and Trello?
Yes! Unito can integrate Excel spreadsheets with Trello through our standalone sync platform, or embedded in Trello with our Board Sync Power-Up. Google Sheets users can also try the new Export & Sync Power-Up to sync card data to spreadsheets quickly and efficiently.
How do I connect my Trello boards to Excel for an automated import?
The steps in the guide above outline the specific process for importing Trello data into Excel. But in brief: connect your Trello board and Excel spreadsheet to Unito, choose a one-way flow direction from Trello to Excel, set rules to filter cards based on your existing label system in Trello, make sure your Trello card fields have matching columns in Excel, and launch your Unito flow. This also allows you to import Excel spreadsheets into Trello.
How do I create an Excel spreadsheet from a specific board in Trello?
Unito can’t create new spreadsheets from Trello, although you can tell Unito to create new Trello boards for your 2-way integrations in the connect tool step. But you’ll have to set up a spreadsheet manually before importing Trello project data automatically with Unito. Just make sure your header row includes the names of each Trello field.
How do I power-up Microsoft Excel in Trello?
Unito’s Board Sync Power-Up enables integrating Microsoft Excel and Trello to link cards with Excel rows for your reporting workflow. Unito also supports Microsoft Excel, Airtable, Notion and many other reporting and database tools.
How do I export all data from Trello to Microsoft Excel?
You can export all data from Trello to Microsoft Excel by setting up one Unito flow per Trello board with the same set of rules to sync them with your spreadsheets. The duplicate flow function makes this process faster and easier than exporting a CSV file.
Can you pull reports from Trello with Unito?
Unito can sync data from Trello cards into Excel spreadsheets to populate existing data, which you can then turn into reports through pivot tables, adding your own formulas, and flexing your spreadsheet muscles! The benefit of Unito is the automatic data transfer from Trello to Excel and real-time 2-way updates as changes are made in either tool.
What can Unito and Trello sync with?
Unito can sync Trello to Microsoft Excel, Outlook, Google Sheets, Asana, Wrike, Airtable, Salesforce, GitHub, GitLab, Azure DevOps, Notion, ClickUp, Google Calendar, Jira and many others. Here’s a full list of Unito’s integrations.
What is JSON and how does it impact my Trello Excel integration with Unito?
JSON (JavaScript Object Notation) is a data interchange format that organizes data in key-value pairs, providing a standardized way to represent and transfer data. In the context of this Trello Excel integration, JSON acts as the bridge, facilitating Unito’s project data sync between boards with Excel spreadsheets.
Can I import Excel into Trello?
Yes. Unito’s integration allows you to push data from Microsoft Excel to Trello and back, with automated updates in both direction. And unlike importing a CSV file manually, you don’t have to worry about working through complicated piles of data to match up information to the Trello fields it needs to populate.
Can I export a Trello board to Excel with a free trial?
Yes, a free Unito trial will allow you to set up a flow between an Excel file and a Trello board, exporting multiple cards in just a few minutes. That being said, as soon as your trial ends, your Unito flow will stop syncing changes between both tools unless you get a paid plan. This could lead to problems if your teams rely on that data, since it’ll quickly get outdated.
What’s next after importing Trello data into Excel spreadsheets?
- Duplicate this flow to sync cards from other boards or rows from other spreadsheets
- Read about our internal Trello – Google Sheets use case.
- Learn how to sync custom fields to your Trello workflow
- Follow a similar guide to sync ClickUp and Excel, Microsoft Excel with Airtable, Excel and monday.com, Excel and Wrike, Excel and Google Sheets, and Jira with Excel.
- Or follow our guides to:
- Sync cards between multiple Trello boards
- Sync Trello cards with Slack messages
- Sync Trello with Google Calendar
- Connect Trello to Google Sheets
- Sync monday.com and Trello
- Export Google Forms to Trello
- Link Azure DevOps work items with Trello Cards
- Connect Trello and Confluence
- Sync Microsoft Outlook calendar events to Trello
- Sync HubSpot and Trello or Salesforce and Trello
- Connect Wrike and Trello or Asana and Trello
- Sync Trello to Airtable or Trello to Jira
- Sync GitHub issues to Trello cards
- Connect Trello to a Notion Database
- Connect Smartsheet and Asana
- Sync Smartsheet to Jira Cloud
- Sync Trello and Smartsheet