How To Quickly Export Trello Cards to Google Sheets With 2-Way Updates
These step-by-step instructions will show you how to connect Trello with Google Sheets through Unito in order to sync cards to spreadsheet rows. This simple 2-way integration will help you streamline project management, reporting, and data tracking by aligning key information from your Trello board(s) to a spreadsheet.
Whether you’re trying to sync new or historical (existing) Trello cards, you’ll learn how to automatically translate them into organized data in Google Sheets.
Note: If you’re looking for information about Unito’s Export & Sync Power-Up, visit this article instead.
In this guide:
Feel free to skip ahead if you’ve already started building your Trello – Google Sheets flow.
- Tools: Trello and Google Sheets
- Use cases: Task management, project reporting, data migration
- Great for: Data analysts, project managers, stakeholders and executives
How do Trello cards become rows in Google Sheets?
You’ll tell Unito which Trello fields to sync to Google Sheets and associate them with columns. That means you need to set up a table header (the first row) in Google Sheets with names for each column to pair with your Trello fields.
The names don’t have to be the same, you just need to know which columns you want to match with fields in Trello (e.g., title, description, member etc.)
When you sync Trello to Google Sheets with Unito, your rows will represent Trello cards and your columns will represent fields (e.g., card title, member, labels, etc.).
Before we export Trello cards to Google Sheets rows:
- Copy this free Google Sheets template designed with Trello in mind.
- Install the Unito add-on for Google Sheets, Unito Spreadsheet Sync
- Set up a row header in your spreadsheet with the fields you wish to sync from Trello. Here’s a list of all Trello fields supported by Unito.
Add Unito to your Trello Board (optional)
This step is for users who wish to add Unito as a Power-Up to an existing Trello board. You can skip this process if you’ve already installed Unito or you’ve logged in directly to our app.
Otherwise, click here if you need help adding Unito as a Trello Power-Up. Just don’t forget to come back to this guide!
Install the Unito Spreadsheet Sync Extension
From the Google Workspace Marketplace you can install Unito Spreadsheet Sync, a necessary Google Sheets add-on, in order to sync your spreadsheets with Trello.
If you need help setting it up, follow these instructions:
How to install Unito Spreadsheet Sync in your Google Workspace
Install Unito Spreadsheet Sync in order to connect your spreadsheet to Trello.
You can find more detailed steps on this process here.
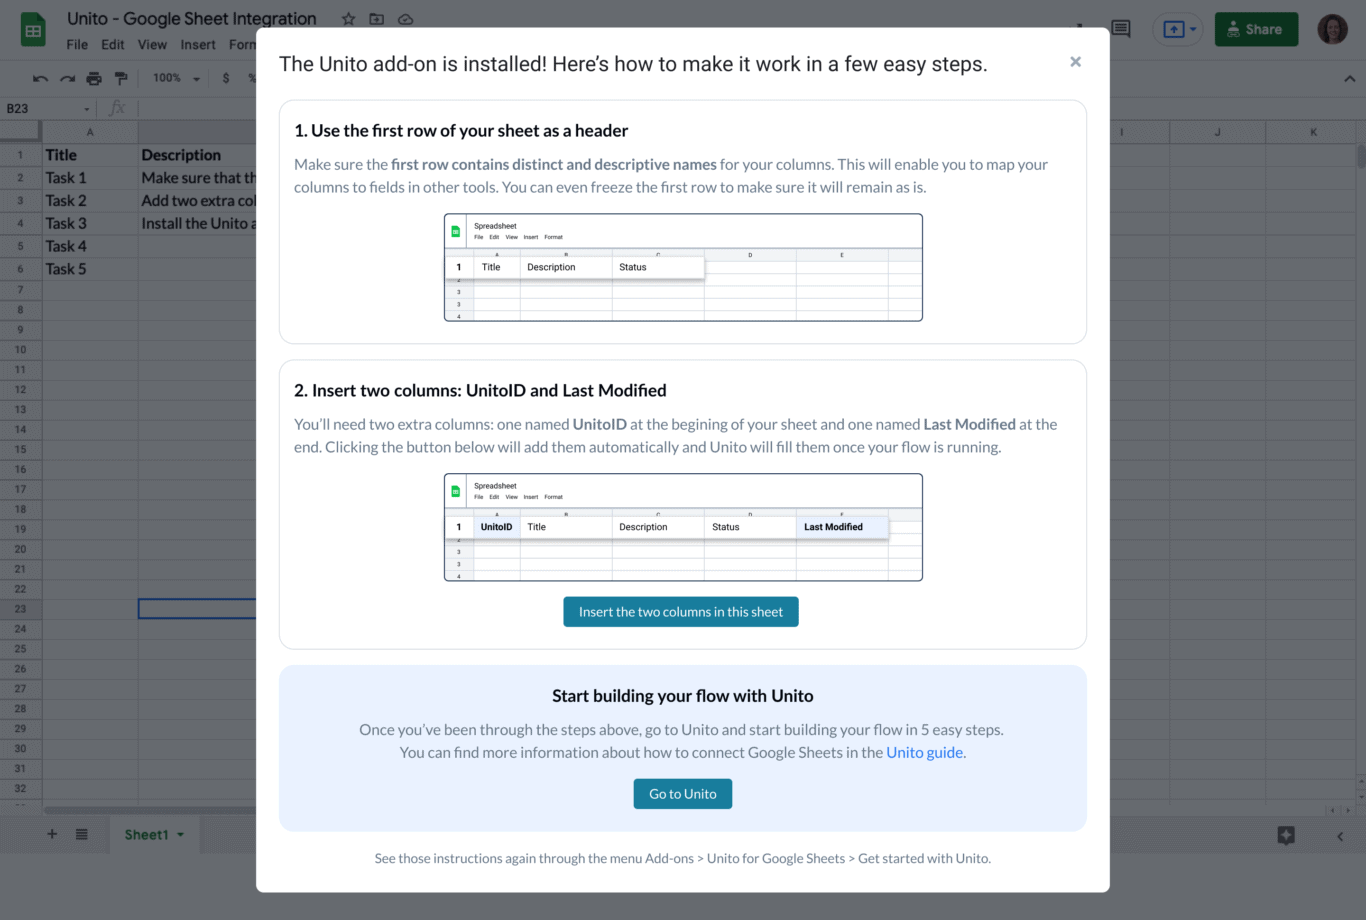
When you’re ready, select the Unito add-on, then Open Unito, and Insert the two columns in this sheet.
Whether you do this automatically or manually, the first and last rows in your spreadsheet must be titled: “UnitoID” and “Last Modified”. Only data between those two columns will sync with Unito.
Add a header row to Google Sheets
Your Trello card fields (attachment, description, due date, etc.) will be linked to Google Sheets columns through the header row.
IMPORTANT: Unito’s Spreadsheet Sync add-on for Google Sheets will create two additional columns labeled: “UnitoID” and “Last Modified”. Only data between those two columns will sync with Unito.
Don’t delete or modify these columns! You can hide them, but if they’re removed from an active spreadsheet, your data will stop syncing.
Why do I need a header row to sync data to Google Sheets? (click to expand)

How to auto-populate your header row
Unito Spreadsheet Sync now allows you to automatically populate a header row in a blank spreadsheet by selecting import from Unito Spreadsheet Sync.
After you insert two columns into a blank sheet, click Create Flow from within Unito Spreadsheet Sync and Import data from the tool of your choice. When you create a flow this way, you’ll be given an option to auto-populate your row header.

If you haven’t figured out what kind of data you want to sync to your spreadsheet, we created this Google Sheets template you can use to get started.
Step 1. Connect Trello and Google Sheets to Unito
- Navigate to the Unito App and select +Create Flow.
- Next, select Start Here to connect Trello and Google Sheets.
- Choose the accounts you want connected to Unito.
- Then, select the Trello board and Google Sheet you want to sync.
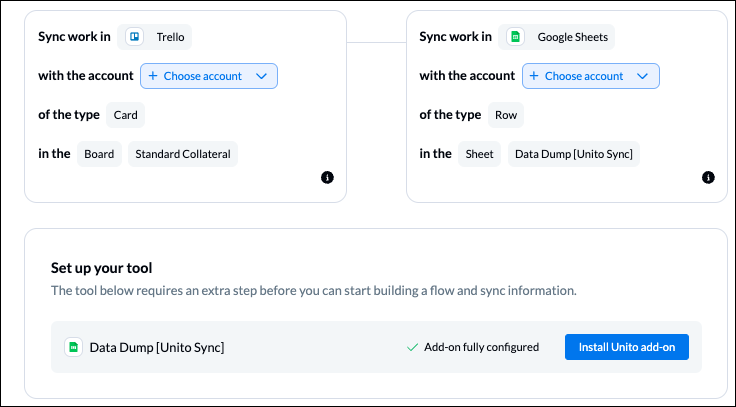
If you haven’t yet installed Unito Spreadsheet Sync, you’ll be prompted to do so at this stage. You can get the extension from the Google Workspace Marketplace.
(optional) Set a date/time format for your spreadsheet
You can adjust the date-time format in your spreadsheet to any format you wish.
- Open your sheet and select the column with your dates.
- Then click Format > Number > Custom date and time.
- From there you can choose the format you wish and apply it to all the cells in your date columns.
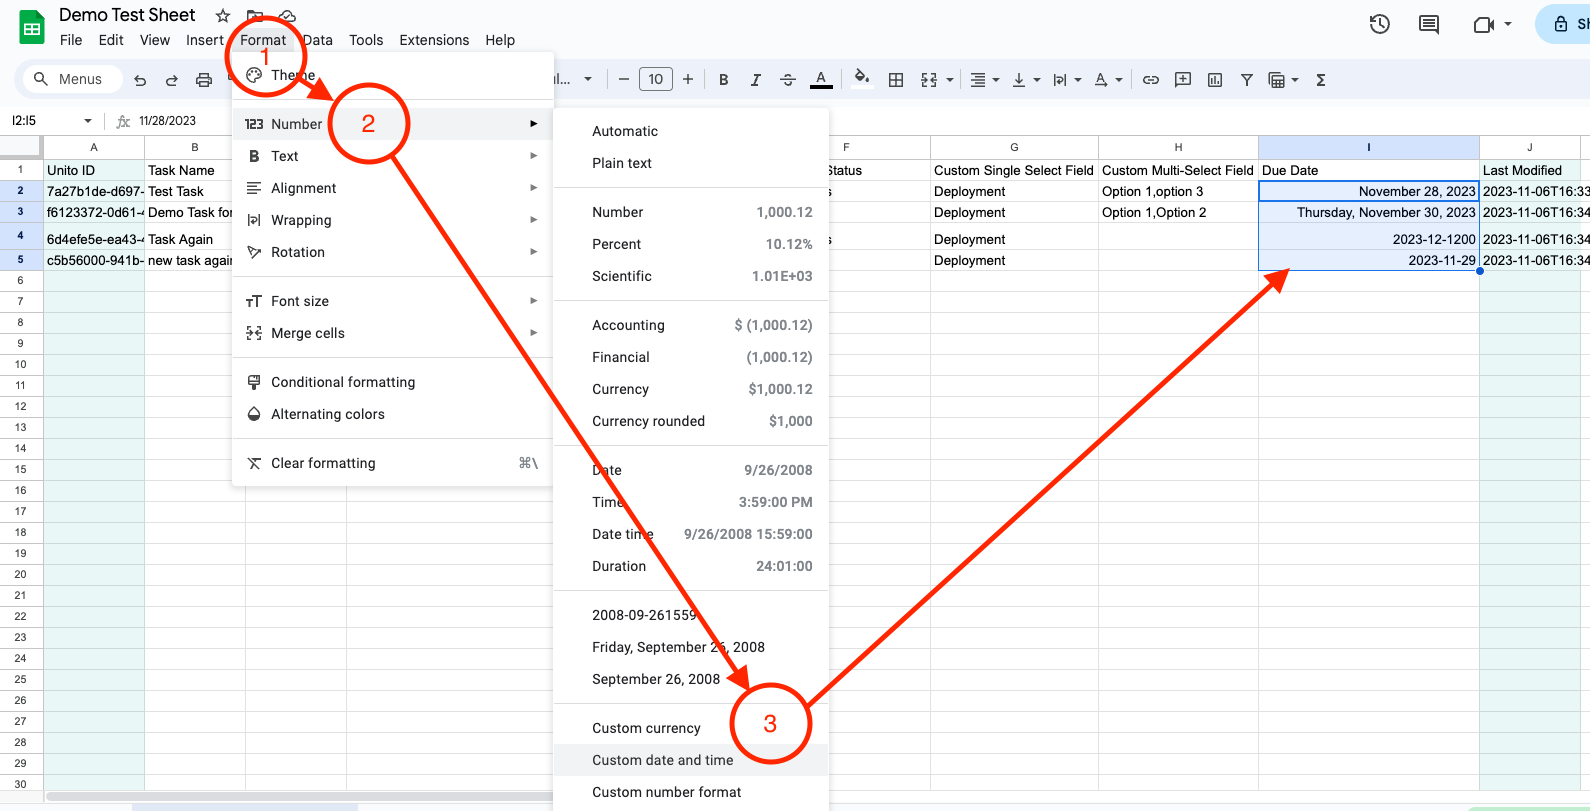
When you’re ready, click Confirm.
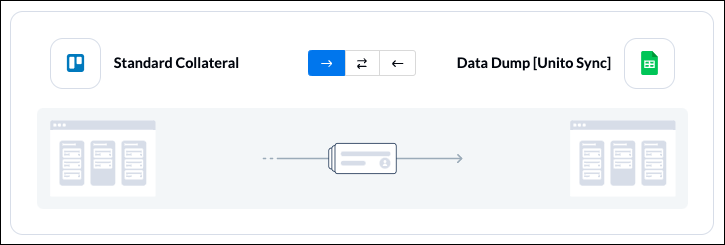
Step 2. Choose a flow direction for creating rows or Trello cards automatically
Flow direction determines how new rows or cards are created but not modified. We’ll determine how cards and rows will be modified later on.
NOTE: Here’s a breakdown of each option:
- One-way from Trello to Google Sheets: cards created in your Trello Board will appear as new rows in the connected sheet, but not vice versa.
- One-way from Google Sheets to Trello: Rows created in your connected sheet will appear as new cards in your Trello board, but not vice versa.
- Two-way sync: Any new sheet rows or cards created in their respective tools will appear in the other (rows as cards, and cards as rows).
Click Confirm when you’ve chosen a flow direction.
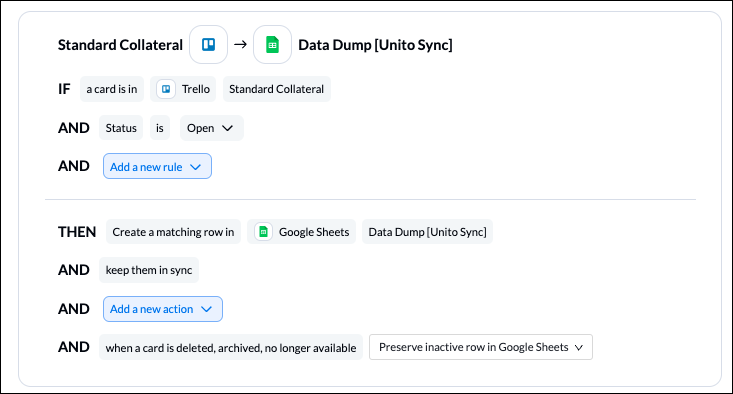
Step 3. Pick rules to filter data between Trello and Google Sheets
Now we can set up rules to determine which trigger events will send data between our tools.
Select Add a new trigger to establish your rules for each directional flow.
NOTE: These triggers are intended to help you keep only the most relevant information in sync to avoid oversharing unnecessary details. There can be a lot of variability here that will depend on your particular needs and tool setup. By customizing your Trello labels, you can be even more precise about what kind of data is shared with Google Sheets.
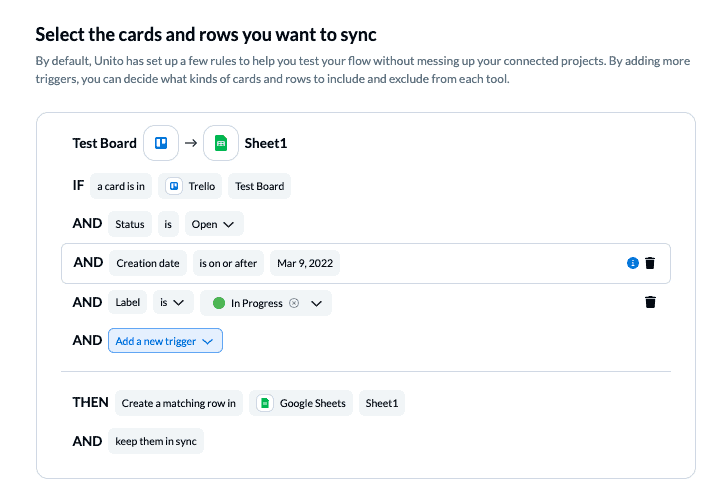
For this demo, we’ve told the system to create a matching row in Google Sheets for every card in our Trello board with a green label which we’ve named “in progress” that was created after our chosen date.
If you select the trash bin icon beside a rule, you can remove it from your flow.
Find out more about setting rules.
Step 4. Link fields between Google Sheets and Trello
When you sync Trello cards to Google Sheets, Unito will “map” them to columns in your spreadsheet. That’s why you need a header row.
If you’re using a new spreadsheet that doesn’t already have a header row, Unito will auto-populate the header row with Trello fields, otherwise you’ll have to create the header row manually.
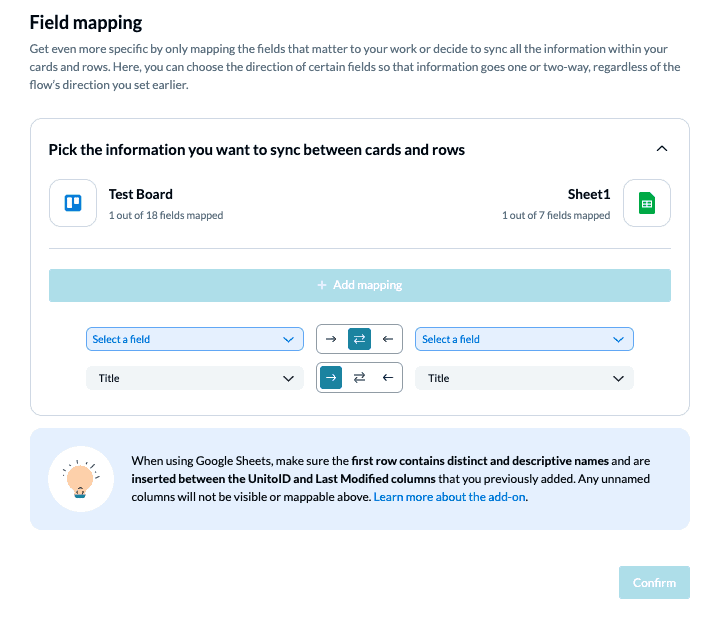
Click +Add mapping to create a new pair of linked fields, then click Select a field for each tool, and find the appropriate field to map. See below for an example:
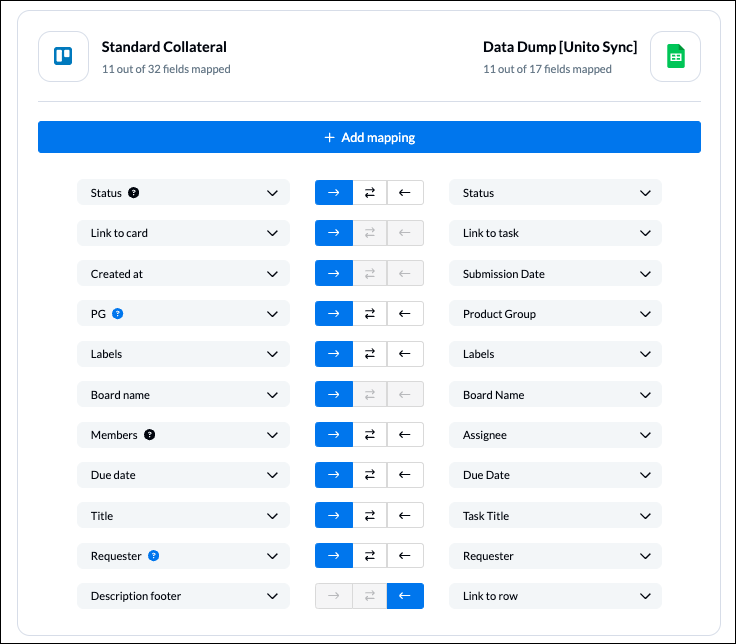
Click Confirm when you’re satisfied with your field mappings to proceed.
Note: If you change a column name in a synced spreadsheet, be sure to update your flow’s field mappings in Unito or else your data will stop syncing.
Find out more about setting field mappings.
Step 5. Launch your connected Trello Google Sheets integration
If you’ve followed the steps above, your flow will now create a row in Google Sheets whenever a new card is added in Trello based on the rules we set up.
If you have any questions, don’t hesitate to reach out and let us know.
Learn more about this flow:
Read our overviews of Trello and Google Sheets to better understand the limits and capabilities of each.
Read about our internal Trello – Google Sheets use case.
What can you do after syncing Trello and Google Sheets?
- Populate a spreadsheet with Trello card details, including: title, member, label, due date, status, description footer, checklists, and custom fields.
- Create new cards in Trello based on Google Sheets rows with specified fields.
Unito’s integrations are all code-free, meaning you don’t need a dedicated IT team or professional services to implement anything. You can do it all yourself just by following this guide.
Syncing cards to rows will save valuable time by eliminating manual input for business and data reporting, project management, customer tracking and more. You can even set rules to tell Unito which cards should (or should not) become spreadsheet rows.
Frequently Asked Questions about Unito’s Trello Google Sheets Integration
Why export Trello cards to Google Sheets with Unito?
This setup not only saves significant time by eliminating manual data entry but also enhances your business reporting, project management, and customer tracking processes. We’ll also show you how to create custom rules based on Trello fields – like labels or assignees – to control which cards get synced. And while we focus on Trello and Google Sheets here, the same principles apply to other Unito integrations with spreadsheet tools.
Review project progress, report to stakeholders or share updates
There are a number of valuable use cases for this workflow: you can use it to review project progress from your spreadsheet, build a report for stakeholders, or simply share Trello updates with other teams using a simplified, yet flexible Google Sheet.
Automating this process saves you the time it takes to manually copy and paste card details into your sheet. By connecting Trello and Google Sheets with Unito, you eliminate the need to jump back and forth between tabs to double-check your data since everything will be automatically kept up-to-date in real-time.
Can Unito integrate Trello with Google Sheets?
Yes! Unito can integrate Google Sheets with Trello through our standalone sync platform, or embedded in Trello with our Board Sync Power-Up or the new Export & Sync Power-Up to sync card data to spreadsheets in just a few clicks!
How do I sync my Trello boards?
If you’d like to connect Trello boards together with Unito, simply follow the steps in this integration walkthrough for Trello users.
How do I create a spreadsheet from Trello?
Unito can’t create new spreadsheets from Trello, although you can tell Unito to create new Trello boards for your 2-way integrations in the connect tool step. But you’ll have to set up a spreadsheet manually before importing Trello project data automatically with Unito. Just make sure your header row includes the names of each Trello field.
How do I power-up E in Trello?
Unito’s Board Sync Power-Up enables integrating Google Sheets and Trello to link cards with Google Sheets rows for your reporting workflow. Unito also supports Microsoft Excel, Airtable, Notion and many other reporting and database tools.
How do I import data from Trello to Google Sheets?
You can integrate Google Sheets and Trello to Unito with the steps outlined above. A Unito flow is able to automatically keep spreadsheets up-to-date with the latest data from Trello with individual cards synced to spreadsheet rows. The easiest method for importing data from entire Trello boards to Google Sheets is with the Export & Sync Trello Power-Up.
What can Unito and Trello sync with?
Unito can sync Trello to Google Sheets, Microsoft Excel, Outlook, Asana, Wrike, Airtable, Salesforce, GitHub, GitLab, Azure DevOps, Notion, ClickUp, Google Calendar, Jira and many others. Here’s a full list of Unito’s integrations.
What’s next after syncing Google Sheets and Trello?
- Duplicate this flow to sync cards from other boards or rows from other spreadsheets
- Sync GA4 data to Google Sheets
- Learn how to sync custom fields to your Trello workflow
- Learn how to create an effective marketing dashboard in Google Analytics 4
- Try Unito’s Export & Sync Power-Up to do this in just one click!
- Or follow our guides to:
- Sync cards between multiple Trello boards
- Sync Trello cards with Slack messages
- Sync Trello with Google Calendar
- Connect Trello and Excel
- Sync monday.com and Trello
- Export Google Forms to Trello
- Link Azure DevOps work items with Trello Cards
- Connect Trello and Confluence
- Sync Microsoft Outlook calendar events to Trello
- Sync HubSpot and Trello or Salesforce and Trello
- Connect Wrike and Trello or Asana and Trello
- Sync Trello to Airtable or Trello to Jira
- Sync GitHub issues to Trello cards
- Connect Trello to a Notion Database