How to Quickly Sync Trello Cards Between Multiple Boards with 2-Way Updates
This walkthrough details the steps required to link, or sync, Trello cards between multiple boards, Trello workspaces and accounts with automated 2-way updates. You can use it to create new Trello cards in one board linked to existing cards in another, and enable automated updates at each end.
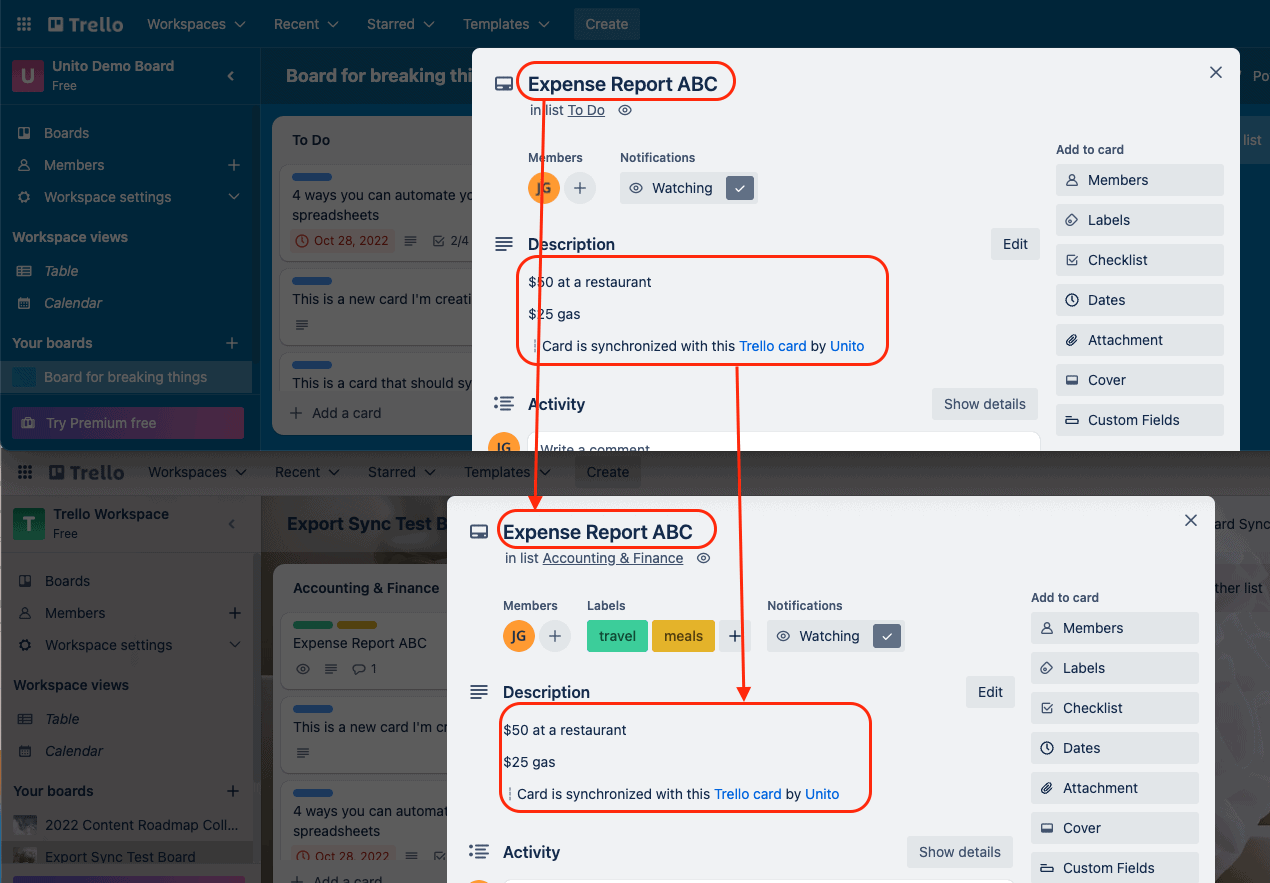
Once two linked cards are connected, any manual changes you make to one will automatically appear in the other. Features of this workflow include: real-time 2-way sync, automated updates, and a no-code set up that anyone can put together in minutes.
In this guide:
- Tool: Trello
- Use cases: Task management, project reporting, marketing reporting
- Great for: Project managers, consultants, marketers
How can I sync Trello cards between boards?
This guide covers how to link cards in Trello with Unito, a platform that has produced some of the most popular Trello Power-Ups available, including several frequent Trello staff picks.
Browse Unito’s collection of Trello Power-Ups (click to expand)
First you’ll need to decide how many cards you might end up syncing each month. If you’re working with a few dozen cards, you should start with Unito’s 2-Way Card Mirroring Power-Up. It’s great for quickly duplicating individual cards at the push of a button from one Board to another.
But, if you’re working with hundreds or thousands of Trello cards at scale, you’ll definitely prefer using Unito’s Board Sync Power-Up.
There can be a lot of flexibility in how you link cards, so this guide will cover the broadest use case with Board Sync.
Before syncing Trello cards between boards with Unito
Make sure you have access to each Trello workspace you’d like to connect to Unito with permission to access and modify cards in your boards. We recommend only having a single Trello account set up each flow, so make sure that user is a member of each board you plan on syncing.
Click here if you need help adding Unito as a Trello Power-Up. Just don’t forget to come back to our guide!
Step 1. Connect your Trello account and boards to Unito
- Sign up for Unito if you haven’t already!
- Navigate to the Unito App or open Board Sync and select +Create Flow.
- Click Start Here.
- +Add a tool to this flow, then select your Trello account and boards.
- Note: We recommend only using one Trello account in your flow. Make that user a member of each Trello board and workspace you plan on syncing.
- Select Trello boards to keep in sync.

When you’re ready to continue, click Confirm.
Here’s more information about connecting tools to Unito for the first time.
Step 2. Tell Unito where to create and sync new Trello cards
Next, you’ll set a flow direction to determine how new Trello cards are automatically generated by Unito.
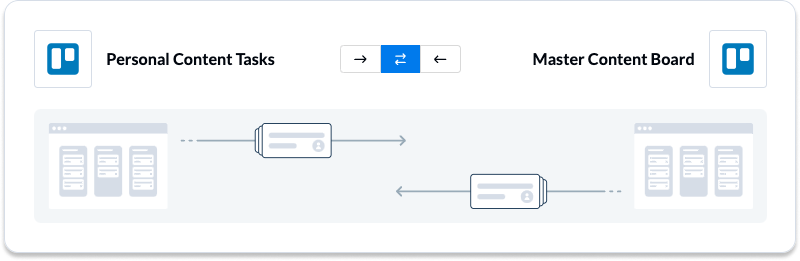
Here’s a breakdown of each flow direction:
- One-way flow: only cards created in the source Trello board will appear in the destination Trello board.
- Two-way flow: cards created in either Trello board will appear in the other.
Select Confirm when you’ve chosen a flow direction.
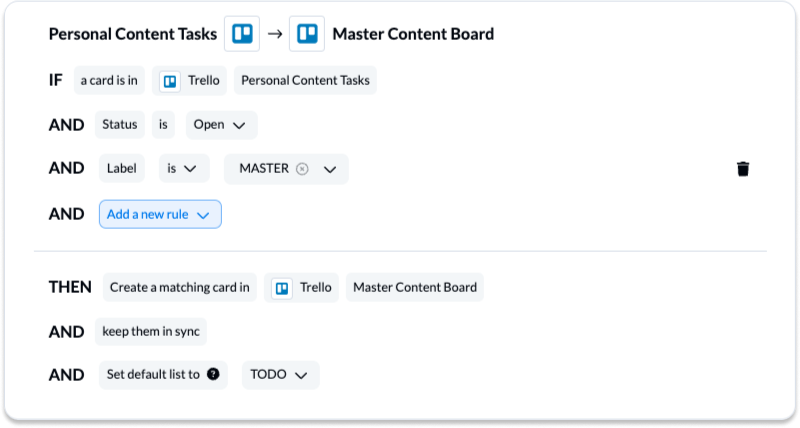
Step 3. Set rules to exclude any Trello cards from syncing
Next, we’ll set rules to determine which triggers will create new cards in our Trello boards.
Rules allow you to exclude specific Trello cards from syncing. By default, Unito will sync all cards created after you launch your flow. You can sync older Trello cards by removing the creation date filter from your flow.
What are Unito’s default rules?
Select Add a new rule to set rules for each directional flow.
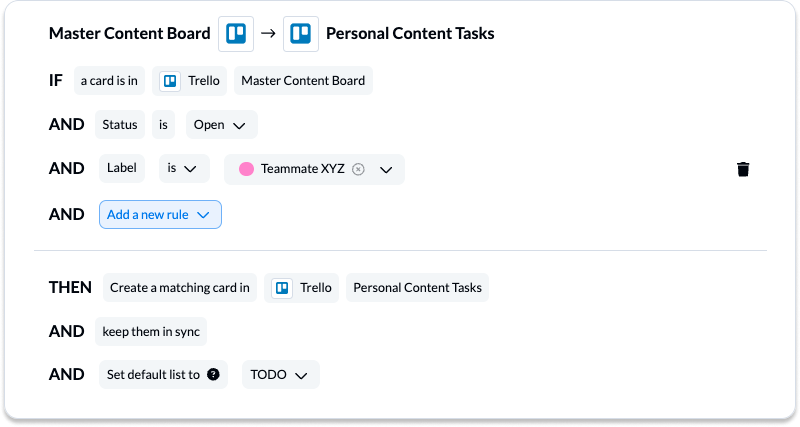
If you chose a 2-way flow direction, you’ll need to set rules for each direction.
Select Confirm to proceed.
Find out more about setting rules.
Step 4. Link card fields between Trello boards
Fields are the details of your Trello cards: members, comments, attachments, due dates, etc. The field mapping table shows you the relationship between fields in each Trello board as well as how updates will sync in real-time: from one board to another in single direction, or 2-ways.
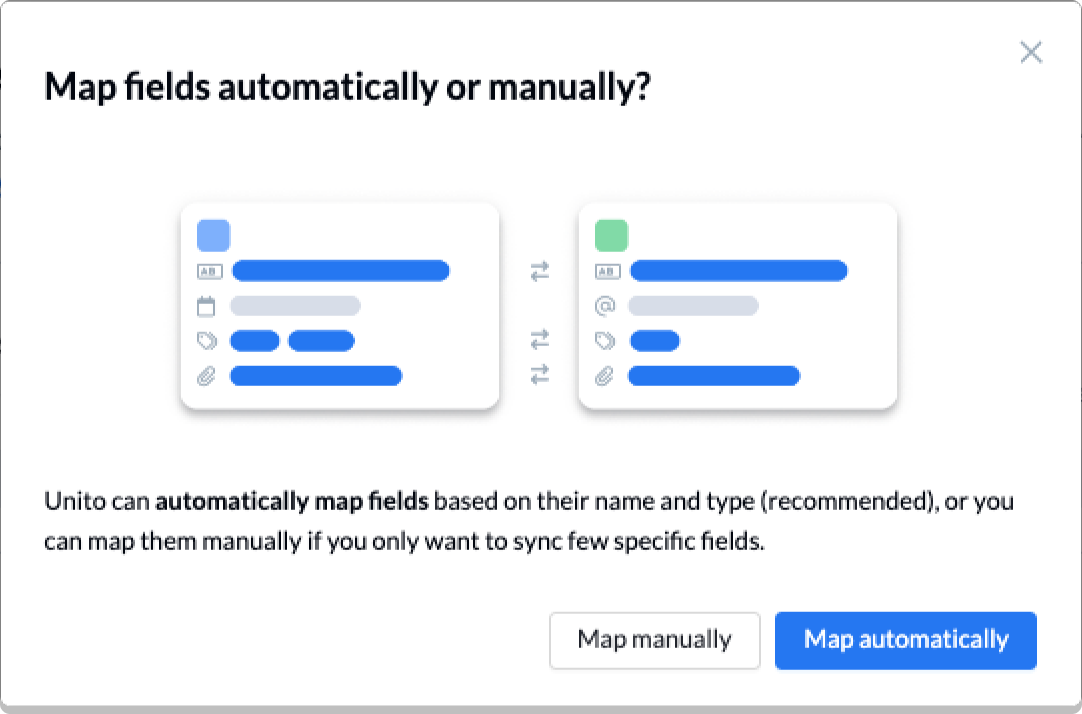
First, you can either map fields automatically or manually. If you choose automated mapping, you’ll begin with a pre-built template that you can easily modify.
Next, select + Add mapping to sync additional fields. Then, click Select a field.
Here is our demo’s completed set of field mappings:
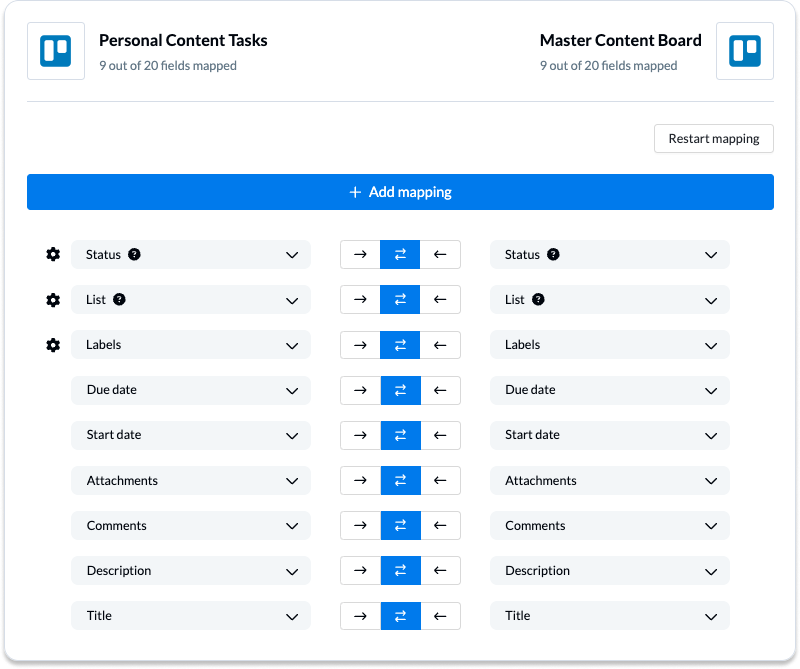
After you’ve chosen a field in the first board, Unito will suggest compatible matches in the second after you click on the drop-down menu.
Configuring Trello lists and labels in Unito
Select the gear icon beside a field lets you further customize your flow. For example, you can link labels together so that Unito knows they’re related:
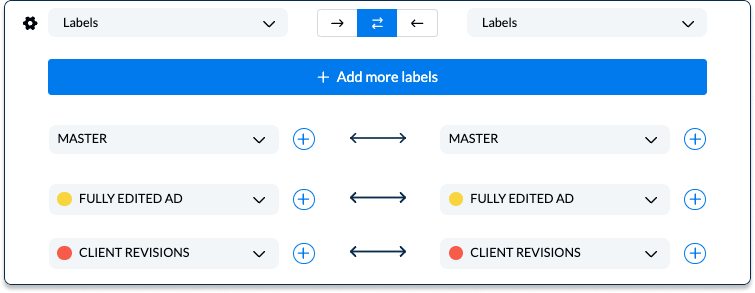
If your labels aren’t related however (if one board uses labels to explain the state of that card, while another uses labels to identify a location, person, or department) we recommend removing that field from your flow.
Here’s a look at mapped Trello lists in Unito:
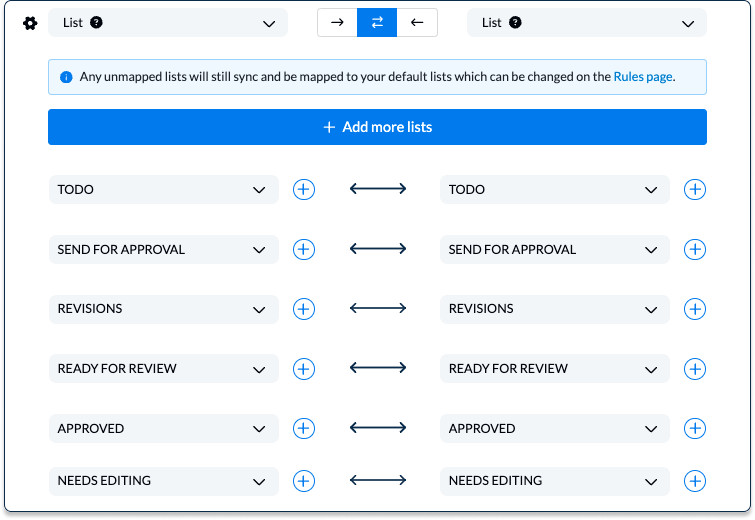
Each of those pairs must be set manually if they’re named differently. Align them in a 1:1 relationship (e.g., Approved to Approved in the example above) if the fields represent the same information. Again, if they don’t (so in this example, if one of the Trello lists served a completely different purpose), you’d want to remove that field from your flow.
Note: If you don’t configure field mappings in Unito, your flow will refer to the default rules when creating new cards automatically.
Hit Confirm to proceed.
Find out more about field mappings.
Launch your Trello Trello 2-way integration
And that’s it! You’ve just completed our quick-start walkthrough to sync Trello cards between boards and lists. Your linked Trello cards will now update automatically in real-time as you work. Congratulations!
By following the steps above, you should now be able to sync cards from one Trello board to a master board. You can also duplicate this flow to sync other boards to your master board with Unito.
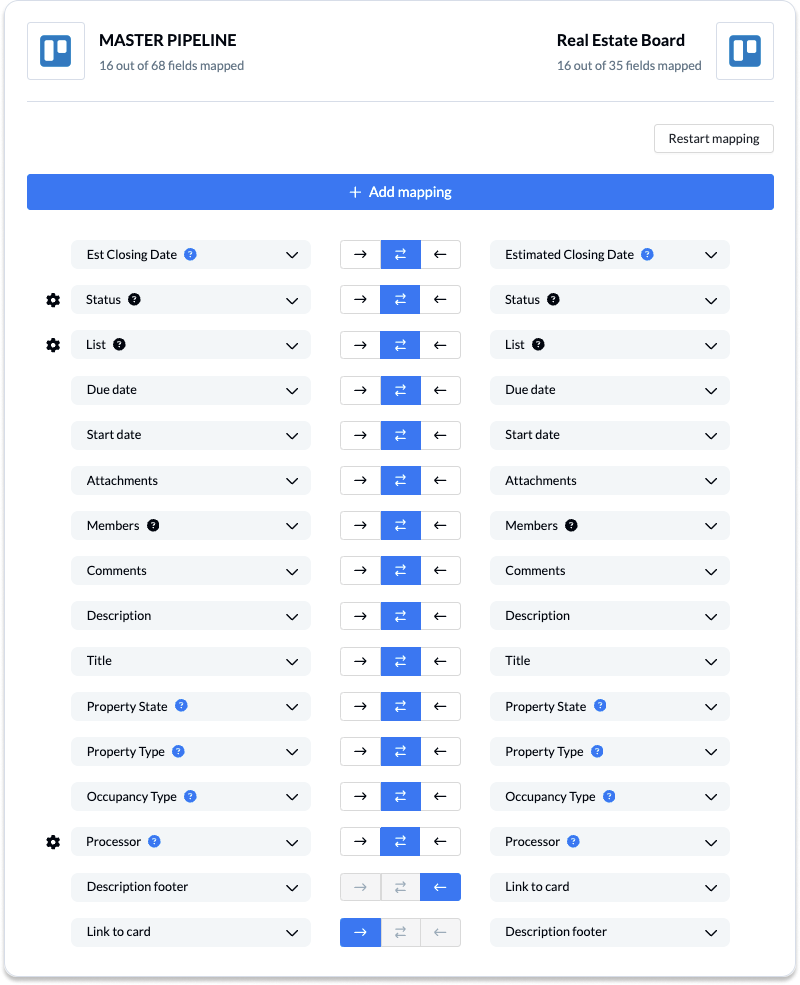
A look at advanced field mapping tables:
Here are a few examples of some advanced field mapping tables put together by some Unito power users:
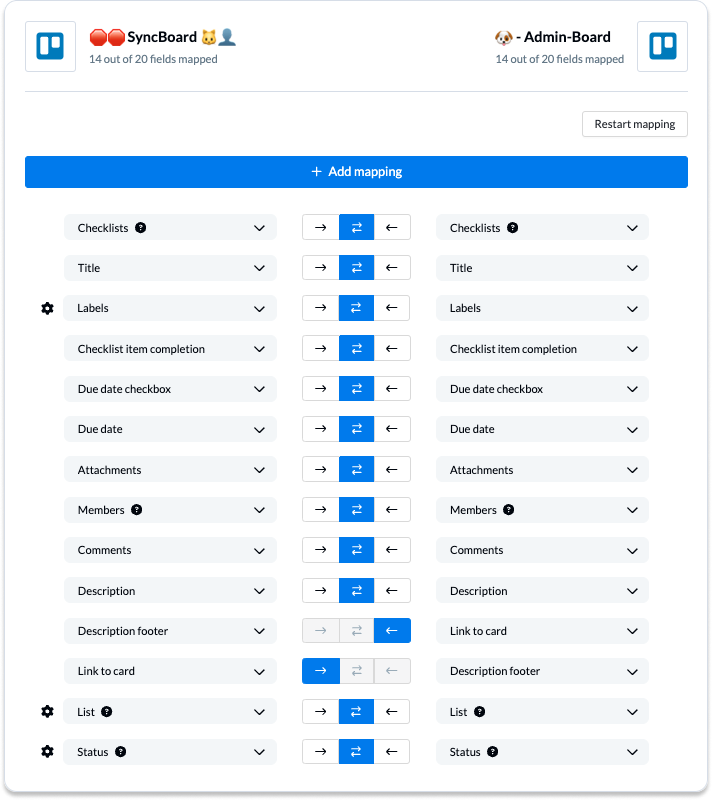
Here’s another example from a Trello power user who set up a master board with Unito:
If you have any questions, don’t hesitate to reach out to Unito’s support team and let us know.
Additional Unito resources for Trello users
- Duplicate this flow to sync cards from other boards.
- Learn how to sync custom fields to your Trello workflow
- Browse our support documentation for Unito’s Trello integration.
- Learn how to sync Trello cards with other industry-leading tools or follow our guides to:
- Sync Trello cards with Slack messages
- Sync Trello with Google Calendar or Trello to Notion
- Connect Trello to Google Sheets or Trello and Excel
- Sync monday.com and Trello
- Export Google Forms to Trello
- Link Azure DevOps work items with Trello Cards
- Connect Trello and Confluence
- Sync Microsoft Outlook calendar events to Trello
- Sync HubSpot and Trello or Salesforce and Trello
- Connect Wrike and Trello or Asana and Trello
- Sync Trello to Airtable or Trello to Jira
- Sync GitHub issues to Trello cards
Tips and tricks for optimizing your Trello integration with Unito
Plan out your use case for syncing Trello cards between boards
The goal of the demo flow outlined in this article is to create a two-way link between Trello cards across lists and boards that syncs relevant information between them.
Do more with a Trello Hub Board:
Create a Trello Hub Board for an even more expansive and sophisticated Trello setup. A hub board takes in cards from many other boards and then re-distributes them to a select few.
Think of it as an automated delegation and oversight support tool. Cards come in from, say, project boards for a department, and then go out to individual contributors. One example could be to take in graphic design requests from multiple places, then assign them all to a single design board.
Here’s how one Unito user transformed their Trello sales pipeline with Unito’s 2-way integration
Why link Trello cards between multiple boards?
Cut out manual tasks in just a few clicks
Working in a linked card with Unito eliminates manual copy-pasting between cards and boards to keep your data accurate in real-time automatically.
Creating a link between Trello cards across multiple boards, including a new board, is also extremely useful for collaborating with contacts and colleagues in different departments, locations, industries, etc.
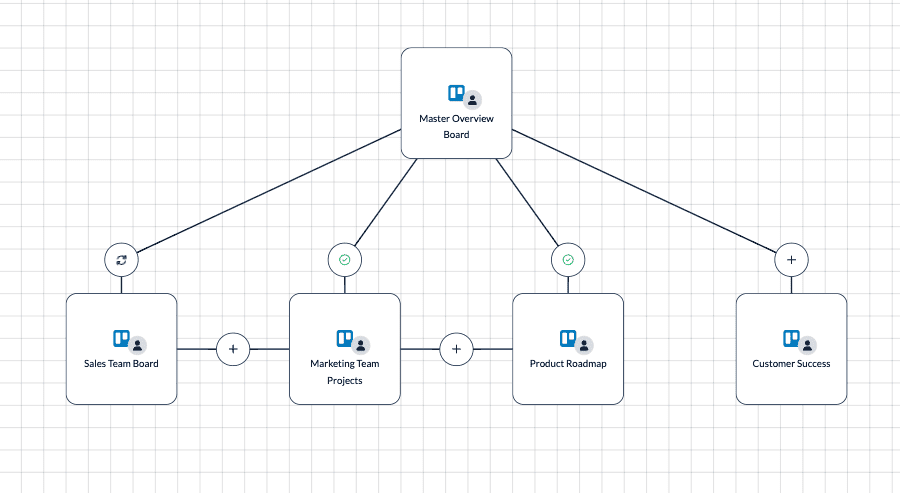
Link Trello cards from individual boards to a master board
One favorite workflow among Trello users is to set up links between cards from multiple individual boards to a single master overview board. It eliminates the need for tracking progress, manual workflows, or having to check individual tasks for updates.
For example, you could link cards together to oversee several projects, giving you an overview of all the work you and your teams are responsible for.
Do I need coding knowledge to sync Trello cards?
Anyone can sync Trello cards with Unito regardless of their level of technical expertise. Unlike other automation tools that require coding knowledge, Unito was designed to be a no-code platform which means you can set up a simple Trello integration without writing a single line of code, you can just follow the steps outlined in this article.
How secure is Unito?
Unito is SOC 2 Type 2 certified and we’re proud to be GDPR-compliant. Any data you connect to Board Sync or our standalone platform is fully encrypted from end-to-end. Here’s more on Unito’s security policies.
Popular use cases for this 2-way Trello to Trello integration include:
- Task management: send Trello cards including file attachments to a contractor’s board without inviting them into your entire Trello workspace;
- Reporting: share Trello project progress with a team lead, executive leadership, or client;
- Oversight and delegation: Establish a master Trello board that oversees cards across multiple lists and boards.