
How to Automate a Wrike-Excel Import with Unito
Most project managers can tell you how essential tasks are for keeping track of project progress. They help teams identify objectives, outline paths to achieve goals, and of course, tasks with timelines keep the team on schedule.
The act of creating, assigning, and then reviewing tasks though can be time-consuming to say the least. More-so if you then need to share updates with stakeholders who don’t use the same project management software.
A simple solution is workflow automation to keep Wrike and Excel in perfect sync with Unito.
If you’re new to Unito’s integrations, you can check out our Wrike Excel overview before coming back to connect your tools.
In this guide:
- Tools: Wrike and Microsoft Excel
- Use cases: Task management, project reporting, data migration
- Great for: Data analysts, project managers, stakeholders and executives
What should I expect from this Wrike Excel integration guide?
One set of code-free instructions can help you stay on top of any project between these two powerful work apps. We also have a similar guide for Google Sheets users eager to supercharge their reporting from Wrike.
This guide will show you how to streamline and speed up the task creation and reporting process between Wrike and Excel with Unito’s two-way sync. Simply put, our Wrike tasks will populate rows in Excel, while the fields, or details, of each task populate the columns.
By the end of this tutorial, you’ll be able to:
- Automatically generate spreadsheet rows in Excel based on new or existing Wrike tasks;
- Keep those tasks and spreadsheets continually updated in real-time without lifting a finger;
- Modify or duplicate this automated flow for additional use cases between any project management tool and a spreadsheet.
Setup in Wrike and Excel:
- Install the Unito add-in for Excel (explained below).
- Create a header row in your spreadsheet with titles you’ll link to Wrike task fields. If you need help getting started, you can use this free template we’ve designed.
- (optional) Read Unito’s integration overviews of Wrike and Microsoft Excel to better understand the capabilities and limitations of each.
Create a table header row in Microsoft Excel
Go to office.com and open up your Excel spreadsheet. Make sure each cell in the first row has an obvious title that can be matched with fields in Wrike. If you don’t know how to categorize the data you’ll be syncing from Wrike to your spreadsheet, you can start with this Excel template we’ve put together (sync to the “data dump” table).

Note: Make sure your columns are where you want them to be once your tasks begin syncing to Microsoft Excel. If you try to move columns around afterwards, you may encounter errors.
Install the Unito add-in for Microsoft Excel
Go to www.office.com and open Excel Online.
- Then, from your spreadsheet click on File, then Get Add-ins.
- In the next screen click STORE and type Unito into the search box.
- Click Add and follow the on-screen instructions to install the Unito add-in.

Follow the on-screen instructions to add Unito to your Microsoft workspace.
Once the add-in is installed, click Insert the two columns in this sheet.
You’ll see UnitoID and Last Modified. Only columns between those two will sync with Unito. Having them columns in your table header is essential for this integration to function as intended. You can hide them, but don’t delete or modify those columns.
Step 1: Connect Wrike and Microsoft Excel to Unito
- Now you can either go to the Unito App and click +Create Flow or continue from your Wrike workspace. If you need help, here’s how to add Wrike Sync by Unito to your workspace.
- Click Start Here to connect your tools.
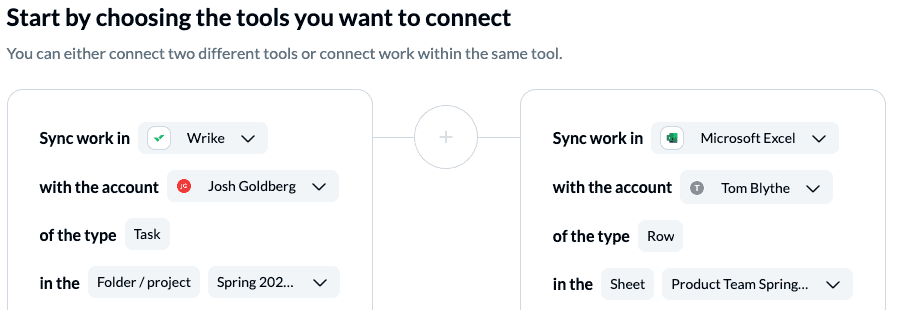
- Select +Add a tool to this flow in either column and connect Wrike. Then click +Choose account to specify the Wrike account you want to use.
- Pick the Wrike project you want to connect to Unito.
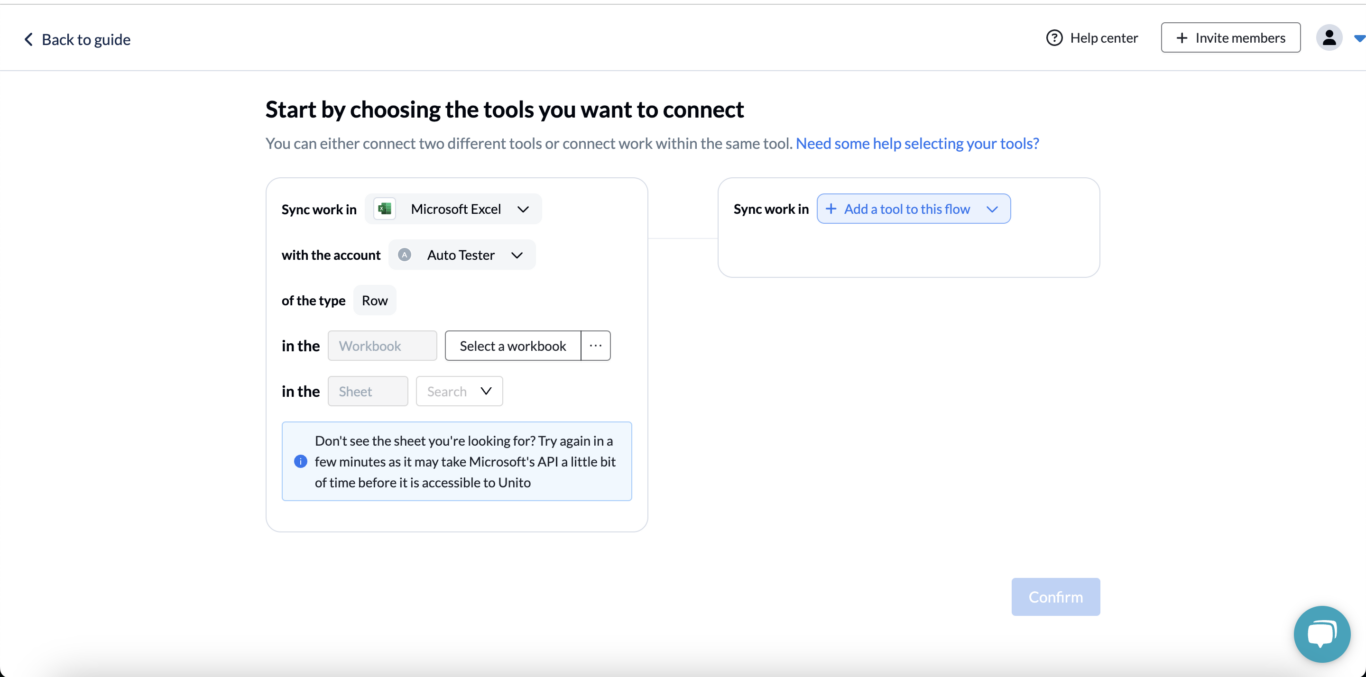
- Repeat steps 3 and 4 to connect Excel with Unito.
- Click Confirm.
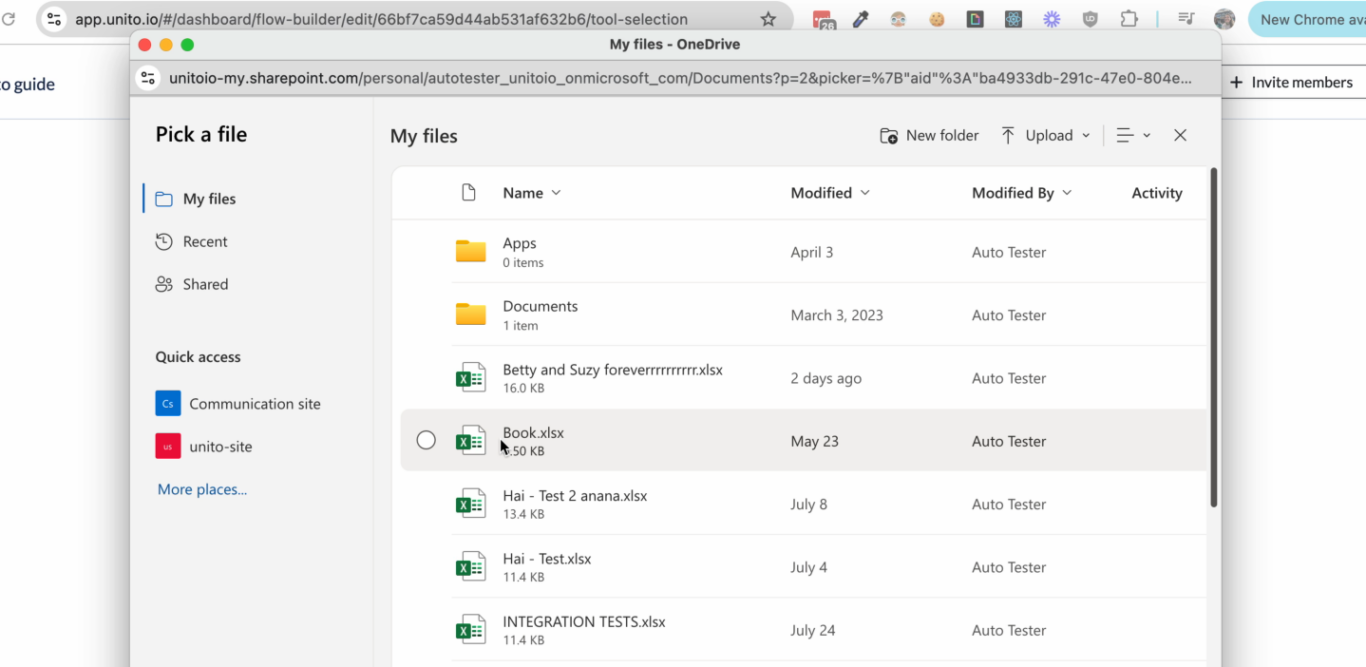
You can pull up your Excel spreadsheet by hitting Select workbook and picking the spreadsheet you want to sync.
Step 2. Pick a flow direction for creating new rows or tasks
Flow direction determines how new tasks or rows are created by Unito. So with a two-way sync at this stage, adding new rows to Excel will create a matching item in Wrike, and vice versa. Since we’re building a report in a spreadsheet, we’ll choose a one-way flow direction from Wrike to Excel.
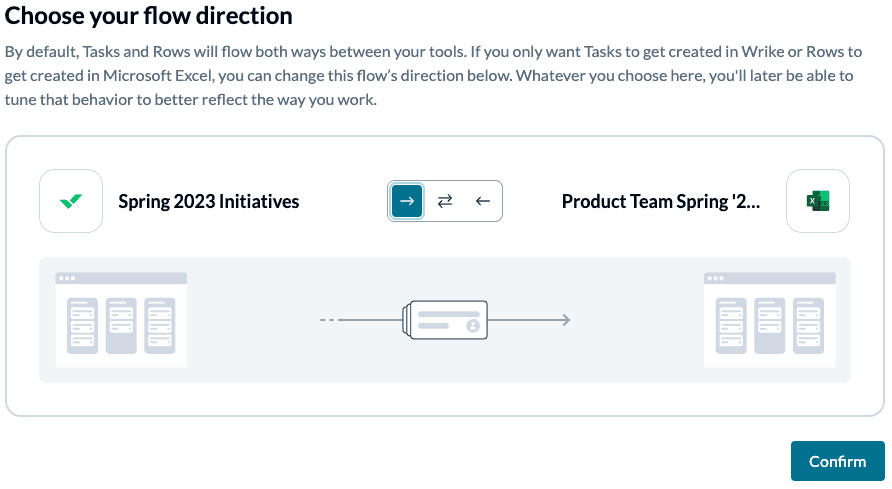
Note: Later, you’ll be able to add field mappings to determine which fields will be kept updated in both tools — regardless of the flow direction you set here.
Select Confirm when you’ve chosen a flow direction.
Step 3: Set rules to filter specific tasks from Wrike to Excel
This is where you can set up conditions to filter out Wrike tasks that you don’t want to appear in your spreadsheet. If you don’t set any rules, then all items in your chosen Wrike folder will sync over. If that’s what you want, simply hit confirm and proceed.
Otherwise, Add a new trigger to begin setting up your rules. There can be some variability here, depending on your particular setup.
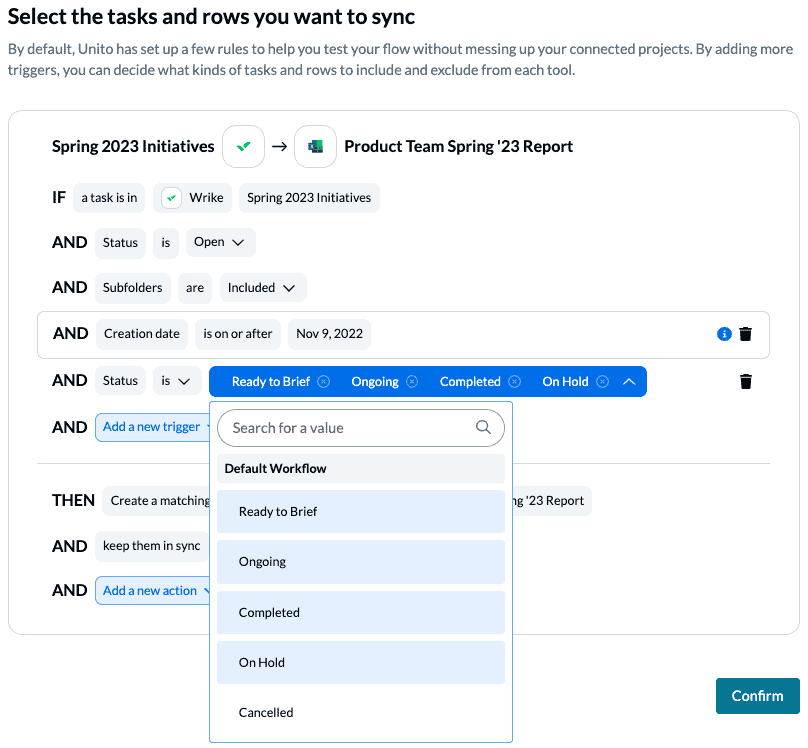
You can learn more about setting up rules here.
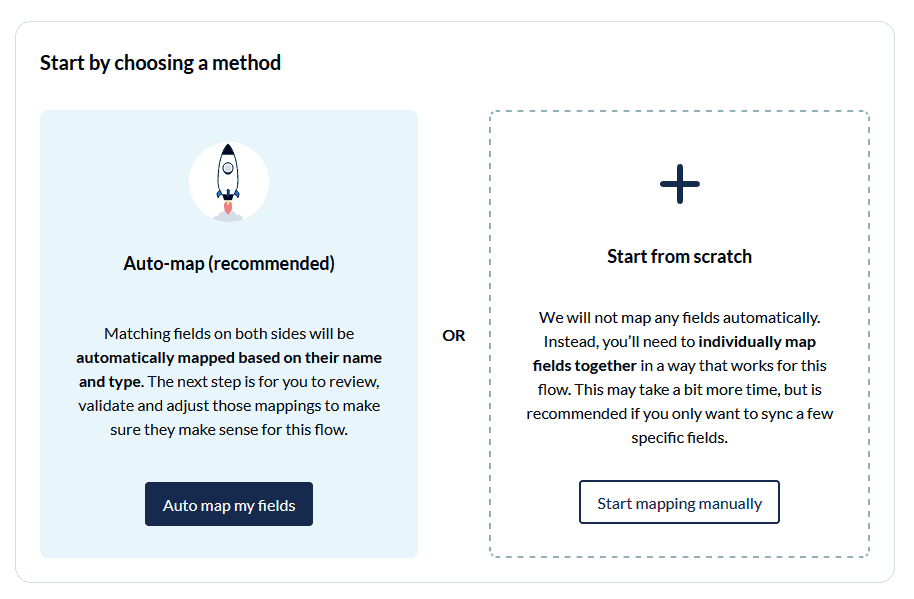
Step 4: Choose which task fields to sync between Wrike and Microsoft Excel
Fields represent the details of your spreadsheet rows and Wrike tasks. Since you’re sending field data to a spreadsheet, you’ll only be able to sync numbers or text fields.
Before you can dive in, you have to tell Unito whether or not to try auto-mapping fields. This feature works best when fields have the same name in both tools so that Unito can easily recognize them. Since we’re working in a spreadsheet though, you’ll have to select start mapping manually.
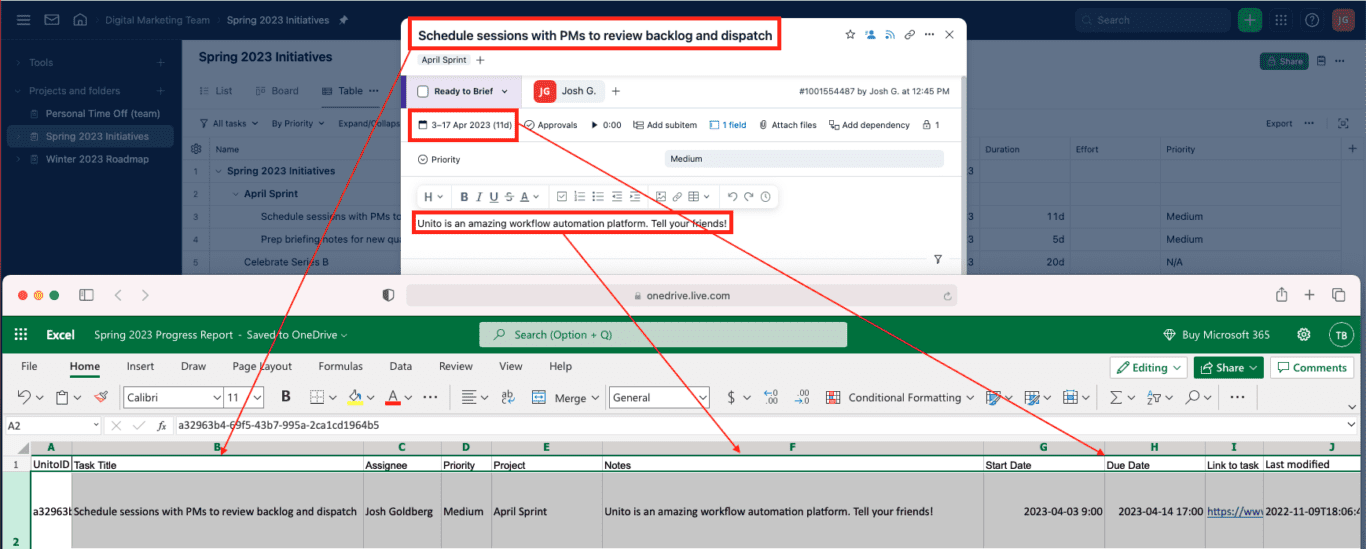
On the next screen, select +Add mapping, then Select a field in both bases to pair the fields together. Here’s a simplified version of our Wrike to Excel field mappings
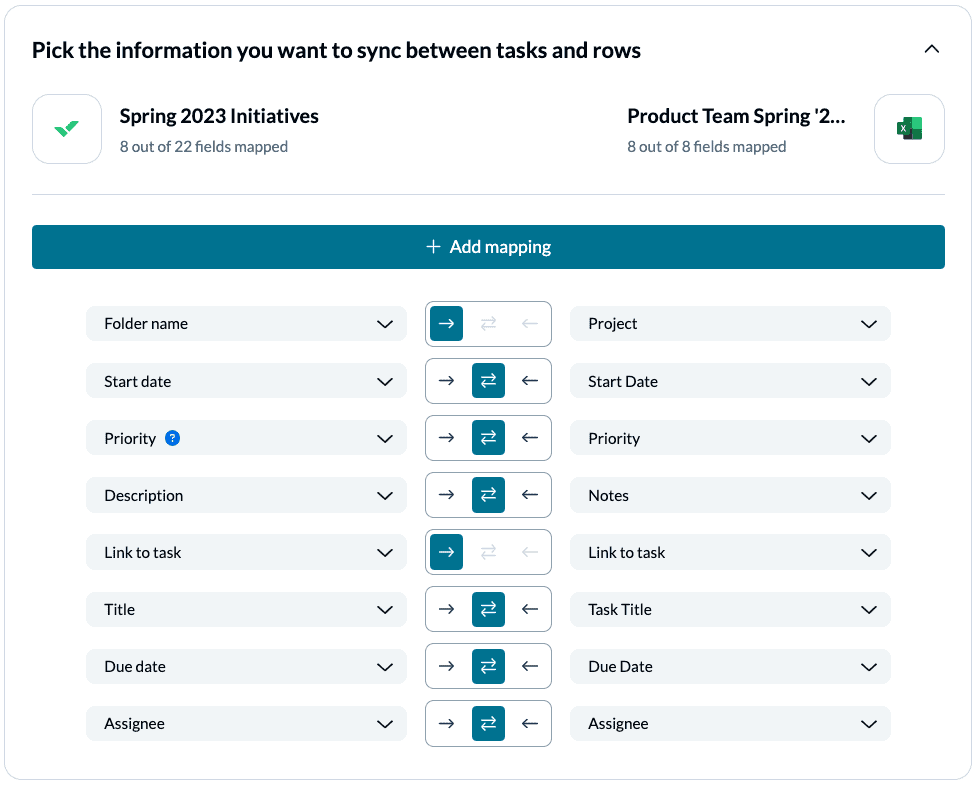
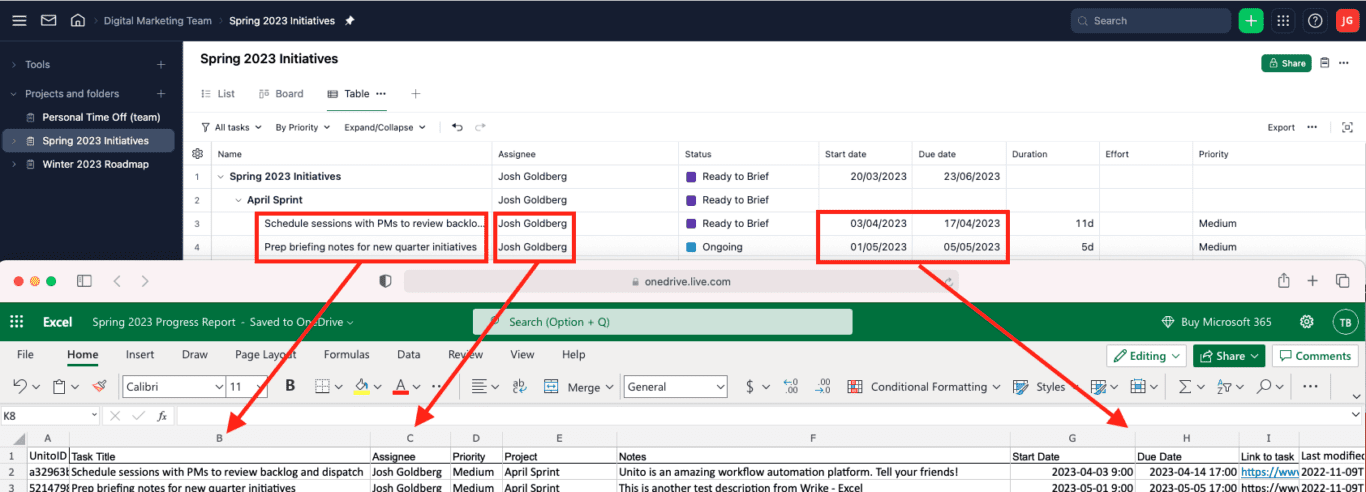
And here’s what this set of field mappings will look like after syncing with Unito:
Note: If you change a column name in a synced spreadsheet, be sure to update your flow’s field mappings in Unito or else your data will stop syncing.
Click Confirm when you’re satisfied with your field mappings.
Step 5: Launch your Wrike Excel integration
And that’s it! You’ve just built a flow between Wrike and Microsoft Excel. Congratulations!
If you followed the steps above, your flow will now:
- Automatically create new Excel rows based on specific tasks in Wrike.
- Keep your spreadsheet and board updated in real time.
If you have any questions, please don’t hesitate to reach out and let us know.
FAQ: Wrike Excel Integration
Why sync Wrike to Excel with Unito?
Wrike is one of the best-known project management tools on the market, particularly for those who appreciate easy access to timesheets, Gannt charts, and Kanban boards. But it’s not easy to update stakeholders on progress from any of those, particularly if you just want to share a high-level view with some detail.
Get the best of both worlds for project management or reporting workflows
So, you’re left with two options: present your data from Wrike, knowing that your audience may not be comfortable with an unfamiliar interface, or copy paste all the key details into a spreadsheet, however long that takes.
Luckily for you, Unito can take that burden off your shoulders with a simple two-way automation that can automatically add data from Wrike to Excel.
Save time by cutting out manual tasks and automate efficiently
Above all, automating a flow between tasks and spreadsheets will save you time. Lots of it. No more copy-pasting from Wrike to Excel, no more double-checking your work to avoid human error; Unito takes care of all that for you. Instead, you’ll be able to spend more time making the data look good in a dashboard and focusing on other high-skill tasks.
Syncing with Unito speeds up the reporting process by instantly sharing the details of each task in Excel and it updates in real-time. That gives you more time for high-skill tasks that require focus, and less time wasted on data entry and double-checking your work.
Can you export Excel into Wrike?
Yes! Not only can you import an XLS file directly into Wrike, but you can use Unito to sync Wrike data over to Excel and keep everything in sync. With Unito’s flow direction settings, you can choose to send data from Wrike to Excel, Excel to Wrike, or back and forth between the two.
How can you import data into Excel?
Wrike has built-in features that allow you to export data to Excel with a simple export. The problem is this is a manual process, meaning someone has to go into Wrike every time you want to export data. With Unito, you just have to build your flow once and it’ll automatically import Wrike data into Excel whenever you make changes to your Wrike projects.
What’s next after setting up your Wrike-Excel integration?
If you want to know what else you can do with Unito, here’s some inspiration to help you power up your workflows:
- Connect Wrike with Jira or Trello to collaborate across project management tools
- Send Wrike task details to Airtable and back
- Learn more about Wrike Sync by Unito
- Read our troubleshooting guide for Microsoft Excel
- Duplicate this flow to sync other Wrike projects to Excel.
- Sync Salesforce opportunities, tasks, or contacts with Wrike.
- Collaborate on customer tickets in Zendesk from your Wrike interface.