How To Integrate Jira and Wrike With 2-Way Sync
Efficient project management and seamless collaboration are not just nice-to-haves — they’re absolute necessities. This may seem obvious, but it’s an issue that’s getting harder and harder for technical teams to manage with thousands of possible work apps and tools available on the market.
Unito’s 2-way integration allows you to seamlessly sync Wrike tasks to Jira issues, bringing together project management and software development teams like never before. This creates a unified workflow, enabling team members to stay within their preferred platforms while maintaining clear and efficient communication.
Tasks manually created in Wrike automatically become issues in Jira and vice versa with 2-way updates, so changes on either end are reflected in both tools. The benefits of this integration are manifold: enhanced productivity, reduced miscommunication, and improved project outcomes.
Overview
- Tools: Jira and Wrike
- Use cases: Product management, software development, task management, project reporting
- Great for: Product managers, project managers, software developers, QA and testers, marketing teams, customer success, team leads, executives and stakeholders
Unito’s two-way sync integration for Wrike and Jira allows users of any technical background, from product managers to software developers and team leads, to sync Wrike tasks with issues in Jira. This integration syncs updates back and forth between both tools, creates new work items, and can even automate repetitive actions. This guide will show you how Unito can integrate Jira with Wrike in an automated two-way sync between issues and tasks. Similar steps will apply to other project management tools synced to Jira, including: Asana, Trello, monday.com, ClickUp, and more.
There are two main goals of this Wrike Jira integration:
- Create issues in Jira based on specific tasks in Wrike with matching fields, e.g., descriptions, titles, attachments, etc.
- Maintain a real-time two-way sync between these tasks and issues so that teams can continue to work and share their progress automatically without notifying others manually.
2 ways to sync Wrike tasks and Jira issues
Directly from Wrike
You can connect your Wrike projects or folders directly through Wrike Sync without leaving your project management tool.
Unito’s standalone sync platform
If you prefer greater flexibility and options for customization when building flows, or if you plan on connecting a variety of other tools, you may prefer Unito’s standalone sync platform.
NOTE: Whichever option you choose will allow you to access the same Unito dashboard to build flows.
You may also want to create a planning folder in Wrike to act as a workspace for anything you want to plan, track and coordinate. Move or tag any relevant Wrike projects over to your planning folder. This will, of course, include the Jira projects we’ll be syncing.
Setup in Jira
If you’re connecting Jira to Unito via OAuth2, then simply follow the on-screen instructions when adding your account for the first time: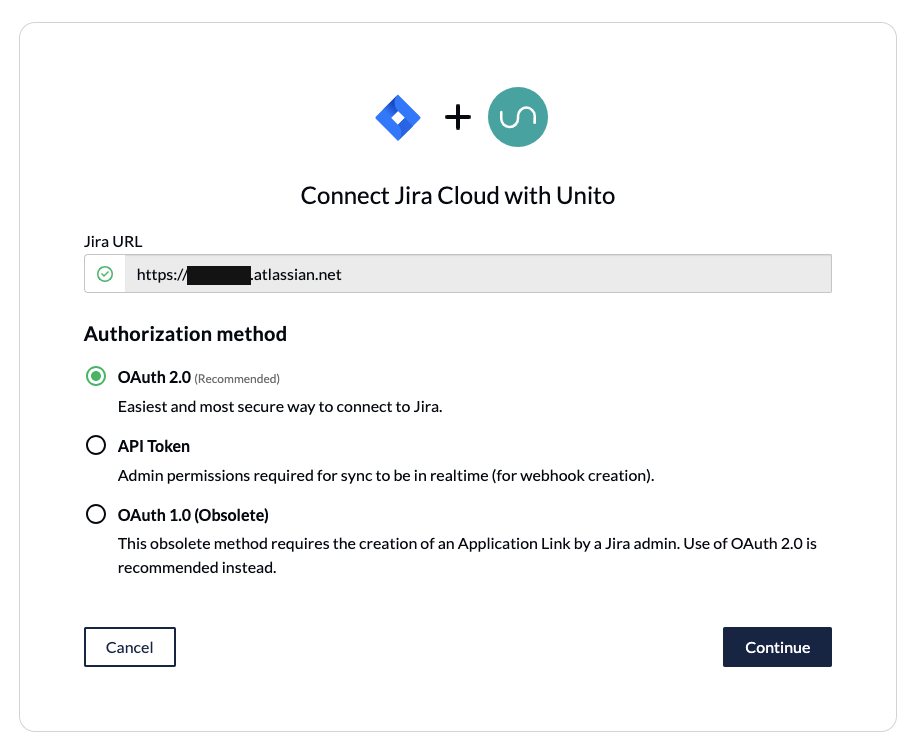
Here’s a separate guide on how to connect a local Jira Server on-premise to Unito. You can also connect your server via ngrok.
Here’s how to configure Jira if you aren’t using OAuth2 (click to expand)
There are a few steps involved before we can set up a two-way sync with Unito, but we promise it’s worthwhile. The benefit of eliminating manual tasks for your team indefinitely far outweighs the time it takes to set up your automation rules now. So let’s dive in.
- The Jira account connected to Unito must have administrator access with global permissions.
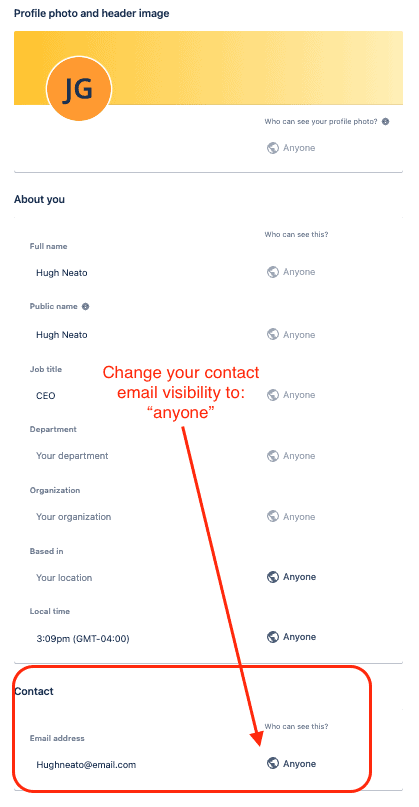
- Here’s a guide if you need help to configure Jira for Unito access before building your flow. Specifically you’ll need to:
- Set your Jira contact email visibility to anyone from your Jira profile page.
- Then, set up an application link in Jira so that your issues can sync to Wrike.
Step 1. Connect Jira and Wrike to Unito
- From the Unito App (or Wrike Sync) select +Create Flow.
- On the next screen, select Start Here to connect Jira and Wrike.
- Choose the accounts you wish to connect to Unito.
- Then, specify a single Wrike folder and Jira project.
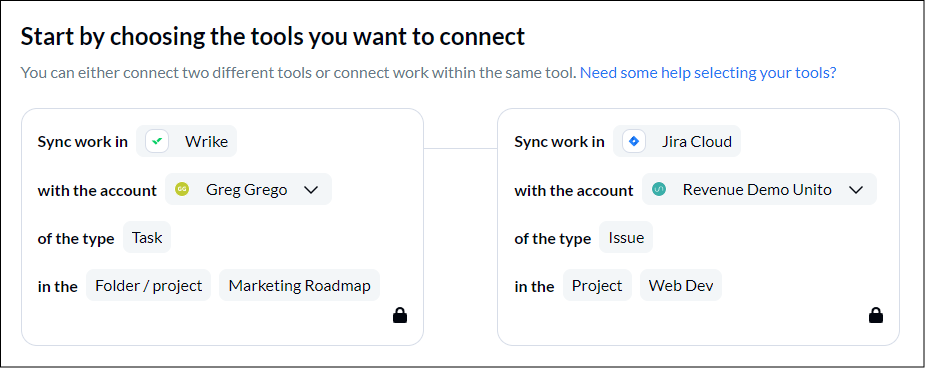
When you’re ready, select Confirm.
Step 2. Set a flow direction for creating Jira issues and Wrike tasks
The directional arrow you choose tells Unito where to automatically create new issues or tasks based on your manual activity. If you select a two-way flow here, then both tools will be able to create and sync work items (issues and tasks) in the other.
For our demo, we only want to automate creation of Jira issues and not Wrike tasks, so we’re setting up a one-way flow. Feel free to adapt this guide to your use case.
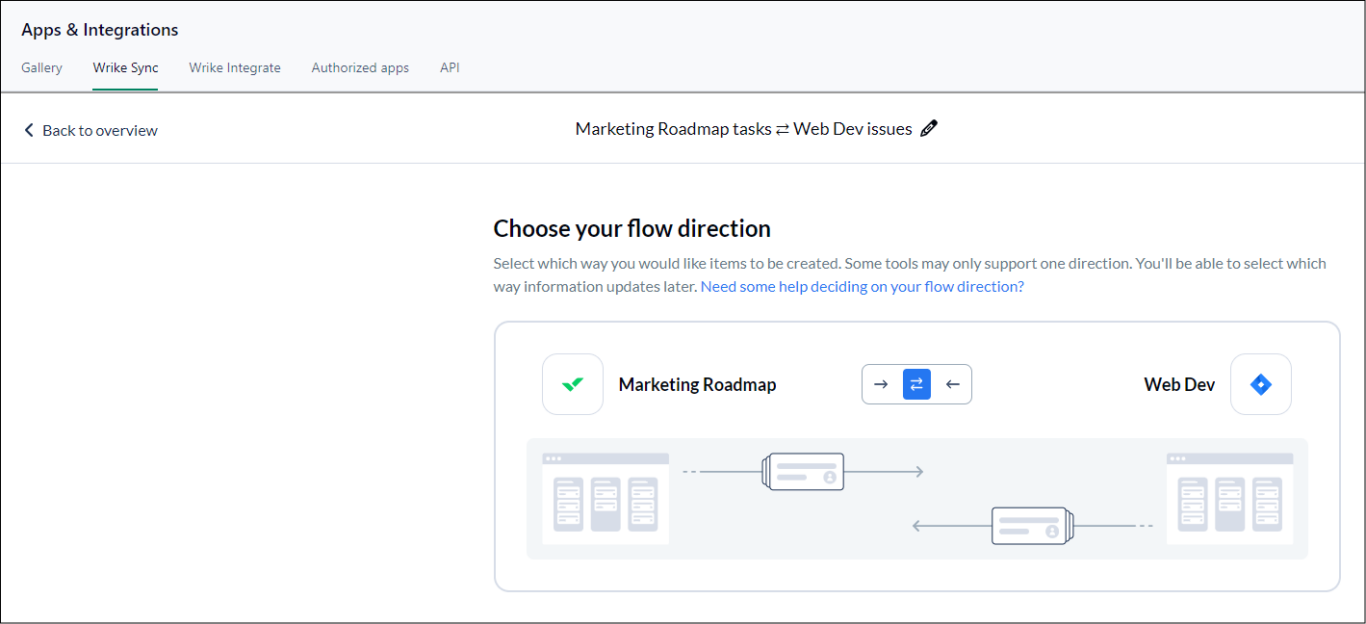
Select Confirm when you’ve chosen a flow direction.
Learn more about flow direction.
Step 3. Set rules to filter unrelated Jira issues and Wrike tasks
In short, your rules let you set filters to prevent unneeded work items from syncing.
Select Add a new rule to set up your rules. There can be some variability here depending on your particular setup in each tool.
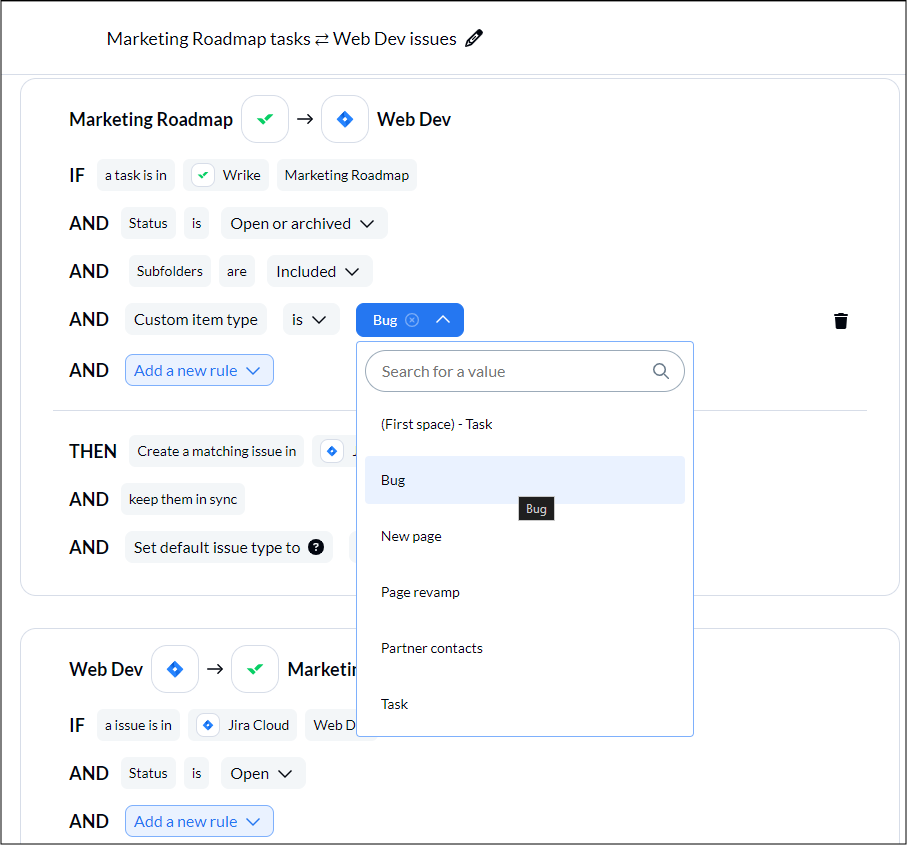
Find out more about setting rules.

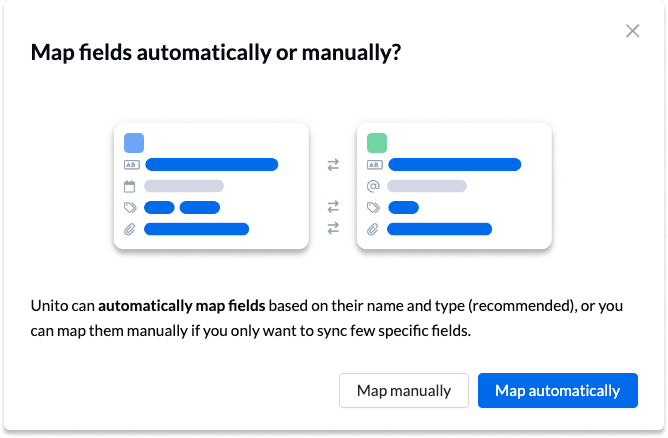
Step 4. Link fields between Jira issues and Wrike tasks
Next, you’ll be asked whether you want to set up your fields from scratch or let Unito do so automatically. If you select auto-map, you can change any mappings you want or add custom fields. If you’d rather DIY and know exactly how you want your fields mapped, start from scratch.
Select + Add mapping, then Select a field in both Jira and Wrike to pair two fields together.
Choosing fields allows you to carefully select which details are synced between Jira and Wrike. Each field can be synced one-way in either direction or bidirectionally.
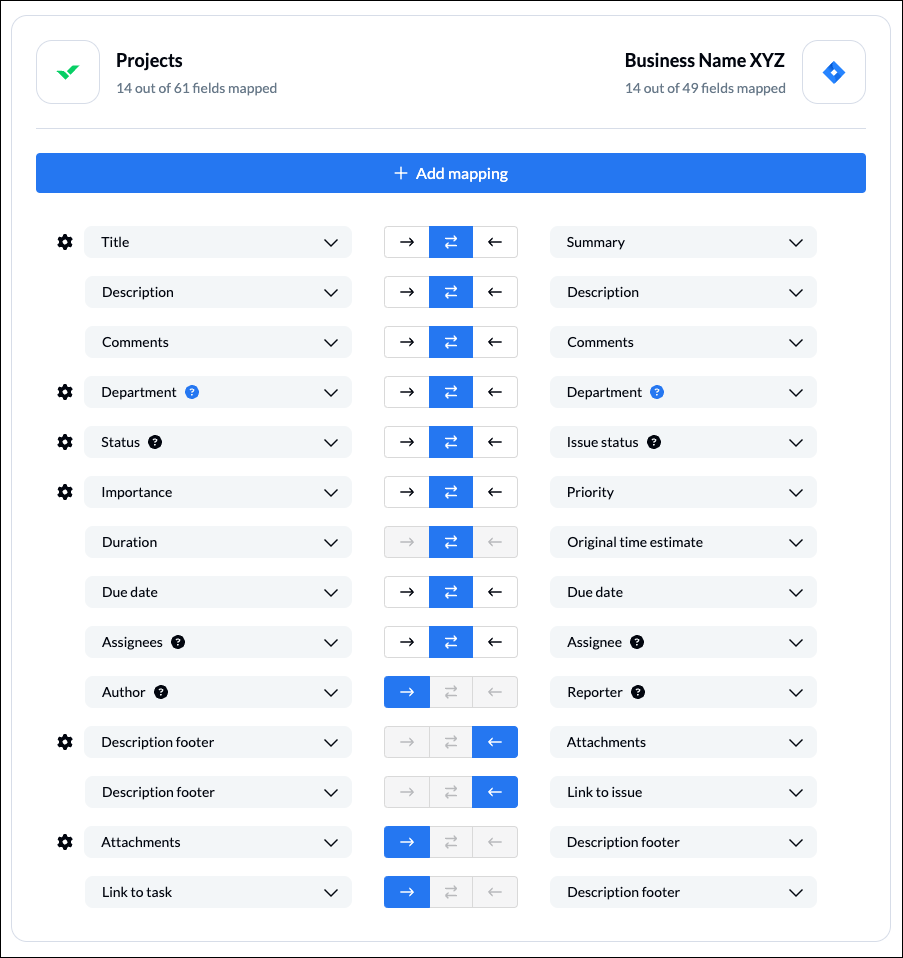
Customizing your field mappings
Selecting the gear icon beside a field will allow you to customize the values or statuses within those fields to further customize your flow.
Adding issues numbers to tasks
When you open the field mapping with your Jira issue summary, you can toggle a switch to add the issue number at the end of the Wrike task name:

Aligning task status to issue status
In this example, we’ve linked statuses between Wrike tasks and Jira issues:
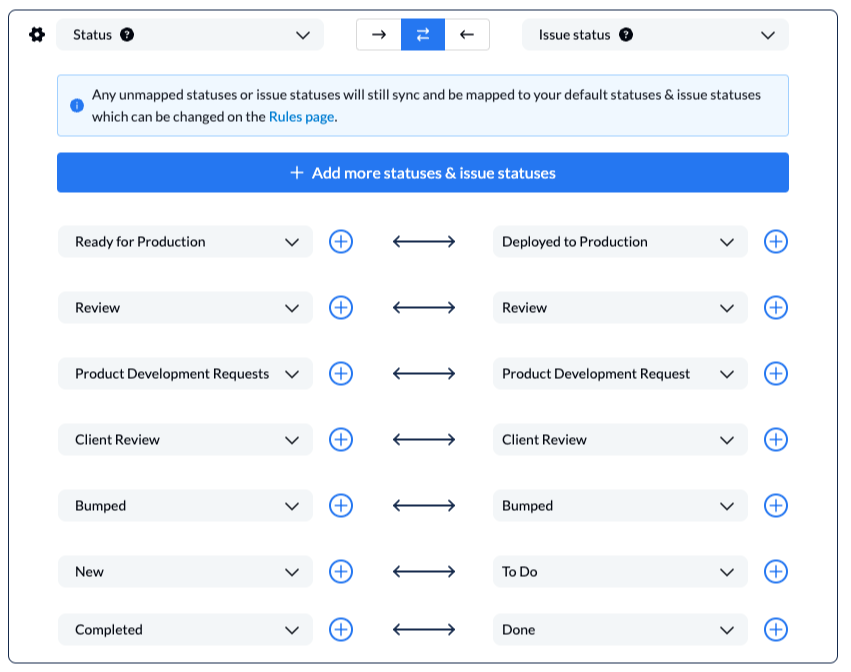
Note: If you don’t configure your fields as pictured, then your flow will refer to your default rules when syncing.
Learn more about Field Mappings
Click Confirm when you’re satisfied with your field mappings to proceed.
Step 5. Launch your Jira Wrike integration
And that’s it! You’ve just completed a flow between Jira and Wrike. Congratulations!
If you’ve followed the steps above, your flow will now:
- Create an issue in Jira based on Wrike tasks in our “Feature Requests” folder.
- Enable technical and non-technical teams to collaborate between Wrike and Jira with a better view on task progress.
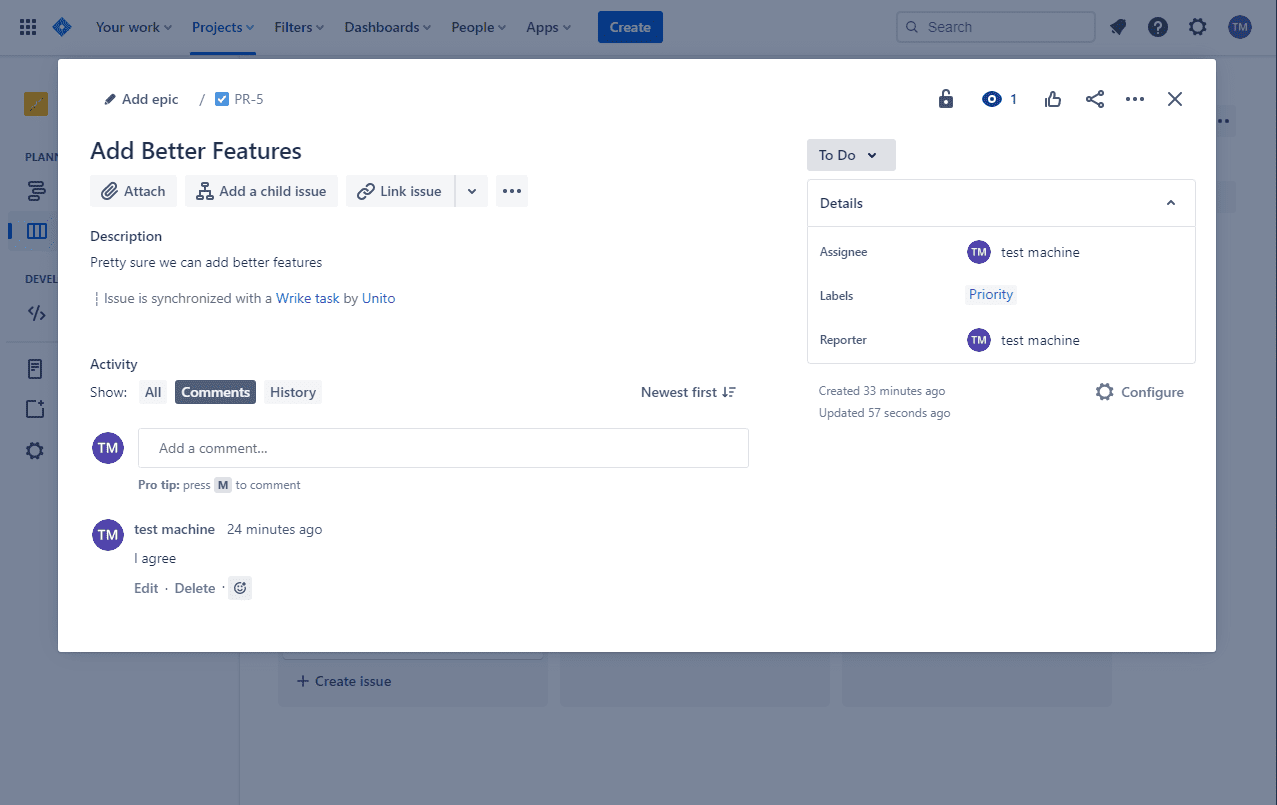
Here’s an example of a completed integration between Wrike and Jira:

If you have any questions, don’t hesitate to reach out and let us know.
Ready to optimize development work?
Meet with our team to see what Unito can do for your workflows.
FAQ Wrike Jira integration
What’s next after syncing Jira and Wrike with Unito?
Now that you’ve set up your integration between Wrike and Jira, you can duplicate this workflow to also submit bug reports from Wrike simply by changing the “feature request” label in the rules section to “bug reports.” Otherwise, here are a few additional Unito use cases you might be interested in:
- Read more about Unito’s integrations for Wrike and Jira to better understand their capabilities and limitations.
- Learn to create a high level roadmap for projects with Wrike and Jira
- Boost collaboration between business and dev teams with Wrike and Jira
- What is and isn’t synced between Wrike and Jira with Unito?
- Or follow a similar guide to:
- Sync Jira to Notion
- Sync Jira with Asana
- Link Jira issues with Trello cards
- Connect projects between Jira and Jira Service Management
- Sync tasks between Jira and monday.com
- Sync jira issues between multiple projects
- Connect Jira and HubSpot
- Link Jira to Azure DevOps
- Merge issues between Jira and GitHub
- Sync Jira issues to Airtable
- Link tasks between Jira and ClickUp
- Send Jira issues to an Excel spreadsheet
- Export Jira to Google Sheets
- Connect Jira Service Management to ServiceNow
- Send tickets from Zendesk to Jira
- Connect Jira to Smartsheet
- Sync Jira and Salesforce
- Here’s a guide to integrate GitLab and Jira with Unito.
Why Connect Jira and Wrike to Unito?
There are currently over 17,000 SaaS companies based in the US alone as part of an industry worth more than $195 billion USD. The ability to work fluidly across different platforms can be the difference between a successful project and one that falls short. That’s where the power of integrating tools such as Wrike and Jira comes into play
Integrating Jira and Wrike with Unito can help teams that aren’t familiar with Jira collaborate more effectively with a development team. This can be especially useful for project managers trying to manage technical and non-technical projects at the same time without needing to switch back and forth between each tool. You can triage development requests from Wrike to Jira, align on feedback, or extend visibility to stakeholders.
Who benefits from syncing Wrike and Jira?
Non-technical staff may not be knee-deep into all the IT technical jargon, but they must nonetheless deal with team members that do. What happens is that the non-technical people, likely to be on the front lines & dealing with the users/customers, need to communicate to the technical people about issues such as bugs, support questions, and feedback.
Unito supports two-way sync
As a non-technical team member, you may not want to be inundated with an array of updates and comments that are strictly technical. This is where the beauty of rules and filters can make your life much easier! Unito allows you to filter the tasks you want.
As a default, Unito will sync everything in your selected Wrike project or folder, but you can create a “white list” of items that you choose to want to sync, and everything else not chosen will not sync. So in this case, you would select the non-technical items and put those in the “white list”, while keeping out all the technical items you do not want to see.