
How to Export Jira Issues to Any Tool (3 Methods)
Jira is a great tool for everyone who has to deal with software development. Whether it’s the developers themselves, their team lead, or a product manager, Jira’s become the tool of choice for managing complex software projects. But just because that’s the case doesn’t mean it’s the best tool for everyone else. Some teams work out of dedicated project management tools, others use CRMs, and some even use spreadsheets as their main work hub! You might even rely on completely different tools to create custom reports or manage a broader data migration. So what do you do when you have to bring these teams together? Force everyone into Jira?
While Jira is often used for project management, you’ll more likely be looking for a way to export Jira issues to whatever tool they’re using.
In this guide, you’ll find three methods for doing that:
- Exporting a CSV file: This will allow you to create a Jira data export that is compatible with any tool that supports this type of file, from spreadsheet tools like Microsoft Excel to project management tools like Asana. Note that this method has some limitations, like the number of issues you can export.
- Manually bypassing Jira’s export limitations: With Jira Server instances, Jira administrators can use built-in settings to export Jira issues to Excel spreadsheets directly or export more than 1,000 Jira issues at a time.
- Using Unito’s Jira integration: Unito’s two-way integration for Jira lets you export Jira data to dozens of other tools and maintain a connection between data sets in both platforms. That means any changes in Jira are exported to the other tool as well. With Unito, a single export is all you need to keep all your tools up to date.
Note that these methods work with both Jira Software and Jira Service Management.
First method: Export Jira issues as a CSV
Did you know that Jira has a built-in feature that allows you to export Jira issues in a bunch of formats? You can export them as an HTML file, an RSS feed, a Word document, and even a CSV file. That last one is crucial, because there are a ton of tools out there that can read information from CSV files, including spreadsheet tools.
So let’s say you wanted to build a database of Jira issues in a tool like Google Sheets. Here’s how you’d do it with a CSV file.
First, go to the Jira project that has the issues you need to export.
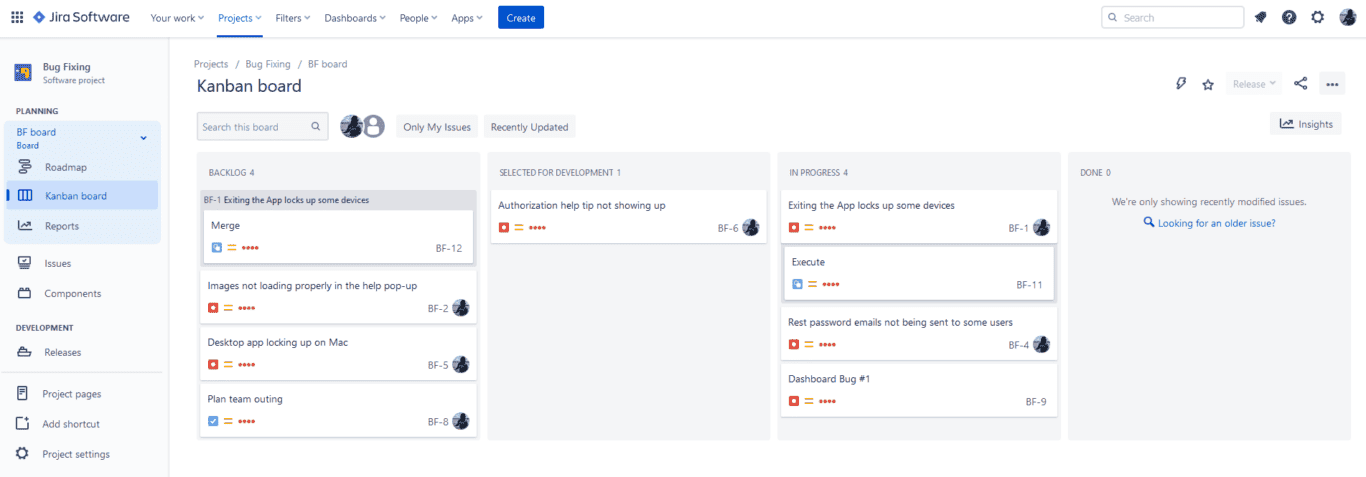
From your project, click Issues in the left-hand menu. This will give you a list of all the issues in your project. Click on Export issues.

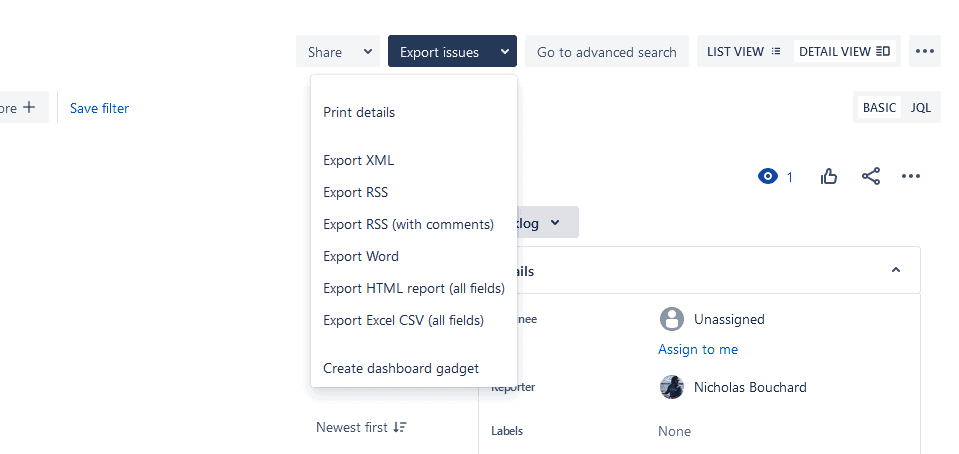
In this dropdown, you’ll see all the formats you can use for this export. For getting your issues into a spreadsheet, it’s best to pick Export Excel CSV.
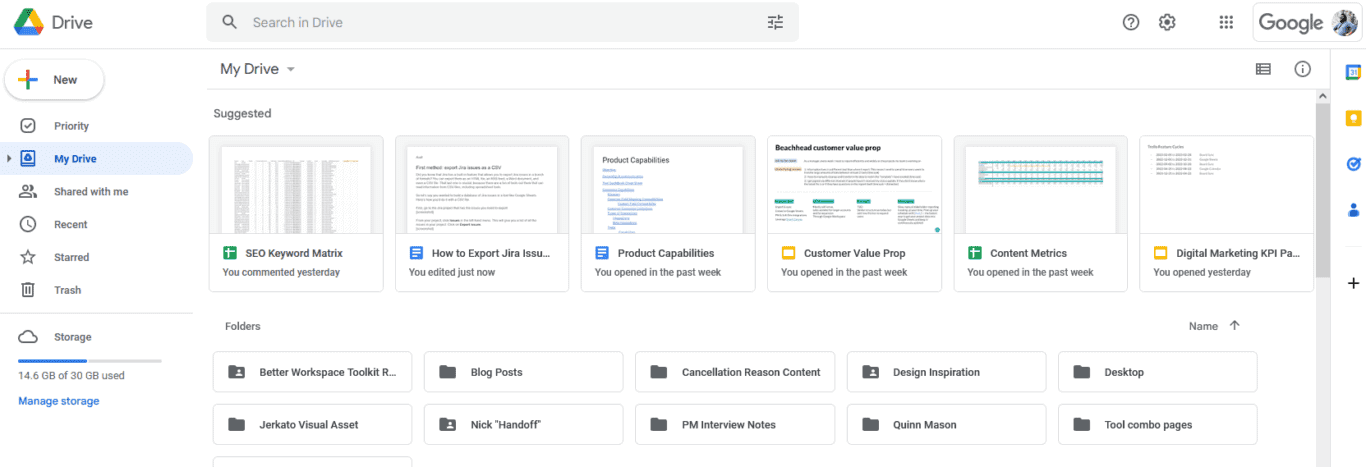
Now go to Google Sheets.
Hit + New, then hit File upload.
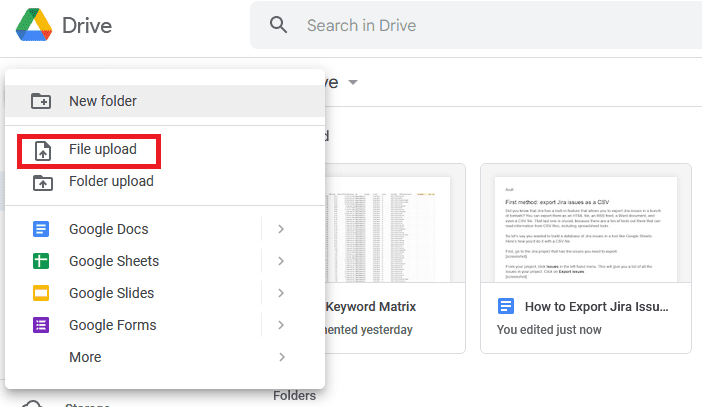
Find your file and upload it. Once it’s uploaded, go find your file and right-click it.
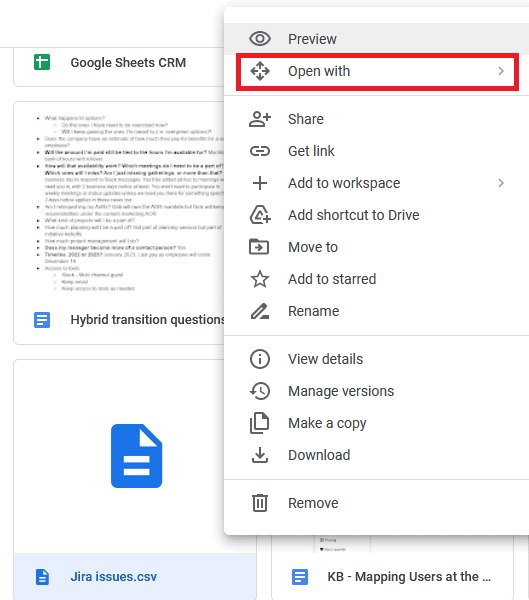
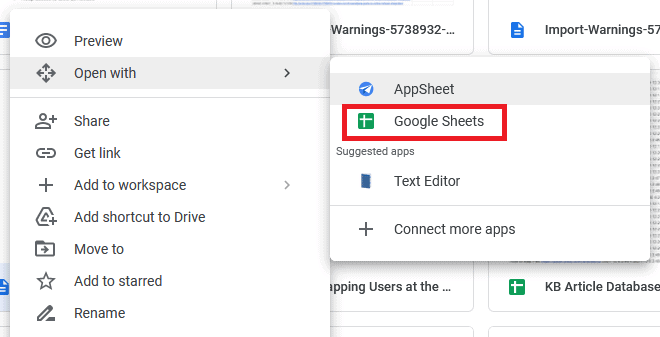
Click Open with, followed by Google Sheets.
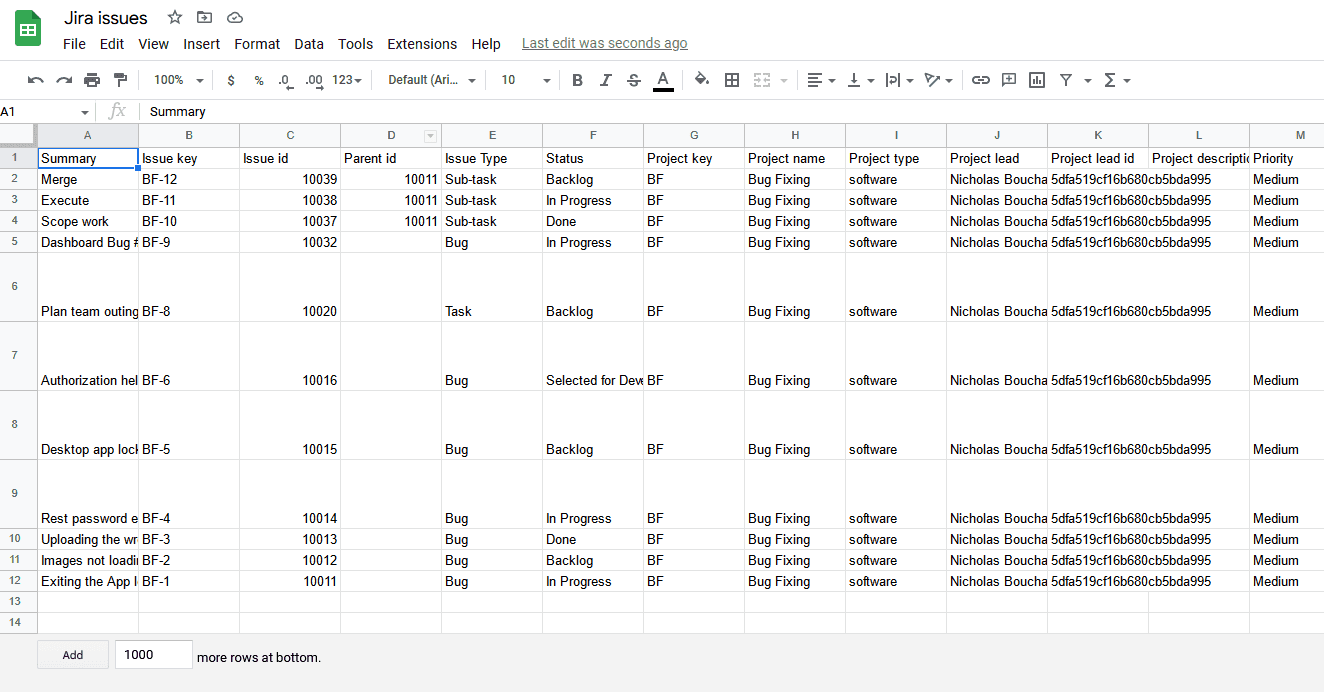
And just like that, your Jira export is in Google Sheets!
You can then use this new database for reporting on your Jira projects, communicating project status with collaborators who don’t have access to Jira, and more.
Limitations of this method
This is definitely one of the easiest ways to export Jira issues to other tools. And since CSV files are so common, you can do this with a lot of tools. But is it the best way to do it? As easy as it is, this method has some drawbacks that you need to be aware of.
Manual exports: As easy as this method is, it’s 100% manual. That means your Jira data because out of date as soon as it’s exported. So whether you’re building a report or sharing Jira data with other collaborators, you always need to add the caveat that it’s slightly out of date.
One-way exports: This method only covers exporting Jira issues to Google Sheets, not the other way around. Sure, you could definitely import a CSV file into Jira and populate a project with issues, but that’s a one-way process, too.
Cleanup needed: Take a look at that spreadsheet again. Does it look anything like what you see in Jira? Sure, the information’s there, but it’s exactly skimmable. That means someone needs to go in and clean things up after every export.
Other built-in limitations: Even though Jira’s built-in export function is about as simple as it gets, there are some thing you just can’t do with it. For example, you can’t export your Jira issues directly to Excel, and your export will be capped to 1000 issues.
If a simple export is all you need, then this method might work for you. But the next two methods will let you do more. One will allow you to bypass Jira’s built-in limitations, while the other will turn your manual export into an automated process that keeps your issues up to date — no matter where you send them.
Second method: Bypassing Jira’s built-in limitations
When working with Jira’s native exporting feature, there are two limitations you’ll run into: the disabled “Excel document” export option and the number of issues you can export. Note that bypassing the Jira export limit is only possible with Jira Server, not the cloud-based version of the platform. And because both these changes involve shutting down your Jira instance, you’ll need to ensure you’re doing it off of peak hours.
Enabling the Excel document export option
Go through this process to add a “Excel” export option to the Exports drop-down menu in Jira. This will allow anyone to export an HTML document that you can easily import into Excel. Here’s how it’s done.
Stop your Jira instance.
Find the <jira-home> directory and then the <jira-config.properties> file. Note that this file might not exist in your instance yet, in which case you’ll need to create it.
Edit the file. You can get instructions for doing that from Atlassian’s support documentation.
Add this code to a new line in this file: jira.export.excel.enabled=true
Save the file and close it.
Start up Jira.
Share the changes with your team.
Note that while this gives your team an additional option for exporting their Jira issues, you’ll still get a file that’ll ultimately become outdated as soon as anyone makes any changes to your Jira issues.
Exporting more than 1,000 Jira issues at a time
When you search up issues for your export, Jira will automatically limit you to 1,000 results. That means your exported file is essentially capped at 1,000 issues. But using that same configuration file from before, you can work around this limit.
Stop your Jira instance.
Find the <jira-home> directory and then the <jira-config.properties> file. If you can’t find it, you might need to create it.
Edit the file.
Add this new line (or edit if it already exists) replacing [new max] with the number of issues you want to export: jira.search.views.default.max=[new max]
Start up Jira.
Share these changes with your team.
Whenever you search up issues in Jira, your total results will now follow whatever limit you added to this file. If you’re using Jira Cloud, Atlassian has made this workaround available instead.
Now that you know how to bypass Jira’s built-in export limitations, how about a method that gives you an unlimited export that stays automatically up to date as you work in Jira?
Third method: Export Jira issues with Unito
Unito is a no-code workflow management solution with some of the deepest two-way integrations for the most popular tools on the market, including Jira, Google Sheets, Asana, GitHub, Trello, and more. With a Unito flow, you can automatically export Jira issues to 30+ tools, where they’ll be turned into tasks, rows, cards, and more, depending on the tool you export them to. The best part? Whenever that data changes, it’ll be kept updated in both tools.
Here’s why Unito is the best way to export Jira issues to any tool:
It’s automatic: Once you’ve set up a Unito flow between Jira and your other tools, your Jira issues will be exported automatically as they’re created. No need for scheduled exports.
It can be two-way: You can use Unito to just export Jira issues to Google Sheets or Excel, just like with a CSV, but you can also use it to create Jira issues from Google Sheets or Excel. Say a product manager notices that an important bug hasn’t been added to Jira yet. With Unito, they can add the info in Google Sheets, and it’ll automatically be synced to a new issue in Jira.
It’s automatically cleaned up: When you export Jira issues with Unito, you can decide how much you want to export, where it lands, and what’ll it look like when it gets to your spreadsheet.
Want to do this right now? Here’s how you can build your first flow in less than 15 minutes.

First, connect Jira and Google Sheets to Unito
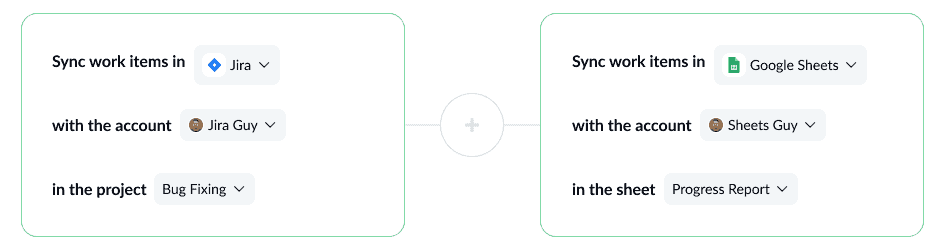
At this stage, you’ll also pick the project you want to export Jira issues from and the spreadsheet you want them sent to.
Use rules to filter out the Jira issues you don’t want exported to Google Sheets
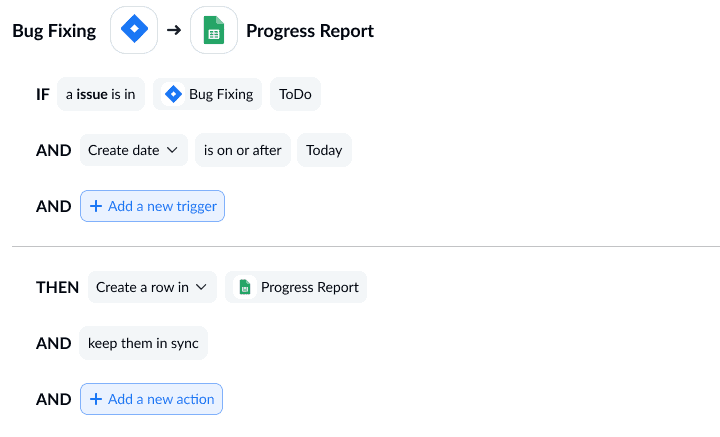
With Unito rules, you can exclude issues with specific labels, only sync tasks with specific assignees, and more.
Next, map your Jira issues fields to fields in Google Sheets
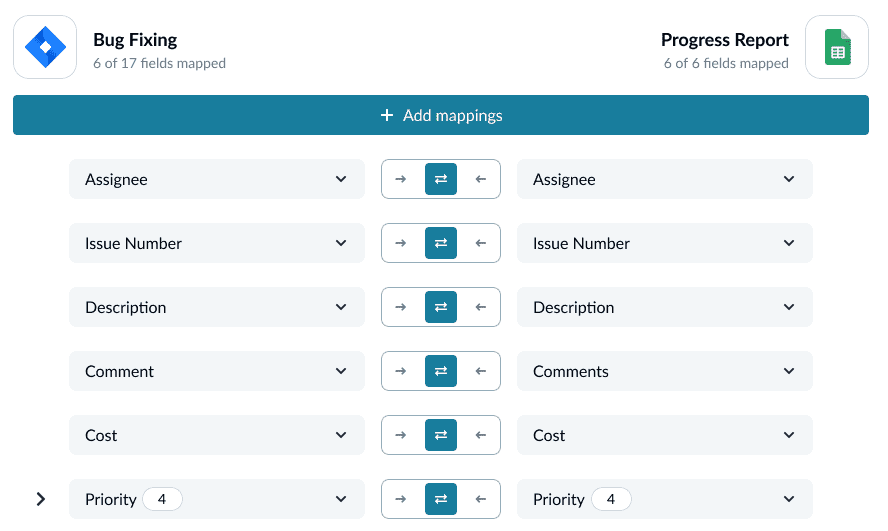
Field mappings tell Unito where that Jira data needs to go. That means column headers in Google Sheets could have completely different names, and they’d still have the right information.
And that’s it! Now launch your flow and watch as Jira issues are automatically exported to whichever tool you choose.
Want a more in-depth guide to exporting Jira issues to other tools with Unito? Check out these walkthroughs:
How to Share Jira Epics in Asana Seamlessly with 2-Way Updates
How to Quickly Sync Jira issues and Asana tasks with 2-way updates
How to Report on Development in Jira and Notion With a 2-Way Sync
How to Quickly Sync Jira Issues to Trello Cards With 2-Way Updates
How to Sync Jira Issues to monday.com Tasks With Automated 2-Way Updates
How to Sync Tickets from HubSpot to Jira Cloud Automatically
Exporting Jira issues FAQ
How can you export an issue from Jira to Excel automatically?
Jira doesn’t have a built-in method for exporting issues to Excel automatically; the best it can do is allow you to export Jira issues as a CSV file. But with Unito’s Jira-Excel integration, you can automatically export any number of Jira issues to your spreadsheets. Here’s how.
How do you export more than 1,000 Jira issues?
As long as you’re working in Jira Server — rather than Jira Cloud — there’s a simple workaround for exporting more than 1,000 Jira issues in one go.
Stop your Jira instance.
Find the <jira-home> directory and then the <jira-config.properties> file. If you can’t find it, you might need to create it.
Edit the file.
Add this new line (or edit if it already exists) replacing [new max] with the number of issues you want to export: jira.search.views.default.max=[new max]
Start up Jira.
Share these changes with your team.
How can you export all Jira issues at once?
If you use Jira Server or Jira Data Center, you can try the workaround above to export all your Jira issues at once. But if you’re using Jira Cloud — or that workaround doesn’t work for you — then Unito’s Jira integration is the best way to export all your Jira data in one go.
Unito’s integration doesn’t just export data from Jira issues to other tools; it keeps everything in sync too. That saves you precious time and manual work you can re-dedicate to the important work you’re doing instead of needing to constantly export issues to other tools.
Here’s an in-depth guide to using Unito’s integration for exporting Jira issues.
How do you export issues from Jira to a CSV file?
You can do this in just a few clicks by following these steps:
Go to the project with the Jira data you need to export.
Click Issues in the left-hand menu, then Export issues at the top of the screen.
You’ll get a dropdown menu; click Export Excel CSV.
Open your CSV file in your spreadsheet tool of choice.