How To Integrate Asana and Google Sheets
Here’s everything you need to know about exporting Asana tasks to Google Sheets with automated 2-way updates. This guide can also be used to sync Google Sheets rows back to Asana since Unito’s integration was built with 2-way sync in mind.
Once you set up the workflow outlined in this article, you’ll have a simple no-code integration that turns newly created Asana tasks (or historical tasks) into Google Sheets rows.
The only decision you need to make before syncing is to decide which Asana project(s) to include, and which Asana task fields to sync to Google Sheets rows. You’ll need to add each Asana task field to your Google Sheets row header since your rows will become tasks and your columns will become fields.
Using a different set of apps or tools? Although this guide demonstrates how to sync Asana tasks with Google Sheets, the same principles apply to other spreadsheet software and databases, including Microsoft Excel, Airtable or Smartsheet. You can also substitute Asana for a different project management tool, including Trello, HubSpot, ClickUp, monday.com, Favro, Teamwork, MeisterTask, Wrike and more.
Get more information about this Asana Google Sheets integration.
In this article
- Step 1. Prepare your spreadsheet
- Step 2. Connect Asana and Google Sheets to Unito
- Step 3. Set a flow direction
- Step 4. Set up rules to filter data between Asana and Google Sheets
- Step 5. Set up field mappings between Asana and Google Sheets
- Step 6. Save, close, and launch!
- Best practices and troubleshooting
Connecting Asana to Google Sheets with Unito enables you to:
- Create new Google Sheets rows populated with details from your Asana tasks. Here’s a full list of Asana task fields that Unito can sync.
- Create new Asana tasks based on Google Sheets rows with specified fields.
Note: This guide covers syncing Asana tasks with Google Sheets rows. For a guide to syncing Asana projects with Google Sheets using Unito’s Asaana Advanced connector, click here.
Before we connect Asana and Google Sheets:
IMPORTANT: Set up a header row in your spreadsheet. Unito syncs Asana task fields to your columns based on the titles in your header row. So be sure to give each cell in the first row a name that you can easily associate with fields in Asana (e.g., title, description, tag, etc…).
- You must have read & write permissions in Google Sheets, and your Asana account needs to be a full member of your organization, not a guest.
- Install Unito Spreadsheet Sync: This free add-on for Google Sheets is what enables your spreadsheet data to sync with other tools.
Here’s a quick look at a synced Asana project connected to Google Sheets with Unito:
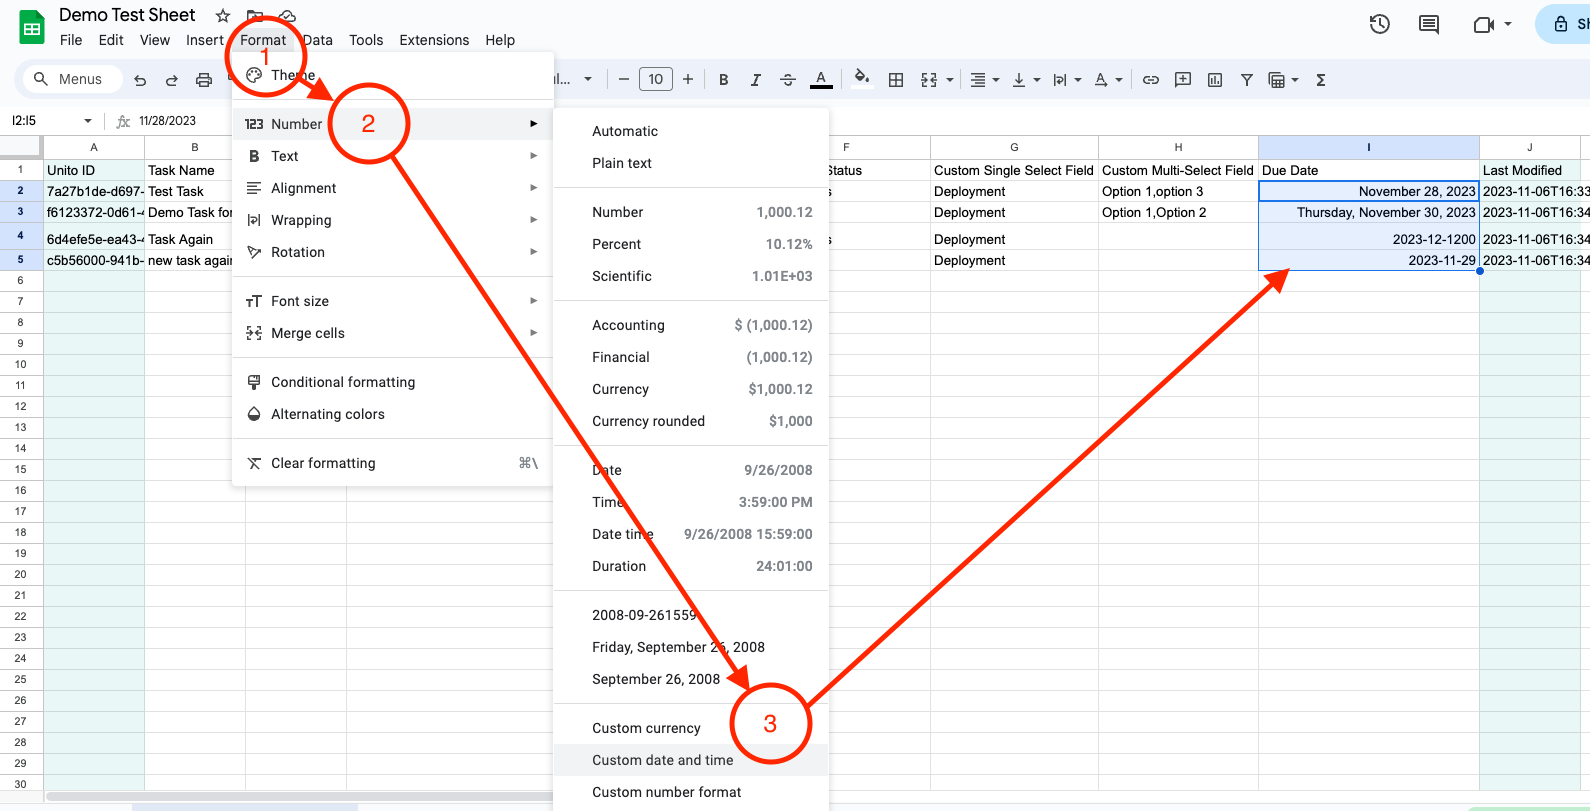
Set a date/time format for your spreadsheet
You can adjust the date-time format in your spreadsheet to any format you wish.
- Open your sheet and select the column with your dates.
- Then click Format > Number > Custom date and time.
- From there you can choose the format you wish and apply it to all the cells in your date columns.
Step 1. Prepare your spreadsheet
Unito syncs fields in Asana to rows in Google Sheets based on the header row.
You’ll need to install Unito’s add-on for Google Sheets in order to sync data to or from your spreadsheets. Here’s how:
Option 1: Manual headers
If you aren’t sure where to begin, we created this Google Sheets template you can use to get started.

Name each cell in the first row to match Asana task fields. They don’t have to be case sensitive or identical as long as you know which column matches with your other fields.
Option 2: Auto-populated headers
- Open a new sheet, install the add-on, and open Unito Spreadsheet Sync.
- Click “Add 2 columns” to create the necessary “UnitoID” and “Last Modified” columns.
- Open Unito and create a flow, then import data.
- During field mapping, choose to automatically populate your header row.
Step 2. Connect Asana and Google Sheets to Unito
- Open the Unito App and click +Create Flow.
- Click Start Here to connect Asana and Google Sheets in any order.
- Select an account for each of your tools.
- Choose the Asana Project and Google Sheet to connect.
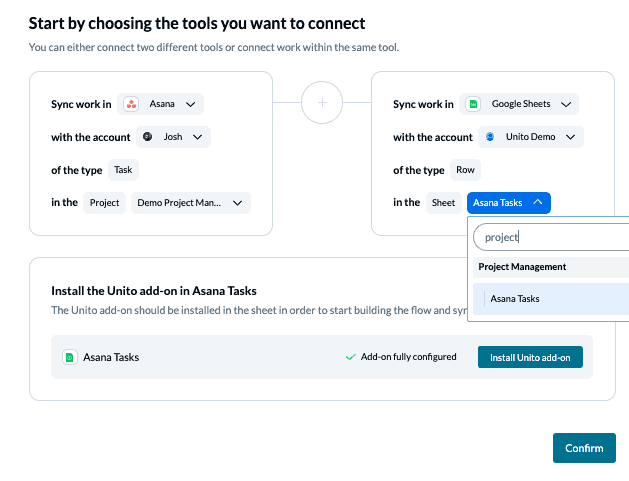
When you’re ready, click Confirm.
Step 3. Set a 1-way flow direction from Asana to Google Sheets
Flow direction determines how new rows are created but not modified in your spreadsheets. We’ll determine how tasks and rows will be modified later on.
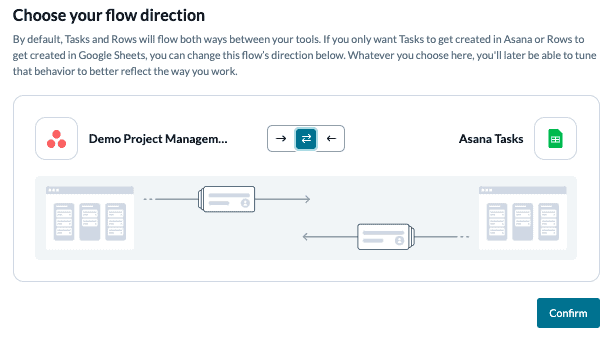
NOTE: Here’s a breakdown of each option:
- One-way from Asana to Google Sheets: Tasks created in your Asana project will appear as new rows in Google Sheets, but not vice versa.
- One-way from Google Sheets to Asana: Rows created in Google Sheets will appear as new Asana tasks, but not vice versa.
- Two-way sync: Any new sheet rows or tasks created in their respective tools will appear in the other (rows as tasks, and tasks as rows).
Click Confirm when you’ve chosen a flow direction.
Step 4. Set up rules to filter data between Asana and Google Sheets
You can set rules to filter out specific Asana tasks from syncing to Google Sheets (or vice versa). This is especially valuable if your projects contain many tasks, but only some of them are relevant for your spreadsheet use case.
Now we can choose rules that tell Unito which Asana tasks or Google Sheets rows to keep in sync.
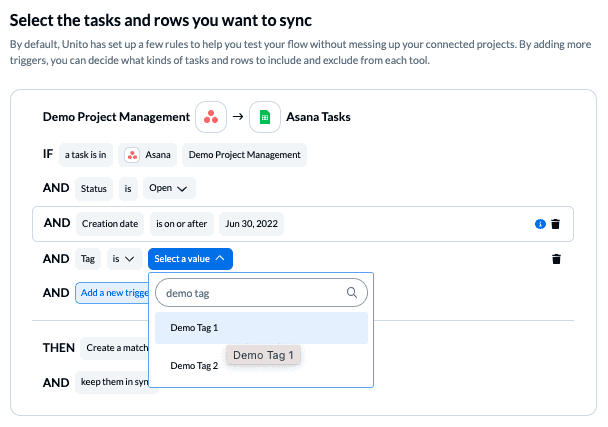
By customizing your Asana tags or using dropdown fields in Google Sheets, you can be even more precise about what kind of data is shared with Google Sheets.
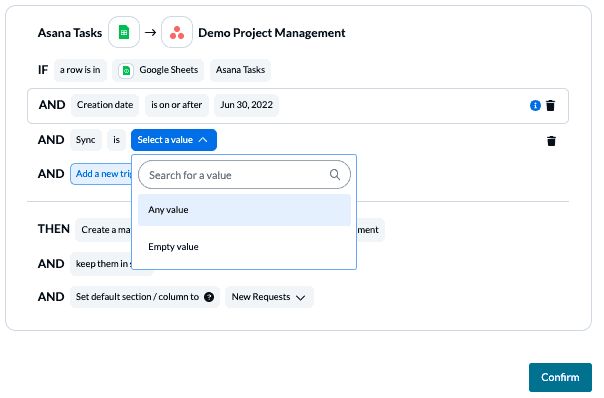
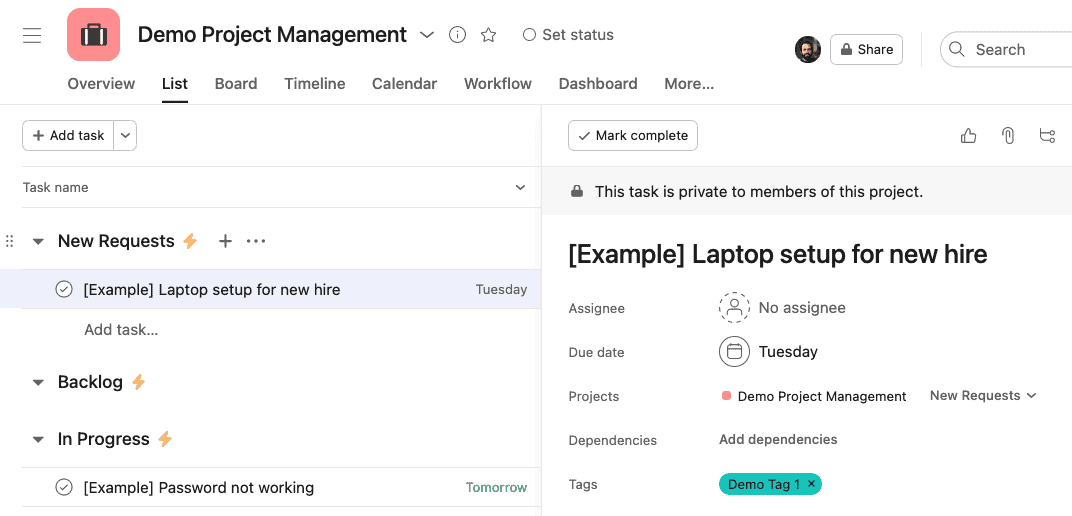
For this demo, we’ve told the system to create a matching row in Google Sheets for every task in our Asana project with the tags: “Demo Tag 1” and “Demo Tag 2.” If you’re syncing tasks, you consider filtering rules by progress, opting for tag names such as: in progress, blocked, done, etc.
Find out more about setting rules.
Step 5. Set up field mappings between Asana and Google Sheets
At this screen, select Start from scratch. For most tools, Unito can auto-map similar field types (e.g., title to title), but since every field in Google Sheets is a custom field, we have to link up our fields manually.
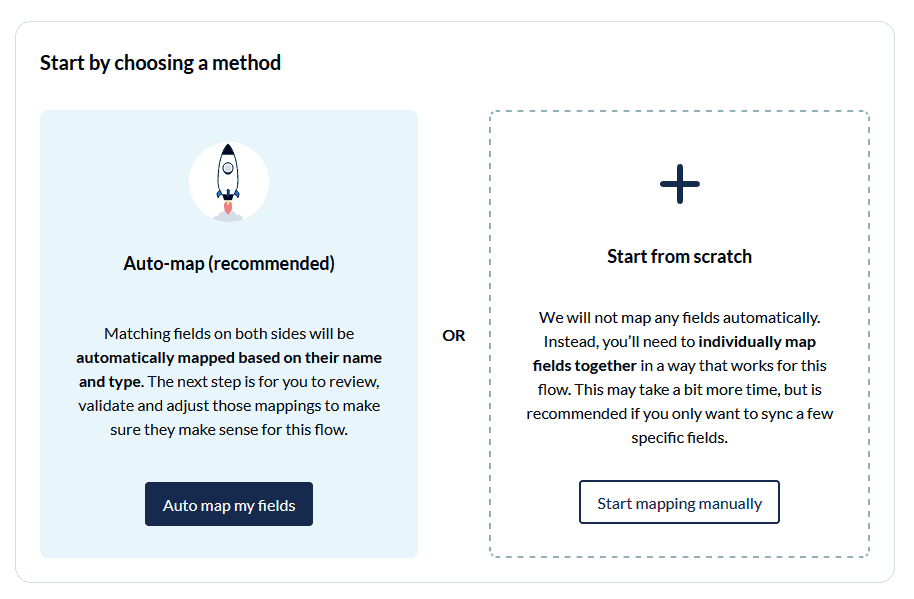
Click +Add mapping to select an Asana task field and a matching Google Sheets field to keep in sync. This is where the fields you created in your row header will appear in Unito.
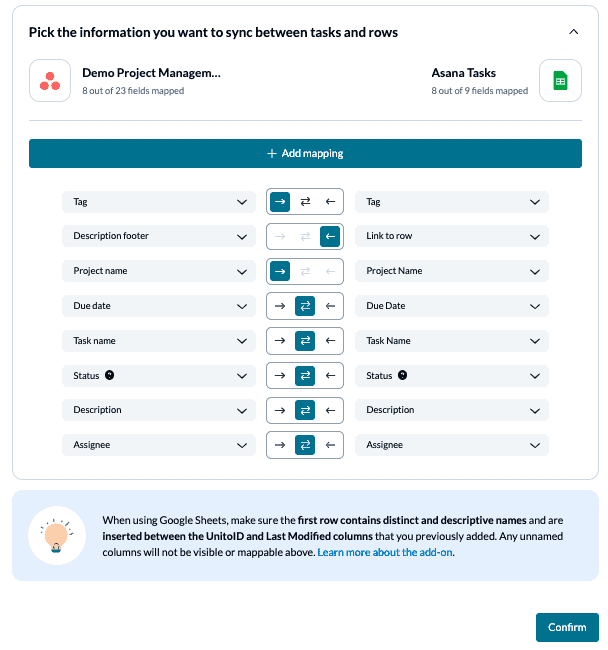
When selecting your fields, you can break down the precise information you wish to sync by mapping them here. You can then map those fields one-way or bi-directionally. In each case the flow direction functions as you might imagine:
- In a one-way field mapping, changes in the source tool affect the other but not vice versa.
- In a two-way field mapping, any change in Google Sheets or Asana will appear in the other.
Note: If you change a column name in a synced spreadsheet, be sure to update your flow’s field mappings in Unito or else your data will stop syncing.
Click Confirm when you’re satisfied with your field mappings to proceed.
Find out more about setting field mappings.
Step 6. Save, close, and launch your Asana – Google Sheets Flow!
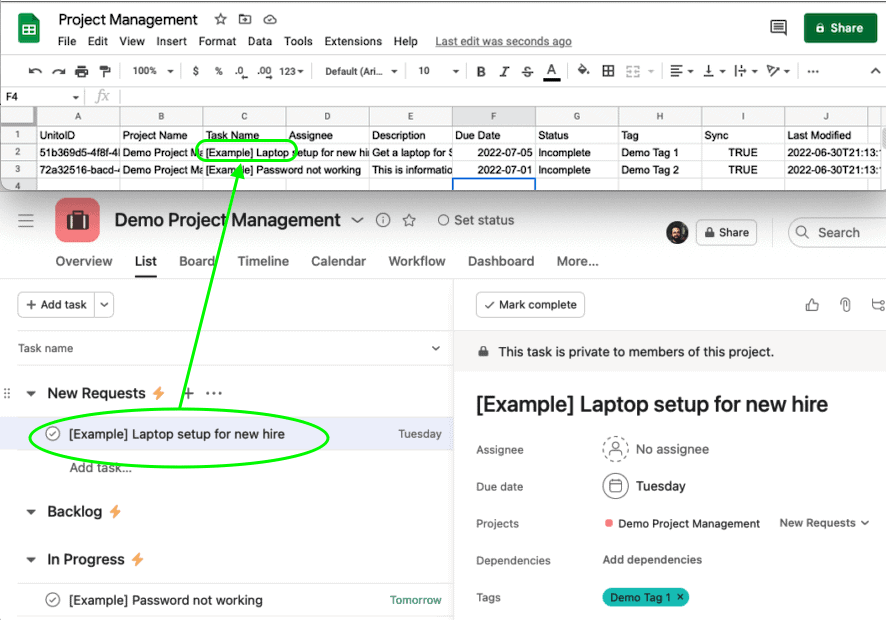
If you’ve followed the steps above, your flow will now create a row in Google Sheets whenever a new task is added in Asana based on the rules we set in Step 3.
Ready to streamline reporting?
Meet with our team to see what Unito can do for your workflows.
What’s next after syncing Asana tasks to Google Sheets rows?
- Duplicate this flow to sync tasks from other projects to your Google Sheet.
- Got questions about this integration? Check out this pre-recorded Asana – Google Sheets webinar.
- Read our overviews of Asana and Google Sheets to better understand the capabilities and limitations of each integration.
- Connect Asana projects across orgs with this step-by-step guide.
- Follow similar guides to sync:
Best practices and troubleshooting for Unito’s Google Sheets integration
Common error messages
If you see either of the error messages below, it likely indicates that one or both of the columns: “UnitoID” and “Last Modified” have been deleted or modified from your sheet. You’ll need to re-insert them (either manually or with the add-on) before your data will sync again.
“We’ve detected that mandatory columns have been removed from your Google Sheet. Let’s get you back up and running.”
“The container configuration does not allow us to sync.”
Why connect Asana and Google Sheets with Unito?
Syncing tasks to spreadsheet rows is especially helpful when you want to speed up the process of reviewing tasks from the uniformity and flexibility of a spreadsheet. You can build reports for stakeholders quickly and efficiently through simple automation. It’s also handy for reviewing budgets and expenses; resource management; and collaborating with external contractors, clients, or other contacts.
It’s also useful for sharing specific information about a task or project with an external contact without giving them full access to your Asana organization or workspace. You can even allow your external contact’s changes in Google Sheets to be automatically reflected in your Asana tasks with a 2-way sync.

Getting around with Google Sheets and Unito
You can find more information on the following topics in Unito’s knowledge base:

