
How to Easily Export and Sync Asana to Microsoft Excel With Automated 2-Way Updates
This guide will walk you through the process of syncing Asana tasks to a spreadsheet in Microsoft Excel with automated 2-way updates. Exporting Asana projects to Excel rows with Unito is as easy as using any new app or platform – no coding knowledge required.
This 2-way workflow is helpful if your team in Asana wants to import tasks from Excel rows or vice versa with relying on a CSV file. Once you’re done, you’ll have set up a workflow that turns each Asana task into an Excel row automatically (or vice versa if you want Excel to create Asana tasks).
If you’d like to learn more about Unito first, check out our integration overview for Microsoft Excel and Asana.
By the end of this guide, you’ll be able to:
- Export Asana project data from tasks to Excel rows automatically.
- Generate new Excel rows automatically as your team creates Asana tasks.
- Update Excel in real-time with a 2-way sync whenever you make changes in Asana tasks, or vice versa.
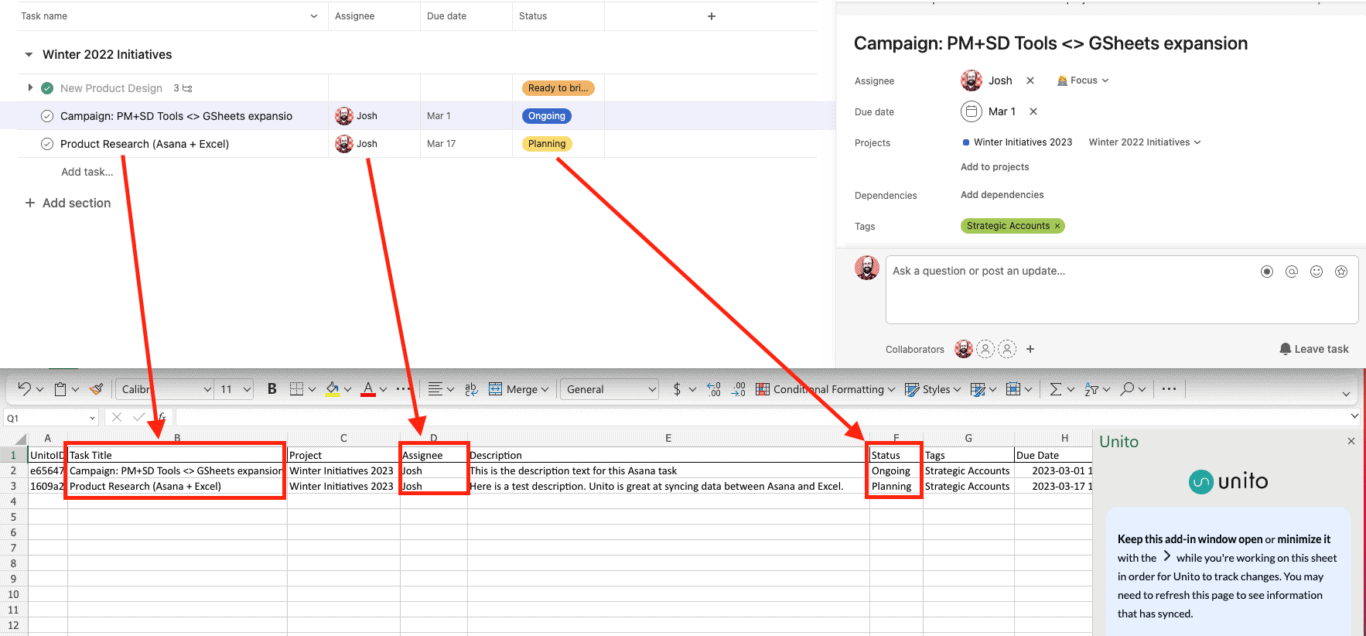
Here’s an example of our completed integration that exports Asana to Excel:
In this guide:
- Tools: Asana and Microsoft Excel
- Use cases: Task management, project reporting, data migration
- Great for: Data analysts, project managers, stakeholders and executives

Before you connect Asana and Excel to Unito:
- Permissions required to sync: You must have read & write permissions in Excel, and your Asana account needs to be a full member of your organization, not a guest.
- Excel Add-in: Install the Unito add-in for Microsoft Excel Online. Without the add-in, you won’t be able to sync data between Asana and Excel.
- Table header: Set up a table header in Microsoft Excel so that the first row includes the names of your Asana task fields (e.g., title, description, assignee, etc.). More on this below.
If you aren’t sure where to begin, we created this template for Microsoft Excel users you can use to get started. Just be sure to download the template and then upload it to your own One Drive in order to use it. Feel free to create a new project and export Asana data from there if you’d like to test the integration before syncing historical data.
Step 1. Prepare your table header in Excel
Your Excel table header tells Unito where to put Asana task fields in your spreadsheet. So be sure to give each column a name that matches with fields in Asana. They don’t need to match perfectly, but keeping a similar naming convention in place may help you stay organized and manage projects more easily.
Here’s a full list of Asana task fields.
Once you connect Asana and Excel to Unito and set up your table header, your rows will become tasks and your columns will become fields.
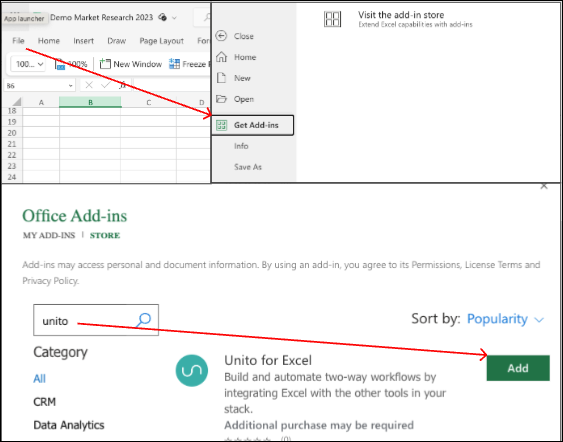
Step 2. Install the Unito add-in for Excel
Go to www.office.com and open Excel Online.
- Then, from your spreadsheet click on File, then Get Add-ins.
- In the next screen click STORE and type Unito into the search box.
- Click Add and follow the on-screen instructions to install the Unito add-in.
Follow the on-screen instructions to add Unito to your Microsoft workspace.
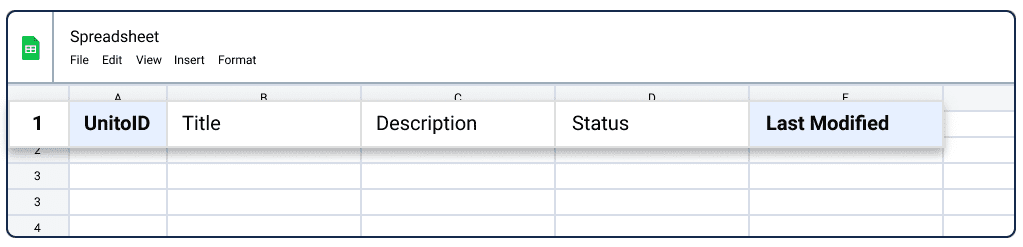
Once the add-in is installed, click Insert the two columns in this sheet.
You’ll see UnitoID and Last Modified. Only columns between those two will sync with Unito. Having these columns in your table header is essential for this integration to function as intended. You can hide them, but don’t delete or modify those columns.
Step 3. Connect Asana and Microsoft Excel to Unito
- Open the Unito App and click +Create Flow.
- Click Start Here to connect Asana and Excel in any order.
- Select an account for each of your tools.
- Choose the Asana Project and Excel spreadsheet to connect.

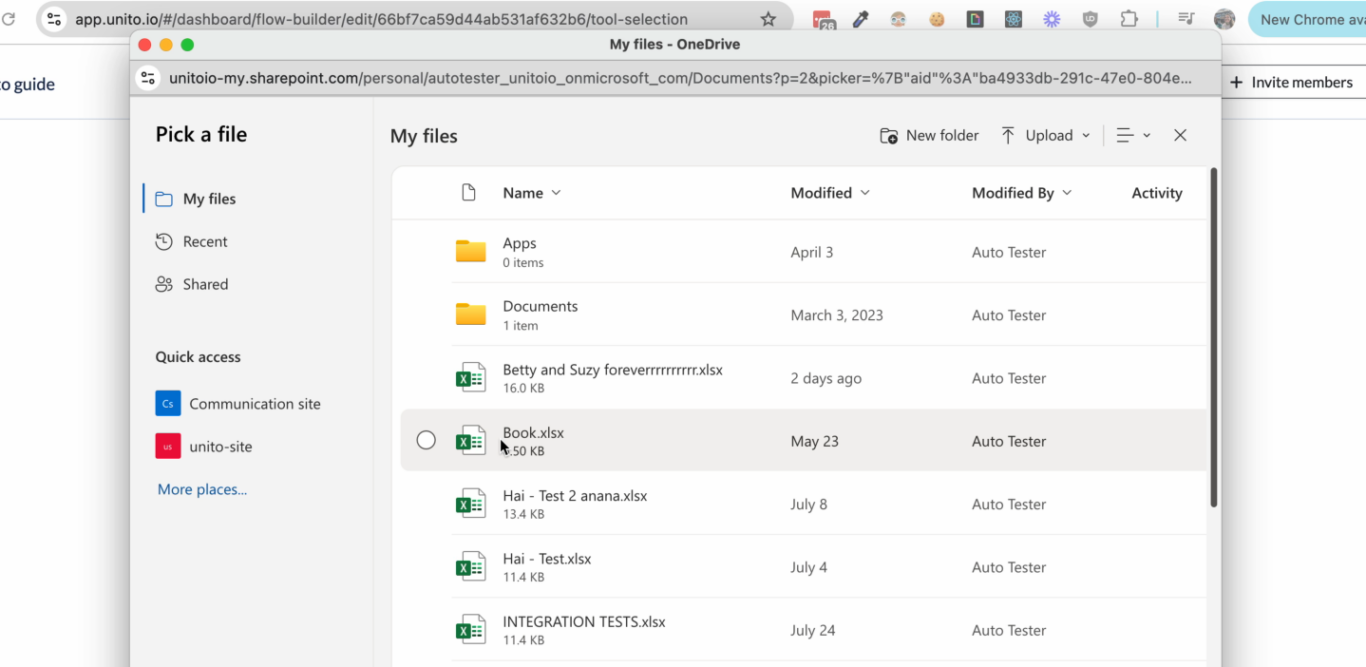
You can pull up your Excel spreadsheet by hitting Select workbook and picking the spreadsheet you want to sync.
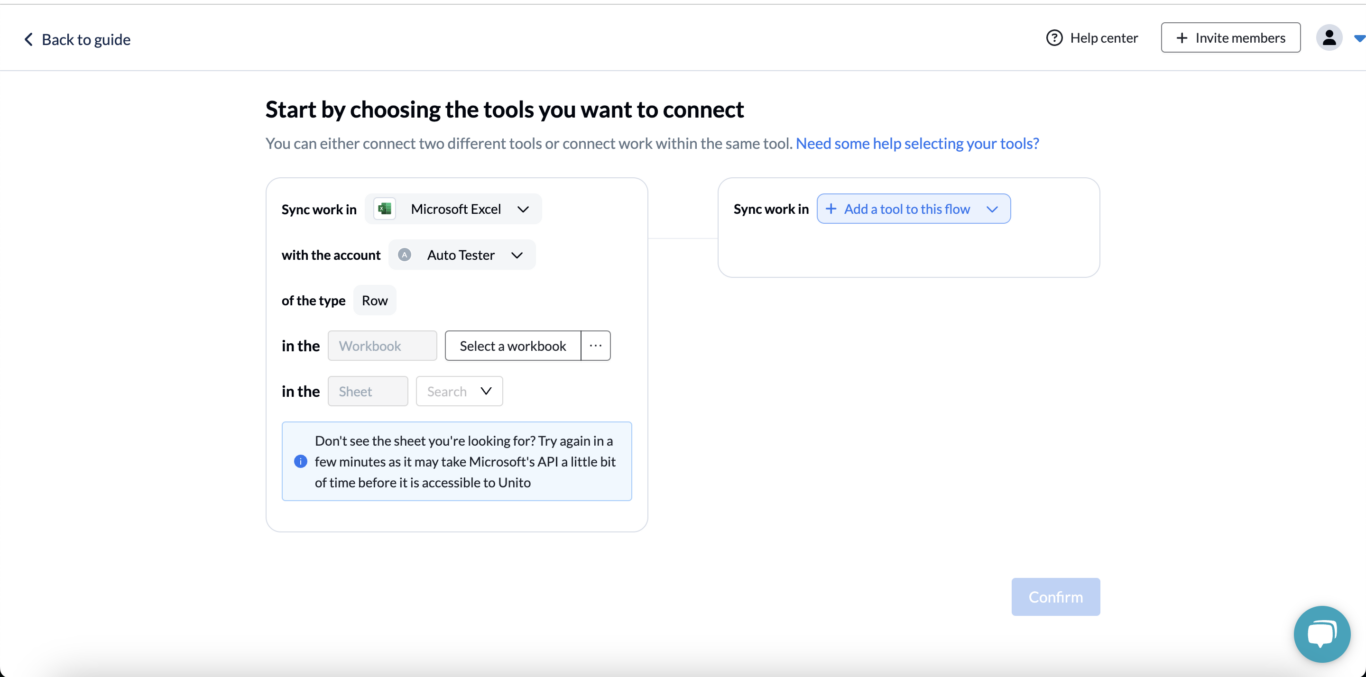
When you’re ready, click Confirm.
Step 4. Set a flow direction between Asana and Excel
Flow direction determines how new Asana tasks or Excel rows are created but not modified or updated. That comes in step 6.

Click Confirm when you’ve chosen a flow direction.
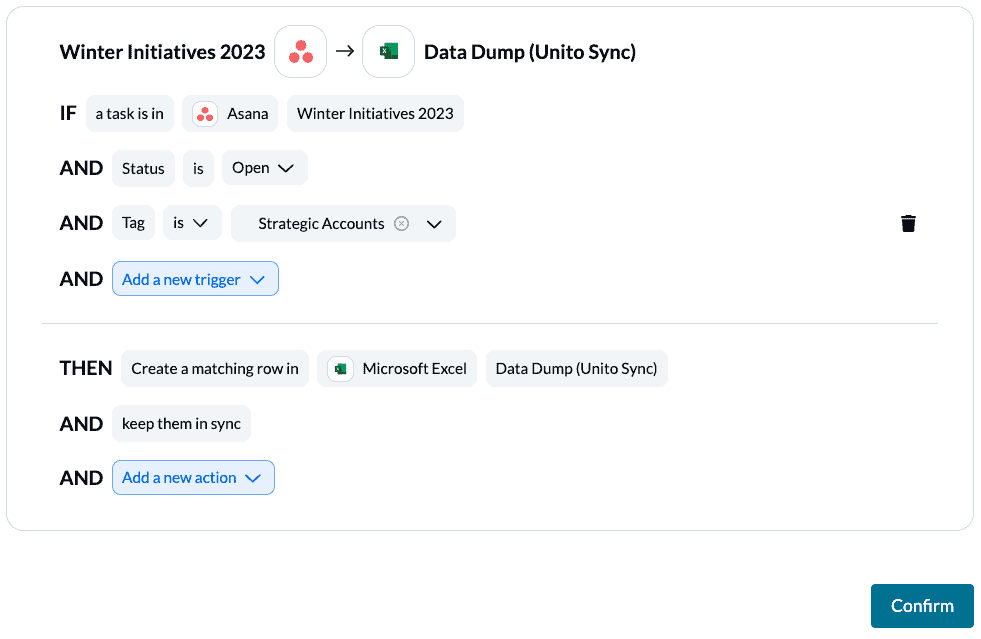
Step 5. Set up rules to filter data between Asana and Excel
You can set rules to filter out specific Asana tasks from syncing to Microsoft Excel (or vice versa). This is especially valuable if your projects contain many tasks, but only some of them are relevant for your spreadsheet use case.
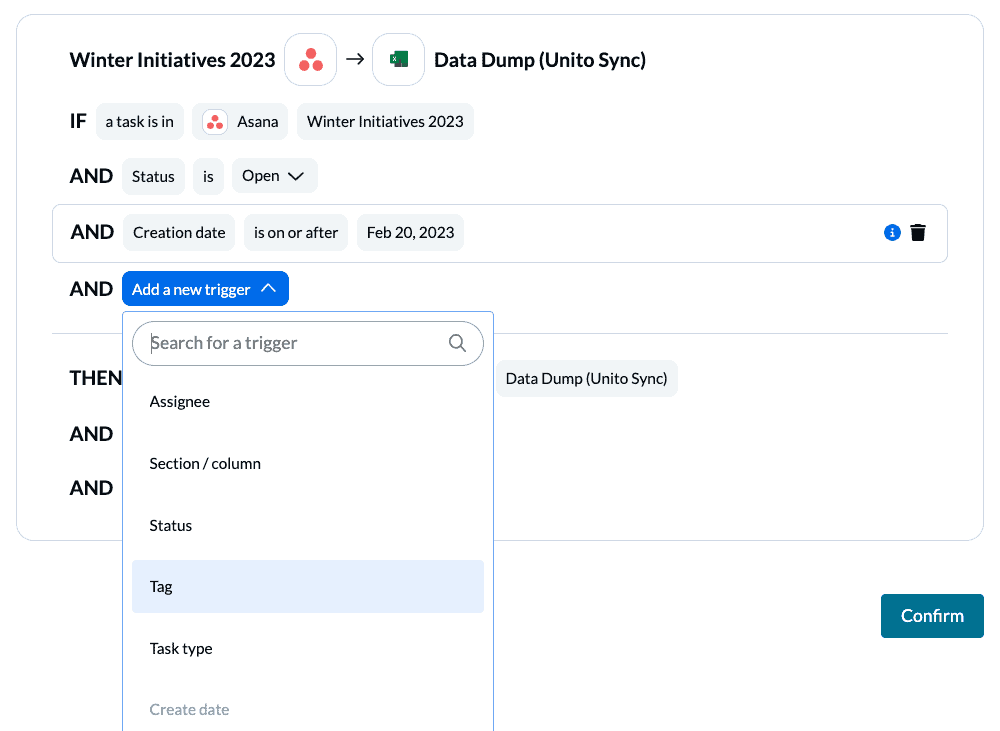
By customizing Asana tags, you can be even more precise about what kind of data is shared with Excel:
Find out more about setting rules.
Step 6. Set up field mappings between Asana and Excel
Next, select Start from scratch. Since every field in Excel is a custom field, Unito can’t auto-map them.
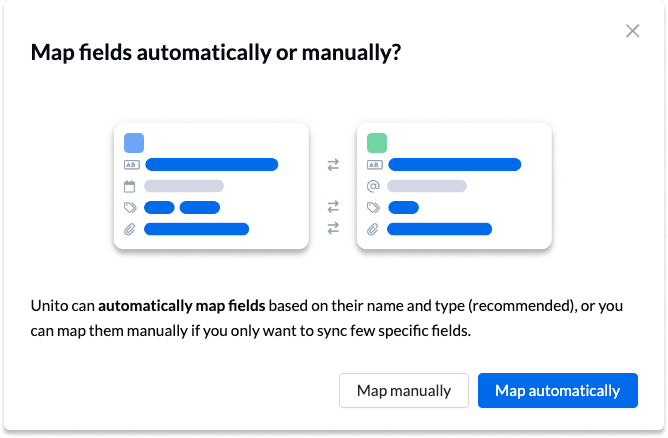
Click +Add mapping to select an Asana task field and a matching Excel field to keep in sync. This is where the fields you create in your table header will appear.
If you forgot to include a field in Excel, you can add new columns or change the names, but you’ll have to close your browser tab with Unito and re-open it for the changes to appear in your flow.
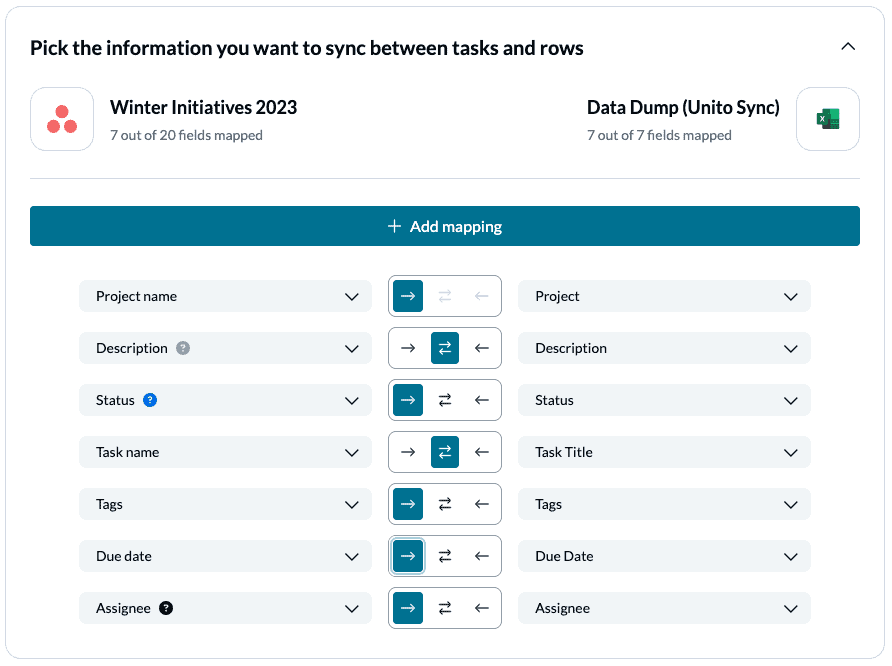
Click Confirm when you’re satisfied with your field mappings to proceed.
Find out more about setting field mappings.
Note: If you change a column name in a synced spreadsheet, be sure to update your flow’s field mappings in Unito or else your data will stop syncing.
Step 7. Save, close, and launch your Asana – Excel Flow!
If you’ve followed the steps above, your Unito flow will now:
- Create new rows in Excel based on specified Asana tasks.
- Keep those rows and tasks updated in real-time based on our field mappings.
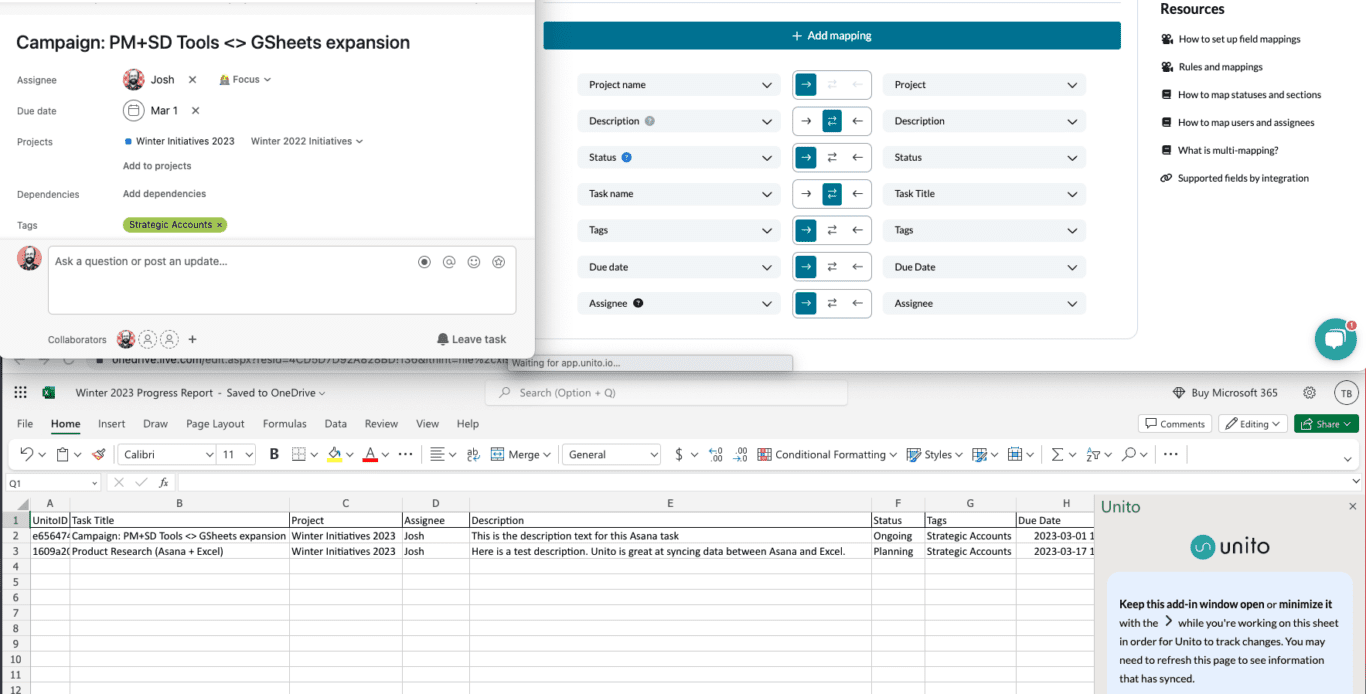
Here’s one last look at our demo integration between Asana and Excel:
If you have any questions, don’t hesitate to reach out and let us know.
Ready to streamline project management?
Meet with our team to see what Unito can do for your workflows.
What’s next after syncing Asana tasks to Excel rows?
- Duplicate this flow to sync tasks from other projects to your Excel spreadsheet.
- Read our integration overviews of Asana and Microsoft Excel to better understand the capabilities and limitations of each integration.
- Need help? Here’s our troubleshooting guide for Microsoft Excel
- Follow similar step-by-step guides to connect Asana to GitHub, Trello, Google Sheets, Asana and Smartsheet, or Airtable.
- Learn how to set up a master Asana project across multiple orgs.
- Follow a similar guide to connect Airtable with Asana.
- Or check out these tutorials to connect Excel and Airtable, Wrike, or monday.com.
- Attend a demo webinar to find out what else you can do with Unito.
Best use cases for syncing Asana tasks to Excel rows
Unito can export Asana to Excel or vice versa (keeping both in a real-time, 2-way sync) to not only save you from copy-pasting tasks manually into a spreadsheet, but also to keep your data up-to-date from end-to-end.
Integrating Asana and Excel simplifies the process of building progress reports, project timelines, managing human resources, analyzing financial details related to tasks and other use cases requiring you to paste Asana project details into Excel.
Can Asana import tasks from Excel?
Yes absolutely! You can import Asana project data without needing a CSV file to sync new tasks or historical data automatically. The goal is to create workflows that enable you to efficiently organize your project management without replacing an old process with an equally complex one.
Optimize your process in Asana and Microsoft Excel
Your ability to import or export from Asana or Microsoft Excel will massively impact your process on how best to track teams quickly and effectively, by working the way you want from the interface of your choice.
Enjoy the comfort of a familiar project or spreadsheet
Those who prefer to stay in their projects or spreadsheets can do so, and you can track any teams progress automatically. It’s a new tool in your toolkit that will make a big difference whether you’re syncing new projects or older on-going campaigns.
Why connect an Asana project to a Microsoft Excel spreadsheet?
No more need to export or import a CSV file
Syncing Asana tasks to Excel rows enables you to speed up the reporting process by populating your data table with live updates from Asana that change as work is completed. So when someone in Asana updates a task, Unito enables you to see those changes from Excel in real-time.
This method saves you the hassle of exporting or importing a CSV file. Instead you can manage data manually with a 2-way integration. Your project timeline will thank you when all of your exported data appears in Excel automatically as a synced spreadsheet.
Spend more time finessing your dashboard
You can build reports for stakeholders quickly and efficiently through simple automation that establishes a fully-synced spreadsheet. It’s handy for reviewing budgets and expenses; resource management; and collaborating with external contractors, clients, or other contacts across a variety of apps and tools.
Project management is all about efficiency and optimizing your workflow. So being able to manage multiple projects at once becomes a simpler process when you export Asana task field data to Excel quickly and automatically.