What Is Zendesk and What Is It For?
A help desk software. A customer service portal. An agile platform. Zendesk is all of these and more, and its unbeatable help center and user-friendly interface set you up for success from day one. Small wonder that Zendesk is synonymous with top-notch customer support, for small businesses and global enterprises alike.
Any kind of software is an investment, though, and you want to be sure that Zendesk is the right option for you. If you’ve been Googling questions like “What is Zendesk used for?” or “How to set up Zendesk?” we’ve prepared a two-part guide to help you out. In Part One, we’ll talk about what Zendesk does and why it’s the number-one choice for customer experience software. Let’s dive in!
Zendesk is one of the most popular and user-friendly service desk tools on the market. One look at their feature-packed products and simple, accessible workflows makes it pretty clear as to why.
Ready to ramp up your customer service? Let’s dive into Zendesk and how your teams can use it.
What is Zendesk?
Essentially, Zendesk is a cloud-based customer support solution that helps agents keep track of tickets raised and monitor customer interactions across channels. It’s an all-in-one platform where you can resolve queries, get a 360-degree view of your customer, and track agent performance and CX analytics. You can also set up a knowledge base where customers can log in and browse other tickets to find the answer they’re looking for.
Zendesk is designed to be used right out of the box, and as you scale up, it scales with you. So whether you’re a fast-growing startup or an established enterprise, there’s a lot you can get out of Zendesk.
Not sure if Zendesk is right for your team? Check out these alternatives.
What type of companies use Zendesk?
Zendesk offers five plans to cater to different scales and complexities of customer support needs. Over 100,000 companies across industries use Zendesk, including brands like Uber, Accor Plus, Siemens, and Shopify.
Small businesses and startups might legitimately ask: “Is Zendesk right for me?” After all, top-notch solutions don’t come cheap. Zendesk knows this, and it wants to help new businesses succeed – which is why it offers a program that gives qualifying startups six months of access for free. With Zendesk’s capabilities behind you from day one, you’re pretty much guaranteed a solid growth path.
Getting started with Zendesk
So you’ve signed up for Zendesk and are ready to kick things off. When you log into Zendesk for the very first time, you’ll be greeted by this welcome screen:
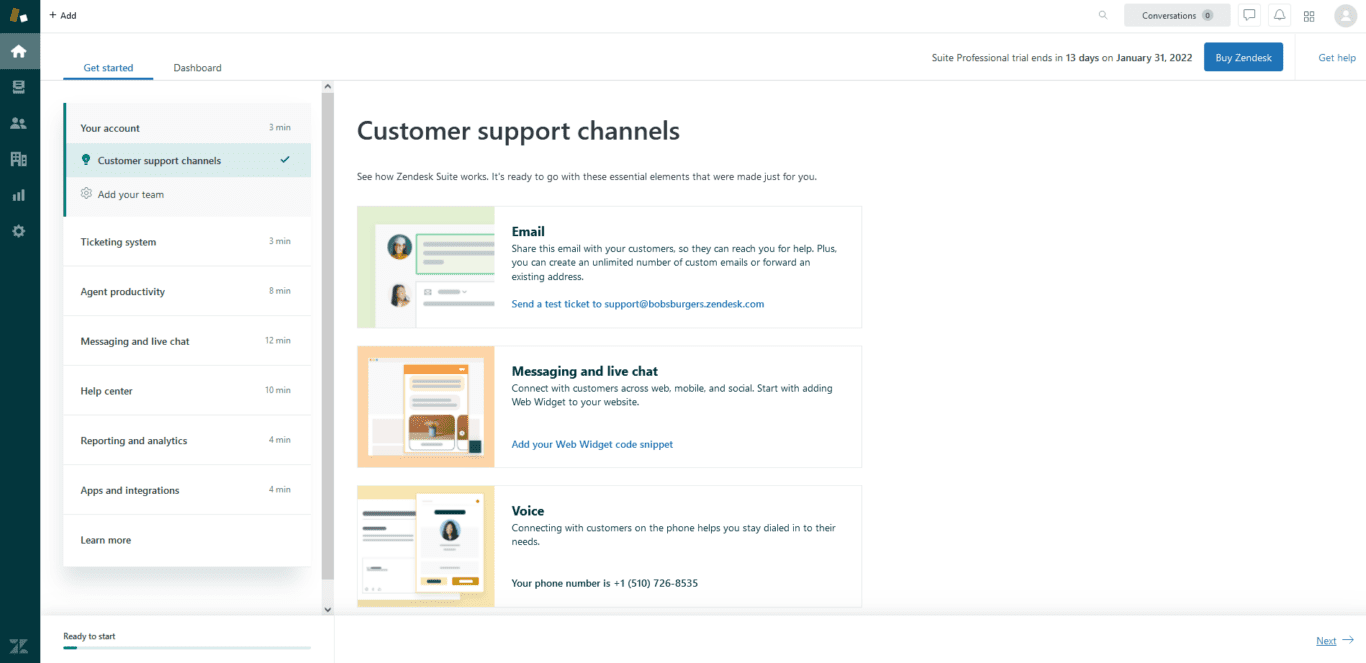
This is where you’ll find information about your domain, and the support email or phone numbers customers can use to contact you. These fields are populated using information you input when signing up, so they should look familiar
Notice there is a gear icon on the left, which will take you to advanced settings.

In this tab, you’ll be presented with all of the support channels Zendesk offers. To interact with your customers, you can use:
- Phone
- Text
- Chat
Core Zendesk features
Now that you’re at home on the Zendesk home screen, let’s dive into the tool’s main features and sections.
Views
The ‘Views’ section is the second icon on the left-hand side of the Zendesk dashboard (beneath the tiny home icon). It’s in Views that you’ll find your tickets, whether they were created by someone on your team or by a customer.
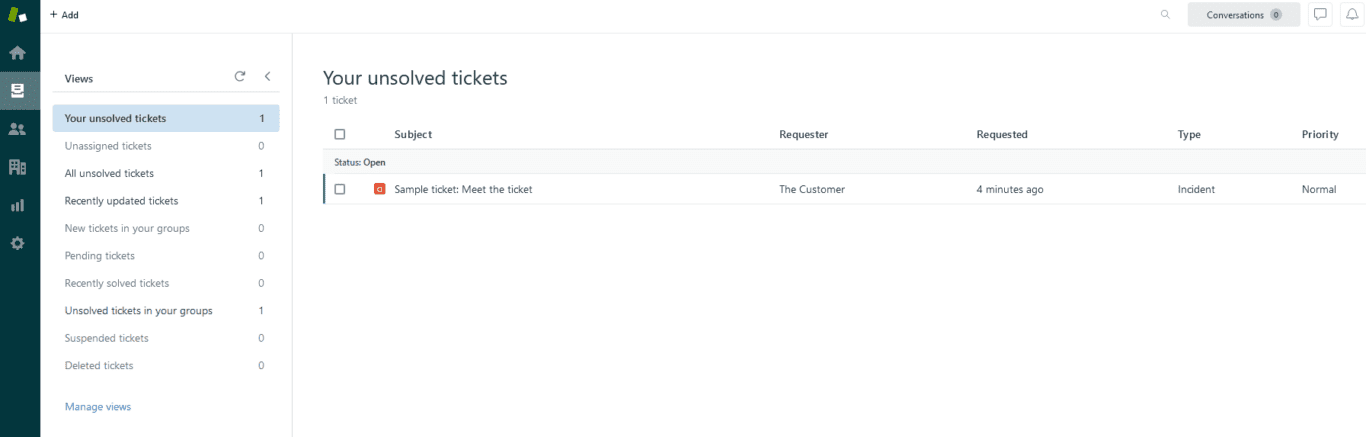
You can easily switch the type of view you prefer to sift through tickets, such as “All unsolved” or “Recently solved.” It looks easy enough on a beginner account, but once you have hundreds (if not thousands) of tickets to swim through, those filtering methods will come in handy!
Admin
Need to change or manage your Zendesk account? Pop into the Admin section.
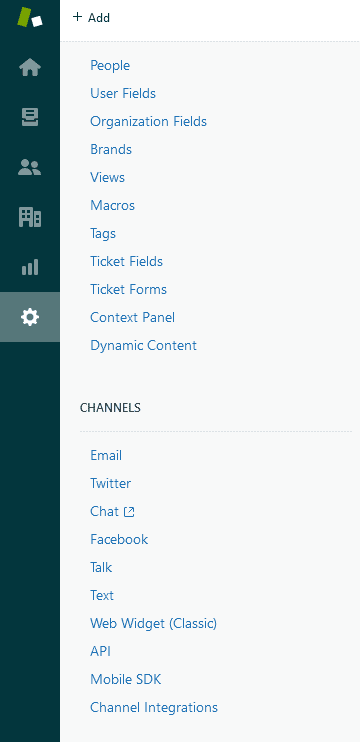
From the ‘Admin Home’ section you’ll be able to access:
- Apps
- Channels
- Business Rules
- Settings
- And so much more!
The reporting tool — Explore
Want to create a better experience for your customers? All customer service teams should strive for continuous improvement. To do so, you need a solid understanding of your customer service data. The data is what tells you what’s going wrong, and what’s resonating with your customers.
Now called Zendesk Explore, the tool’s reporting functionality aggregates all of the overwhelming and confusing data into digestible insights that empower you to make smart decisions on what to do next.
You can use the built-in reporting dashboard that Zendesk provides, or create your own to tap into the most relevant data for your business.
Zendesk Chat
Now things are getting fun! The Zendesk Chat is your main tool to communicate with people who are on your website, right NOW.
You can embed your own personal Zendesk Chat code snippet directly into your website. When a visitor is active on your site, they will appear in this section of the app. All you need to do to start a conversation is to click on the chosen visitor, and a chat window will appear, and you can chat to your heart’s content.
Note that you can add notes and relevant information from your interactions with the visitor on the right-hand side. Additionally, as soon as you generate this chat, a new ticket is created so that you remember to follow up on the conversation. If the user gives you their email address, they can receive a copy of the chat log by email as well — which allows the conversation to continue even if they log off or bounce off of your page.
Additionally, if this visitor already has a customer profile, you’ll be able to see all the tickets related to this person within this window. Knowing a user’s history with your brand allows your agents to be prepared for the interaction, and really cater their approach to the individual.
The Chat section is not just for chatting either — you’ll also get access to analytics.
In the analytics section, you can see how many chats have been served, how many were missed, and then sort these by:
- Response time
- Chat duration
- Satisfaction
- Wait time for served customers
- Wait time for missed customers
- Conversions
You also have a handy dashboard to monitor metrics at-a-glance in a visual way, such as how many agents are online, your average response time, and the current customer queue.
Zendesk Talk
Unlike Chat, Zendesk Talk is where you’ll handle all phone conversations.
You can customize the maximum queue size and maximum queue time before callers get rerouted to voicemail, and even record custom greetings!
Benefits of Zendesk
There are several excellent customer support solutions on the market, but Zendesk still stands out as the OG authority. Let’s talk about some of the benefits that it’s justly famous for.
Flexibility and consistency
Zendesk gives you a top-notch omnichannel CX platform right out of the box – and with a few clicks, you can set up automations to streamline your workflow and start driving results. Agents can easily transfer between channels depending on how the conversation is going, while the back-end panel records everything for context so they can pick up where they left off at any time.
Endless customization
Custom branding? A live chat box on your homepage? Unique help center pages? APIs to build your own apps? Those are just the beginning. With thousands of out-of-the-box and DIY customizations, Zendesk lets you be there for your customers in exactly the ways you want to be.
Integration options
Zendesk comes with over 1000 powerful integrations for platforms like Mailchimp, Slack, Jira, and Segment. And with Unito, you can set up even more integrations with automatic two-way data syncing, like from Zendesk to Wrike.
Plethora of resources
If you’re wondering: “Is Zendesk easy to use?” we’ll be honest and say that there’s a bit of a learning curve before you can unlock its full potential. With the vast library of training resources, though, you’ll be able to get started even if you’re completely new to CX. You can also opt for Zendesk’s hands-on guidance services to set up your customer support platform just the way you like it.
How much does Zendesk cost?
There are three ways you can add Zendesk to your tool stack: its core Zendesk ticketing platform (called Basic), Zendesk Suite, and Zendesk Sell.
Zendesk Basic pricing
Zendesk Basic gives your team access to Zendesk’s ticketing system and lets you communicate with customers through email, Twitter, and Facebook. It’s an inexpensive way to streamline your customer support process. Here’s what you can expect to play for each Basic plan.
- Support Team: This is Zendesk’s most affordable plan at $19 per agent, per month. You’ll get a centralized platform to support customers through a ticketing system, email, Facebook, and Twitter. You’ll also have access to automation, reporting, and analytics.
- Support Professional: This plan will cost you $55 per agent, per month. You get everything from the Team plan plus customer satisfaction surveys, multilingual support, and service level agreements.
- Support Enterprise: At $115 per agent, per month, this plan adds skill-based routing, custom agent roles, and a sandbox.
Zendesk Suite pricing
Zendesk Suite is the true all-in-one platform that your support team can use to streamline all their workflows. It goes beyond the ticketing system, giving them a knowledge base, digital onboarding capability, and even AI-powered features.
- Suite Team: For $55 per agent, per month, you’ll get Zendek’s ticketing system, messaging across all communication channels, a help center, automated bots, analytics dashboards, and a whole lot more.
- Suite Growth: Bump up your spend to $89 per agent, per month, and you’ll add multiple ticket forms, service level agreements, customer satisfaction ratings, multilingual support, and a self-serve customer portal.
- Suite Professional: When you pay $99 per agent, per month, you’ll get live analytics, side conversations, integrated community forums, access to an advanced AI add-on, and more.
With Zendesk Suite, you can also get a custom Enterprise plan with custom pricing and features your enterprise-sized business really needs. You’ll just have to reach out to Zendesk’s sales team.
Zendesk Sales pricing
If you’re looking for new ways to support your sales team, then this might be what you’re looking for. Zendesk Sell gives you a customizable pipeline, a dedicated CRM, and a great way to track follow-up tasks.
- Sell Team: At $19 a month per agent, Zendesk Sell gives you up to two customizable pipelines, pre-built sales dashboards, call tracking and recording, text messages, as well as email and calendar integrations.
- Sell Growth: Bumped up to $55 per agent, per month, this plan gets up to 10 customizable pipelines, everything in the Team plan, plus a product and price book, advanced reports, sales forecasting, and customer prospecting.
- Sell Professional: For $115 per agent, per month, you’ll get up to 20 pipelines, plus lead scoring, task automation, advanced permissions, and a customizable company hierarchy.
Zendesk apps
Zendesk has a built-in app marketplace that gives you access to integrations, automation, and a ton of other tools to make your Zendesk workflows run that much smoother.
If you’re not sure where to start, here’s a breakdown of the best Zendesk apps.
Where to start with Zendesk: Triggers
One of the most powerful features for maximizing your team’s efficiency is triggers. Triggers allow you to automate certain actions based on your customers’ behavior. This ensures that messages are sent even when an agent is not available — as long as the conditions of the trigger are met.
Triggers are incredibly useful for making sure no customers slip through the cracks!
To create your first trigger, make sure you’re in the Zendesk chat section. Next, on the left-hand side below settings, choose Triggers, then click the ‘Add Trigger +’ button. You’ll be taken to a new page where you can customize everything about your trigger.
First, choose whether or not this trigger is enabled. In some cases — for example, during a holiday — you may want certain triggers to run for a limited period of time. You can always come back here and turn each trigger on or off.
Next, you can name your trigger and give it a description. Stick to a clear nomenclature — when you have several of these, you’ll want to have a clear understanding of which is which. You also want your entire team to be on the same page.
Then decide whether or not each visitor sees the message only once, or every time the triggering action occurs.
Now comes the fun part — making the trigger come to life. Choose what type of action should trigger this specific message. This means that you can target your messaging based on several factors.
For instance, let’s say I want to target
- everyone who is NOT San Francisco-based
- people that click on the chatbox on my site
- users that are still online.
I can choose to make this trigger happen if all conditions apply, or if any of them apply. In this case, I want all of them to apply.
You can add as few or as many conditions as you like depending on your goals. Then click ‘Create Triggers’ and boom! You’re done.
How to integrate Zendesk with other tools
Learning how to use Zendesk is great, but what about slotting it in with your tool stack? Without the right integration, you can spend hours just copying and pasting information from tool to tool so everyone’s in the loop. Just because a tool is great for your needs doesn’t mean it works for another team. No one should be forced to use a tool that doesn’t fit their workflow.
Want to save time and effort? Try Unito. Unito has the deepest two-way integrations for some of the most popular tools on the market, including Zendesk, Asana, Trello, Google Sheets, and more.
Or you can follow this guide to sync Zendesk with Jira.
Sync data across tools seamlessly, use rules to filter out irrelevant information, and map fields so everything ends up exactly where it needs to go. All of that in just a few minutes.
Zendesk FAQ
Have some quick questions about Zendesk? Here are the answers.
What is Zendesk?
Zendesk is a suite of software designed for customer support teams — though there is a product for sales teams as well — that helps them optimize every part of the customer support process. There’s a ticketing system to appropriately triage and handle requests, a knowledge base, automation, a digital onboarding platform, and more.
What is Zendesk used for?
Zendesk is used by customer support teams to make every part of their job easier. The ticketing system centralizes customer requests — which would otherwise come in through phone calls and emails — while features like the help center and digital onboarding platform help reduce the flow of overall requests.
Professional customer support leaders can use Zendesk’s features to improve the customer journey at every stage, all while lightening their team’s workload.
What’s the difference between Zendesk Support and Zendesk Sell?
Basically, what team it’s for. Zendesk Support has features designed to help support teams handle customer requests — and improve the overall customer experience. Meanwhile, Zendesk Sell is all about helping your sales team close more deals and bring in more business. It offers a customized pipeline where sales leaders can track deals and feed new leads. Beyond that, it also helps automate some of the more repetitive aspects of sales work, record calls, and more.