How to Build a Hub Board in Trello
One of Trello’s greatest strengths can also be your team’s downfall. Since creating and using a Trello board is so simple, you’ll quickly rack up dozens of boards for individual projects, personal to-do lists, team priorities, and more. While there are a ton of Power-Ups out there for streamlining work throughout a single board, few of them can help you work across multiple boards.
That’s where Unito and the Trello hub board come in.
By pairing the right board with the best Trello integration on the market right now, you can get visibility on any number of Trello boards without constantly jumping back and forth or copying and pasting data over and over again.
Here’s how it works.
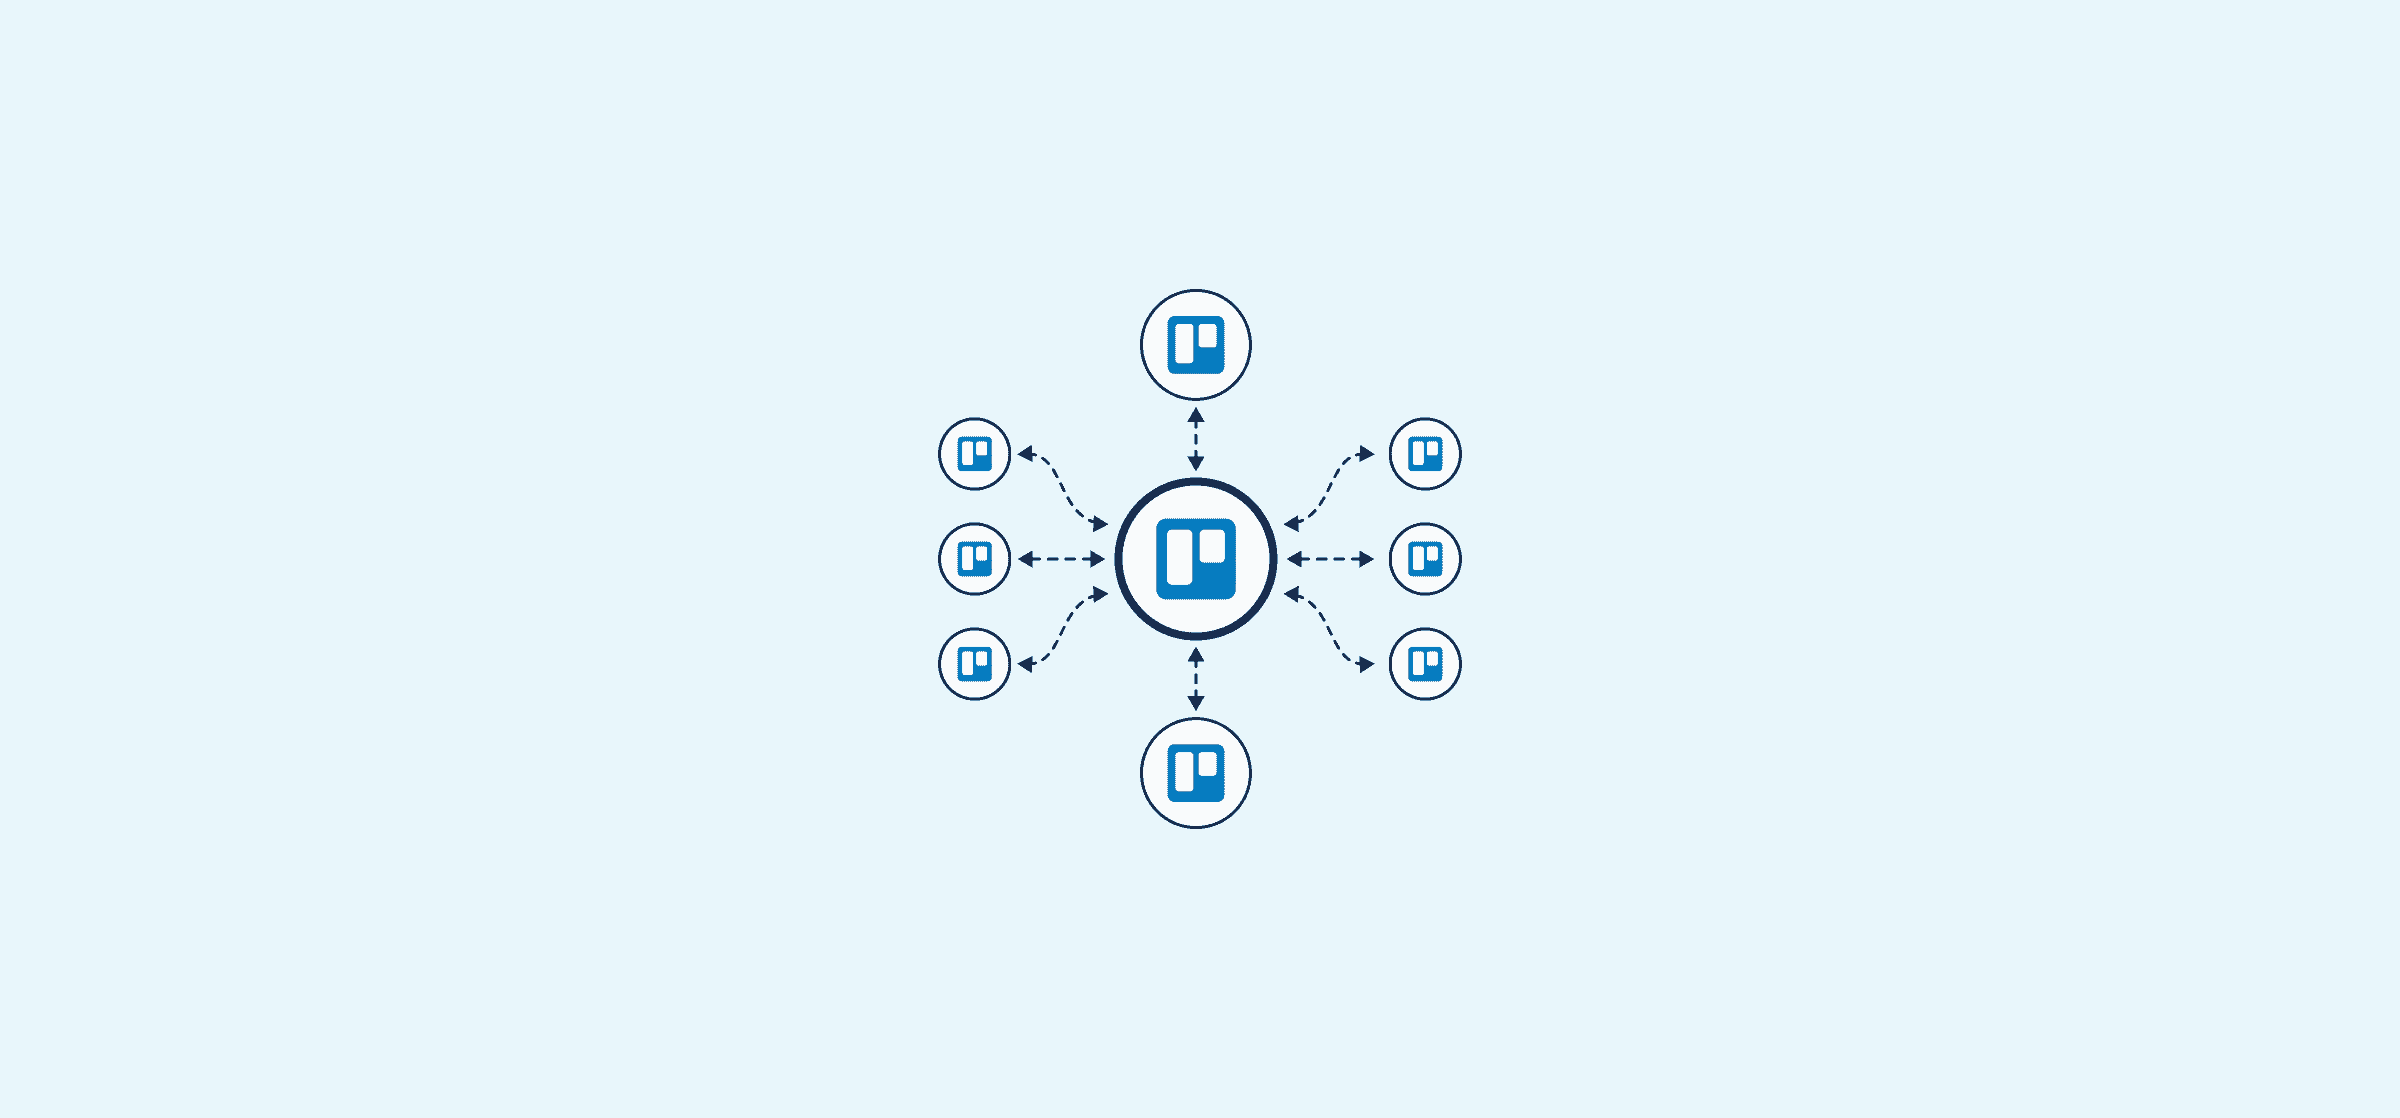
What is a Trello hub board?
Think of a hub board like an operator or dispatcher. It’s a place where any number of Trello cards can stream through before reaching their final destination. You won’t work directly with a hub board once it’s set up; its main purpose is to keep multiple Unito flows — each flow is a single two-way connection between two Trello boards — organized, no matter how many Trello boards you connect.
“The best part about Unito is the staff, hands down. This is exactly the kind of thing we want to spend money on in order to grow our business and be scalable. With their help I put together a Trello Hub Board and it’s saving me hours and hours.”
AC Furey, Executive Director, Thirty-Six Education
Trello Hub Boards can only be built with Unito, a workflow management solution that automatically syncs Trello cards back and forth between boards, keeping cards up to date everywhere. You can connect individual Trello boards together with Unito flows which will send cards back and forth between them.
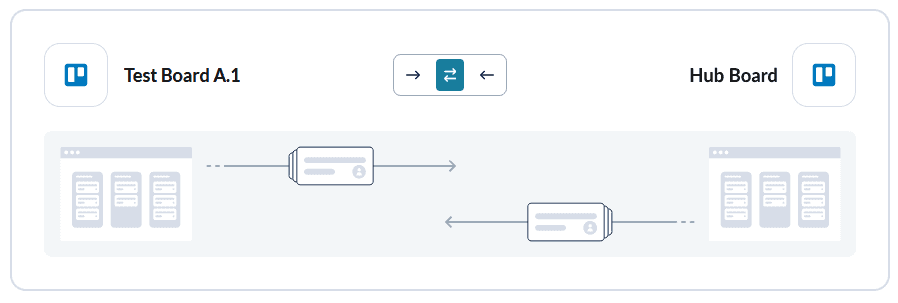
Here’s an example of a Trello hub board, connected to multiple Trello boards with Unito flows.
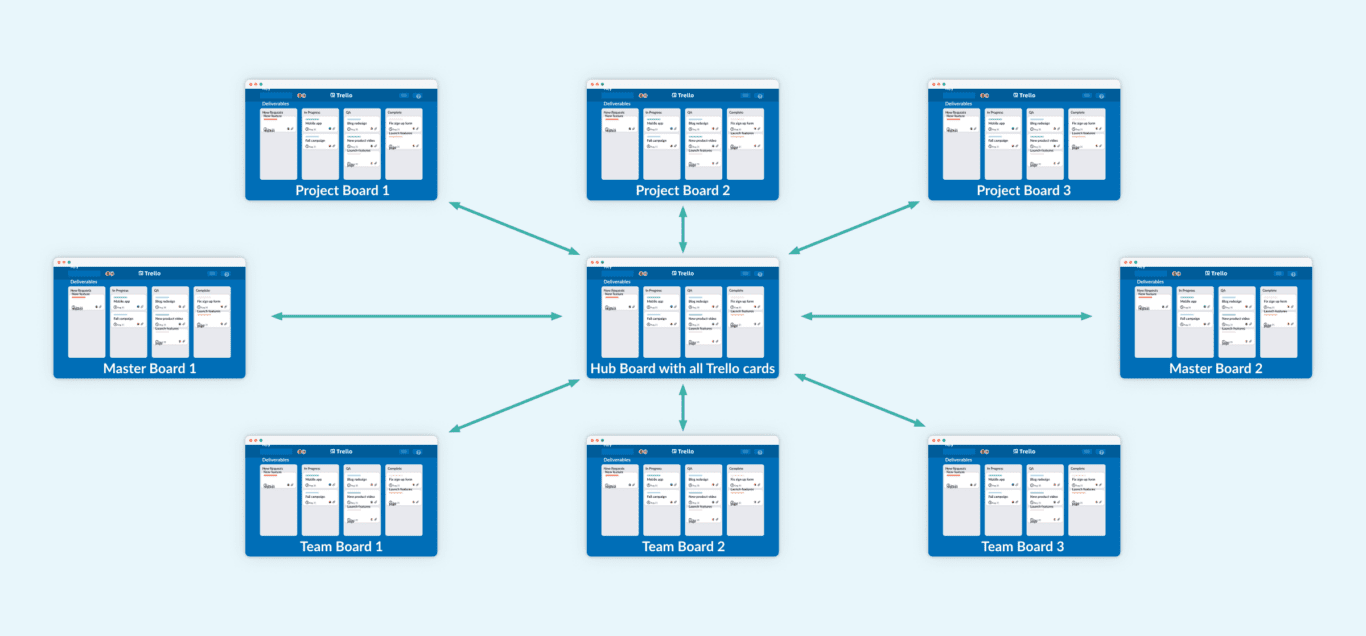
Trello cards are synced from each Project and Team board to the hub board, from where they can be evaluated, labeled, and fed to other boards as necessary — whether that’s to another project board, team board, or even a master board.
But this isn’t a one-way relationship!
Even after cards are sent out of the hub board, they’ll still be in the hub board, where they’ll be kept up to date as your teams work on them in other boards. And any time they need to be sent to another board? They’ll pass through the hub board and go to the right place.
The hub board vs. the Trello master board
If you’ve used Unito and Trello for a while, you might have already set up a Trello master board before — another kind of Trello board that can only be built with Unito. There are some key differences between the master board and the hub board.
Usually, a Trello master board is used as an overview of Trello cards in multiple boards. This gives better visibility on work happening throughout your workspace, helps with dispatching tasks, and streamlines Trello workflows.
At first blush, that sounds a lot like a hub board, right?
The difference is that a hub board does a lot more on the operations side; it’s not just for getting an overview of your work as it happens, it’s also for dispatching cards. Your hub board will often have quite a few more cards than any individual master board — and it’ll probably dispatch cards to your master boards, too.
Why use a Trello hub board?
Here’s an idea of what can happen if you don’t.
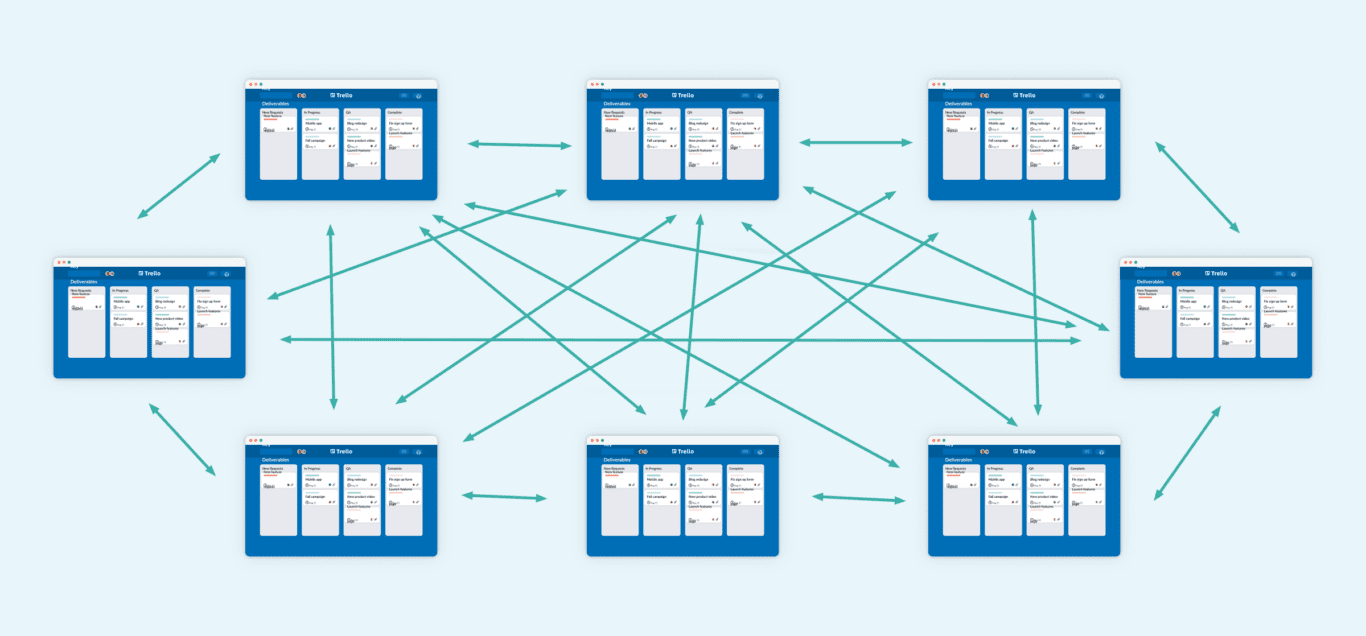
When you’re connecting that many Trello boards, you need a hub board. Here’s why.
It’s the best way to dispatch cards
Since Trello is so easy to use, you’ll often wind up with dozens of Trello boards to cover projects, teams, and even individual to-dos. Without the right workflow, it’s tough to keep track of everything going on across all these boards.
With a hub board, you have a single place to dispatch cards from. You can even set up rules with Unito that automatically apply labels to cards coming from specific boards and move them along to the next stage in your workflow — no matter the board where that is.
You can do more with less
When you start having a lot of Trello boards, all connected with Unito flows, you might struggle to make sense of things after opening up your Unito workspace. And if you have multiple flows connecting the same Trello boards, it can be especially tricky.
If all Unito flows pass through your hub board before sending cards back out to other boards, it’s a lot easier to keep track of everything.
Without a hub board, you might need dozens of flows to achieve the same result. Not only can that get messy, but it can get expensive, too!
Working with external collaborators
Trello is a great tool for working with external collaborators, especially when their work is intertwined with larger projects. But as you scale and grow your stable of freelancers — and add more external partnerships — all these Trello boards become too much for anyone to handle effectively.
That’s when a hub board becomes essential. Whether you set one up specifically for collaborating with external partners and freelancers or integrate it with their external boards, it’s a great way to centralize all work that happens outside the business — and send it on to the right internal team without extra manual work.
But hub boards aren’t just great for working with freelancers. Agencies, for example, often work with dozens of Trello boards — if not more. Think about it! Agencies often need:
- Boards for individual teams
- Boards for individual people
- Boards for clients
- Boards for freelancers
- Multiple master boards
- And more!
Linking all these boards up with flows that go back and forth can lead to issues. But with a hub board, you can centralize all your flows and keep things running smoothly.
How to build a Trello hub board
Think you need a hub board? Let’s dive into what you should do first before you start setting up the Unito flows to make it happen.
Figure out which boards will be part of your workflow
If your Trello workspace has a ton of boards in it, you’ll have to do a bit of cleaning up before you start building your hub board. Are you building a workflow for a single team? A whole department? An entire organization? That’ll tell you how many boards need to feed into your hub board. It’s a good idea to get input from the people who’ll be working in this workflow before you start picking out the Trello boards that’ll be part of it. You might find out that some boards don’t need inclusion after all.
It can be helpful here to draw out an actual map of how your workflow is going to work, with the hub board at the center, the boards you’re syncing to it in the periphery, and any master boards you want to build along the way.
Sign up for Unito
Unito’s deep, two-way integration for Trello is the best way to build a hub board for Trello. That’s because it doesn’t just export data from board to board; it also keeps everything in sync. You can try Unito for free for 14 days, which is more than enough time to set up your first hub board.
Create your hub board
Before you can start syncing cards from your hub board to the rest of your workspace, you have to actually build the hub board. For the most part, it’s a lot like creating a regular Trello board, but there are some key differences to keep in mind as you build:
- Create labels to identify which board a Trello card is coming from, and where it needs to go. Unito flows will use this information to filter out Trello cards that don’t need to be synced and send the rest to the right boards.
- Think carefully about the lists you’ll need for your hub board; this will depend greatly on the type of workflow you’re building. If your workflow involves a lot of creative work, for example, you’ll need lists that reflect that work’s approval status. One list could be called “Approval required” for instance.
Connect your hub board to your first Trello board
Now that you’ve picked out the boards your workflow needs and built your hub board, it’s time to actually start building your Unito flows.
You can get a full guide to doing that here, but here’s a quick step-by-step of how it works.
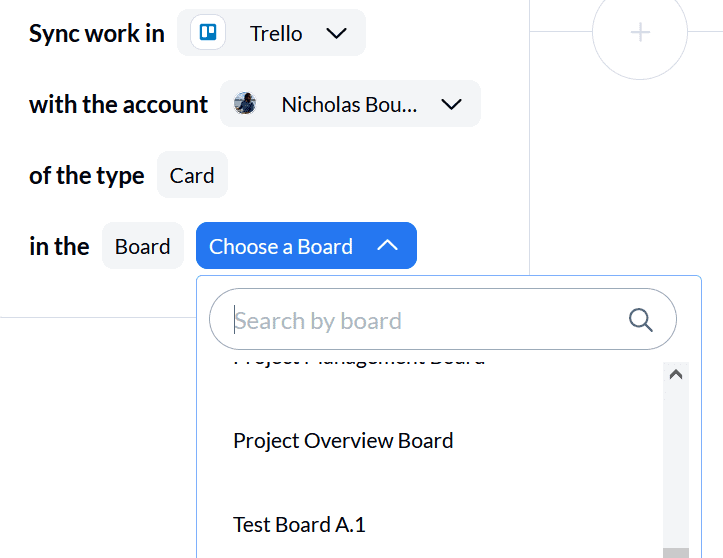
- Connect your Trello accounts and boards to Unito.
When you first launch Unito, you’ll have to pick the Trello account you want to use, then pick the two boards you need to sync Trello cards between.
- Set flow direction…
Unito can be used for both two-way flows and one-way flow, determining if Trello cards get created in one board or both. For a hub board, you’ll want to create a two-way flow.
- …for all boards!
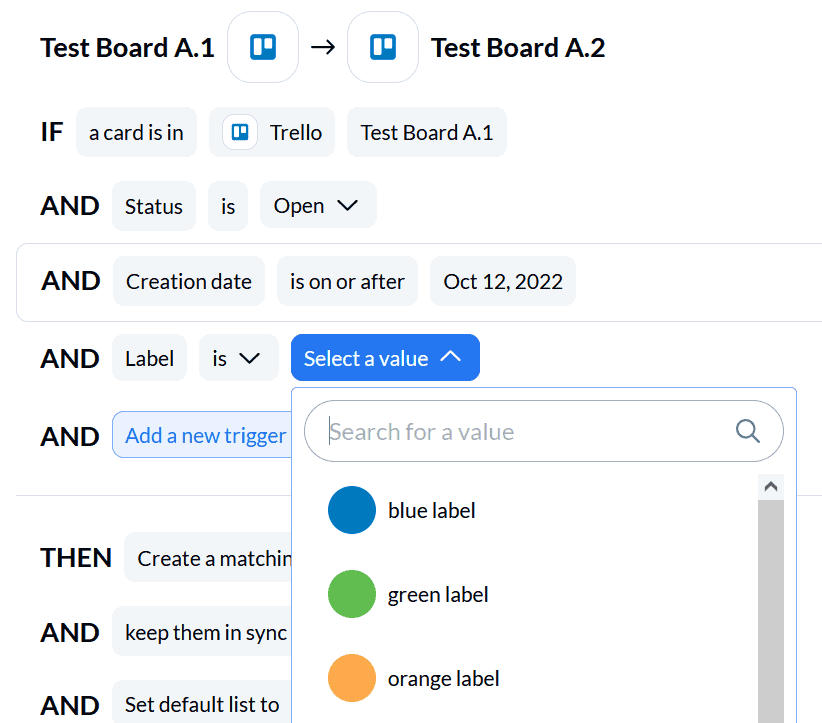
- Build rules.
Unito rules let you filter out Trello cards you don’t want synced by selecting specific labels, assignees, or lists. You could, for instance, create a rule that excludes all cards in a list called “Done.” That way, Unito stops syncing cards once work is done on them.
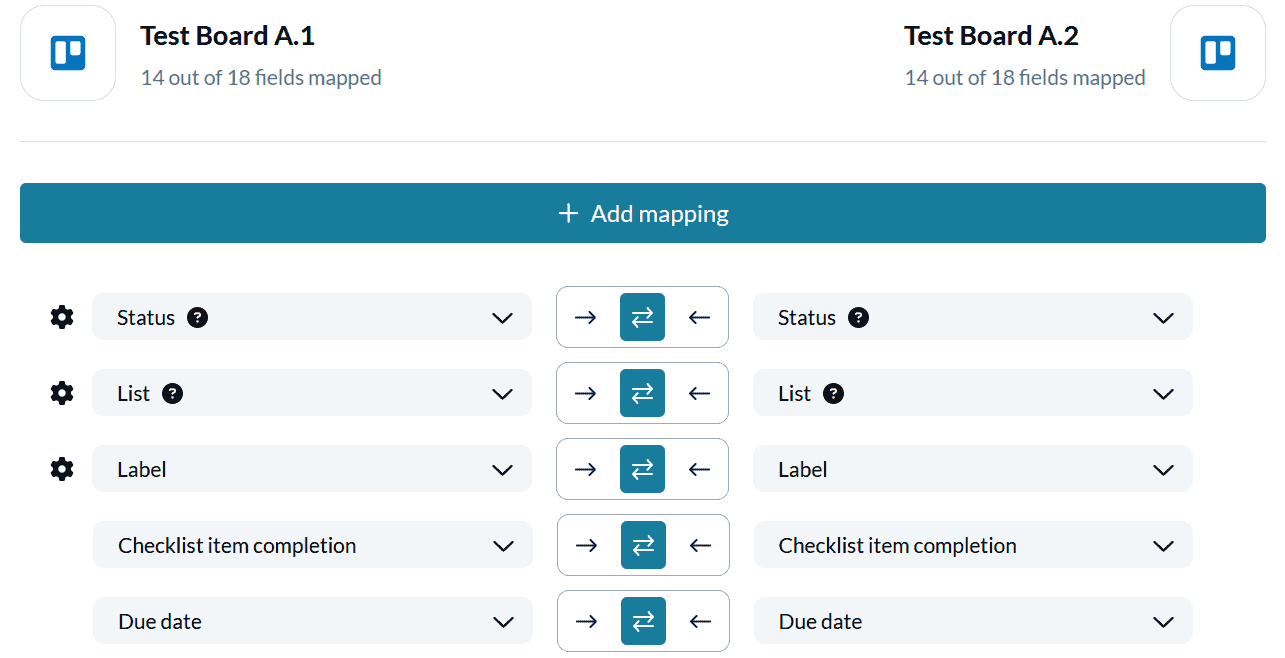
- Map your fields.
Field mappings are used to make sure your data ends up in the right place, even if the fields in each tool have slightly different names. For this use case, most fields will be mapped automatically, but you’ll want to make sure you manually map the lists in your hub board to those in the board you’re syncing with.
- Launch your flow!
After mapping your fields, just launch your flow and watch as cards get automatically synced between boards.
Connect your other Trello boards to your hub board
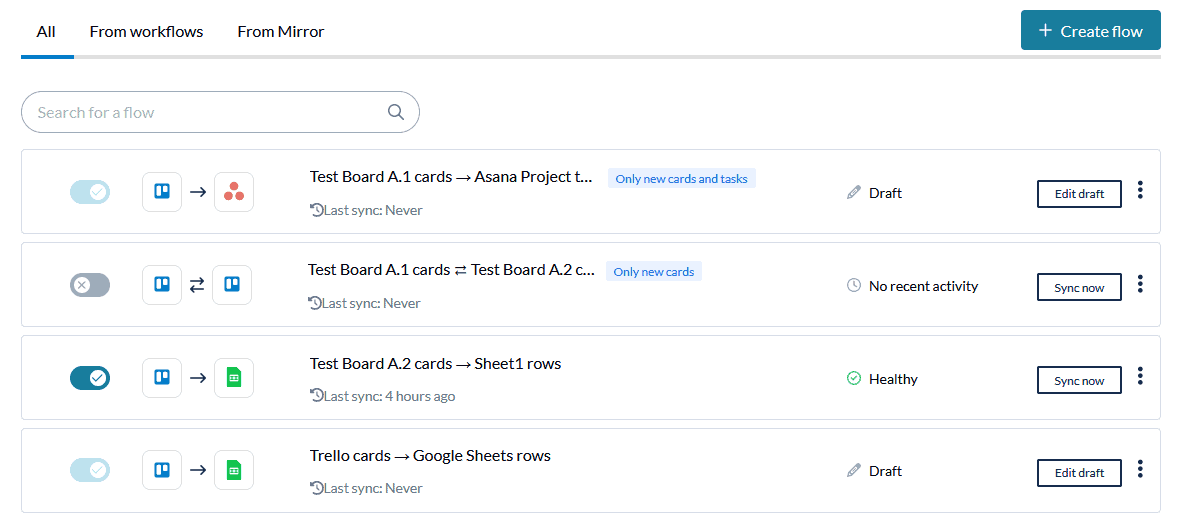
After building your first flow, all that’s left to do is to build the rest! Depending on how many boards you’re connecting to your hub board, this could take you some time. But it’ll be a lot faster if you just duplicate the flow you’ve already built!
All you need to do is find the flow you just built in your flow list.
Hit the vertical ellipsis and click Duplicate.
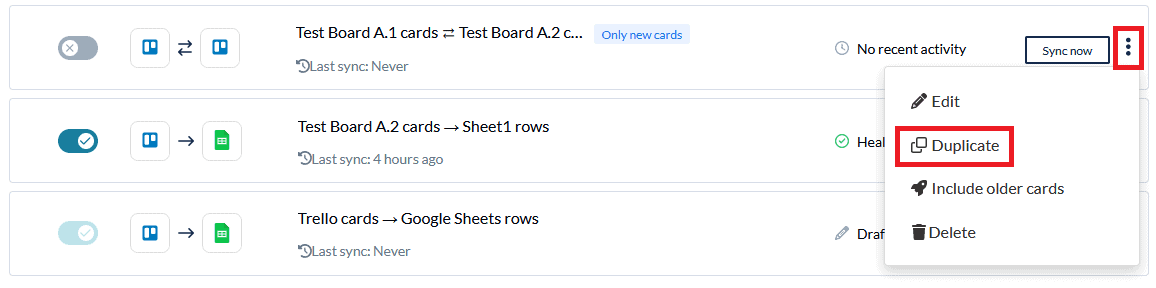
You’ll be taken right to the flow builder again, where you’ll essentially just have to pick the boards you want to connect; your rules settings and field mappings will be automatically saved. You might want to give them a once-over just to be sure, though.
Consider connecting Trello master boards to your hub board
A Trello master board is a single Trello board you can use as an overview for progress in multiple other boards. Whereas the hub board mostly acts behind the scenes to keep your Unito flows working smoothly, the master board is your one-stop shop for getting updates across your entire workspace.
Building this board is a lot like building a hub board, and you can get a full guide for building one here.
“I was really impressed by what the Unito team helped us achieve. Using Board Sync with our Trello Hub Board has really made us more efficient as a team because we’re working at such a large scale now.“
Sandra Owen, Finance & Operations, Acara Property Management
What to do next
So you’ve built your hub board and mastered your Trello workflows. Looking for what to do next? How about trying one of Unito’s other 30+ integrations?
Unito has integrations for tons of tools in your stack, including spreadsheet tools like Google Sheets, Excel, Airtable, and Notion, project management tools like Asana, Jira, and ClickUp, and a whole lot more.
Want to see what else Unito can do? Check out our walkthroughs! Each one will teach you how you can use Unito to get more out of your tools.