How To Create a Sprint in Jira (Easy + Quick)
Starting a sprint in Jira is about as simple as starting a real sprint. You just need to take a few steps to set things up — like tying your shoes and stretching — before you’re off to the races. Whether you’re a project manager, a product owner, or a software developer who’s been deputized as an improvised PM, here’s your full guide for how to create a sprint in Jira, the most popular project management tool in software development.
How to create a sprint in Jira in just a few steps
An important part of the agile software development methodology, sprints are short periods of time during which developers, product owners, and project managers work on a pre-determined chunk of tasks, bugs, and other issues. A sprint can last anywhere between a week and a month. So how do you create a sprint in Jira?
First, you need to make sure you’re using a Scrum project, otherwise you won’t have access to this feature at all. Not sure if the Jira project where you want to create sprints fits the bill? It should look like this.
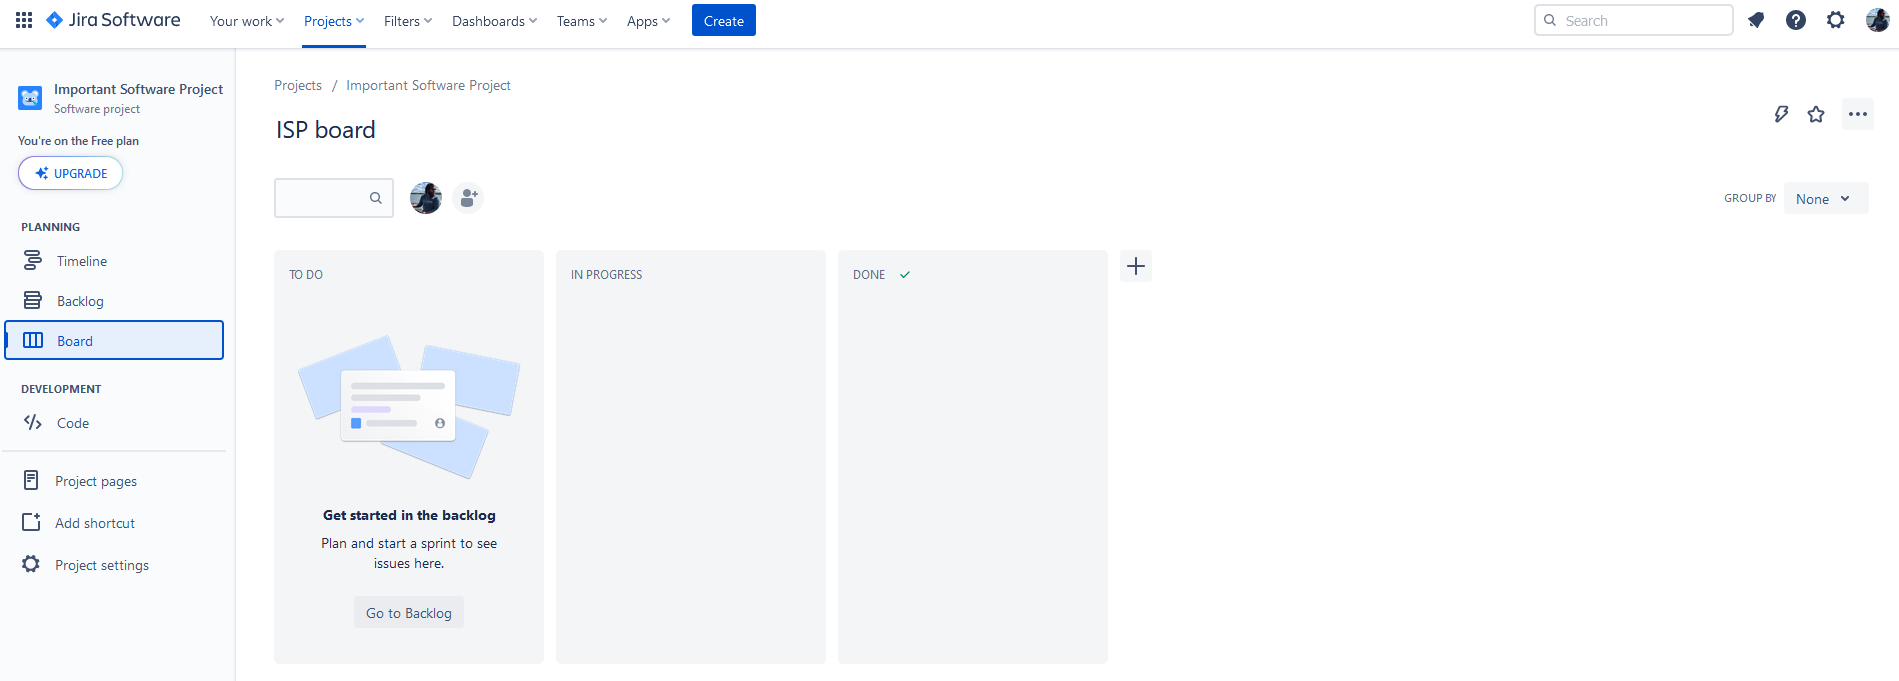
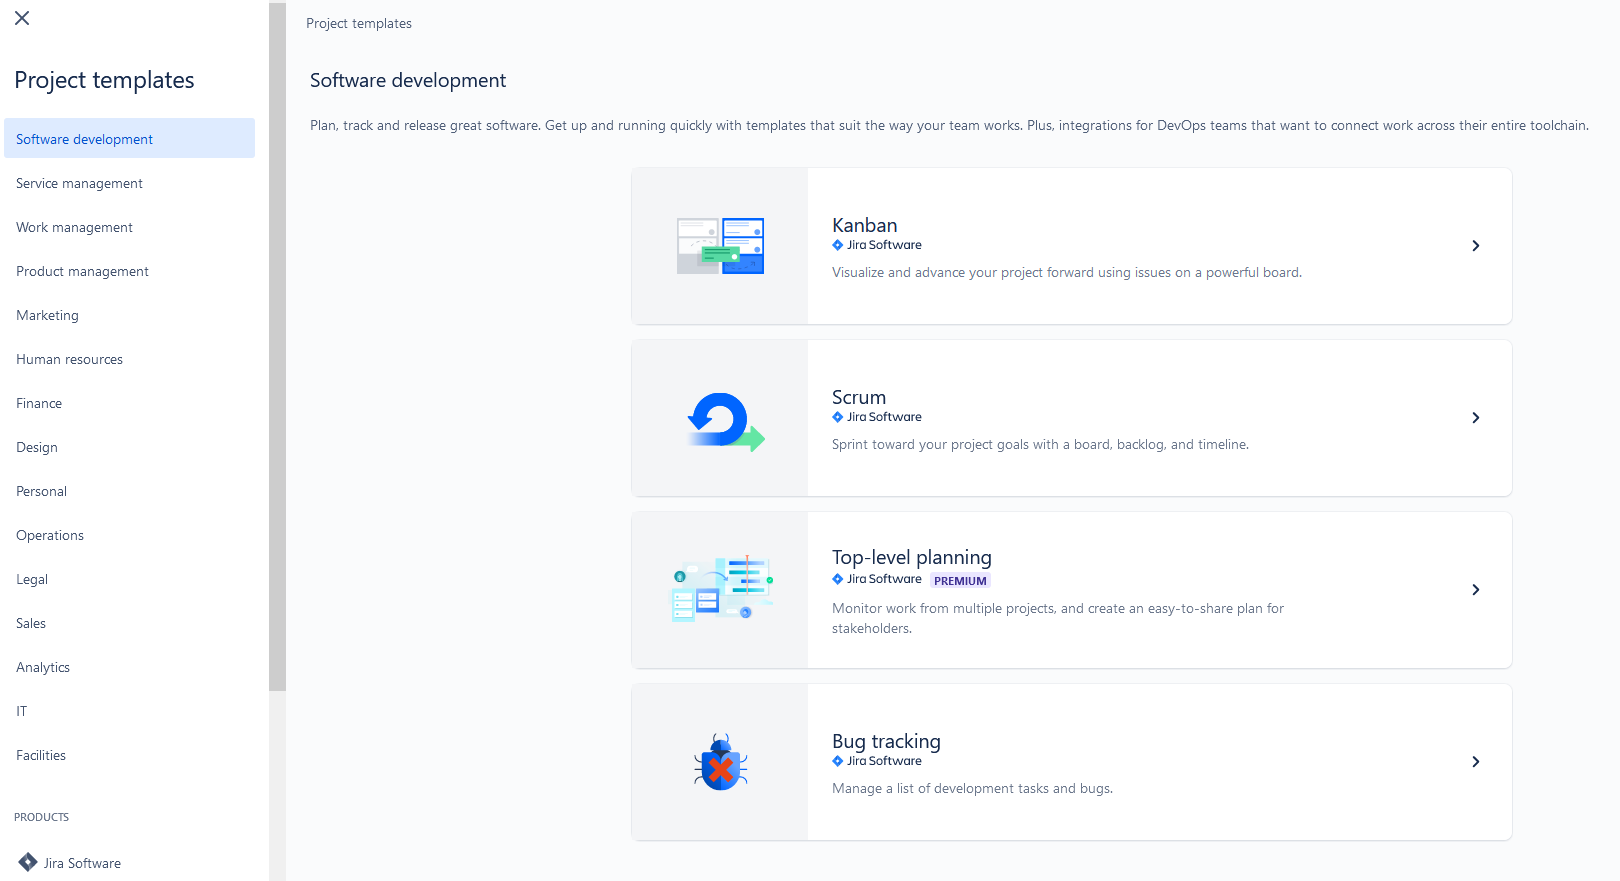
If you can’t find this backlog, you’re probably not using the right template. Not to worry though! You can easily create a new Jira project, just make sure you use the Scrum template — you’ll find it under Software Development.
Once you have the right kind of project, you’ll want to start your sprint from the Backlog screen. You can get there through the sidebar.
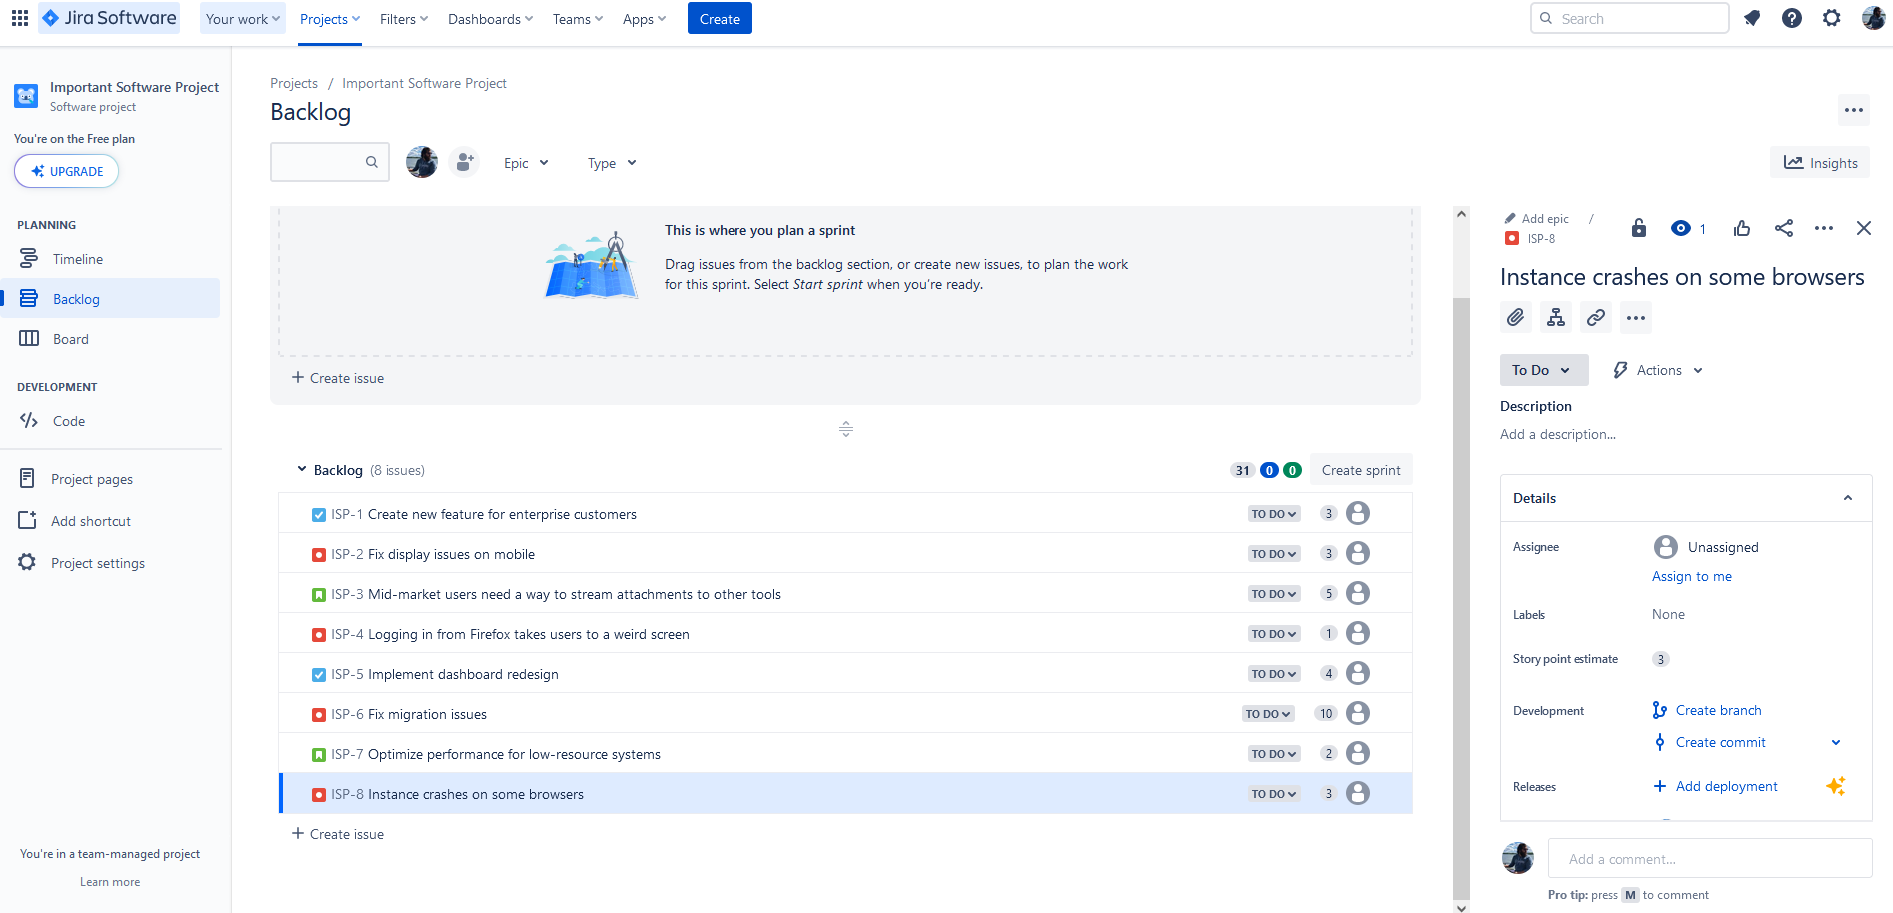
Unless this is a brand-new project, you should already have some Jira issues in your backlog. If not, don’t worry, someone will add them soon! Not only that, but Jira will have already created your first sprint for you — it’s that grey box at the top of the screen. If you’re using an existing project, this is what you’ll see.

See that grey Create sprint button? Hit that to start a new sprint.
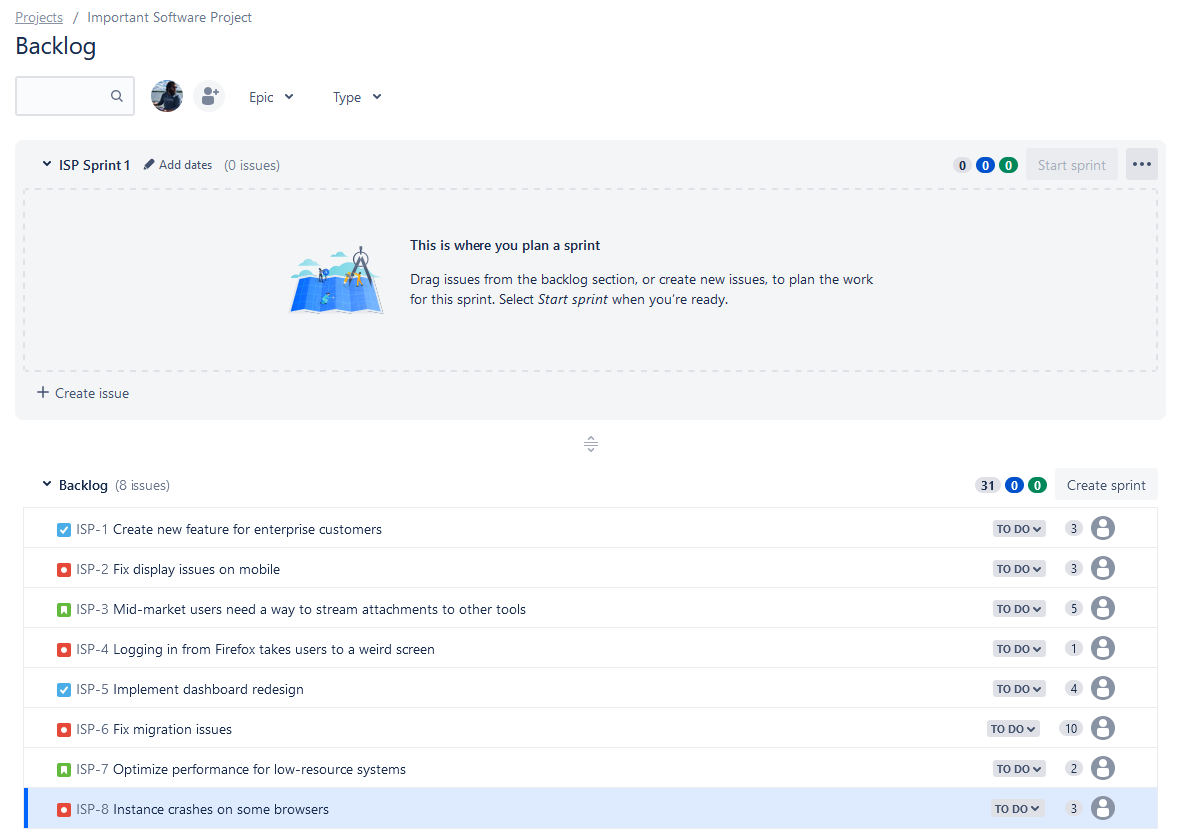
Now that you’ve created your sprint, it’s time to start adding issues to it. Usually, you’ll want to meet with the team working on this project first to determine what will be part of your brand-new sprint. Then, all you need to do is click on an issue and drag it to the grey sprint box.
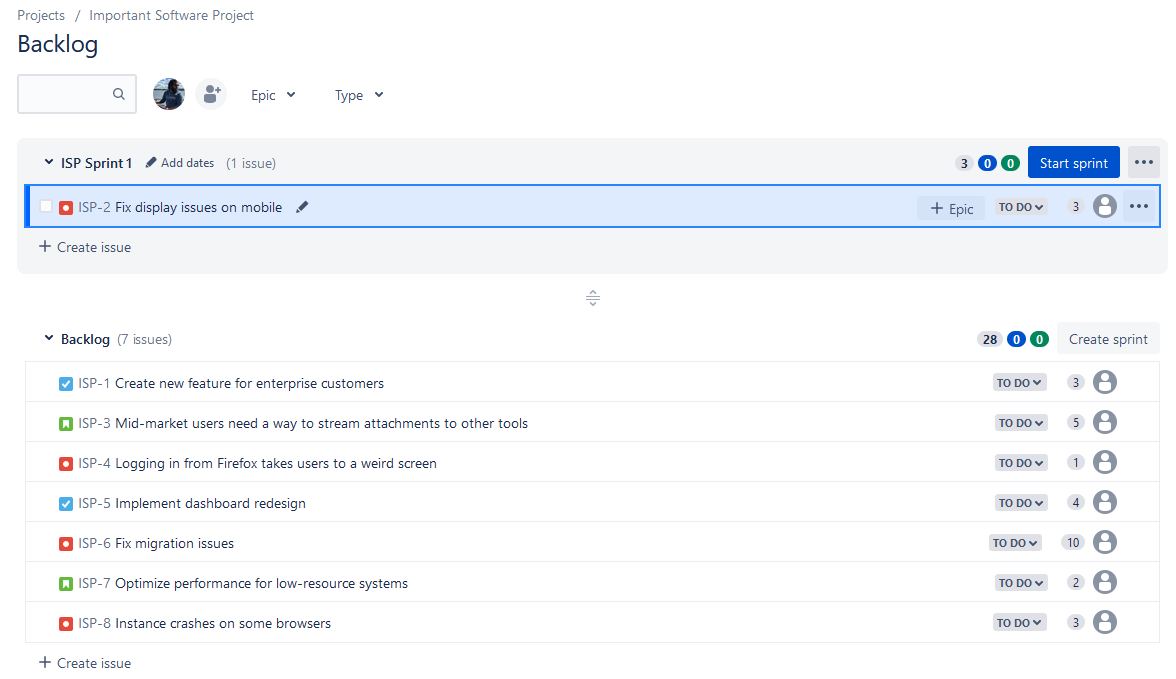
You can also click + Create issue right under your sprint, to add a new issue to it directly.
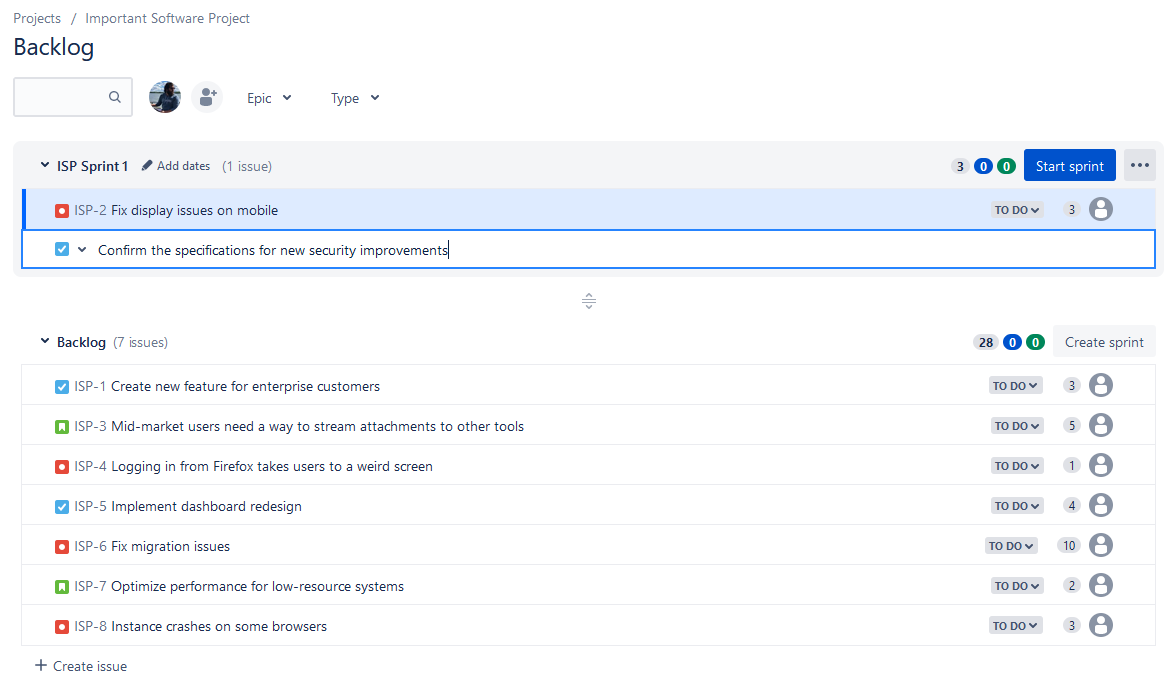
Once you’ve added a few more issues, your sprint is ready to go!
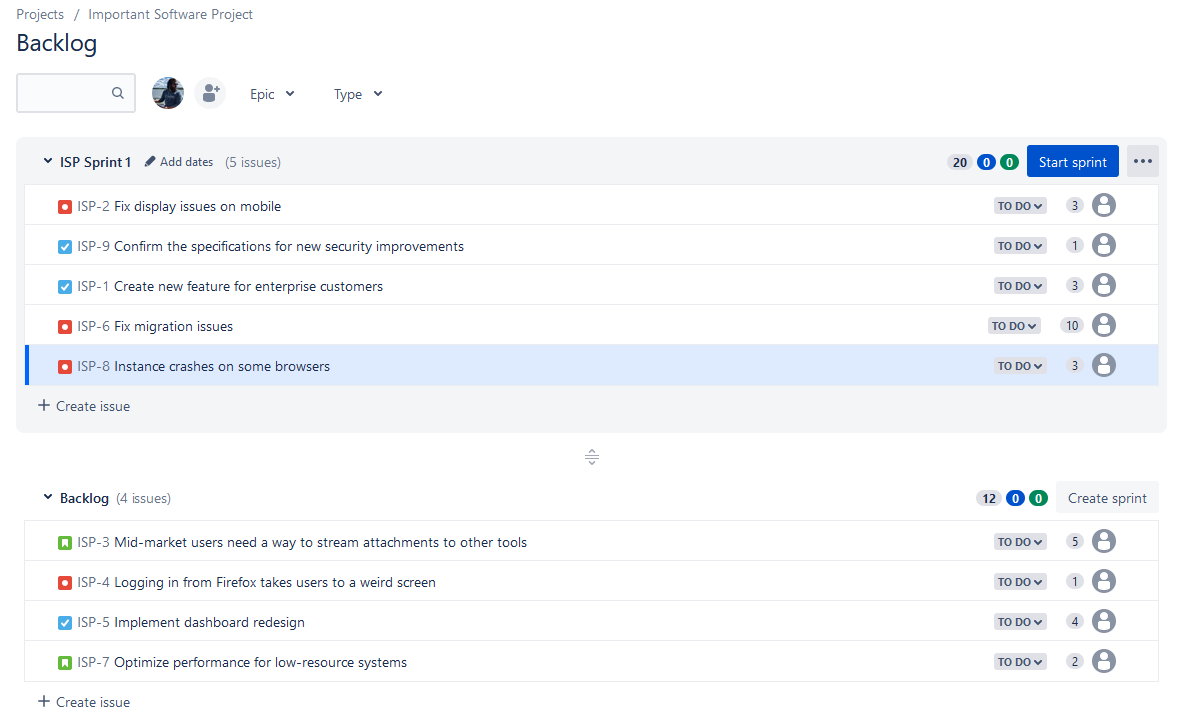
Now all you need to do is hit that blue Start sprint button.
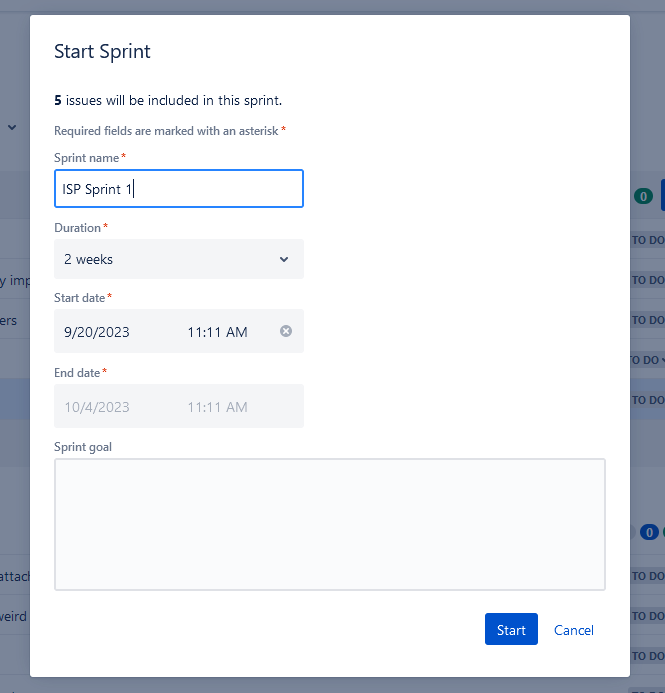
In this next screen, you can give your sprint a name and specify how long it’s going to last. See that Sprint goal box? Use that to clearly explain what you’re aiming to achieve by the end of your sprint — this will give stakeholders an easy way to know what’s going on. After filling everything out, hit Start.
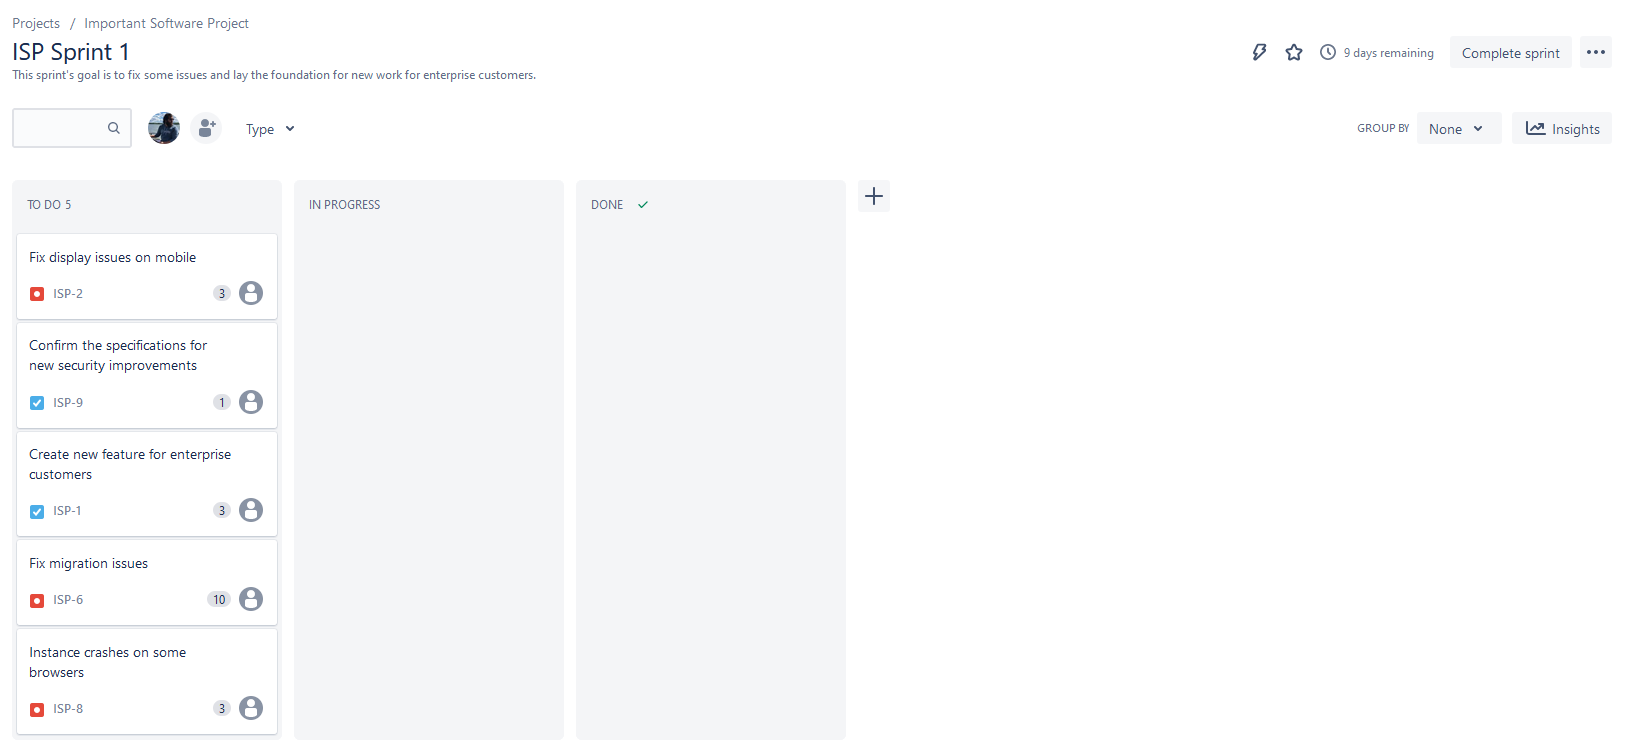
And there’s your new sprint, all ready to go! You can now work on your Jira issues as you normally would, only you’ll have some of Jira’s best agile features to help you out.
“Some other tools we looked at were kind of crazy when it came to pricing. Another big thing for us is 2-way sync for our Salesforce to Jira integration. Most of those options only offer directional sync and Unito is bidirectional, which is what we really needed. Plus they offered the best pricing for us at this stage.”
– Anel Behric, IT Manager, Cloudwerx
How to complete a sprint in Jira
So creating one sprint is one thing, but what do you do when it’s time to close up shop, start the next sprint planning session, and move on to a future sprint? Let’s have a look at that sprint from before again.
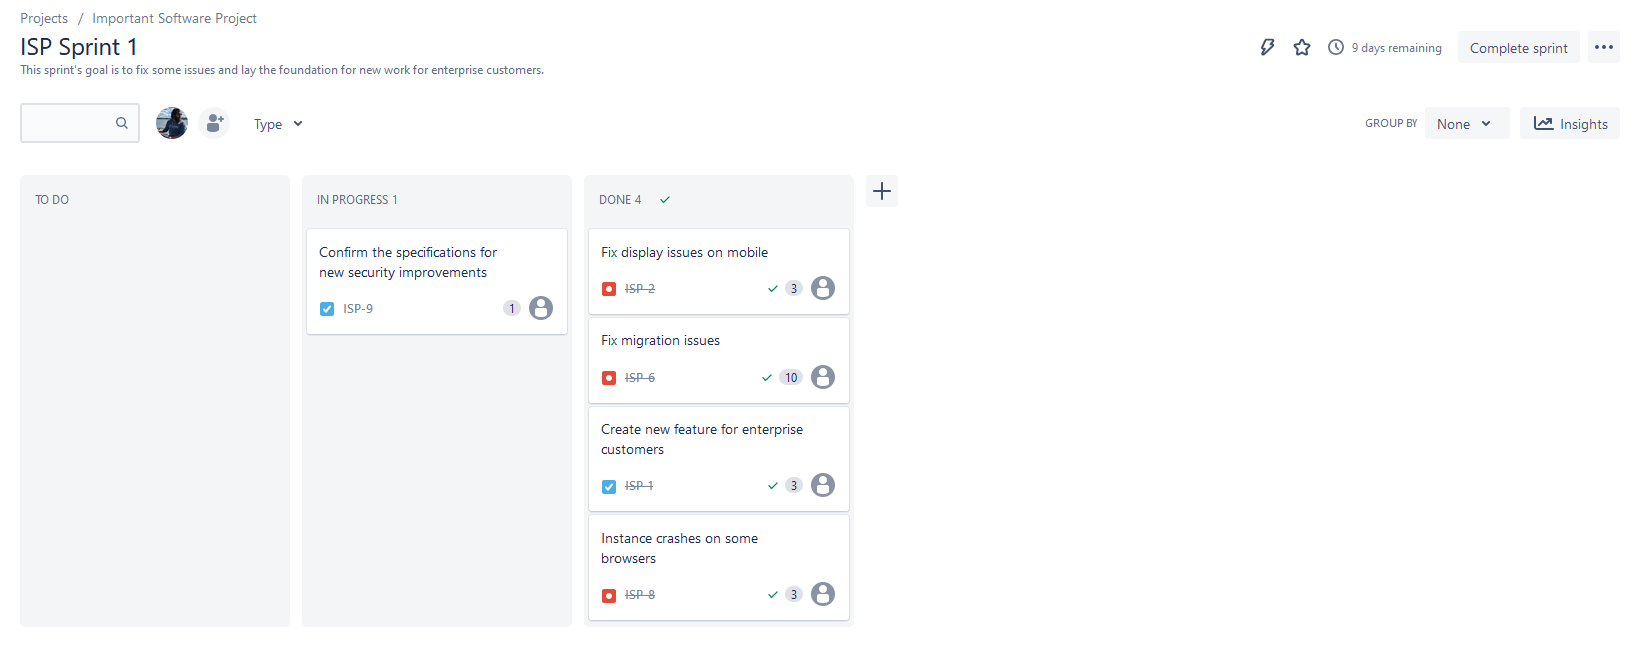
Most of the work planned for this sprint has been done, with just one lingering issue, and it’s time to complete the sprint. Click the grey Complete sprint button in the top-right corner of the screen.
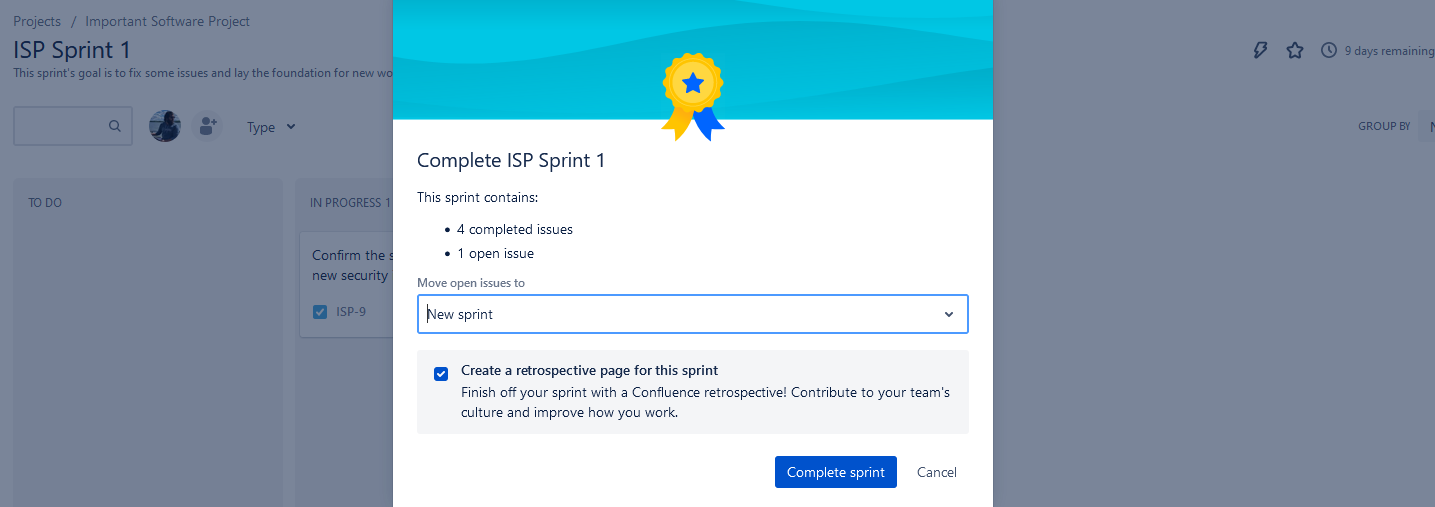
Now you can choose to move open issues to a new sprint automatically or to your backlog. You can also have Jira automatically create a retrospective page in Confluence, allowing you to share learnings with the team.
How to sync issues from active sprints in Jira to other tools
Now that you’ve mastered the Jira sprint, you might be looking for ways to optimize the way your team works. After all, it’s a rare software team that works exclusively in Jira. Most teams use CI/CD tools like GitHub and GitLab, chat apps like Slack, and even completely different project management tools, such as ClickUp for collaborating with other teams.
So how do you make sure everyone’s on the same page without having to constantly copy and paste data between these tools?
You use Unito.
Unito is no-code platform with some of the deepest integrations for some of the most popular tools among software developers, like Jira, GitHub, GitLab, Azure DevOps, Confluence, Trello, Asana, and more.
Here are just a few examples of Unito customers who rely on Unito’s Jira integration:
- Boveda, the global leader in protecting moisture-sensitive products, trusts Unito to keep software teams agile as they work across Wrike and Jira.
- Digitstore24, a full-service online sales platform, built Unito integrations right into their development process, syncing high-value data from Jira to ClickUp and Slack.
- Verivox, a tech company behind a popular comparison portal in Germany, uses Unito to migrate Jira issues to ClickUp.
- Passport Shipping, a shipping and logistics partner for e-commerce merchants, uses Unito to sync Jira issues to Notion and keep stakeholders informed on development work.
And they’re off!
Jira sprints are the best way to get a ton of your software development work done in a short amount of time. Creating one is simple enough that anyone can do it, no matter their background. Just make sure that you take time to actually plan things out with the team before you start dragging issues around in Jira.
FAQ: How to create a sprint in Jira
How do I create a sprint in Jira?
As long as you’re using a Scrum project, you can create a Jira sprint from the Backlog screen when you click Create sprint. You just have to make sure you move any issues you want to work on from the backlog to your sprint — or create them in the sprint directly.
Note that if you’re using Jira Server, this process might be a little different.
Does Jira automatically start a sprint?
Yes, Jira can automatically create new sprints for you. If you create a new Scrum project, it’ll come with your first sprint already created. After that, each time you complete a sprint, Jira can automatically move any incomplete issues to other sprints.
How do I create multiple sprints in Jira?
You can create multiple sprints from the Backlog screen. All you need to do is hit Create sprint as many times as you need. All your sprints will be added to your backlog, where you can fill them with issues, plan them out, and start them. If you’re struggling with this, you might need to enable parallel sprints.

