
How to Set Up a Jira Automation (2 Methods)
Jira is a powerful, highly customizable tool used by teams of all sizes. You could be an engineering, IT, marketing, product, operations, or any other business team working on countless projects and issues to get things done.
But wouldn’t it be nice if some of the tedious parts of task management were automated? In this article, we’re going to take you through why you should leverage automation, and what your best options are.
Why set up a Jira automation?
It’s easy for even the smallest of business teams to be flooded with Jira issues. Within those issues, there are usually many fields that relay different types of data with every update. The data gets granular quickly.
Keeping all that data up to date manually leads to a ton of repetitive work. This is where Jira’s automation feature comes in.
If you could update the “priority” field in one issue, for example, and every matching issue in the other Jira projects was instantly updated in the same way, it would be a game-changer. Every department would be properly looped in without having to sift through each project.
That sounds like a dream, right? Let’s make Jira automation a reality so your team can get back to the work that matters most.
First method: Using built-in Jira automation
Jira lets you create automation rules right within the tool. You could set issues to sync across projects, automatically get assigned to the right person, and create status updates. That way, project managers can spend less time on manual and repetitive tasks and more on a project’s deliverables.
How do these automations work?
You can set up Jira’s built-in automations right in your Jira projects. A Jira automation is made of three key elements: triggers, conditions, and actions. Here’s what they mean:
- Triggers, which are the events that will start the automation. A few examples of supported triggers are:
- Field values changing
- Forms submitted
- Issue assigned
- New comment added to an issue
- Issue deleted
- Conditions, which are criteria that an automation must meet before it triggers. Examples of conditions include:
- Specific issue fields
- Affected services
- Forms attached
- Related issues
- Issue attachments
- Actions, which are the actual thing your automation will do once the trigger and conditions are met. Here are examples of the actions these automations can perform:
- Assign issue
- Attach forms
- Clone issue
- Comment on issue
- Create issue
- Creating sub-tasks
- Create sprint
How to use the rule builder in Jira and Jira Service Management
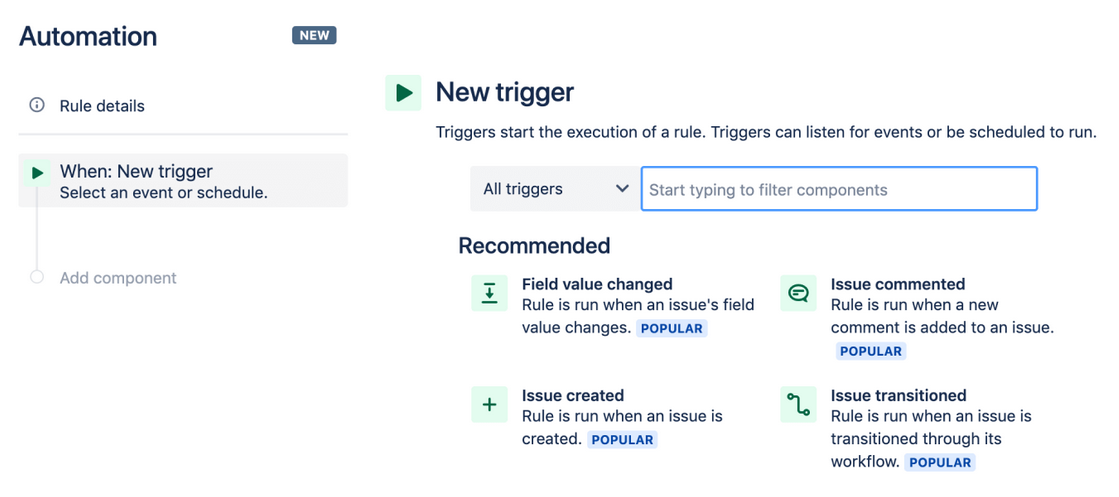
- From your Jira project, select project settings then automation.
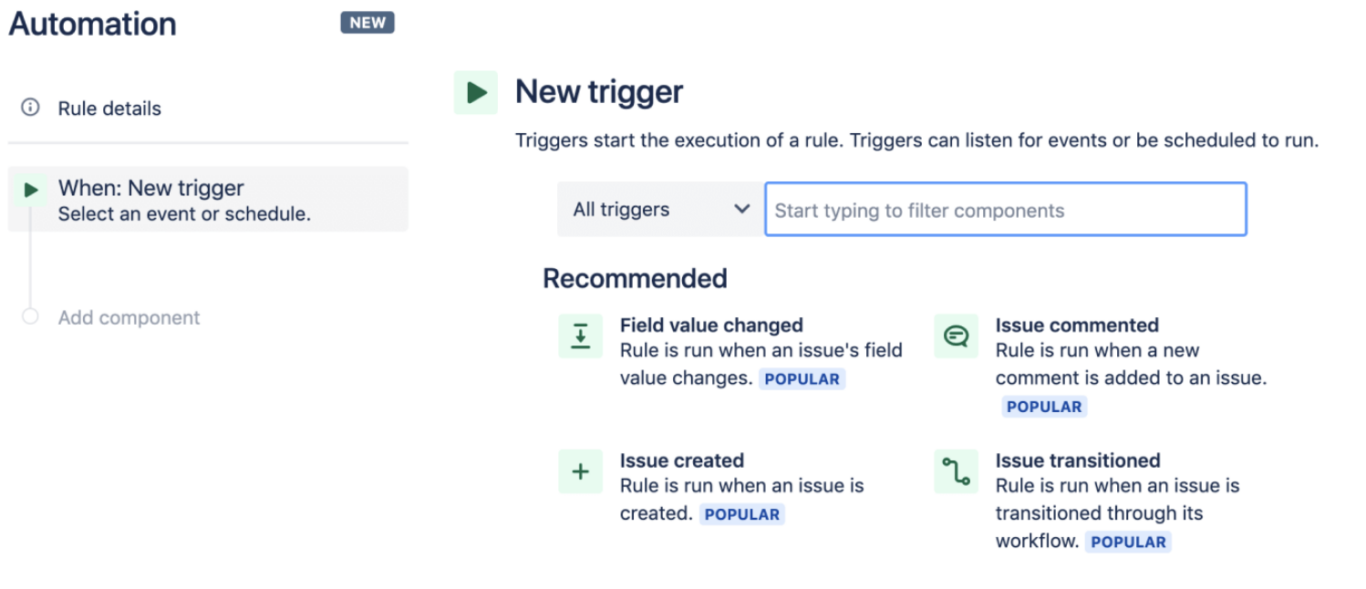
Under the Rule Details section, you can start a new trigger. Jira will give you recommended triggers or you can search keywords in the search bar.
- Select the trigger that most fits your use case, and follow the steps.
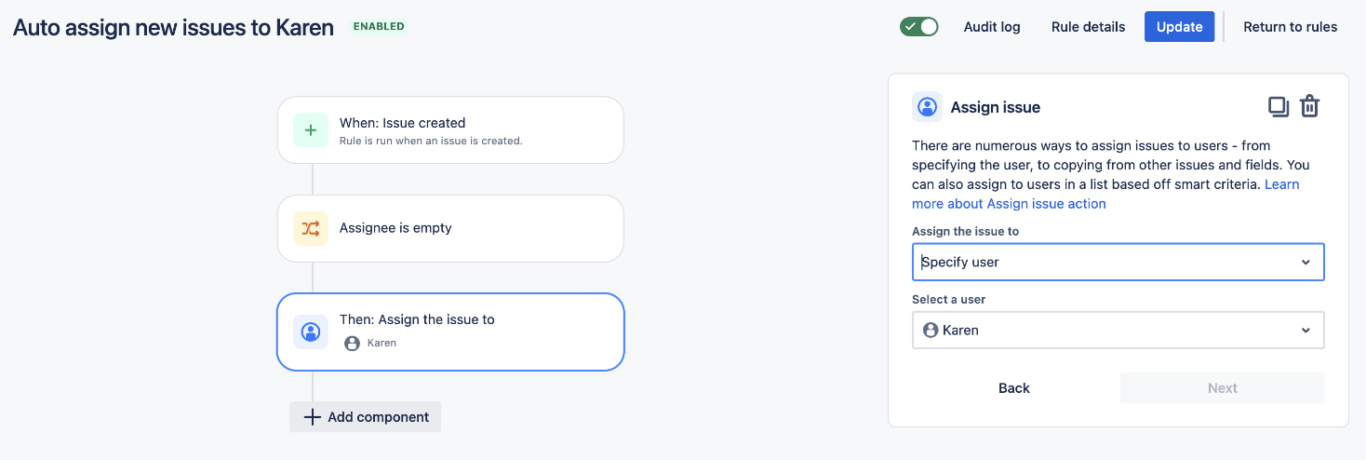
The steps in this section will vary depending on the trigger you’ve selected, but once you’ve followed all the steps you can click Update to apply all of your changes and turn the automation on.
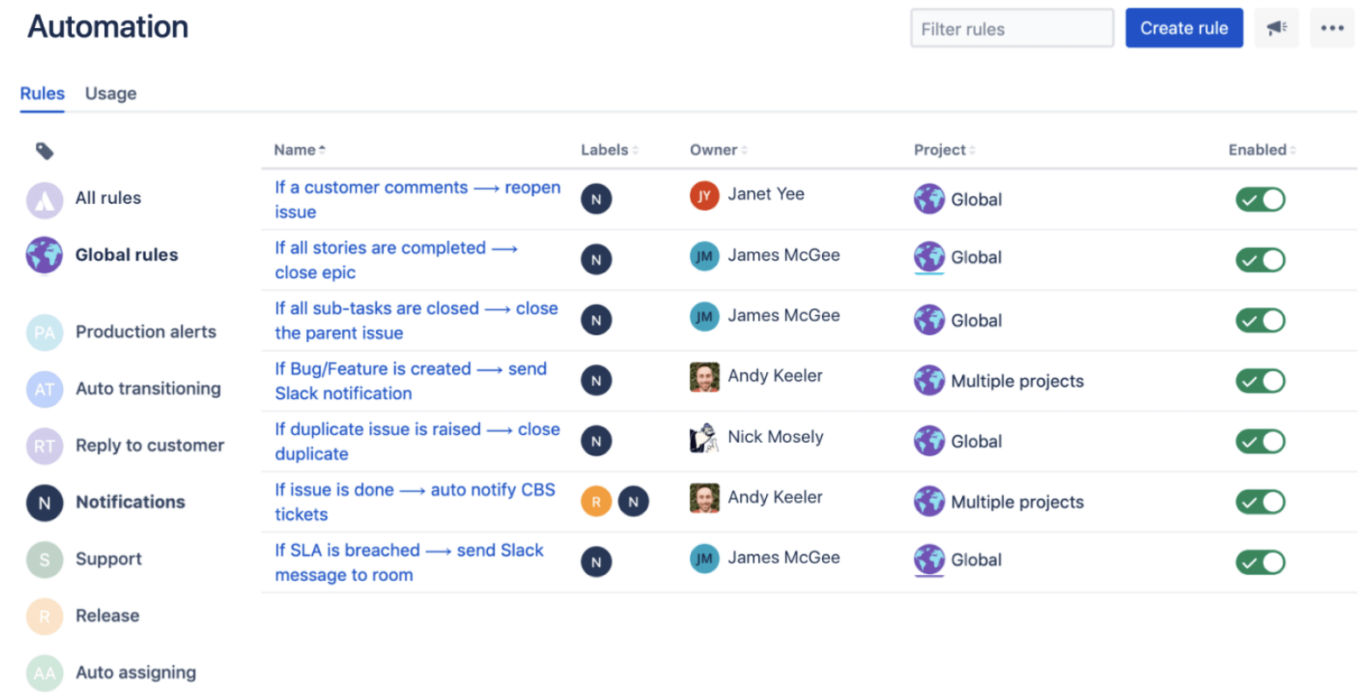
- Once your automations are set up, you’ll see them displayed as a list. From here you can toggle them on or off, click on them to make changes, or view the history logs.
Limitations of this method
While you may assume setting up automations directly within Jira is the simplest route, keep in mind that there are some limitations to this method.
Set up is time-consuming
With this method, setting up each individual rule can be time-intensive. Following the setup steps each time and ensuring the same rule is applied in every relevant project is tedious work. Also, there are tons of templates to sift through, and it’s a long process to decipher which ones make the most sense for your workflow.
Rules only work one-way
When using this method, users must build triggers to complete an action that works in one direction and then they must make it again for the rule to perform in the opposite direction, effectively doubling the work.
Too many cooks in the kitchen
Anyone can build a Jira rule, making it a free-for-all with automations in each project. The need for constant alignment on who needs to build what can be a bit of a bottleneck in the workflow.
Second method: Set up a Jira automation with Unito
For our second method, we’ll take a look at the integration platform Unito. Unito supports a breadth of use cases, and here’s why it’s your best bet for automation.
Set up is fast and straightforward
Setting up a flow with Unito is always just four simple steps. Unito also auto-maps some of the process for you, and if you need to repeat the process there’s a handy “duplicate” button that’s got you covered.
You can choose between one-way or bidirectional syncing
Are you looking to clone issues into separate projects? Unito can automate that for you, and you can choose to sync one-way or bidirectionally to cut down on setup time.
Grant Unito access to only the right champions
Invite the applicable users to your Unito workspace, where you can easily set everything up, access the activity stream for simple auditing, and quickly build out your workflow. No need for your whole team to individually build automations.
80% of Unito’s user base is non-technical, so you’ll have no issues setting this up.

Here’s what that looks like in action:
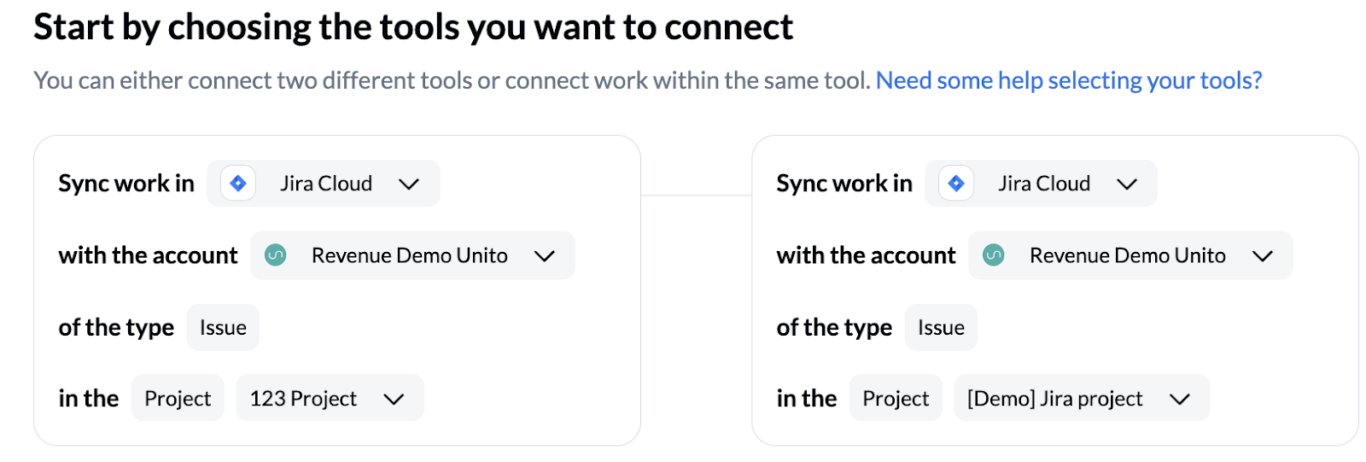
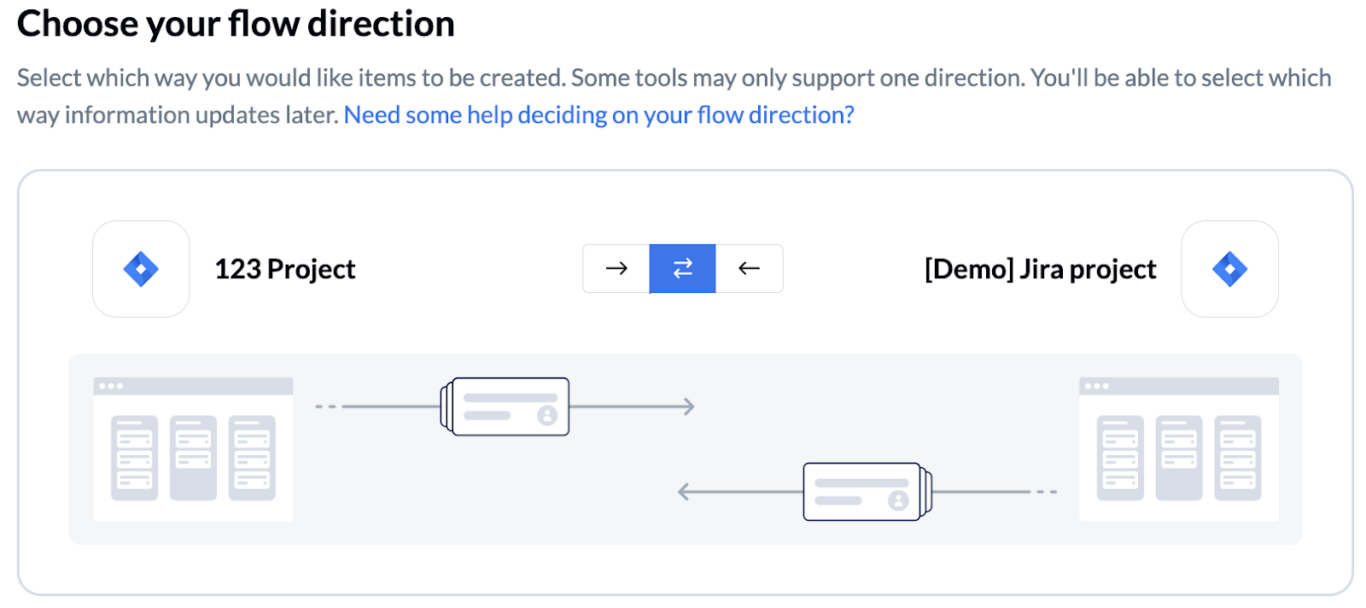
- First, connect the Jira projects you’d like to sync.
- Next, determine the direction of work item creation. This is where you can choose a one-way or a bidirectional sync.
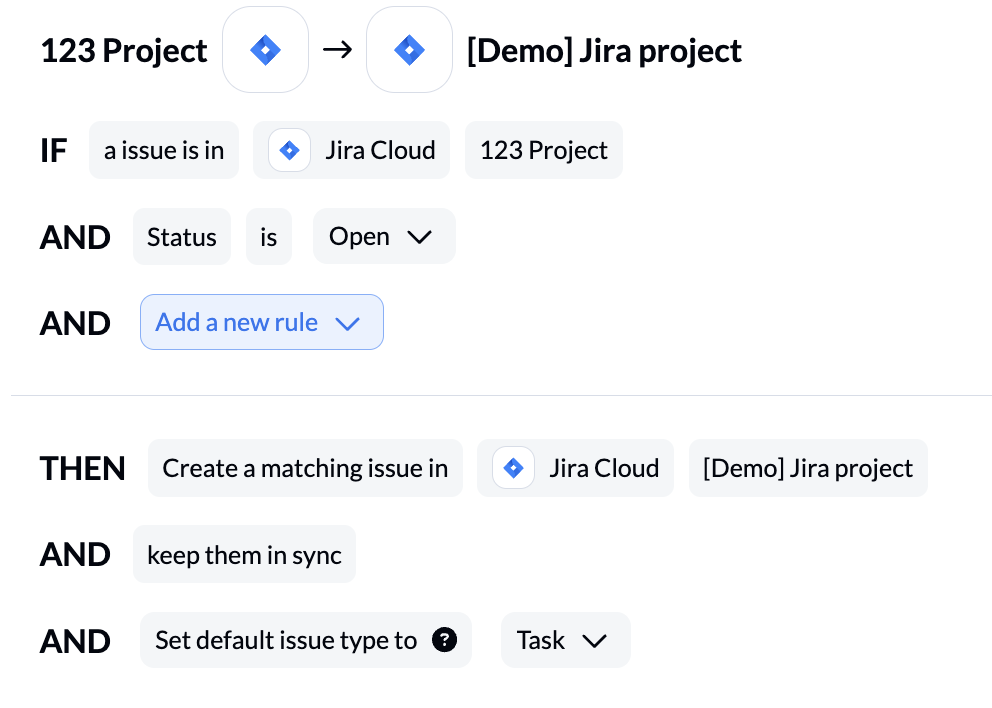
- Then, create rules to determine what gets synced, and where it lands. You can also set the default issue type.
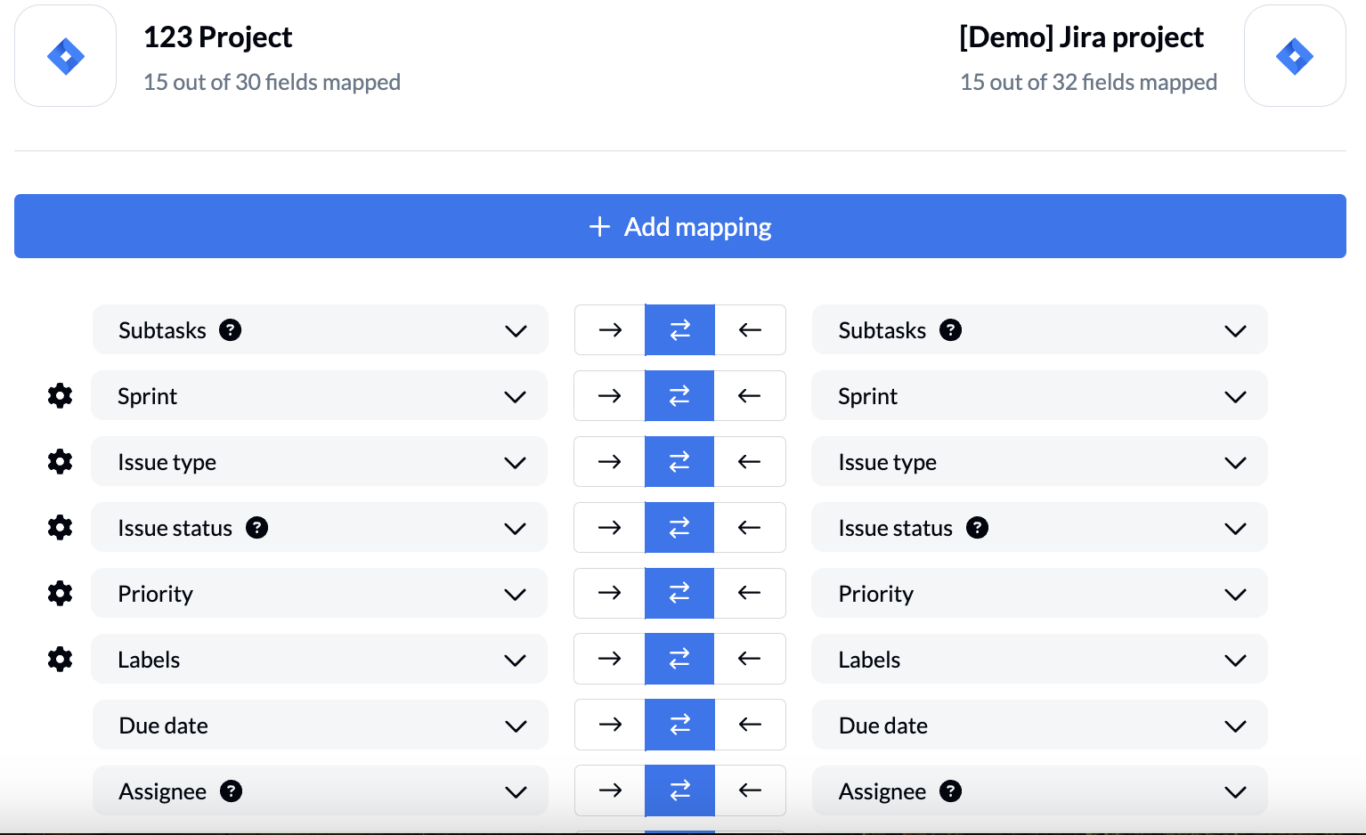
- Decide which fields you’d like to keep updated between projects, and which direction you want the updates to push. Again, you can choose between one-way or bidirectional. You also have the option to let Unito auto-map this step to save time. Unito supports both native and custom fields.
And that’s it! You’re ready to live-sync the automations between Jira projects with a configuration your whole team will understand.
Make automation simple with Jira, and beyond
Aside from Jira automations, Unito supports use cases such as data migrations, ticket management, reporting, external collaboration, or ITSM incident triage for tools like ServiceNow.
Want to set up your first Jira flow?
Get an in-depth guide to automating work across Jira projects.
FAQ: Jira automation
Can you automate Jira?
Absolutely! There are a few ways you can automate issues in Jira:
- Built-in rules: Jira has built-in automation rules that let project managers automatically create issues across projects, update fields, and more. This can be the best option for teams that only need basic functionality and don’t want to add any extra tools to their stack.
- Third-party automation tools: Tools like Zapier and Automate.io allow users of any skill level to automate the creation and updating of issues across Jira projects. You can even use these automations between Jira and other tools, like Asana, GitHub, and more.
- Two-way sync tools: These tools don’t just automate the creation of issues or the updating of single fields. They build two-way relationships between Jira issues in multiple projects or Jira issues and work items in other tools. A tool like Unito fits into this category.
What sorts of actions are supported by built-in Jira automations?
Built-in automations support many of the actions project managers might otherwise need to do repetitively if they were always done manually. You can get a full list of these actions here, but here are a few of them:
- Assign issues
- Attach forms
- Clone issue
- Comment on issue
- Create branch in Bitbucket, GitHub, or GitLab
- Create Confluence page
- Create issue
- Edit issue
- Send Slack message
- Create version
What language does Jira automation use?
You don’t need any coding knowledge to use Jira’s built-in automations. Jira has a simple click-and-drag interface that anyone can use, even if they don’t have a technical background.
That said, if you want a bit more control over your automations, you can also use Jira’s automation API which relies on Python.
How do you automate an issue in Jira?
Here’s a quick step-by-step for automating issues in Jira:
- From your Jira project, select project settings then automation.
- Select the trigger that most fits your use case, and follow the steps to add actions your rule will perform.
- Once your automations are set up, you’ll see them displayed as a list. From here you can toggle them on or off, click on them to make changes, or view the history logs.