
How to Set Up a ServiceNow-Salesforce Integration (2 Methods)
From service and support to IT, data, and development, ServiceNow acts as the ticket management interface between users (internal and external) and the IT department or support team that solves their tech problems.
Salesforce is the go-to platform to manage customer data and streamline workflows for your customer success agents and sales team, converting opportunities into sales, and keeping your contacts organized across all business functions.
Put together, these two tools become a powerhouse duo, sharing data, reinforcing pipelines, improving analytics, and creating more accurate forecasts.
Let’s take a look at a couple of methods to get the most out of Salesforce and ServiceNow by integrating them.
Why a ServiceNow-Salesforce integration?
While Salesforce does have some service management features, many organizations prefer a dedicated platform like ServiceNow. An integration is incredibly valuable if critical data needs to be shared between environments, but doing so manually would be time-consuming and risk data errors from manual entry.
For example, let’s take a company that uses Salesforce as a CRM to manage purchases, sales, and revenue generation with opportunity pipelines. Salesforce also generates a wealth of data crucial to sales predictions and forecasting. Internally they use ServiceNow for IT support and ticketing, incident management, and technical support.
When integrated, either tool can then become a collection point for data, allowing users to perform analytics in one place without the need to manually collect data from multiple other tools or sources. You could either consolidate everything with Now Platform Reporting or build comprehensive data visualizations in Tableau through Salesforce.
Integrating these tools opens the door to a streamlined analysis process and a quicker path to action.
First method: Using ServiceNow Integration Hub
ServiceNow integration hub is an additional module for the Now Platform that comes with nearly 200 connectors out-of-the-box, called Spokes. These spokes come in two forms: pre-built through templates, and customizable versions. It’s one of the most common ways to set up a Salesforce-ServiceNow integration.
The pre-built spokes can be configured using triggers and actions to easily add some limited functionality to your workspace that pulls data into ServiceNow.
The hub also supports the development of custom spokes for users who want to create their own integration for ServiceNow’s API. To do this requires training, scripting knowledge, or 3rd party consulting services.
Step 1: Verify that your installation supports Integration Hub
Before you can integrate Salesforce and ServiceNow, you have to ensure your tools are compatible. Here’s how:
- Verify that the Salesforce Classic or Lightning module you wish to connect is supported: Sales Cloud, Service Cloud, Platform, Customer Community, Partner Community, Company Community, or Chatter.
- Verify that the account you’re going to use to facilitate the integration has the correct permissions for the tasks the integration will need to perform. You can find a list of these here.
Step 2: Register the Salesforce application in Salesforce
- With a Salesforce Admin account, register the Salesforce Application.
- Login and select Classic Environment.
- Go to Setup.
- In the left menu, select Build > Create > Apps.
- Under Connected Apps select New.
- Fill in the required information.
- Set the Refresh token policy value to Refresh token is valid until revoked.
- Click Save.
- Copy the Consumer Key and Consumer Secret fields and save them in a secure location. The Consumer Key (or client ID) and the Consumer Secret (or client secret) are sensitive information and should not be shared.
- Create a profile for the Salesforce Integration in ServiceNow.
- Make sure to set the scope to Global.
- Create an integration profile for the first Salesforce organization where you want to track software subscriptions and optimize licensing.
- Go to the Integration Profile: All > Software Asset > SaaS License > Direct Integration Profiles.
- Fill in the fields with the information below:
| Field | Description |
| Display name | Name of the integration profile.Best practice is to use a name that easily identifies this profile with the organizations it integrates. A shorter name will format better on reports. |
| Connection & Credential | Connection and credential alias for Salesforce.For the first integration profile, use the automatically populated default connection and credential alias. |
| Status | Status of the integration profile.Draft for when the integration is not published.Published will appear once the integration is launched. |
| Profile type | This value is automatically populated. |
- Navigate to the Download Subscription Subflow tab. Make sure that the Subflow field displays Salesforce CRM Download Subscriptions.
- Go to the Reclaim Subscription Subflow tab. Make sure the Subflow field displays Salesforce CRM Reclaim Subscription.
- Lastly, go to the Download Consumption Subflow tab. Same as above, make sure that the Subflow field displays Salesforce CRM Download Consumption.
- Click Save
- Go to the connection & credential aliases record. Select the preview icon
beside the Connection & Credential field.
- Click Open Record in the preview.
- While in the Connection & Credential Aliases form, click Create New Connection & Credential.
- This will open the Create Connection and Credential dialog box. Fill in the field with the below information:
| Field | Description |
| Connection Name | Name of the connection.The name should easily identify the organization you’re creating this connection and credential for. |
| Connection URL (Instance URL) | This is the URL that displays after logging into Salesforce, or the custom domain URL used for Salesforce. |
| OAuth Client ID | Client ID (consumer key) assigned to the Salesforce application. |
| OAuth Client Secret | Client secret (consumer secret) assigned to the Salesforce application. |
| OAuth Redirect URL | URL for the OAuth provider that users are redirected to. This field populates automatically based on the callback URL that you specified in Register a Salesforce application. |
- Click Create and Get OAuth Token.
- Use the same Salesforce Admin account you used to create the application in Salesforce to login to the OAuth2 dialog box.
- ServiceNow will then create an OAuth token for Salesforce and automatically return to the Integration Profile form.
- Select Publish.
Once the integration is published, ServiceNow will start pulling data from Salesforce. Smaller organizations with fewer than 100 users in Salesforce should see this complete in a few minutes. It may take up to an hour or more for organizations with 5000+ users in Salesforce.
Limitations of this method
- One-way integration: ServiceNow only pulls data from Salesforce. Changes in ServiceNow are not reflected in Salesforce.
- Manual process: Setting up this integration can be slow and complex.
- High skill level: This integration requires some technical skills and admin permissions.
- Not scaleable: Additional connections require a similar manual process.
Second method: Use Unito’s ServiceNow-Salesforce integration
Unito is an extensible, enterprise-grade sync platform that’s fully configurable, yet no-code. With 50+ connectors to choose from, Unito lets users keep all their tools up to date with live 2-way flows.
Here’s why Unito is the best way to do this:
- Lowest total cost of ownership: No need for specialized internal resources or third party consultants. Plus, a single Unito license includes all connectors.
- Launch in days or weeks, not months. POCs can be built quickly through an easily-repeatable flow creation process that our team keeps up-to-date with the latest releases from ServiceNow and Salesforce.
- Two-way sync: Unito can sync historical data without user maintenance required.
- Straightforward setup: Quickly set up, tune, monitor and evolve each integration with configuration options that anyone can understand.

Below you’ll find a brief overview of the necessary steps, or if you’re more of a visual learner, you can follow along with this video tutorial from a Unito product expert.
Step 1: Connect your tools
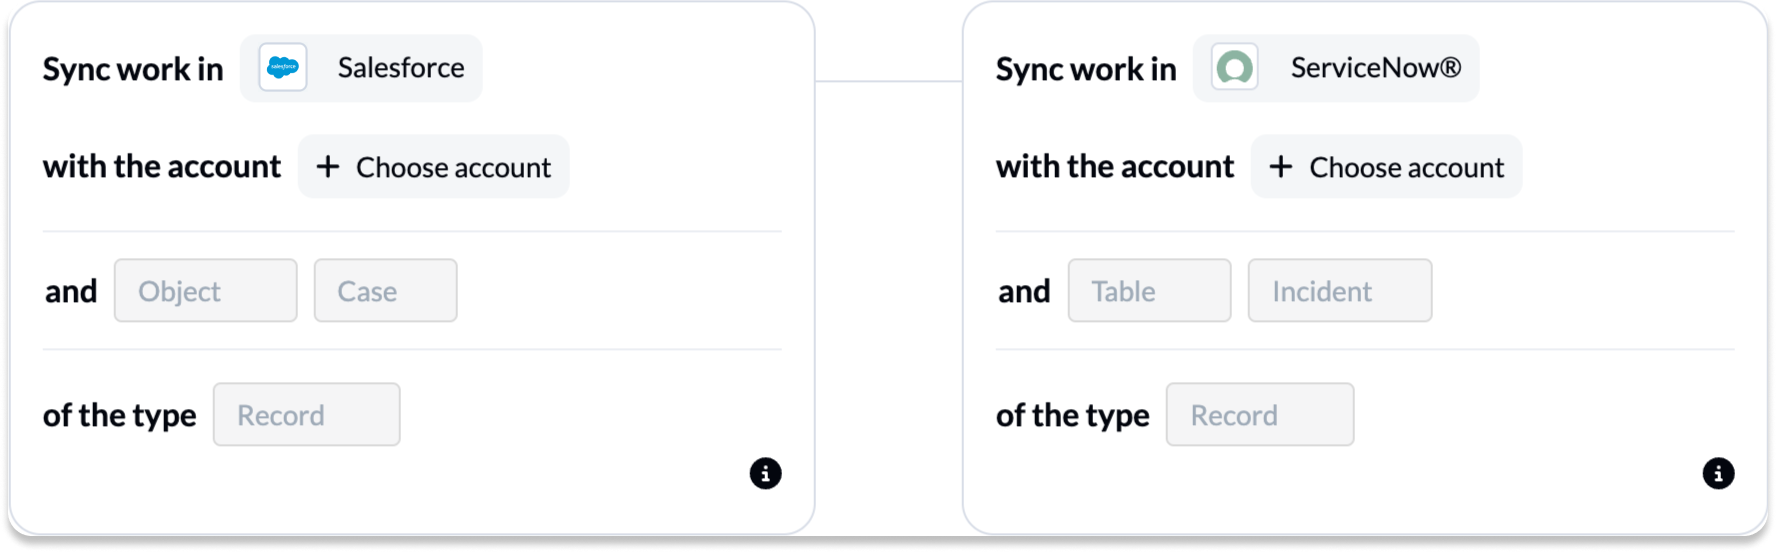
Unito will need to connect to a ServiceNow account that has create, read, update and delete (or CRUD) permissions for the records or tables that you want to sync.
Users can connect Unito to ServiceNow with either OAuth2 or a Username and Password. For details on how to connect using OAuth2, check out this guide.
On the Salesforce side, make sure that the account used has permission to authorize third-party integrations. A quick list of permissions can be found here.
Once the accounts are correct, go to your Unito dashboard and select Connect a New Tool from the top bar and follow the prompts. A detailed guide can be found here.
Step 2: Pick flow direction
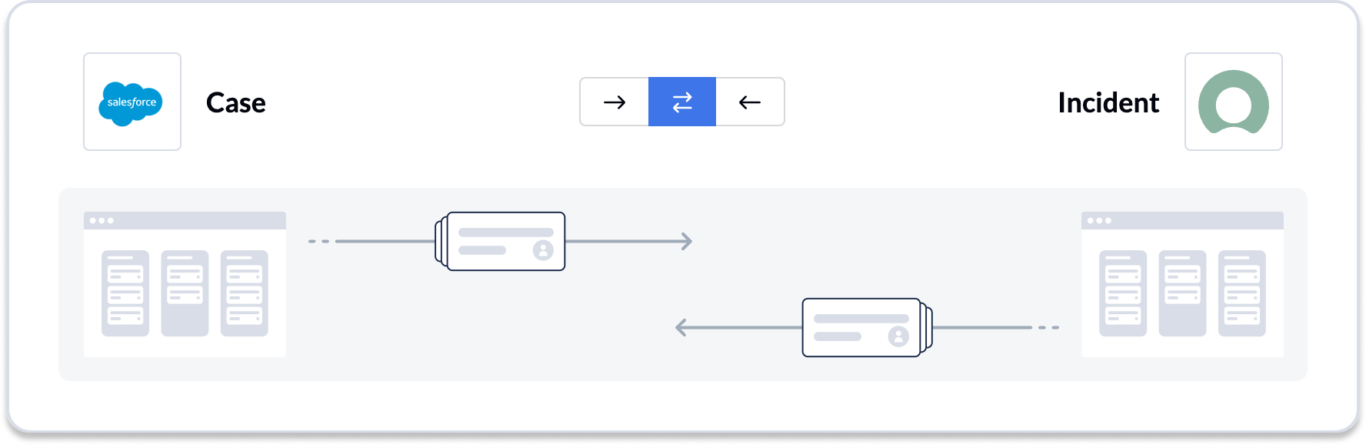
Unito syncs in either one or two directions. A one-way flow will behave much like the built-in ServiceNow spoke, but can be set to go either to or from ServiceNow. A two-way flow means that a change on either side will update on the other, ensuring that the data in both tools is always in sync and the same.
Step 3: Build rules
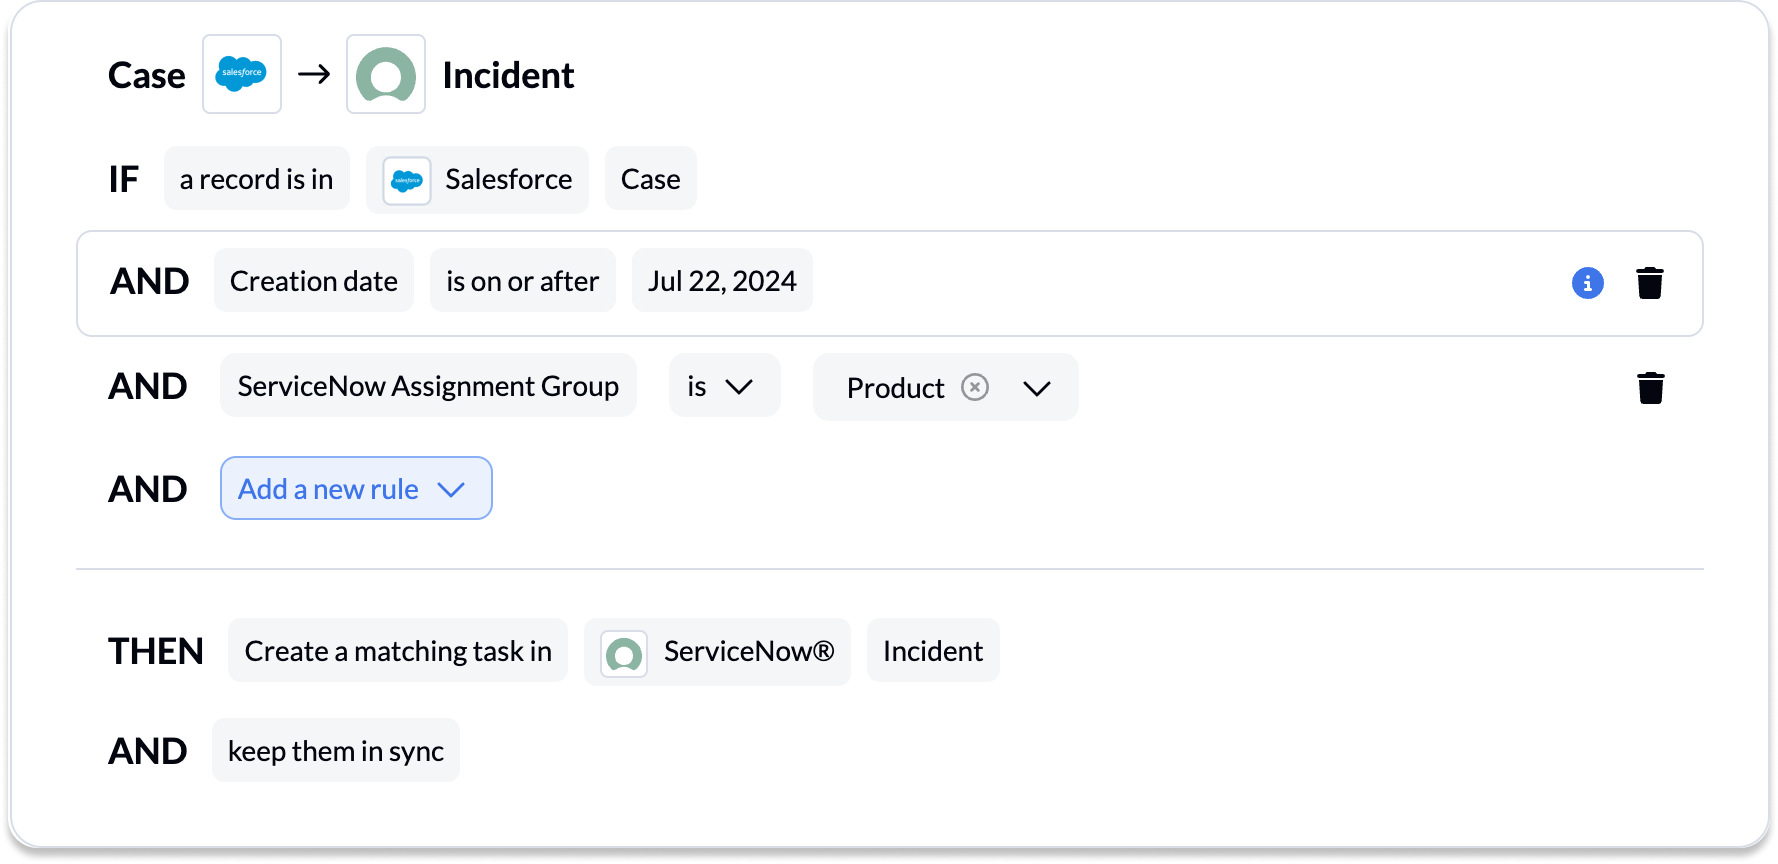
Rules determine what syncs and what doesn’t. Using the drop-down options provided in the interface, select the rules for how you want your flow to function at a larger scale.
You could choose to filter out work items with specific labels, automatically set them to a specific status, or only sync items created after a specific date.
Step 4: Map your fields
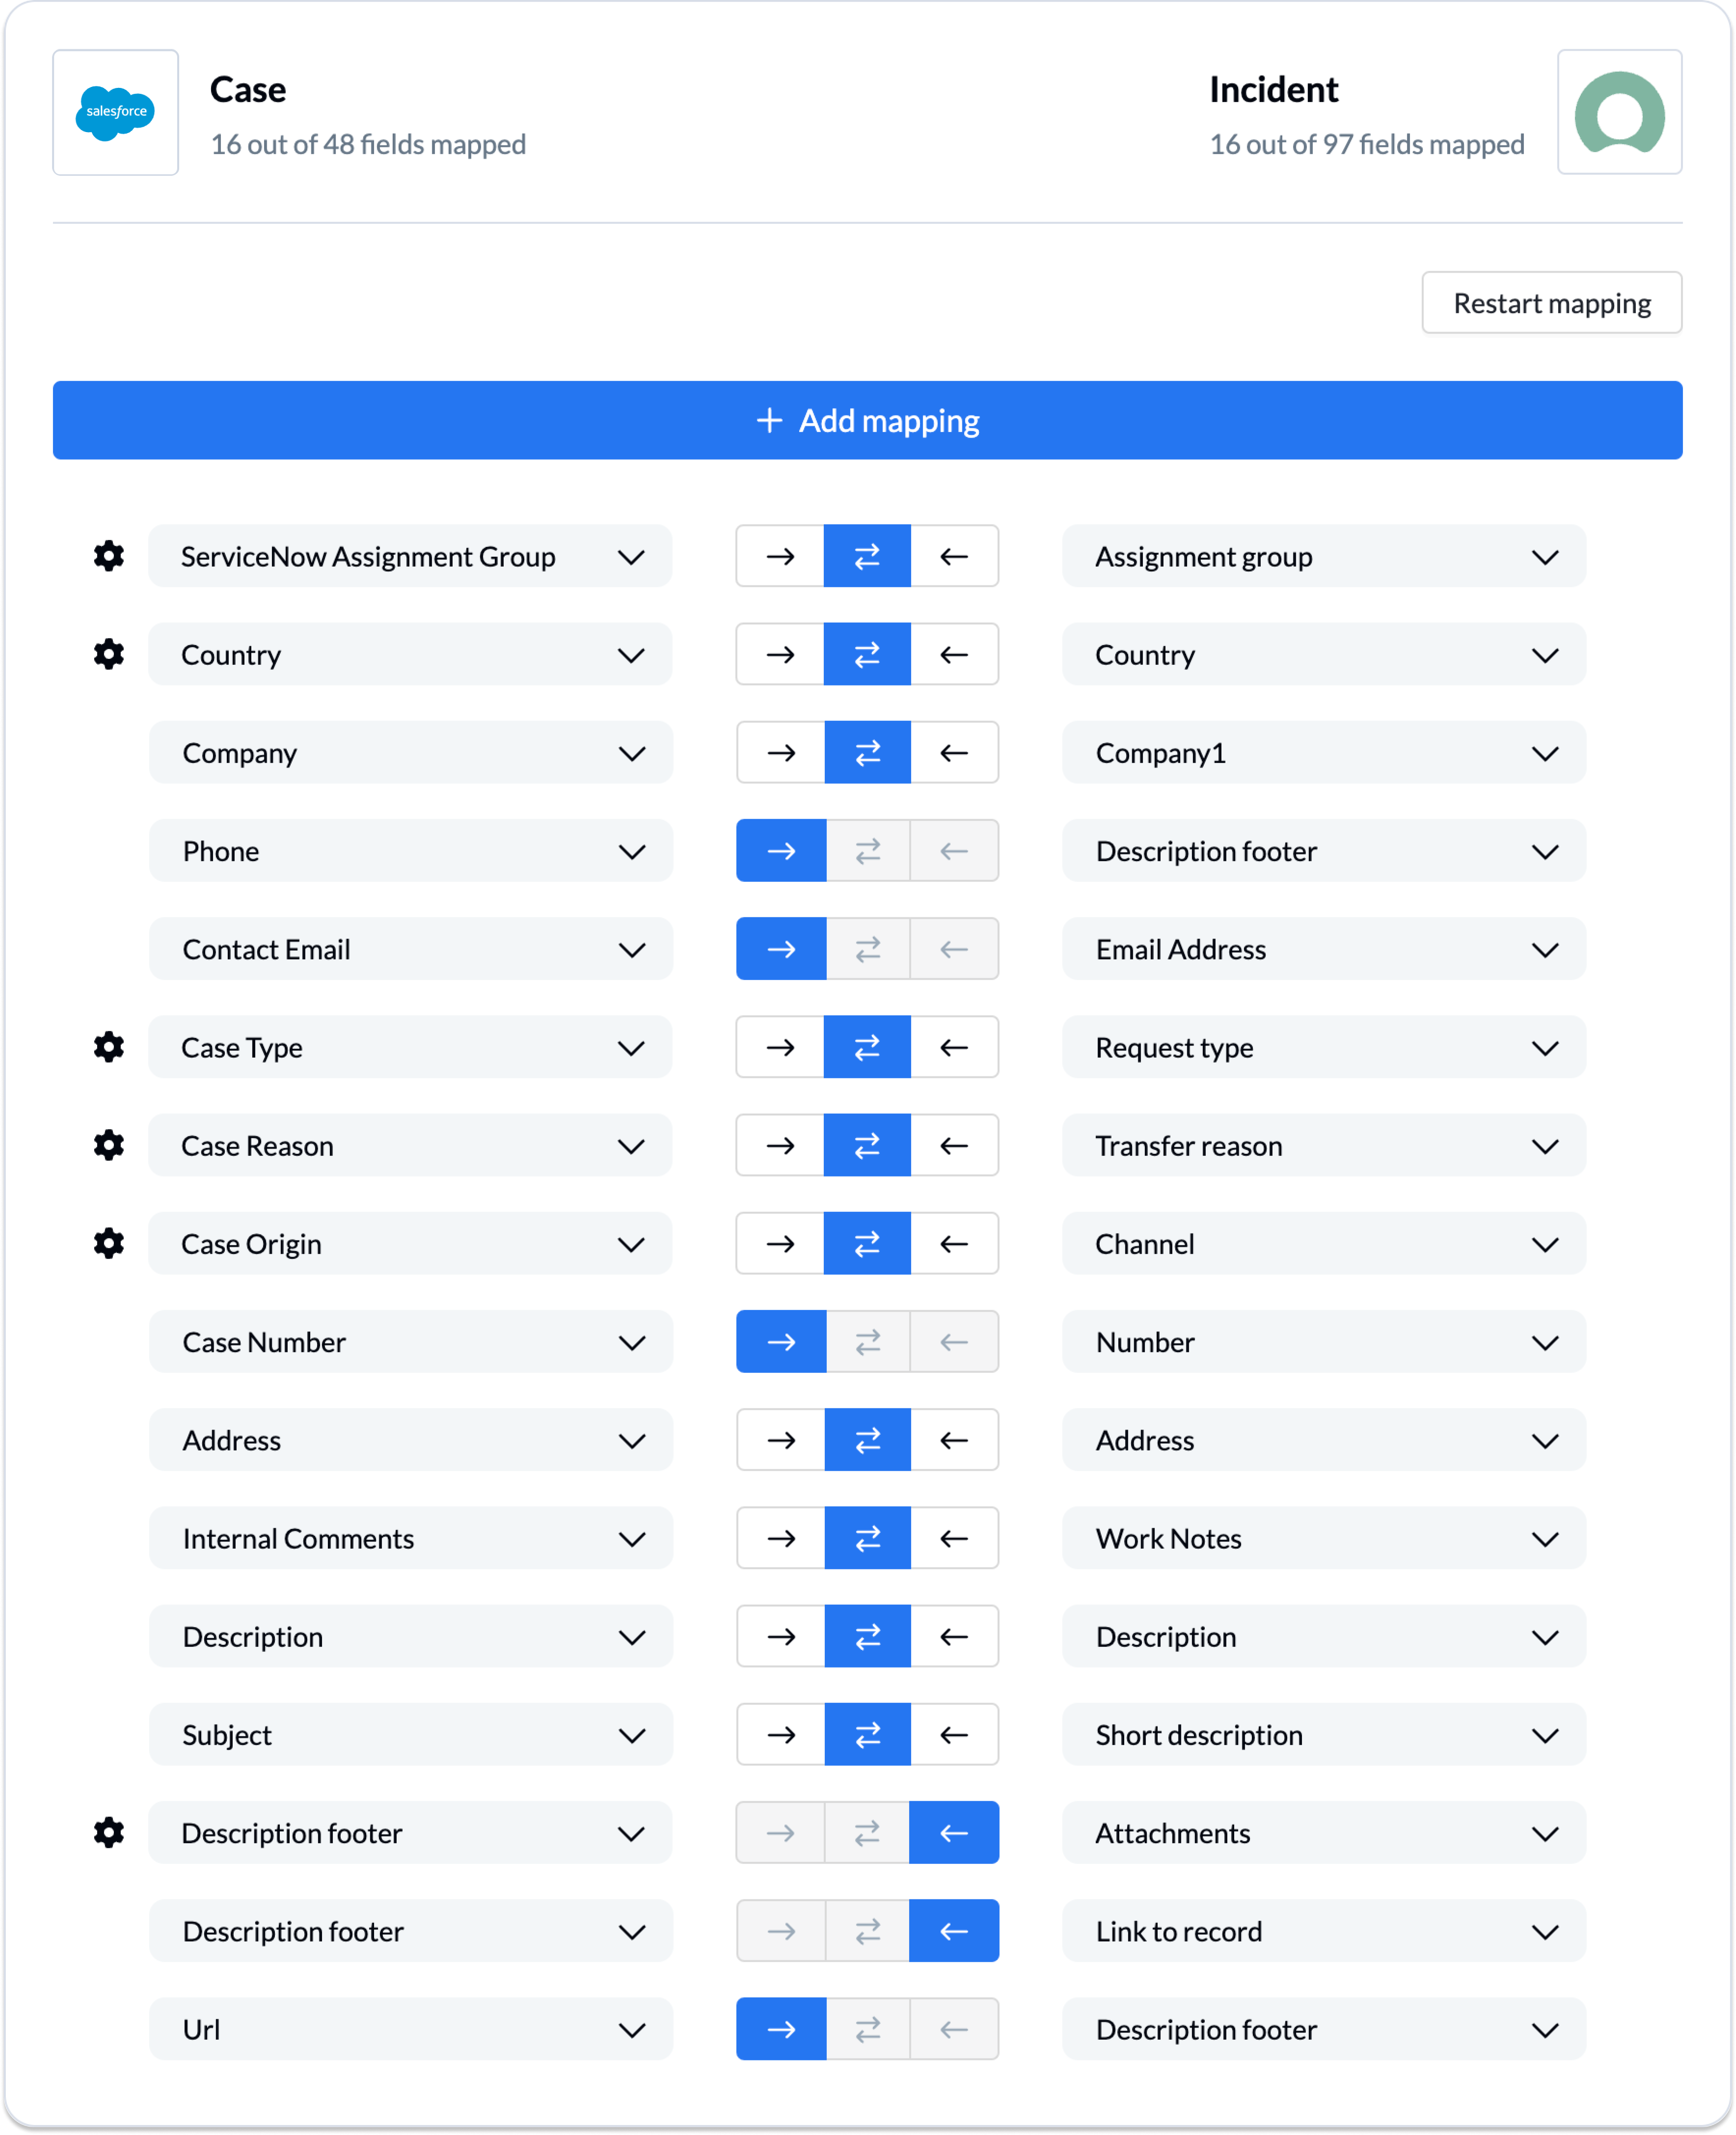
Finally, choose what fields sync to each other across the tools. Unito can do this automatically in most situations. For more detailed customizability, it can be done manually, which lets you choose exactly which information moves where. Some fields can also be set to be one-way or two-way at this level.
Connect Salesforce and ServiceNow with the right integration
ServiceNow and Salesforce have a lot of potential when working together. ServiceNow’s native integration is a great starting point for testing out what these two software can achieve together, but is limited by the manual connection process and unidirectional flow. Unito gives users the ease of use and the customization to truly see what these two tools can do together.
Wanna see this integration in action? Sync up with us!
FAQ: ServiceNow-Salesforce integration
Can you use ServiceNow as a CRM?
Sort of! ServiceNow can be used as a CSM which contains features that allow it to act as a CRM and sales system, despite being primarily an ITSM software. It may not be as effective as a dedicated CRM, but it has some functionality in common with CRM systems.
Is ServiceNow the same as Salesforce?
No, ServiceNow is a cloud-based application platform (PaaS) service, while Salesforce is a cloud-based CRM platform. ServiceNow serves as a platform for creating custom applications and automating workflow, while Salesforce is primarily focused on customer relationship management.
Contrasting Salesforce’s customer-centric focus, ServiceNow streamlines internal business processes. This platform is designed to enhance productivity across multiple departments and improve overall IT services management. It employs AI and machine learning to:
- automate risk assessment
- smart ticket routing
- predict success of IT changes
- provide AI tools like chatbots
These features optimize the handling of IT issues and enhance user experiences.
What is an integration between Salesforce and ServiceNow?
A Salesforce-ServiceNow integration is software that takes data from work items in Salesforce (e.g. tasks, tickets, contacts) and pushes it to work items in ServiceNow (e.g. cases, incidents). ServiceNow offers one of these integrations natively, meaning you don’t need to install any additional software.
You can also use third-party software to integrate Salesforce and ServiceNow. Some examples of this software include:
- Unito
- Zapier
- Workato
- Tray.io
- Mulesoft
How can I choose the right integration for ServiceNow and Salesforce?
This critical decision requires careful examination of the tool’s features, scalability, security, ease of use, and compatibility with other applications.
Some key features to consider when choosing an integration tool are:
- Data encryption
- Two-factor authentication
- Real-time alerts
- Intelligent workflows
- Security orchestration
- Automated response engine
Both Salesforce and ServiceNow offer these critical security aspects, making them good options for integration.
Will ServiceNow overtake Salesforce?
There are currently no signs that ServiceNow will overtake Salesforce. According to some numbers, ServiceNow has over 7,700 customers while Salesforce has over 150,000. Additionally, ServiceNow reported $10.98 billion in revenue in 2024 while Salesforce reported $37.89 billion in revenue that year.
What are the integration methods for ServiceNow?
You can integrate ServiceNow with other tools using any of these options:
- 2-way sync tools like Unito: Unito is a new, simpler approach to integration powered by live 2-way sync. It allows for secure 2-way connections between 50+ industry-leading apps and tools, including ServiceNow and Salesforce. Key features include bidirectional integrations, custom workflow automation, field mapping, flexible rule creation, and reduction of repetitive tasks.
- ServiceNow IntegrationHub: ServiceNow Integration Hub operates on the Now Platform, enabling process owners and developers to build reusable “spokes” and integration “actions” that interact with external platforms from ServiceNow®. However, Integration Hub requires in-depth knowledge of scripting languages and can be very time-intensive.
- Salesforce’s built-in Mulesoft integrations: MuleSoft Composer is part of the broader MuleSoft Anypoint Platform, offering wider integration potential alongside tools like RPA (Robotic Process Automation). Designed primarily for Salesforce administrators who want to streamline automation within Salesforce, it provides a no-code interface, pre-built connectors, and guided templates to empower Salesforce users to build automations without relying heavily on IT support.
- Automation platforms like Zapier
Is ServiceNow part of Salesforce?
ServiceNow is not part of Salesforce. It’s a separate, distinct software platform. While there is some overlap between them, since both tools can be used to manage customer issues and service requests, they’re different platforms run by different companies.
Can Salesforce integrate with ServiceNow?
Yes, there are multiple ways to integrate Salesforce with ServiceNow. Here are a few of your options for integrating these tools:
- 2-way sync tools like Unito
- ServiceNow IntegrationHub
- Salesforce’s built-in Mulesoft integrations
- Automation platforms like Zapier
Does Salesforce compete with ServiceNow?
Yes, Salesforce competes with ServiceNow to some extent. Both can be used to handle support tickets and manage business processes within customer support teams. That said, many organizations use both ServiceNow and Salesforce, since they’re specialized in distinct areas.
Why should I integrate customer service operations?
Customer data, product catalogs, and service catalogs are the lifeblood of both Salesforce and ServiceNow, yet often exist in frustrating silos. Integration solutions like Unito can ensure this vital information is always up-to-date and consistent by syncing Salesforce and ServiceNow data. This eliminates discrepancies that cause delays and customer frustration.
For example, if someone in your organization changes a customer address in Salesforce, that change can be automatically synced to a matching record in ServiceNow. Similarly, product catalog synchronization can enable sales teams and support reps to see the same product details and availability, and prevent miscommunications and failed orders. This allows you to :
- Coordinate across teams with accurate customer data: Imagine if your IT department could create ServiceNow incidents that automatically create corresponding Salesforce cases. Then, manual changes to one would appear instantly in the other, ensuring seamless visibility between platforms. Meanwhile, customer support agents can provide accurate, timely information to end users as the internal IT department works on each incident, ticket, or record.
- Handle escalations with full context: Conversely, critical customer insights or escalations captured within Salesforce can be relayed back to the ServiceNow team as synced records. So the IT department can more effectively diagnose and resolve underlying issues. A no-code, 2-way solution is optimal for minimizing data-related human error, supporting the customer experiences in a large-scale enterprise through automation, and simplifying data sharing between departments.