How To Set up a Jira-Azure DevOps Integration in Minutes (3 Methods)
Your software development team barely looks up from Azure DevOps so they can get all their work done. That makes things difficult for team leads and other stakeholders who need regular updates on software projects but only work in Jira. That’s where a Jira-Azure DevOps integration comes in.
Here are a few ways you can make this happen.
Method 1: Use the Azure DevOps for Jira Marketplace app
The team at Atlassian built an app specifically for setting up a Jira-Azure DevOps integration. You can find it on the Jira marketplace here. With a little bit of technical know-how, developers in Azure DevOps will be able to push data from that tool to Jira, giving leaders more visibility on their software projects.
Let’s go through setting this app up and using it with your Jira projects.
Step 1: Install the Azure DevOps for Jira app
You can either follow the link above to get the app or get to it from your Jira projects by following these steps:
- Hit Apps in your Jira project then Explore more apps.
- You’ll get a search bar. Search for Azure DevOps for Jira. Make sure to pick the one with “Official” in the name, since there are a few apps on the marketplace with a similar name.
- Hit Get app then Get it now.
- After installing the app, hit Configure now.
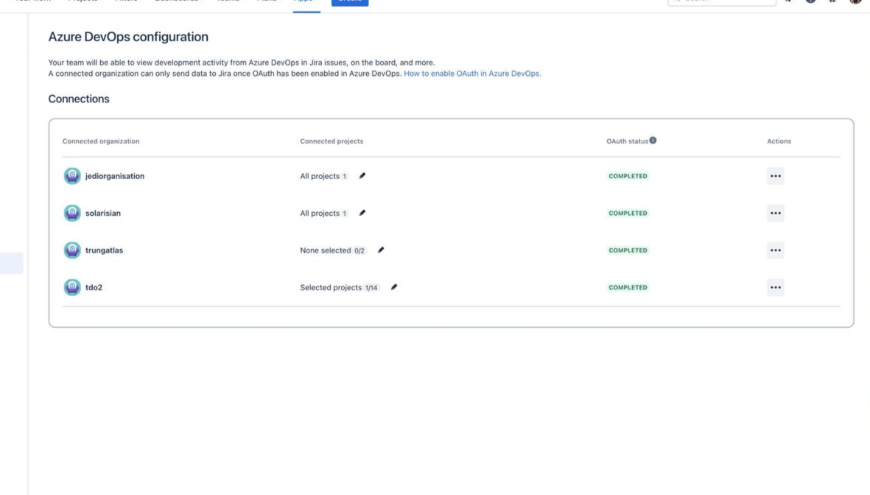
Step 2: Connect Azure DevOps to Jira
Before you can start using this integration, you’ll need to configure your Azure DevOps account so it can connect to Jira properly.
- Sign in to your Microsoft account and accept the necessary permissions.
- Hit Continue on the configuration screen.
- In the new tab that opens, enter the credentials for the Azure DevOps account you’ll connect to Jira.
- On the next screen, hit Accept.
- Hit Connect for any of the organizations you want to connect to Jira.
Step 3: Set up OAuth in Azure DevOps
OAuth is an authorization method that lets third-party apps interact with your Azure DevOps data. It’s essential to set up before this integration can work. You’ll get a pop-up in Jira that tells you when this needs to get set up. Here’s how to do it.
- In the pop-up, hit Go to Azure DevOps.
- Go to your organization settings, hit Security, then Policies.
- Find the Application connection policies header and toggle on Third-party application access via OAuth and SSH authentification.
Congrats! You’ve done everything you need to integrate Azure DevOps with Jira. Now let’s quickly cover some of actions your developers can take to push data form Azure DevOps to Jira.
Step 3: Trigger integration events in Azure DevOps
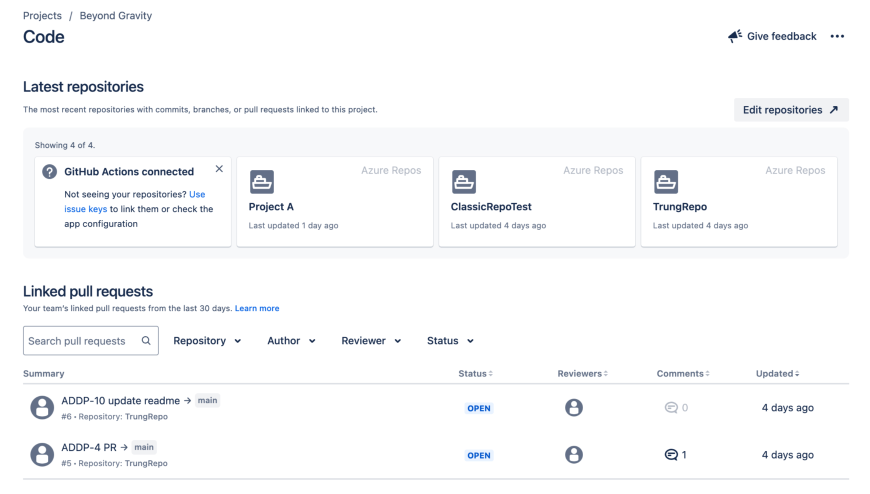
Since this integration is a little more technical, your developers will have to take manual action in Azure DevOps to push data over to Jira. Here are some of the things your team can do to trigger an integration event:
- Set up a CI/CD pipeline using deployment jobs or the classic release pipeline.
- Link deployment events to Jira by including Jira issue keys.
Limitations of this method
This integration is a great way to start pushing data from Azure DevOps to Jira, but is it necessarily the best one for your organization? Let’s go over a few reasons why that might not be the case.
It’s technical
While setting up the integration itself isn’t too complex, actually getting your data to go from work in your Azure DevOps workspace to your Jira issues can be. Developers need to take active, technical actions in Azure DevOps to move that data over. Your head of marketing isn’t going to set this up.
It only covers Jira and Azure DevOps:
This integration is perfectly suited to managing workflows that rely on these two tools, but that’s it. You’ll need other integration platforms to sync data between the rest of your tool stack.
It’s one-way only
This integration really only serves one purpose. It allows your developers to push data from Azure DevOps to your Jira issues, giving product managers, team leads, and other stakeholders more visibility into that work. You can’t get Jira data into Azure DevOps with this method.
It’s not suited to syncing historical data
If you have tons of historical data you need to sync between Jira and Azure DevOps, this might not be the integration for you. It only handles new data, meaning you’ll need another option to handle your backlog.
So with these limitations in mind, what are some of your other options?
Method 2: Use Unito’s Jira-Azure DevOps integration
Unito is an integration platform with native 2-way syncing that offers deep integrations with some of the most powerful SaaS tools on the market, like Jira and Azure DevOps. But you can sync other tools too, from spreadsheets in Google Sheets and Microsoft Excel to project management tools like Asana, Jira, and Trello. This gives you complete visibility into software projects, no matter which tool you work from.
Here’s why Unito is the best way to sync Jira issues with data from Azure DevOps.
Anyone can use it
Unito is a no-code solution, and most users don’t have a technical background. That means anyone from a team lead to a project manager can set up a Unito flow to sync data between these tools. No specialized training necessary.
It integrates over 40 tools
While the Azure DevOps for Jira app is great for pairing these tools, it doesn’t support any others. With Unito, you can get integrations for more than 40 tools, including spreadsheets, project management apps, databases, and more. It also supports more fields than most other integrations on the market, including custom fields.
This integration works for both Jira Cloud and Jira Server.
It’s two-way
Unito is a two-way sync tool by default, meaning you can get updates in both Azure DevOps and Jira. You’ll also see new work items created automatically in one tool when you manually create them in the other. This keeps all your work in sync everywhere, with no extra work required.
Here’s a quick step-by-step guide showing how easy it is to integrate Jira and Azure DevOps with Unito. If you want a deeper, more technical guide, check out our walkthrough.

Step 1: Connect Jira and Azure DevOps to Unito
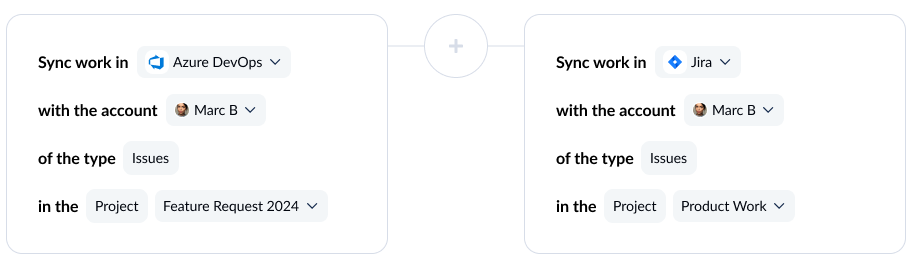
First, connect your tools. In this case, connect an Azure DevOps project and a Jira project.
Step 2: Pick flow direction
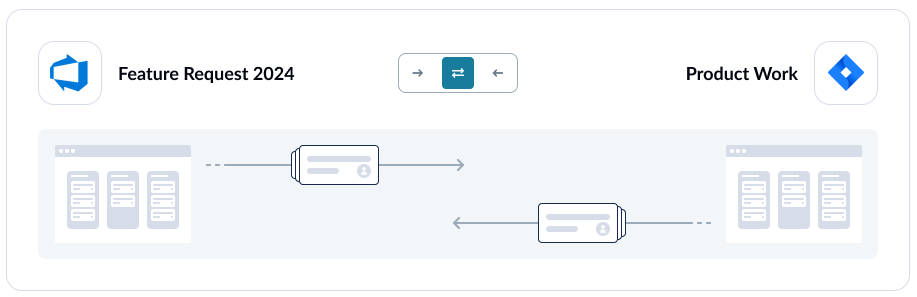
This will determine if new Azure DevOps or Jira issues are automatically created in just one tool or both. It’s where Unito stands out as an integration solution because users can select either one-way or 2-way syncing.
Step 3: Build rules
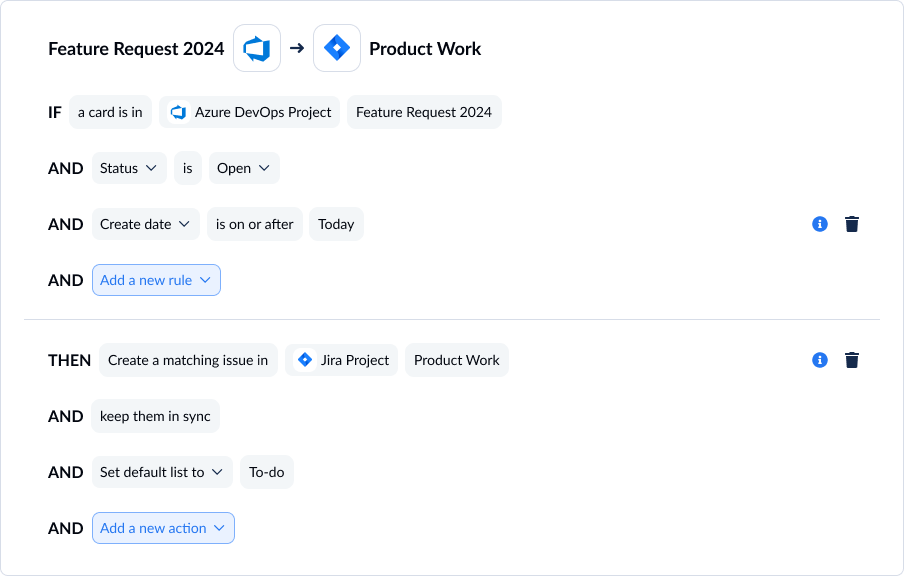
Maybe you don’t want absolutely every item syncing over to the other tool. That’s perfectly fine. You can choose to filter issues based on their assignee, their state, their story point, and more.
Step 4: Map your fields
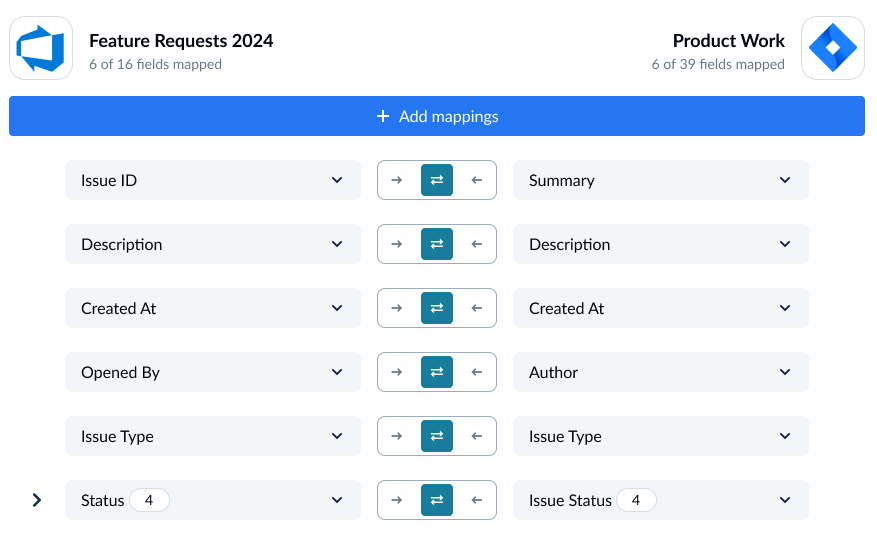
Unito supports most field types so no details are missed. You can have Unito map these automatically or fine-tune them yourself.
And that’s it! You’re ready to launch. Your Jira and Azure DevOps projects will be in sync, saving you manual work and licenses.
Once you’ve got the hang of Unito, you can also try syncing:
- Azure DevOps to Airtable
- Azure DevOps to Asana
- Azure DevOps to Wrike
- Asana and Azure DevOps
- Azure DevOps and Airtable
- Trello and Azure DevOps
- ADO and ClickUp
- Azure DevOps and ServiceNow or other database and project management tools.
Method 3: Use Zapier’s Jira-Azure DevOps integration
Zapier is an automation platform widely used to set up simple one-way automations between thousands of tools, including Jira and Azure DevOps. It has a simple, no-code, drag-and-drop interface that allows anyone to set up their first integration without serious technical skills.
Here’s how you can integrate Jira with Azure DevOps using Zapier.
Step 1: Connect your trigger app account to Zapier
Your “trigger app” is the source of your automation, the tool from which you’ll push data. So if, for example, you wanted the creation of new issues in Azure DevOps to create new Jira issues, you’d make Azure DevOps your trigger app.
Step 2: Customize your trigger event
A trigger event is the event in your trigger app that kickstarts your automation. For Azure DevOps, here are a few examples of trigger events you can choose:
- New work item created
- Work item updated
- New comment on work item
- Code push
- Code check-in
- Completed build
For Jira, you can use the following trigger events:
- New issue
- Updated issue
- New comment
- Updated comment
Step 3: Choose your action app and connect it to Zapier
Your “action app” is the tool where your Zapier automation will actually make changes. So if Azure DevOps is your trigger app, then Jira will be your action app, and vice-versa.
Step 4: Customize your action
The action is the change Zapier will make in your action app. Here are some actions Zapier can take in Azure DevOps:
- Trigger build
- Create work item
- Update work item
- Add link to work item
- API request
And some actions Zapier can take in Jira:
- Add attachment to issue
- Add comment to issue
- Link issues
- Add watcher to issue
- Create issue
- Move issue to sprint
- Update issue
- API request
Limitations of this method
Zapier is easy to set up and simple to add to multiple tools in your workspace. That said, it isn’t necessarily the best option for every workflow. Here’s why.
Best for new data
Zapier doesn’t handle historical data particularly well. Since its automations are trigger-based, only new work items or updates to existing work items are treated by your integration. While you can work around this by setting up fields specifically for pushing existing data between tools and making updates to this field your trigger event, it’s not as intuitive as using an integration solution that natively handles historical data.
One-way automation
Zapier automations are one-way, only pushing data from a trigger app to an action app. While it’s possible to chain multiple automations to simulate a two-way integration, it’s not part of Zapier’s native functionality. This means added maintenance and troubleshooting when something goes wrong.
No real-time sync
Even in situations where you chain enough automations to imitate a two-way sync solution, Zapier won’t give you the same kind of real-time syncing you’d expect with these other tools. If your workflows need real-time syncing, Zapier likely won’t be the best option for you.
FAQ: Azure DevOps-Jira integration
Can Azure DevOps integrate with Jira?
Atlassian offers a built-in Jira-Azure DevOps integration, which requires a bit of technical know-how to work properly. This integration relies on automation to make changes in Jira when specific actions are taken in Azure DevOps.
Unito’s integration creates a true 2-way sync between these tools, essentially connecting individual issues so updates are automatically sent to both Jira and Azure DevOps.
How can you migrate Jira projects to Azure DevOps?
Migrations usually involve relying on third-party tools or consultants to make sure everything goes off without a hitch. That’s because Jira and Azure DevOps don’t have built-in tools for moving data from one to the next reliably at scale.
A tool like Unito allows you to migrate at your own pace, automatically pushing new and historical issues from Jira to Azure DevOps, keeping everything in sync until you’re ready to shut down Jira. This allows you to migrate without pausing important projects, as well as migrating your entire organization on a project-by-project or team-by-team basis.