How To Set Up a No-Code Azure DevOps-Wrike Integration
This walkthrough will show you how to quickly connect Azure DevOps and Wrike in a 2-way sync from your Wrike interface that turns work items into tasks and vice versa. When you’re finished with this guide, you’ll have a simple, no-code integration that keeps all your synced work items up-to-date in real-time whenever changes occur. So whether you’re a project manager in Wrike trying to stay on top of dev work in Azure DevOps, or a lead software developer trying to save time working asynchronously with other teams, Unito can help!
Overview
- Tools: Wrike and Azure DevOps
- Use cases: Software development, product management, task management
- Great for: Developers, engineers, project managers, product managers
Unito’s two-way sync integration for Salesforce and Azure DevOps allows users of any technical background, from product managers to software developers and team leads, to sync Salesforce objects with Azure DevOps work items. This integration syncs updates back and forth between both tools, creates new work items, and can even automate repetitive actions. This in-depth guide shows you how that’s done.
We’ll show you how to set up your own Wrike Azure DevOps integration with a few simple steps
- Create work items in Azure DevOps based on specific tasks in Wrike with matching fields, e.g., (descriptions, titles, etc.) or vice versa.
- Keep your tasks and work items in a real-time 2-way sync with automated updates whenever changes are made on either end.
This integration can be built with Wrike Sync directly from your Wrike interface or through Unito’s standalone platform.
Before we connect Azure DevOps and Wrike to Unito:
You may want to create a new planning folder or project in Wrike to act as a workspace for anything you want to sync to or from Azure DevOps.
Get the Wrike Sync add-on
Wrike Sync is included with any Wrike Business Plus or Enterprise plan. Here’s a technical overview of Wrike Sync.
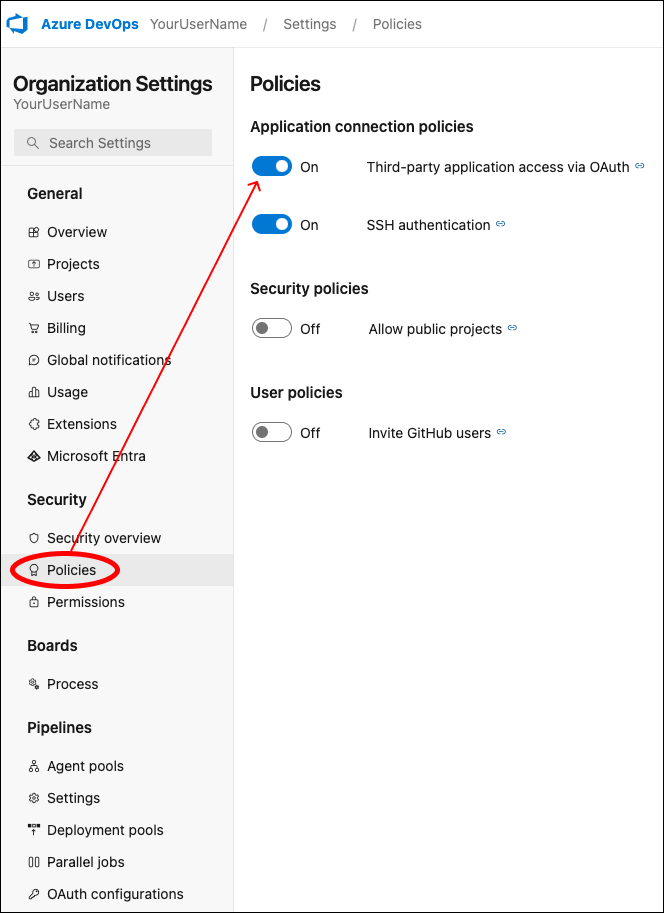
Adjust your organization settings in ADO
Be sure to adjust your Organization Settings in Azure DevOps before building your flow. Just make sure that Third-party application access via OAuth is turned on.
Step 1. Connect Azure DevOps and Wrike to Unito
You can either connect your tools through Unito Sync Platform, or Wrike Sync.
Unito Standalone App:
Navigate to the Unito App and select +Create Flow.
Wrike Sync:
- Login to your Wrike account.
- Click on your profile icon in the top-right.
- Select Apps & Integrations.
- Select Project syncs, then Authorize Wrike.
On the next screen, select Start Here to connect Azure DevOps and Wrike. Choose the accounts and projects or folders you wish to sync.
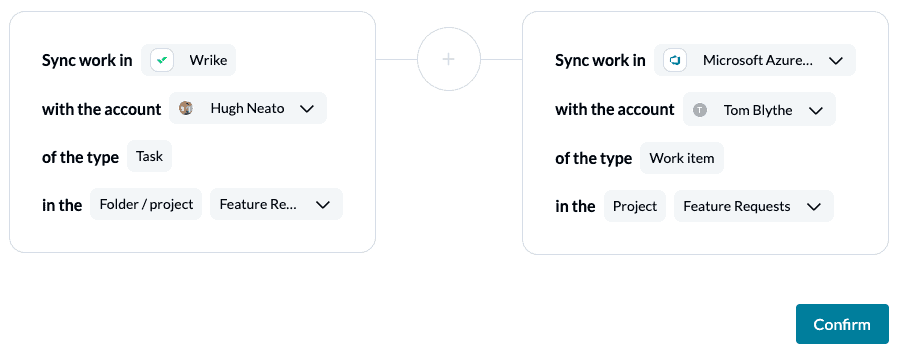
When you’re ready, select Confirm.
Step 2. Set a flow direction between Azure DevOps and Wrike
What is Flow direction? Flow direction determines where new work items or tasks are created by Unito. Pick a source and destination tool for a one-way flow, or pick a two-way flow if you want manual activity in Wrike and Azure DevOps to automatically generate work items or tasks in the other.
For our demo, we’ll be setting up a flow that only creates new work items in Azure DevOps based on Wrike tasks. So we’ve chosen a one-way flow from Wrike to Azure DevOps.
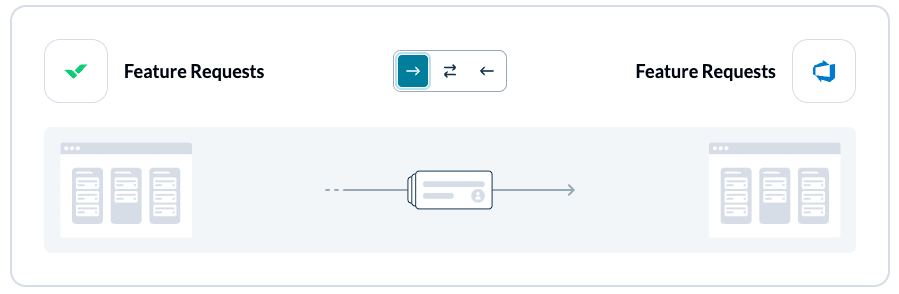
Select Confirm when you’ve chosen a flow direction.
Learn more about flow directions.
Step 3. Set rules to determine which work items to keep in sync
Rules let you filter out tasks or work items that aren’t relevant to your workflow. Set conditions if you want to restrict data from syncing to specific work items or tasks.
Select Add a new trigger to begin setting your rules. There can be some variability here depending on your particular setup in each tool. You can remove a trigger by selecting the bin icon on the right-hand side.


What are default rules?
Unito’s default rules determine how your flow will handle the creation of new items in a connected tool if no specific conditions are set in your field mappings. In the case of Azure DevOps, you can create multiple work item types (e.g., issue, bug, epic) as long as there are applicable custom work item types in Wrike. All you have to do is add work item type as a field mapping in the next section and link each item type one at a time.
Find out more about setting rules.
Step 4. Link fields between Azure DevOps and Wrike
How do field mappings work? Now, you’ll set relationships between fields in Azure DevOps and Wrike so that Unito knows how to link your data, including custom fields. For example, you can tell your flow that a “status” in Wrike should be mapped to your Azure DevOps “state” field so that any change to one, affects the other.
You can also set a sync direction for each pair of fields to determine how manual changes to one, can affect the other.
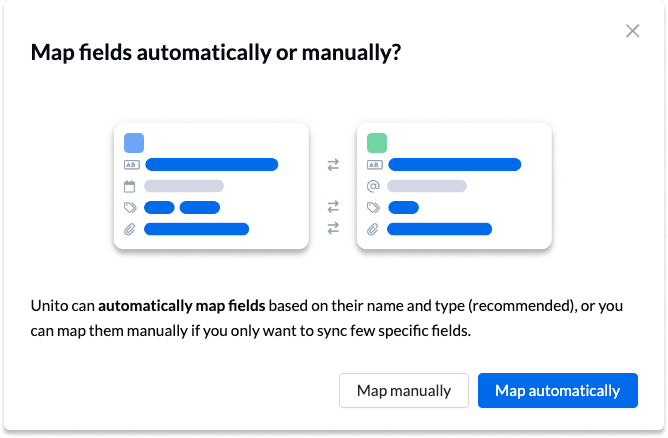
But first, we have to pick between manual mapping and auto-mapping. Auto-mapping provides you with a template based on the fields Unito can identify between both tools.
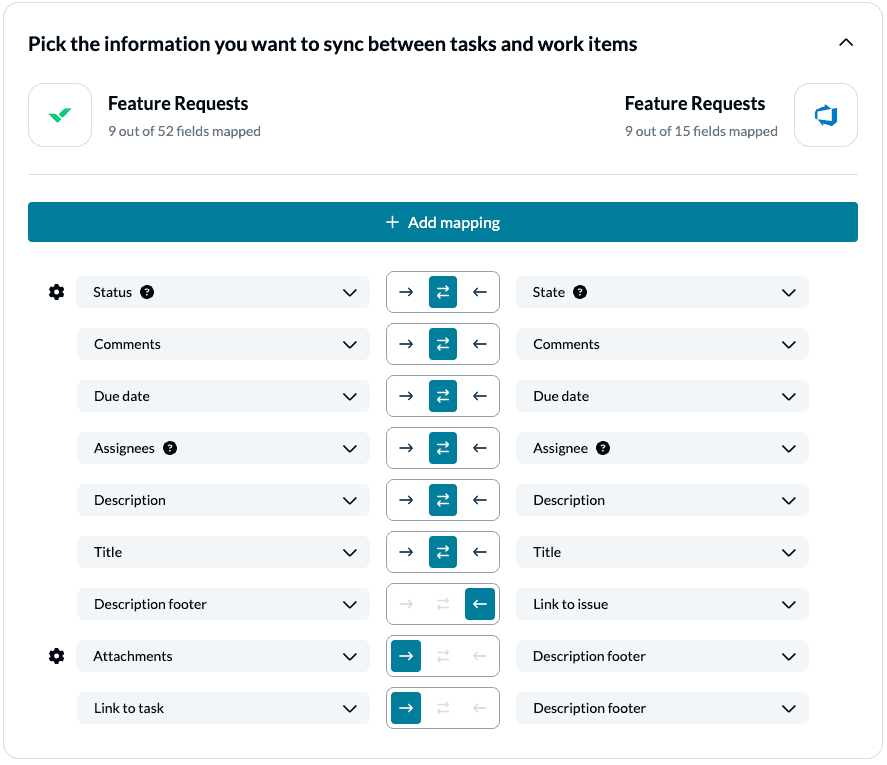
Select + Add mapping, then Select a field in both Azure DevOps and Wrike to pair two fields together. Here is an example of our demo’s auto-mapped fields:
Additional Field Mapping Examples
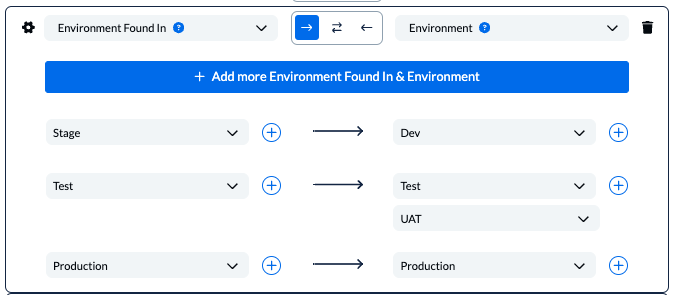
If you see a gear (or cog) icon, that indicates a dropdown field with multiple options (in Azure DevOps these are picklist (string) custom fields.
Click on the gear to link your dropdown options together.
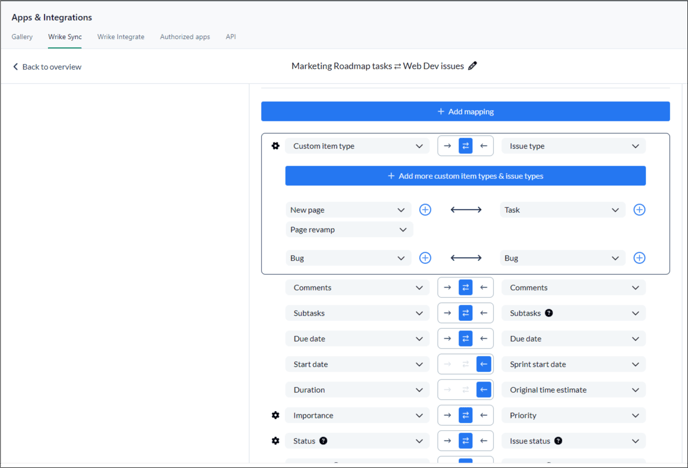
Unito also supports Wrike custom item types, which in the case of this integration can be synced to work item types in Azure DevOps:
Learn more about Field Mappings.
Click Confirm when you’re satisfied with your field mappings to proceed.
Step 5. Save, close and launch your Azure DevOps Wrike integration
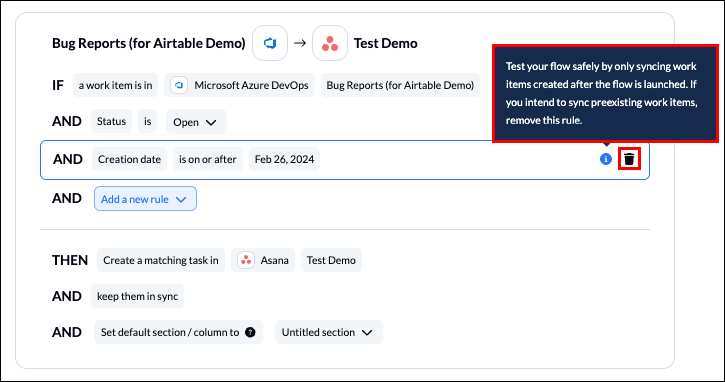
The only thing left to do is decide whether or not to sync historical work items. You can make this decision from your flow’s overview page, or edit your rules as mentioned above.
And that’s it! You’ve just completed a flow between Azure DevOps and Wrike. Congratulations!
If you’ve followed the steps above, your flow will now:
- Create a work item in Azure DevOps based on Wrike tasks in our “Feature Requests” folder.
- Enable technical and non-technical teams to collaborate between Wrike and Azure DevOps with a better view on task progress.
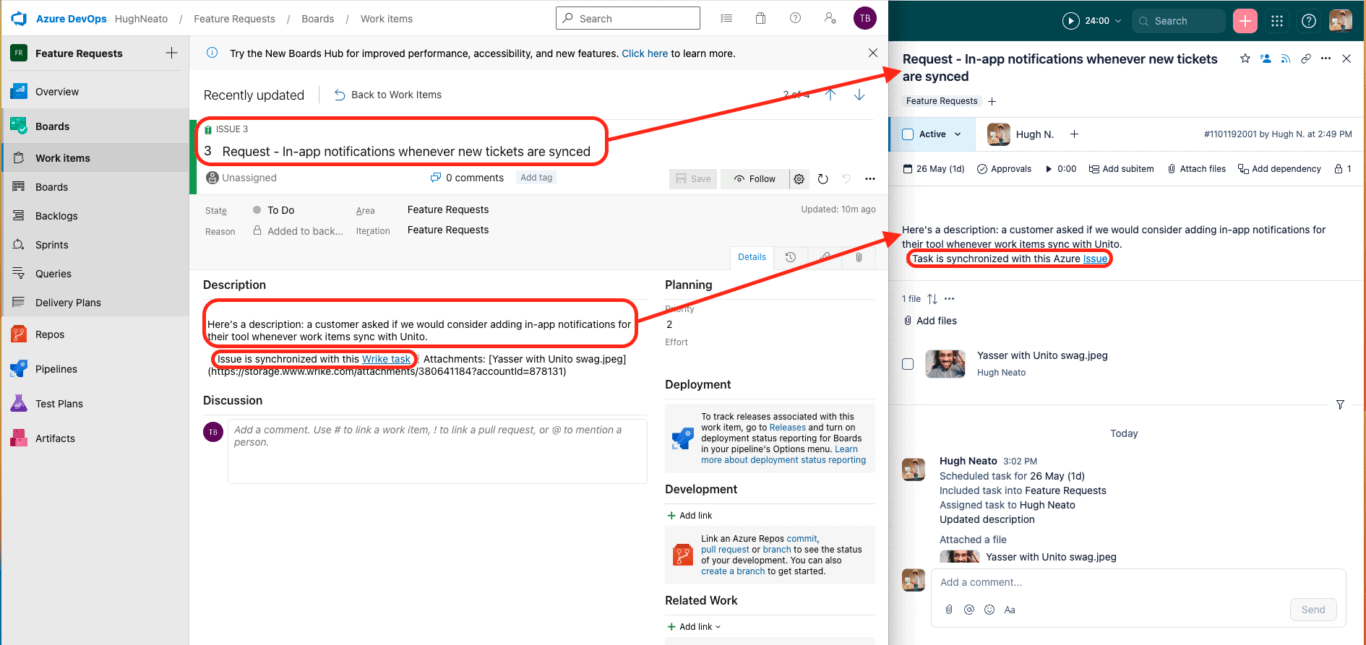
Here’s an example of our demo’s synced task and work item:
If you have any questions, don’t hesitate to reach out and let us know.
Ready to optimize development work?
Meet with our team to see what Unito can do for your workflows.
FAQ: Azure DevOps-Wrike integration
What’s next after connecting Azure DevOps and Wrike with Unito?
Now that you’ve set up your integration between Wrike and Azure DevOps, you can duplicate this workflow to also submit bug reports (or fulfill another use case) from Wrike simply by creating a new folder or project called “bug reports” and connecting it to Unito instead of the “feature request” project or folder.
Or connect Azure DevOps to Jira, Asana and Azure DevOps, Azure DevOps and Airtable, Trello and Azure DevOps, Azure DevOps and ServiceNow, ClickUp and Azure DevOps or other database and project management tools.
You can also read more about Unito’s integrations for Wrike and Azure DevOps to better understand their capabilities and limitations.
Here’s a list of several troubleshooting guides you may find helpful:
- Common connection and sync issues in Unito
- Troubleshooting Unito’s Azure DevOps connector
- Shared connector errors in Unito
- Unreachable domain error
What is Test Mode in Unito?
Unito’s default configuration only synchronizes work items created after activation, but you can customize these settings to encompass past data too. This guarantees that your integration doesn’t overlook anything and no task gets left behind.
How can you monitor sync progress in Unito?
After completing the integration setup with Unito, you can start the data flow and choose Auto Sync for continuous synchronization. This sends new work items or records between tools without manual input. Monitoring the sync progress within Unito is akin to having a project engine dashboard, offering real-time updates on your integration’s health and status.
The dashboard displays:
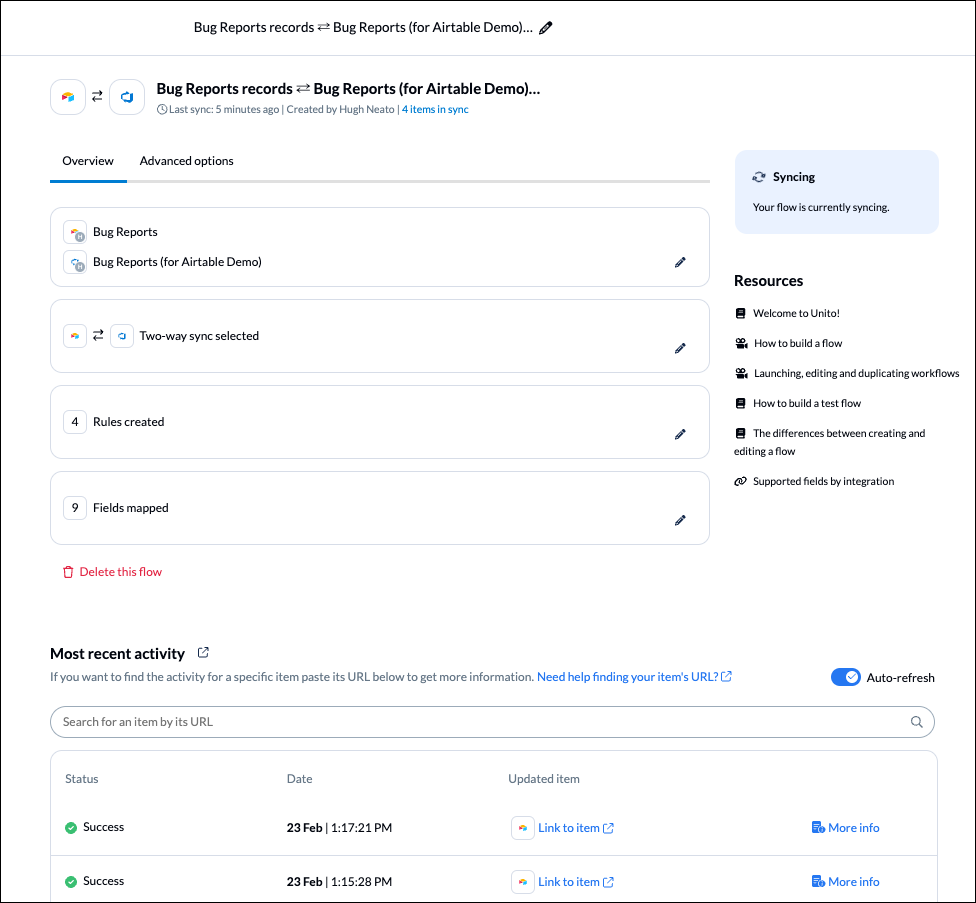
This allows you to quickly identify and address any issues.
The flow status indicators serve as your traffic lights, guiding you through the health of your integration.
The indicators include:
Healthy
Unable to sync
Initial sync in progress
Syncing
Why integrate Azure DevOps with Wrike?
Above all, integrating these powerful tools will enable you to save time, effort, and expense. If members of your team aren’t familiar with both Azure DevOps and Wrike, it can be challenging to get accustomed to a new interface. Syncing work items from Azure DevOps to Wrike means you won’t have to spend time looking for specific tasks, issues, or other work items in each tool. Instead, they’ll appear automatically in the folder, project or repo you’ll specify with a few simple rules.
Streamline collaboration between developers and the rest of your org
An integration between AzureDevOps and Wrike can be especially useful for project managers trying to manage technical and non-technical teams at the same time without needing to switch back and forth between each tool. You can use this no-code integration to triage requests from Wrike to Azure DevOps, align on feedback, or extend visibility to stakeholders.
Maintain consistency with every tool operating as a source of truth
One of the biggest challenges facing teams working with multiple tools is maintaining a source of truth for the latest progress in any task. For dev teams, that means version control. But connecting siloed departments or collaborators ensures that everyone is on the same page when it comes to project status, assignments, deadlines and more.
Skip the endless status meetings
Another solution could be to have status meetings between teams so they can discuss the latest updates and progress. Syncing tasks to work items eliminates the need for updates, check-ins, or scheduled code reviews by enabling the right members of your team with access to your synced project, folder, or repo. If they have questions, they can simply leave comments in one tool and watch them appear in the other in real-time!