How to Sync HubSpot Tickets with Asana Tasks Automatically
This walkthrough details the steps required to link, or sync, Asana and HubSpot tasks, although similar steps and principles will apply to HubSpot tickets. For the purposes of demonstrating Unito’s CRM integration, we’ll be focusing on syncing tasks between HubSpot and Asana. But as you’ll see, the use case we’ll demonstrate below can be extremely useful for syncing bug reports, feature requests, or other tickets you might wish to review. By the end of this guide, you’ll be able to automatically turn Asana tasks into HubSpot work items (e.g., tasks, or tickets) and keep both in a real-time two-way sync.
Why sync HubSpot with Asana tasks?
It’s difficult to maintain visibility over day-to-day operations when you have teams working in different apps or tools. Perhaps your sales team needs quick support and doesn’t want to leave their HubSpot interface to create a Asana task. Or maybe you need an easy solution to share bug reports or feature requests with teams in another tool. That’s when Unito truly shines – setting a simple set of instructions lets you create a long-lasting two-way integration that handles those manual tasks more efficiently.
Syncing HubSpot with Asana through Unito will enable you to:
- Add new Asana tasks automatically when specific HubSpot tickets, deals, or tasks are created.
- Add new HubSpot tasks, tickets, or deals automatically when specific Asana tasks are created.
- Update Asana and HubSpot automatically based on changes in the other.
Typically, you tell Unito to look for specific triggers, such as labels, assignees, projects, organizations, etc. By including those triggers in your rules, you ensure that only those kinds of tickets will sync between HubSpot and Asana with Unito.

In this guide:
- Tools: Asana and HubSpot
- Use cases: Task management, account management, marketing reporting, project management
- Great for: Project managers, marketing, sales, customer success, RevOps
Step 1. Connect HubSpot and Asana to Unito
Navigate to the Unito App and select +Create Flow.
On the next screen, select Start Here to connect HubSpot and Asana.
Choose the accounts you want connected to Unito. On the left-hand side below HubSpot, you’ll see a field labeled of the type. Select Ticket if you’re following this guide, or task/deal to support your own use case. See below for an example:
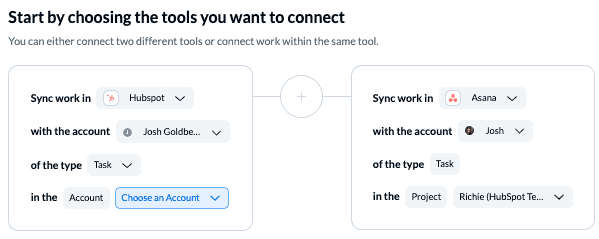
When you’re ready, click Confirm.
Step 2. Decide if Unito will automatically create new tasks in HubSpot or Asana
Flow direction lets tells Unito whether to create new Asana tasks based on HubSpot activity, new HubSpot work items based on Asana activity, or both.
Simply click the directional arrow indicating which tool should create new tasks in the other to create a one- or two-way flow of information.
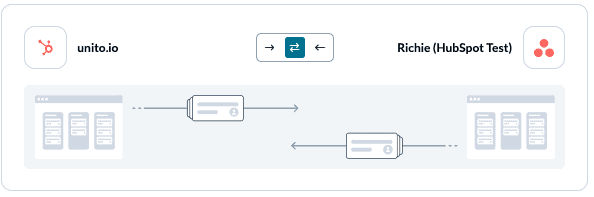
Click Confirm when you’re ready to continue.
Step 3. Set up conditions to automate creation of work items in Asana and HubSpot
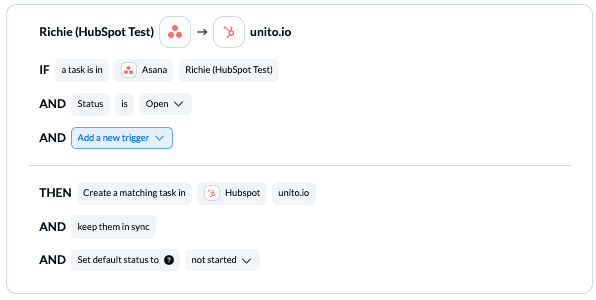
Now you can set up rules to determine which trigger events will send data between HubSpot and Asana. Select Add a new trigger to begin setting rules. You can be as precise or broad in your approach as you wish. Here’s an example of our completed ruleset, which we’ll explain below:
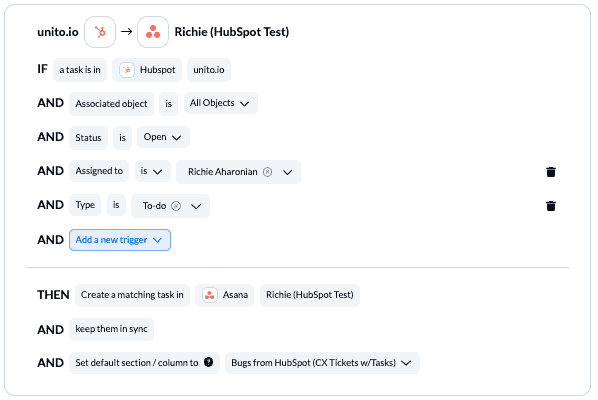
In the above example, Unito will create tasks in Asana in our specified project and section synced to open HubSpot tasks assigned to Richie and marked “To-do”.
On the other side, if one of our Asana users adds a task in that same Asana project of any kind, it will appear as a HubSpot task with the status “not started”:
Find out more about setting rules.
Step 4. Set field mappings to sync details between Asana and HubSpot work items
Fields represent the details of each task or ticket: comments, assignees, attachments, etc. Field mappings allow you to carefully select which details are synced between HubSpot and Asana.
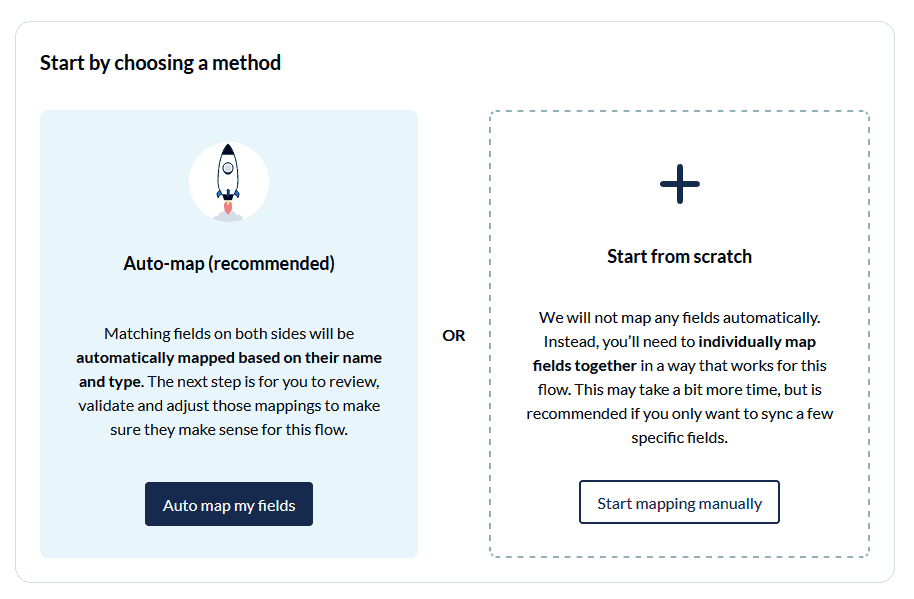
When you first open this screen, you can choose to set up field mappings manually, or have Unito auto map them first. Auto-mapping is great if you like the idea of starting from a template, while manual mapping is better for those who prefer a DIY approach. You can always start with auto-mapped fields, and then edit them accordingly.
Now, you can begin adding new mappings. Select + Add mapping, then Select a field in both HubSpot and Asana to pair two fields together. Select the gear icon to modify the values of applicable fields.
Here’s what our team put together to sync tasks between Asana and HubSpot:
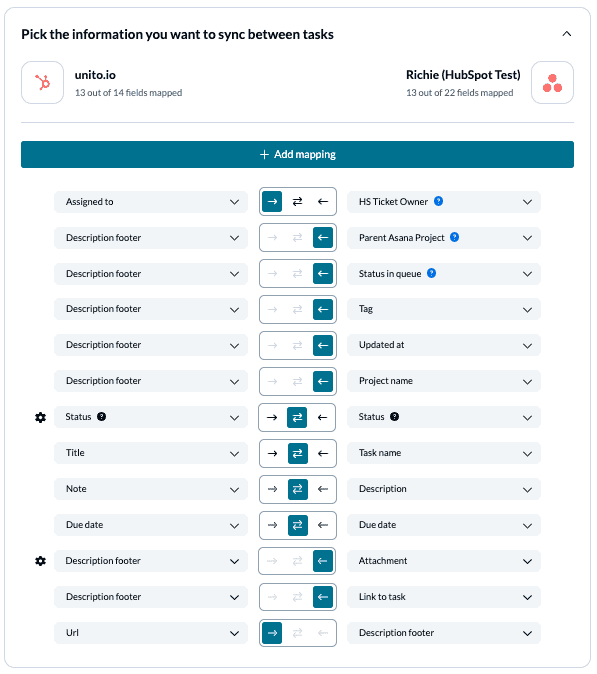
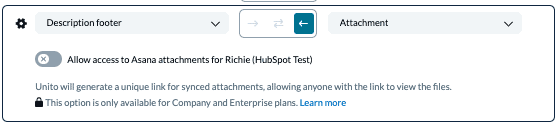
Above, we’ve added custom fields to our Asana project for a bit more customization to match our needs. Some of these mappings are intuitive: task name and title, status and status, description and note, etc. Syncing fields to a description footer is a great solution for any fields that don’t have a natural (or compatible) match in your other tool.
Any field with a cog/gear symbol can be further customized to sync various values/options within that field. In the example below, we’ve specified to Unito that incomplete Asana tasks can be considered either not started, in progress, or waiting in HubSpot, while completed Asana tasks are the equivalent to completed or deferred HubSpot tasks.
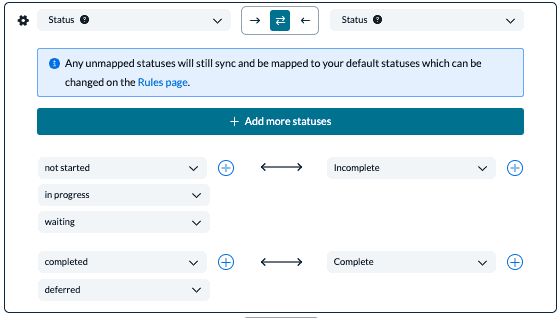
Click Confirm to proceed.
Find out more about setting field mappings.
Step 5. Save, close and launch your HubSpot Asana integration!
And that’s it! You’ve just completed a flow between HubSpot and Asana. Congratulations!
If you’ve followed the steps above, your flow will now:
- Create a task in HubSpot or Asana automatically based on the rules we chose above;
- Enable teams in either tool to collaborate effectively without having to manually switch to the other app.
You can potentially connect your pipeline to multiple projects, using rules to filter tickets by priority, stage, or type. That way, you can dispatch work to multiple teams without any extra effort.
If you have any questions, don’t hesitate to reach out and let us know.
Ready to streamline ticket escalation?
Meet with our team to see what Unito can do for your workflows.
What’s next after syncing Asana and HubSpot?
Learn how to duplicate this flow to suit other use cases you may have in mind.
- Learn how to integrate HubSpot with Trello
- Connect HubSpot Tickets to Jira
- Sync work between HubSpot and monday.com
- Create a shared, automated Google Calendar synced with Asana
- Generate progress reports based on real-time data by syncing Asana to Google Sheets
- Delegate work to external freelancers in Trello from your internal Asana project