How To Set Up a No-Code Asana-Jira Integration
You can integrate Asana with Jira using Unito’s no-code platform. This 2-way synchronization pushes data back and forth between Asana tasks and Jira issues without manual data entry.
It’s ideal for project managers trying to keep up with teams in both tools across any industry. If you’ve got one team in Asana and another in Jira but you’re stuck between them then this guide is for you! Unito’s Asana-Jira integration enables anyone on your team to quickly set up a workflow that turns newly created issues into tasks and vice versa with a range of options in between. You can do this with Jira Cloud, Jira Server, Jira Service Management and Jira Data Center. You can find more documentation about Unito’s Atlassian connectors in our help center.
Similar steps and principles will apply to many other Jira integrations with project management tools including ClickUp, monday.com, Wrike or Trello. We also have a guide on how to sync Jira epics to Asana.
Watch as our team walks you through this flow from start to finish:
Video transcript
This is how you can create a two-way sync between Asana and Jira using Unito. So, in this example, we have our product roadmap here in Asana. We have tasks that are assigned to design, tasks that are assigned for development, and some that are assigned for copy. How we want this example to work is we want any task that has the “dev” label to sync into this Jira board called “Dev roadmap.” I’ve already set up my Unito sync, so I’ll show you how it works. Basically, we add a new task here. We’ll call it “New Homepage.” We’ll assign a due date and we’ll add the “dev” label. Now we’ll go into our Jira board to see if it has synced in. So as you can see, our new task has synced into Jira as a new issue. The title, the due date, and a link to the original Asana task are all synced over into Jira. To show you how this works, we’ll go into our Unito dashboard. So this first step here is connecting your Asana project to your Jira Cloud project. Here is where we choose the direction of our flow. In this example, I’ve chosen a bidirectional flow because I want updates in either project to flow back into the other. I’ve created a single rule, which is anytime the “dev” label or function is assigned in Asana, that’s when the task will sync over into the Jira roadmap. And this is where we’ve mapped all of our fields. So if we want comments to sync over, descriptions to sync over, due dates, etc., this is where we’ll set it up. So there you have it! That’s how you sync Asana and Jira using Unito.
In this article:
- Tools: Asana and Jira
- Use cases: Product management, software development, task management, project reporting
- Great for: Product managers, project managers, software developers, QA and testers, marketing teams, customer success, team leads, executives and stakeholders
This Asana-Jira integration from Unito has two goals:
- Automatically create new Jira issues based on specified Asana tasks and vice versa.
- Maintain a live, bidirectional sync between both project management software so that everyone has visibility over the latest dev work in real-time without needing to manually share or request information.

Before you start
Setup in Jira
If you’re connecting Jira to Unito via OAuth2, then there are no extra steps to sync your Asana data other than the on-screen instructions when adding your account for the first time: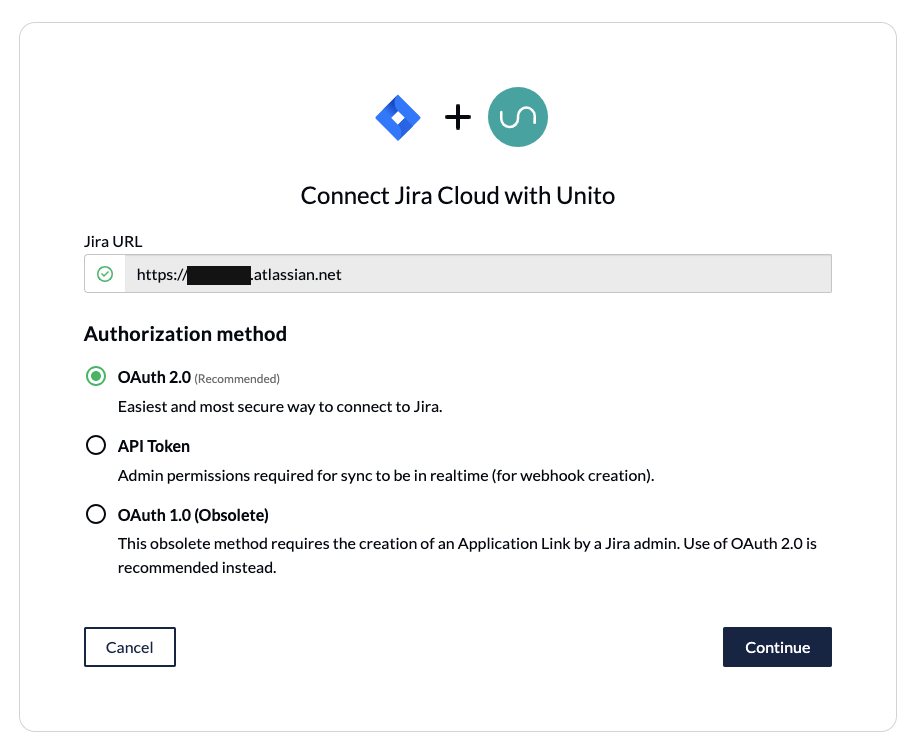
Here’s a separate guide on how to connect a local Jira Server on-premise to Unito. You can also connect your server via ngrok.
Here’s how to configure Jira if you aren’t using OAuth2 (click to expand)
- The Jira account connected to Unito must have administrator access with global permissions.
- Here’s a guide if you need help to configure Jira for Unito access before building your flow. Specifically, you’ll need to:
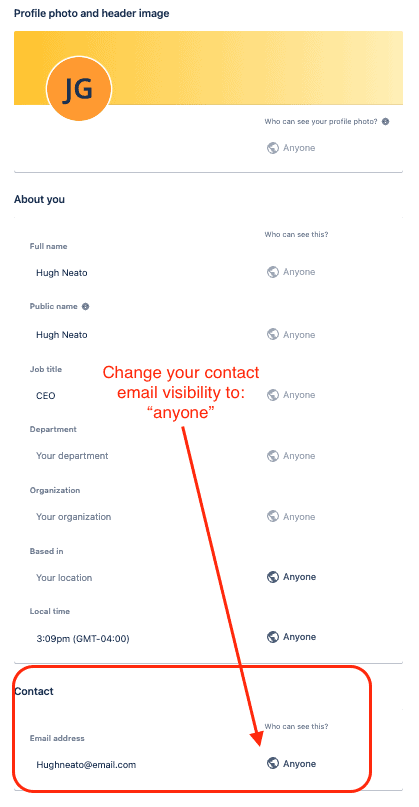
- Set your Jira contact email visibility to anyone from your Jira profile page.
- Then, set up an application link in Jira so that your issues can sync to Asana.
Step 1. Connect Asana and Jira to Unito
- Sign up for Unito if you haven’t already.
- Open the Unito App and select +Create Flow.
- Next, click Start Here to connect your tools.
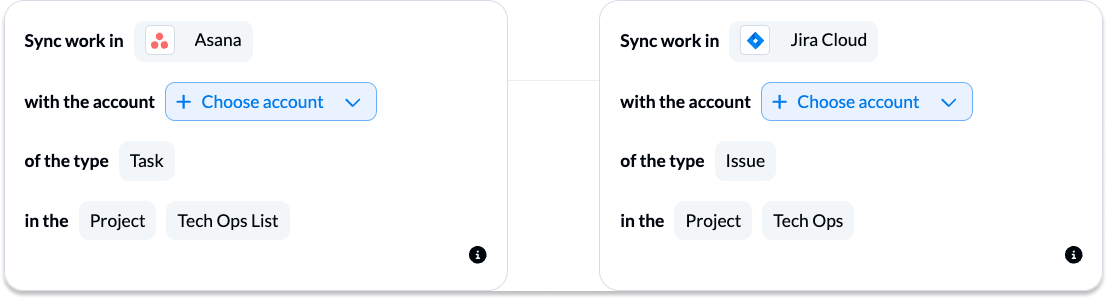
- Select +Add a tool to this flow in either column
- Then, +Choose account to specify each Jira and Asana project.
- Click Confirm.
When you’re ready, click Confirm.
Step 2. Choose a flow direction for creating tasks and issues
With flow direction, you decide where Unito automatically creates work items to match those you create manually. You have three options:
- 2-way: Both Jira issues and Asana tasks are automatically created by your Unito-powered Asana-Jira integration to match items created manually in each tool.
- 1-way from Asana to Jira: Jira issues will be automatically created by Unito to match the Asana tasks you create manually. Unito won’t create new Asana tasks.
- 1-way from Jira to Asana: Asana tasks will be automatically created by Unito to match Jira issues you create manually. Unito won’t create new Jira issues.
Learn more about flow direction in Unito.
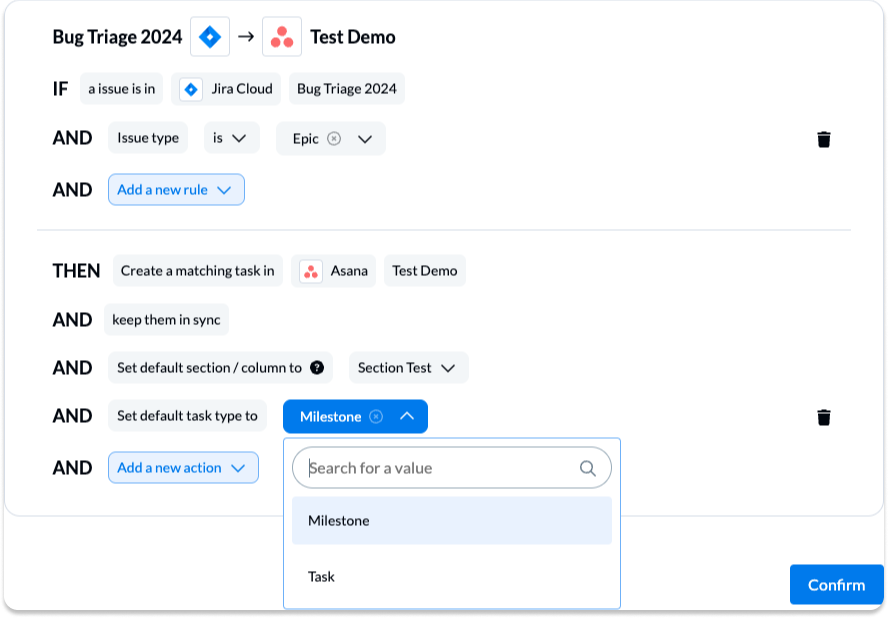
Step 3. Build rules to sync specific work items
Unito rules can do two things:
- Filter out work items you don’t want synced. For example, you could create a rule that only syncs Asana tasks opened after a certain date.
- Automate certain actions. For example, you could create a rule that automatically assigns new Jira issues to a certain person on your team.
Here’s how you can start building your rules:
- Select Add a new rule to apply conditions to your flow. Then, select as many options as you like for each rule. Any of the selected options will trigger a sync.
- (optional) you can also tell Unito to take specific actions in the destination tool after creating the synced item, such as: setting a label/tag, assigning the task to a team member, moving it to a particular section, etc.
If you chose a 2-way flow direction in the previous step, you can add rules for both Jira issues synced to Asana and Asana tasks synced to Jira.
NOTE: Rules are intended to help you keep only the most relevant information in sync to avoid oversharing unnecessary details. You can apply custom labels to your issues or tasks to be even more precise about what kind of data is shared.
Find out more about setting rules.
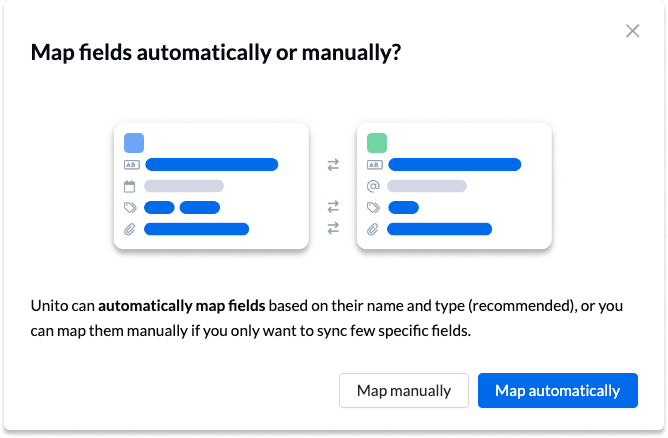
Step 4. Map fields between Jira and Asana
When you map fields, you pair fields in Jira with fields in Asana so data goes exactly where it needs to go. Unito can usually map most fields automatically, whether they’re exactly the same (Owner→Owner) or just compatible (URL→Text). You can also choose to map fields manually to fully customize your flow.
Even if you map fields automatically, you can remove any of the auto-mapped pairs of fields and/or add your own.
- Click + Add mapping to add additional fields to be synced.
- Then click Select a field for each tool, and find the appropriate field to map.
- Choose a direction for real-time updates for each pair of fields: from Asana to Jira, from Jira to Asana, or both.
Here is our demo’s completed set of fields:
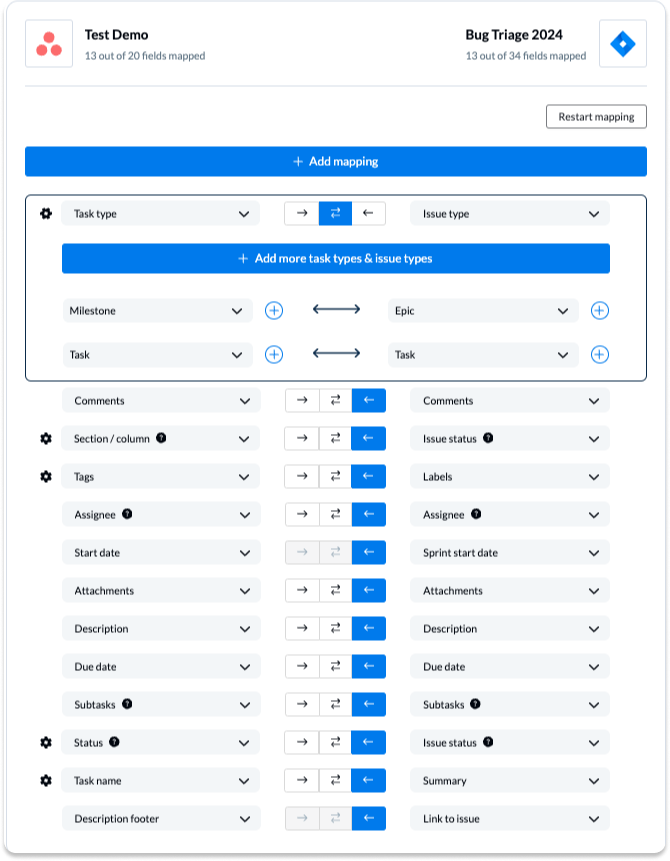
Any pair of fields with a one-way update direction indicates that changes to the source will automatically update the destination field, but manual changes in the destination field won’t affect the source.
Click here for more advanced field mapping options
Field configurations
Selecting the gear icon beside a field will allow you to customize the values or statuses within those fields to further customize your flow. For example, you can append the Jira issue number to your Asana task name:

Grouped values vs. individually paired values
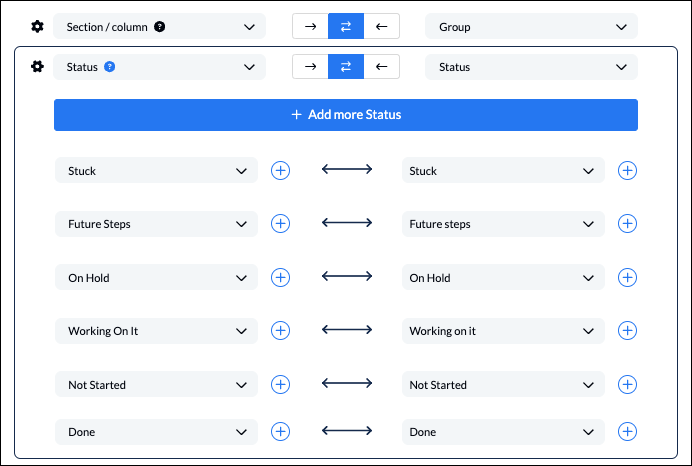
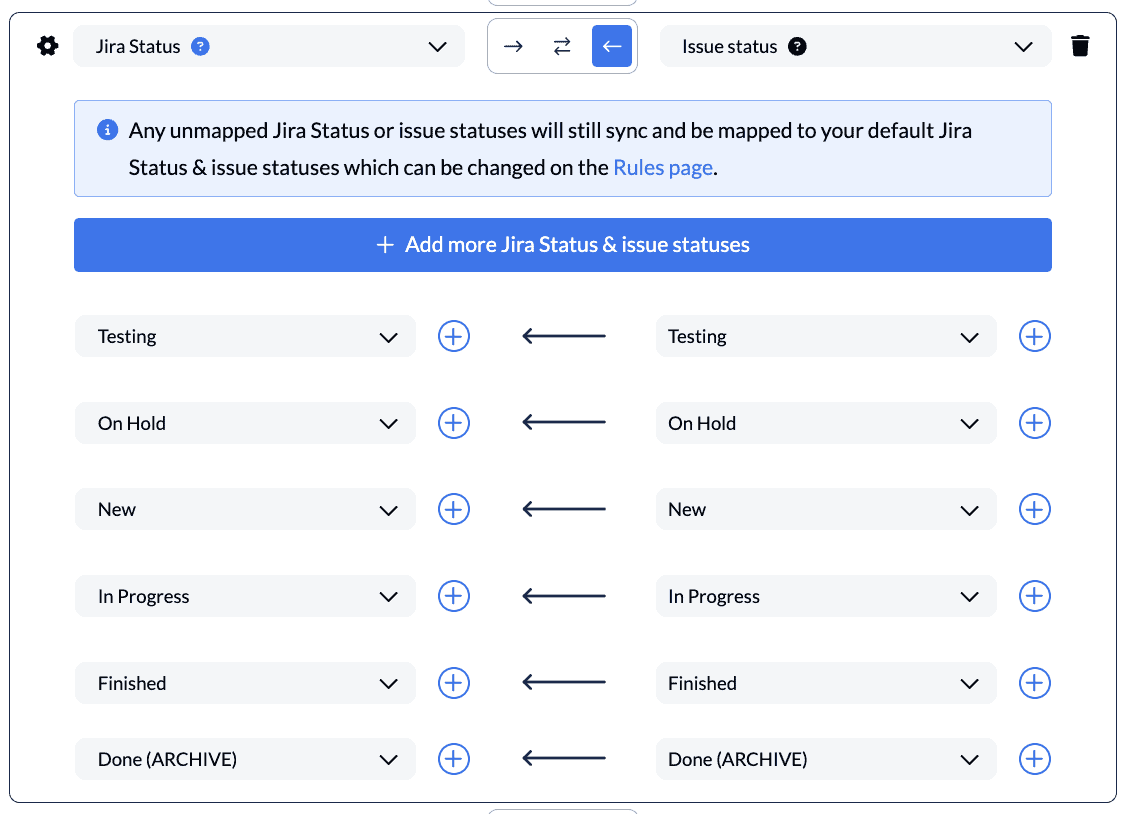
For single-select fields, you’ll want to configure each pair of values individually if they’re named differently so that Unito knows to link them together. So if you have a “blocked” status in one tool and an “on hold” status on another, you can tell your flow that these field values are essentially the same.
- Click on the gear icon beside a single-select field
- Then, select + Add more status (or the name of the fields you’re syncing)
- Choose a value/option for each tool that should be paired together.
- Do this for every unique state or status in this set of fields. It should look something like this:
If you have multiple options that serve the same function or purpose (e.g., “On Hold” and “Blocked”) you can also group those options together if only one option is relevant for your flow. These are called grouped values:
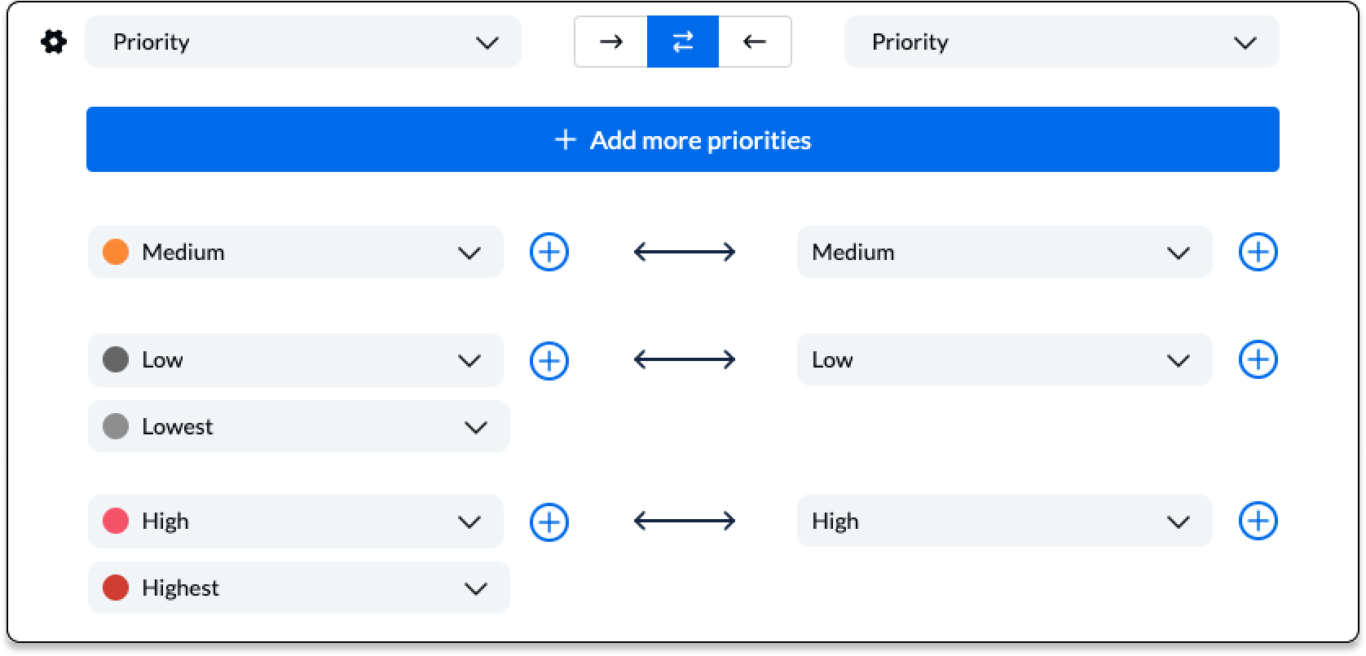
You can create grouped values by clicking on the + symbol instead of +Add more …
Asana-Jira integration custom field mapping example
Here’s a closer look at a more complex set of field mappings between a Jira and Asana project. In this example, the Jira project has several custom fields synced one-way to Asana so the team in Asana can stay up to date on information from Jira as they manage product launches.
The Asana project is part of a go-live initiative for a product launch. With this workflow, both teams will be on top of any issues that need to be resolved before the launch happens. The “Jira next point of contact” custom field is used by this team to indicate who’s responsible for the next step in each process.
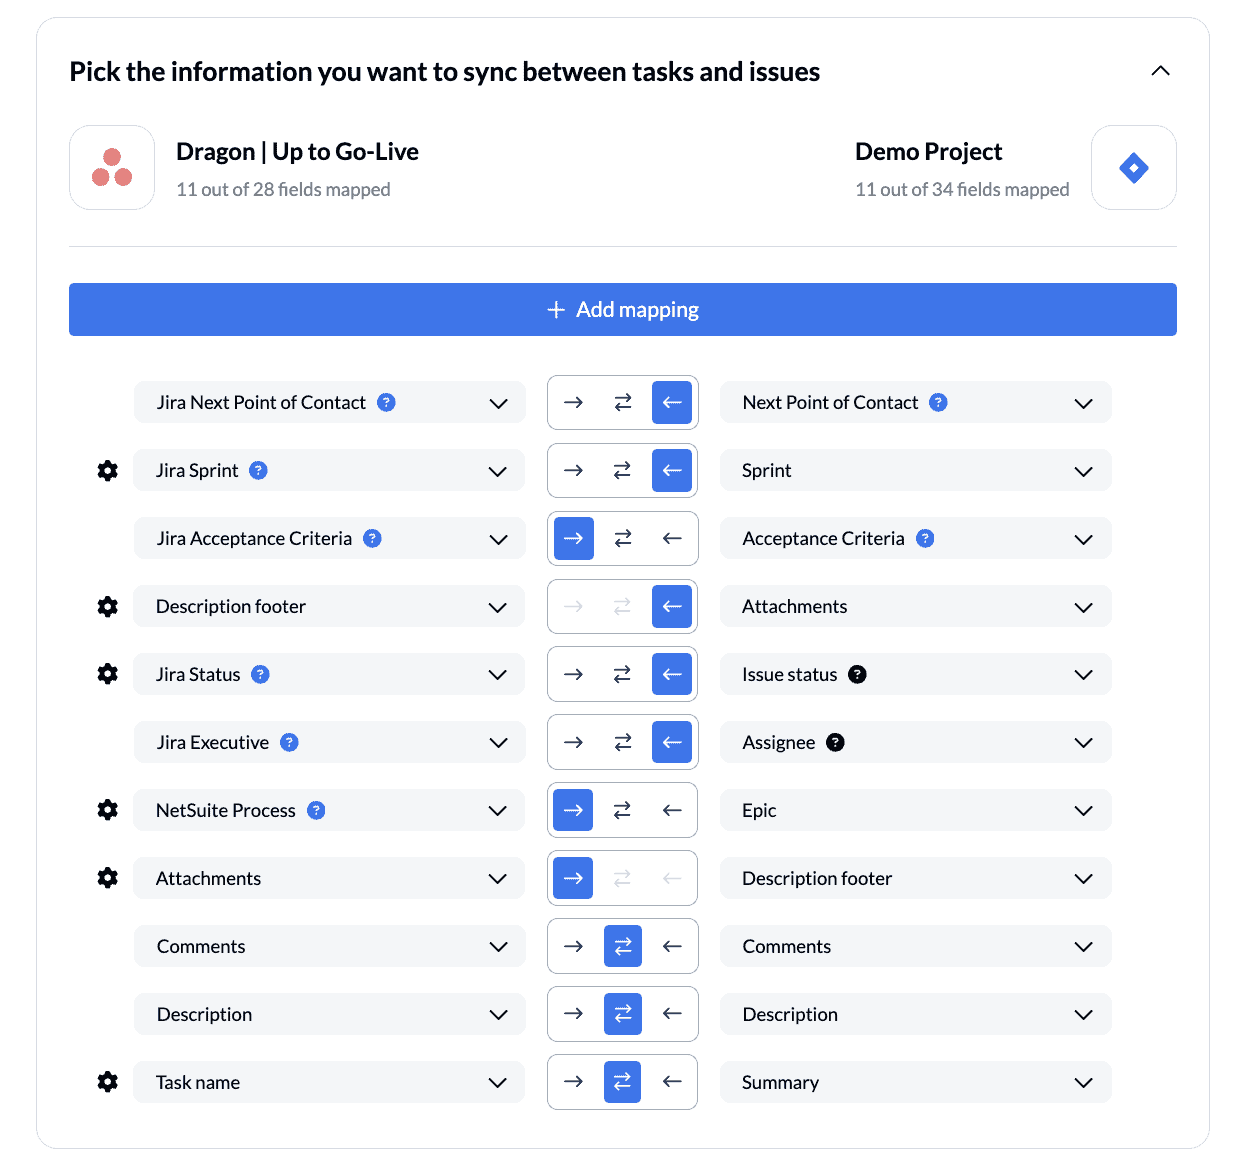
Each field with a blue question mark indicates a custom field synced by Unito. This is where the power of 2-way sync truly shines – by enabling you to sync any fields you can create to match your use case.
Clicking on the gear icon shows the variety of values that can be paired within each set of linked fields:
In this example, the team has synced a custom “NetSuite Process” field one-way from Asana to Jira to ensure that teams in Jira are kept in the loop about which NetSuite process each task pertains to.
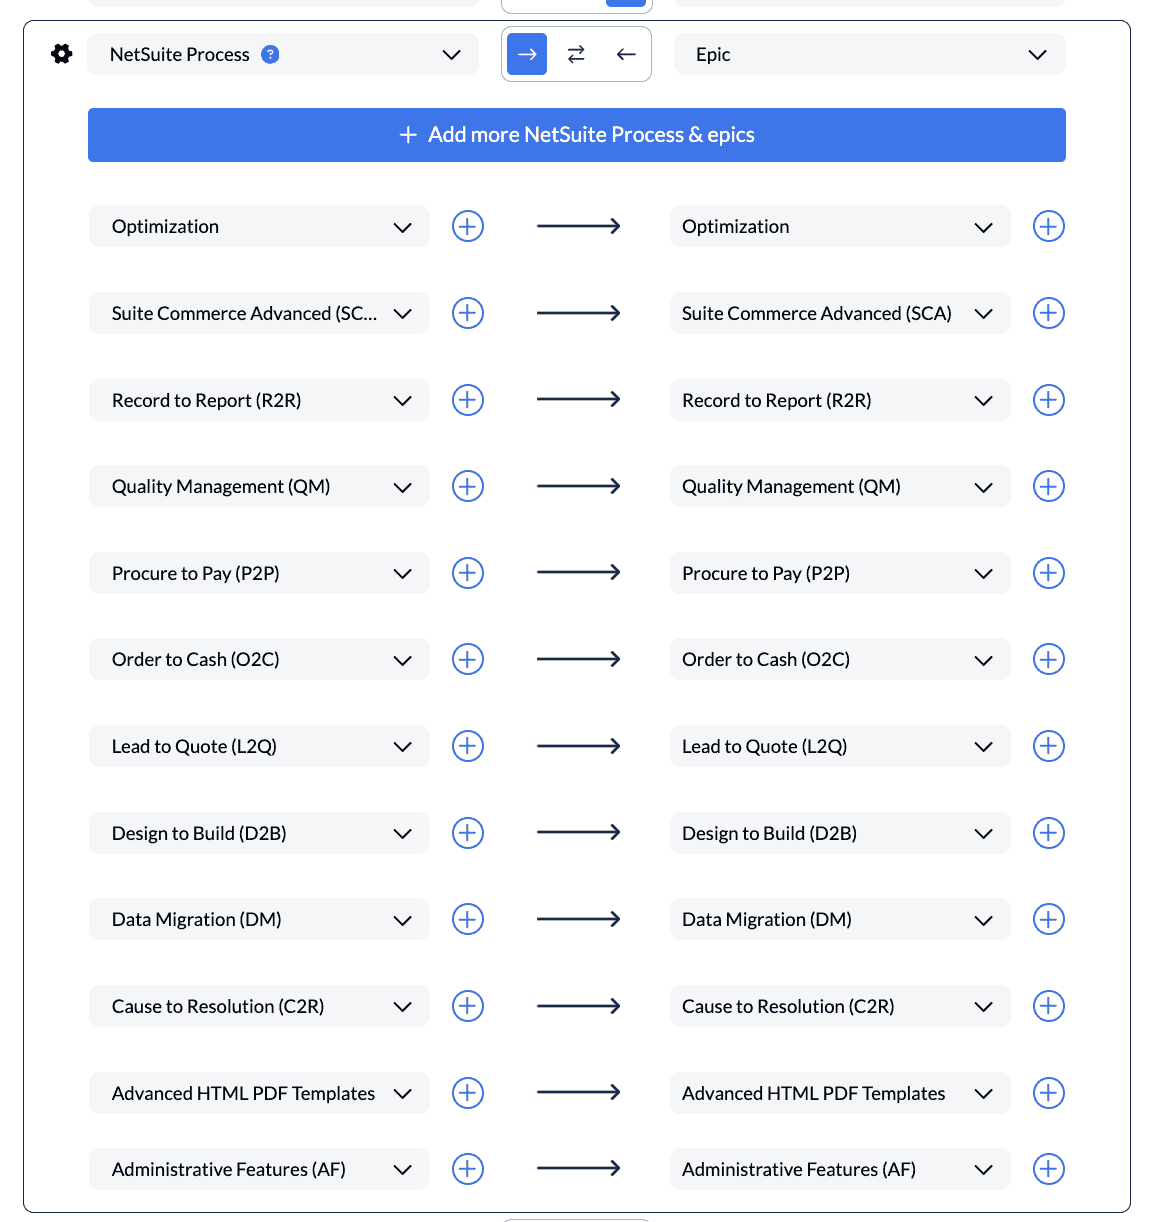
The flow direction for this field is one-way only because the team in Asana is the primary team working on these processes and they want to maintain control over the status and categorization of tasks. This kind of transparency can help teams coordinate their efforts and avoid duplicating work.
Note: If your flow includes any actions, but you don’t configure your fields as pictured, then your flow will refer to your default rules when syncing.
Step 5: Launch your Asana-Jira integration
And that’s it! You’ve just completed a flow between these tools. Congratulations!
If you’ve followed the steps above, your flow will now:
- Create an issue in Jira for every task in our specified Asana project
- Create a task in Asana for every issue in our specified Jira project.
- Allow teams to collaborate between both tools without needing to leave their preferred interface, copy-paste data manually, or request information from the other team about these projects.
If you have any questions, don’t hesitate to reach out and let us know. Our live support team is ready to jump in and lend a hand to make sure your flows always function as intended.
What’s next after setting up this Asana-Jira integration?
- Follow one of our guides for syncing Jira with other tools:
- Sync Jira to Notion
- Link Jira issues with Trello cards
- Connect Jira projects to Wrike
- Connect projects between Jira and Jira Service Management
- Sync tasks between Jira and monday.com
- Sync jira issues between multiple projects
- Connect Jira and HubSpot
- Link Jira to Azure DevOps
- Merge issues between Jira and GitHub
- Sync Jira issues to Airtable
- Link tasks between Jira and ClickUp
- Send Jira issues to an Excel spreadsheet
- Export Jira to Google Sheets
- Connect Jira Service Management to ServiceNow
- Send tickets from Zendesk to Jira
- Connect Jira to Smartsheet
- Integrate GitLab and Jira
- Follow one of our guides for syncing Asana with other tools?
Ready to smash tool silos?
Meet with our team to see what Unito can do for your workflows.
FAQ: Syncing Jira issues and Asana tasks
Can Asana integrate with Jira?
Yes! With Unito you can build a flow in minutes, which will push data from Asana to Jira and keep everything in sync in both tools.
Can you migrate Asana to Jira?
There’s no built-in solution for migrating your Asana data over to Jira, beyond CSV exporter tools. It’s usually recommended that you use a third-party solution to automate this process. Unito’s integration allows you to run a phased migration that’s kept continually in sync as you work.
Why should I integrate Asana with Jira?
Syncing Jira issues with Asana tasks allows your teams to work more effectively together without constantly switching back and forth between tools. This allows:
- Developers who plan sprints in Jira to get work requests from teams in Asana so they always have full context.
- Teams working in Jira to sync updates to Asana so stakeholders have up-to-date reports in the platform they use regularly.
- Improving collaboration between technical teams in Jira and other teams in Asana.
How do I add a Jira ticket to an Asana task?
While you could do so manually, the best way to do this is with Unito’s integration. With a single flow, you can turn a Jira issue into an Asana task automatically and sync any updates between both tools.
How much does an Asana-Jira integration cost?
The cost of an Asana-Jira integration depends on the method you use. Native integrations, like Asana’s integration for Jira Cloud, are included in the subscription cost you’ll pay for the tool they’re built into. Unito’s plans start at $49 a month, scaling up to custom enterprise plans. Other integrations, like Workato, can cost thousands of dollars a year or more.
Does Unito’s Jira integration work with Jira Service Management?
Yes! Unito’s Jira integration works with Jira Cloud, Jira Server, and Jira Service Management.
Can I sync multiple Asana projects to one Jira project?
Yes. Each Unito flow syncs a single Asana project with a single Jira project, but you can build multiple flows, each one syncing a different Asana project.