How To Set Up a No-Code Salesforce-Smartsheet Integration
This tutorial will show you how to connect Salesforce objects to Smartsheet that works as effectively for one user as it does scaling for larger teams. The end goal here is to set up a no-code Unito flow that creates a new Smartsheet rows or tasks automatically whenever you add a new Salesforce record of a particular object type and vice versa.
In this guide:
- Tools: Salesforce and Smartsheet
- Use cases: Task management, account management, marketing reporting, project management
- Great for: Project managers, marketing, sales, customer success, RevOps
Unito’s two-way sync integration for Salesforce and Smartsheet allows users of any technical background, from product managers to software developers and team leads, to sync Salesforce objects with Smartsheet rows and sheets. This integration syncs updates back and forth between both tools, creates new work items, and can even automate repetitive actions. This in-depth guide shows you how that’s done.
By the end of this Salesforce Smartsheet integration guide, you’ll be able to:
- Create new Smartsheet rows automatically based on specific Salesforce records.
- Create new Salesforce records synced to Smartsheet rows.
- Update fields in real-time with 2-way sync whenever manual changes are made.
Step 1. Connect Salesforce and Smartsheet to Unito
- Sign up for Unito if you haven’t already!
- Navigate to the Unito App and select +Create Flow.
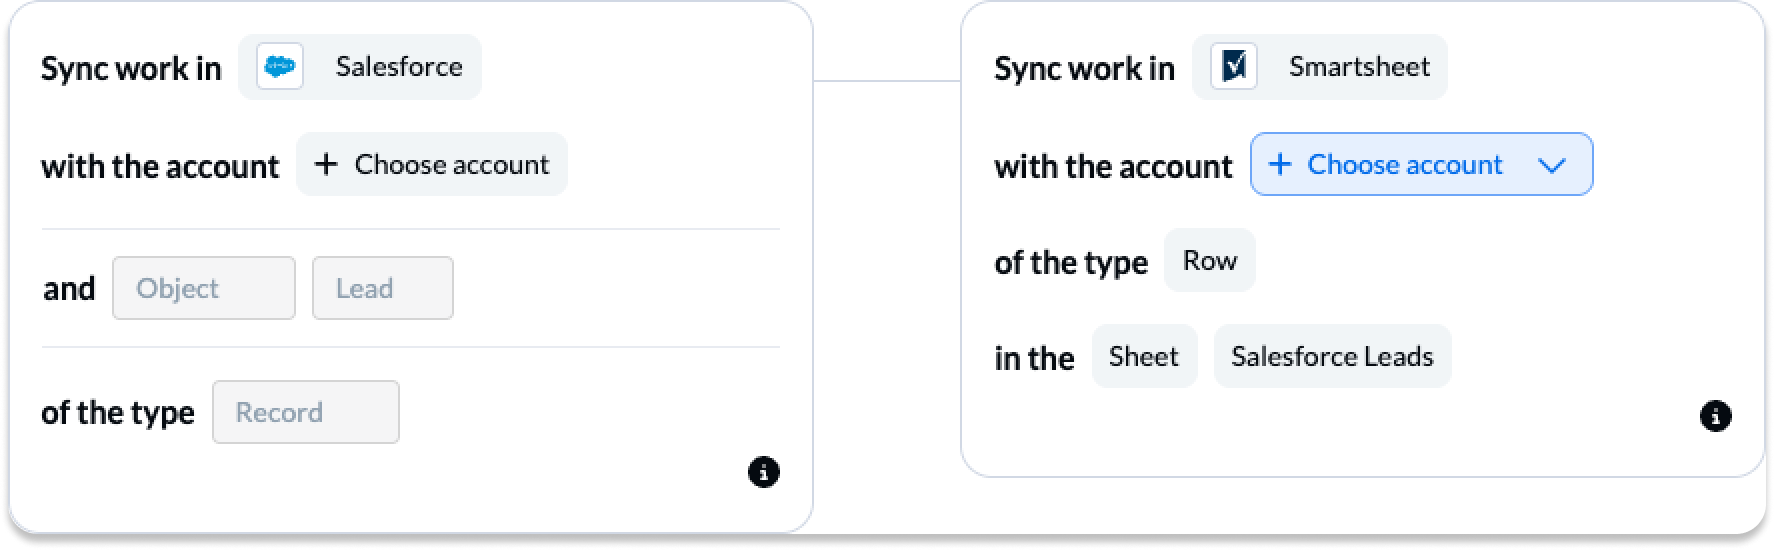
- Select Start Here to connect Salesforce and Smartsheet.
- Then +Choose account for each tool and complete the authorization process.
- Select a specific type of Salesforce object to include in your flow.
- Click Confirm.
When you’re ready, click Confirm.
Here’s more information about connecting tools to Unito for the first time.
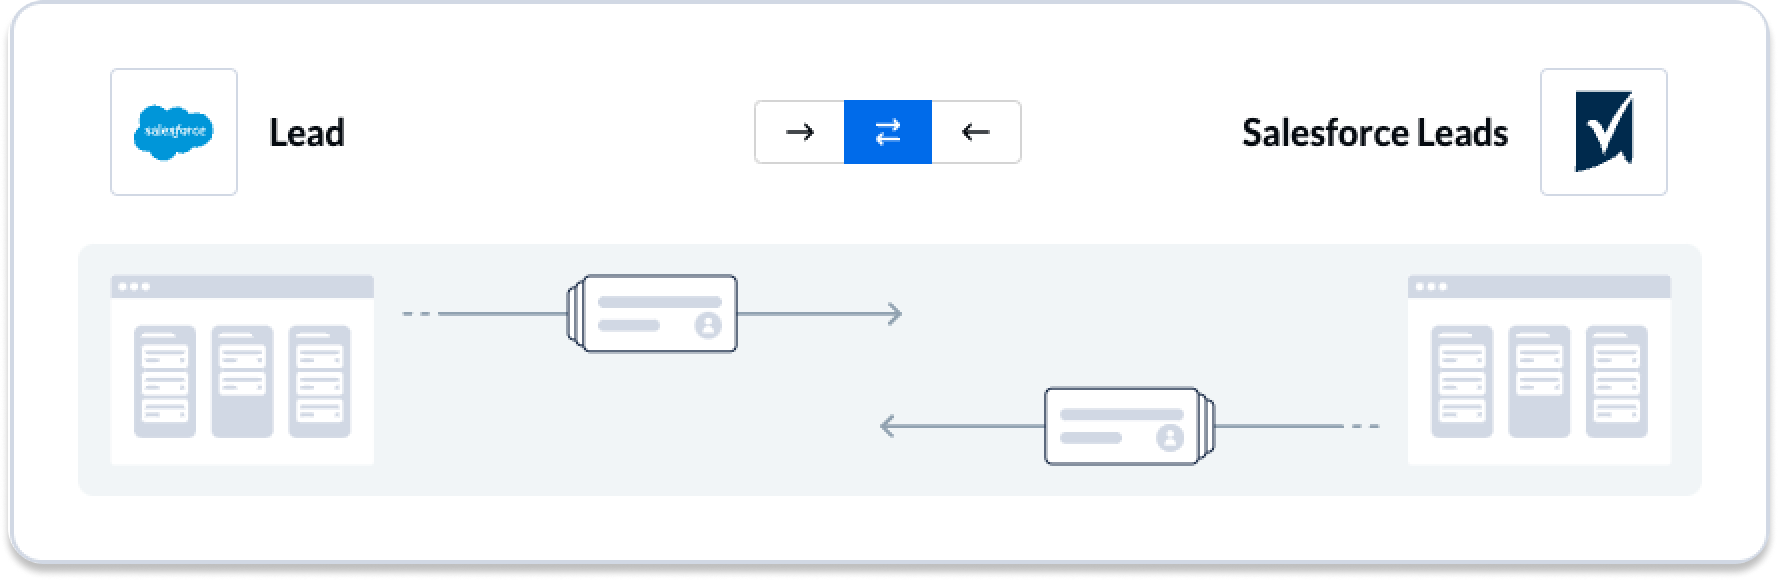
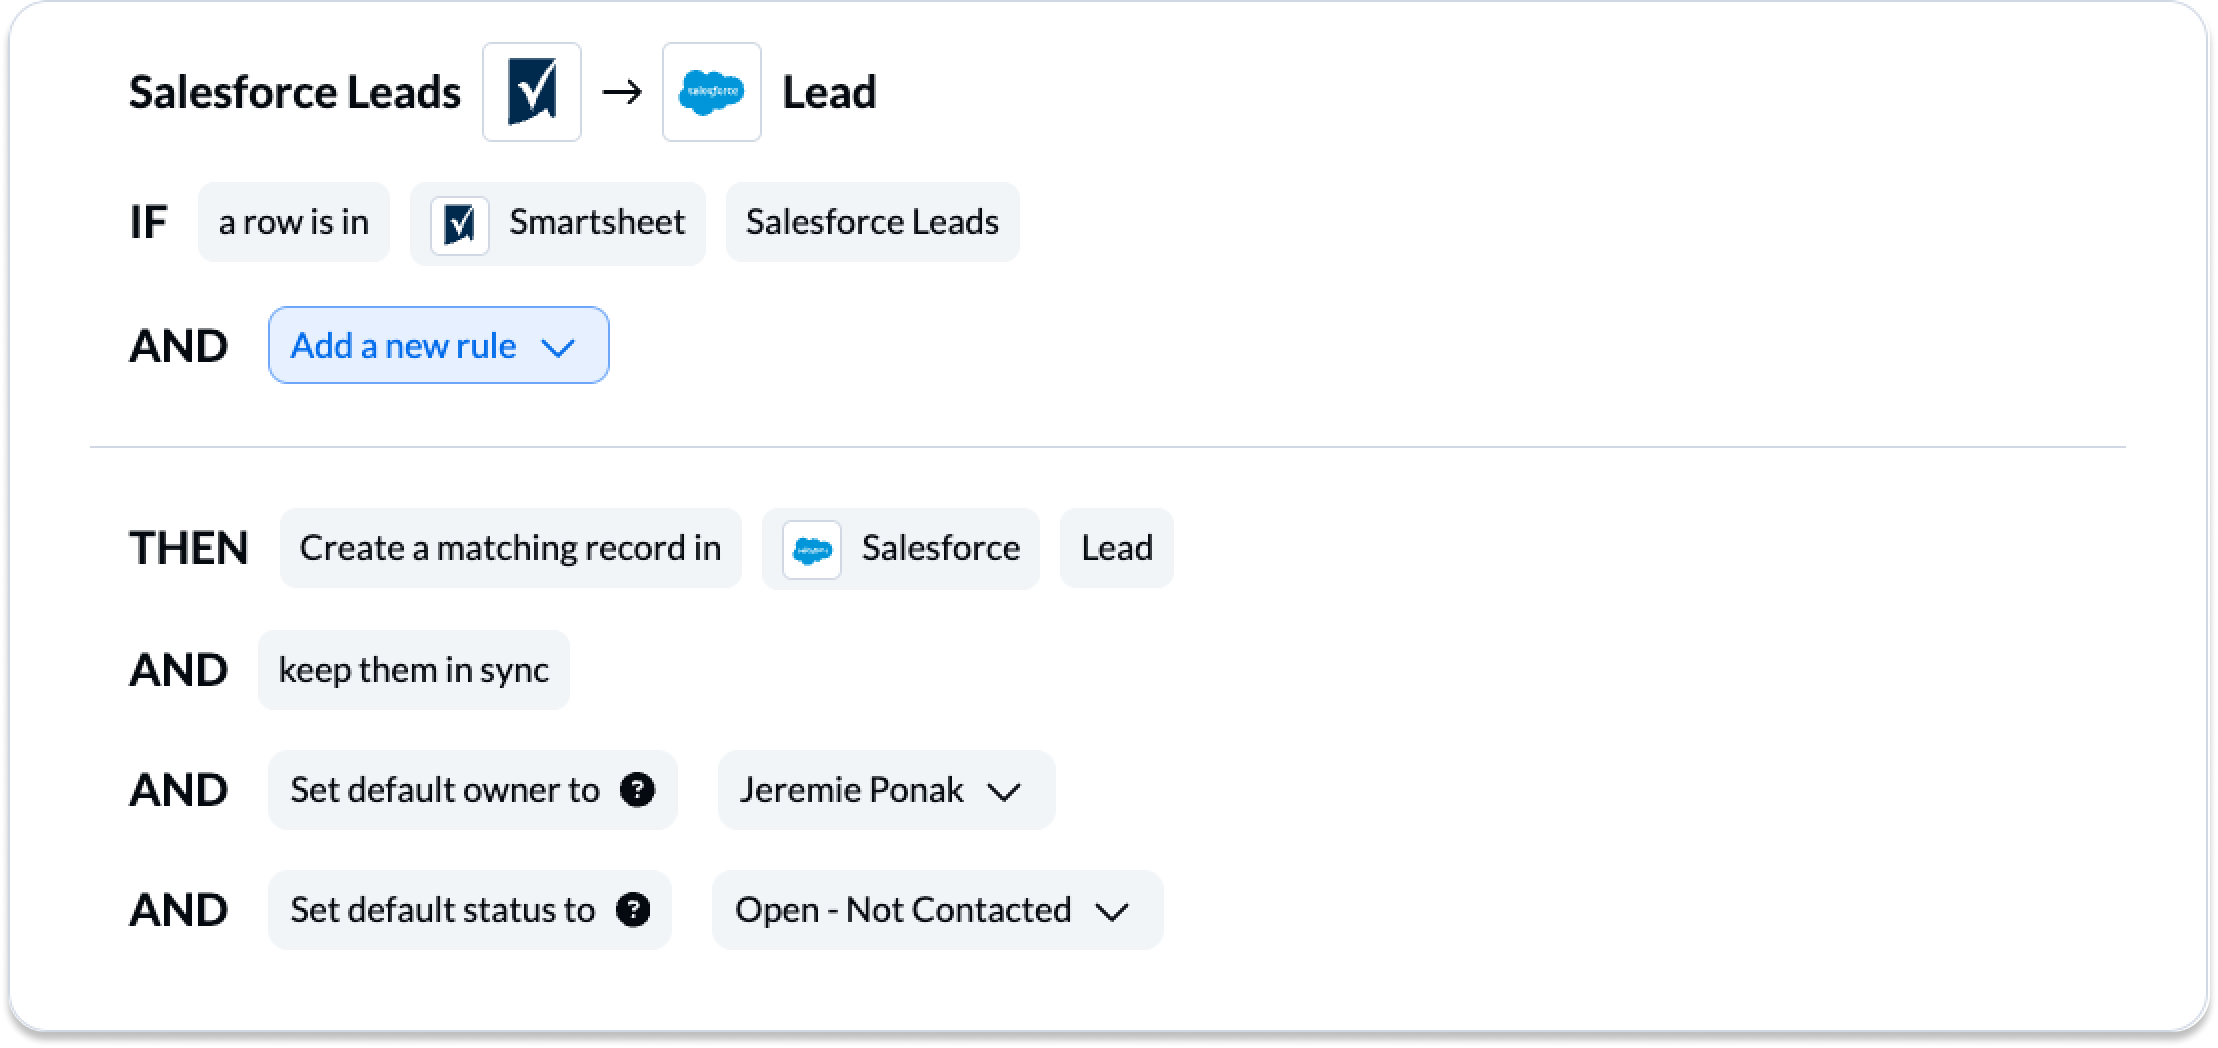
Step 2. Choose a flow direction for new records and rows
When you add new Salesforce records or Smartsheet rows to your projects, Unito creates synced versions of those rows or records in your other connected tool automatically. Flow direction tells Unito where to do that: in Smartsheet, Salesforce or both.
Here’s more information about flow directions in Unito.
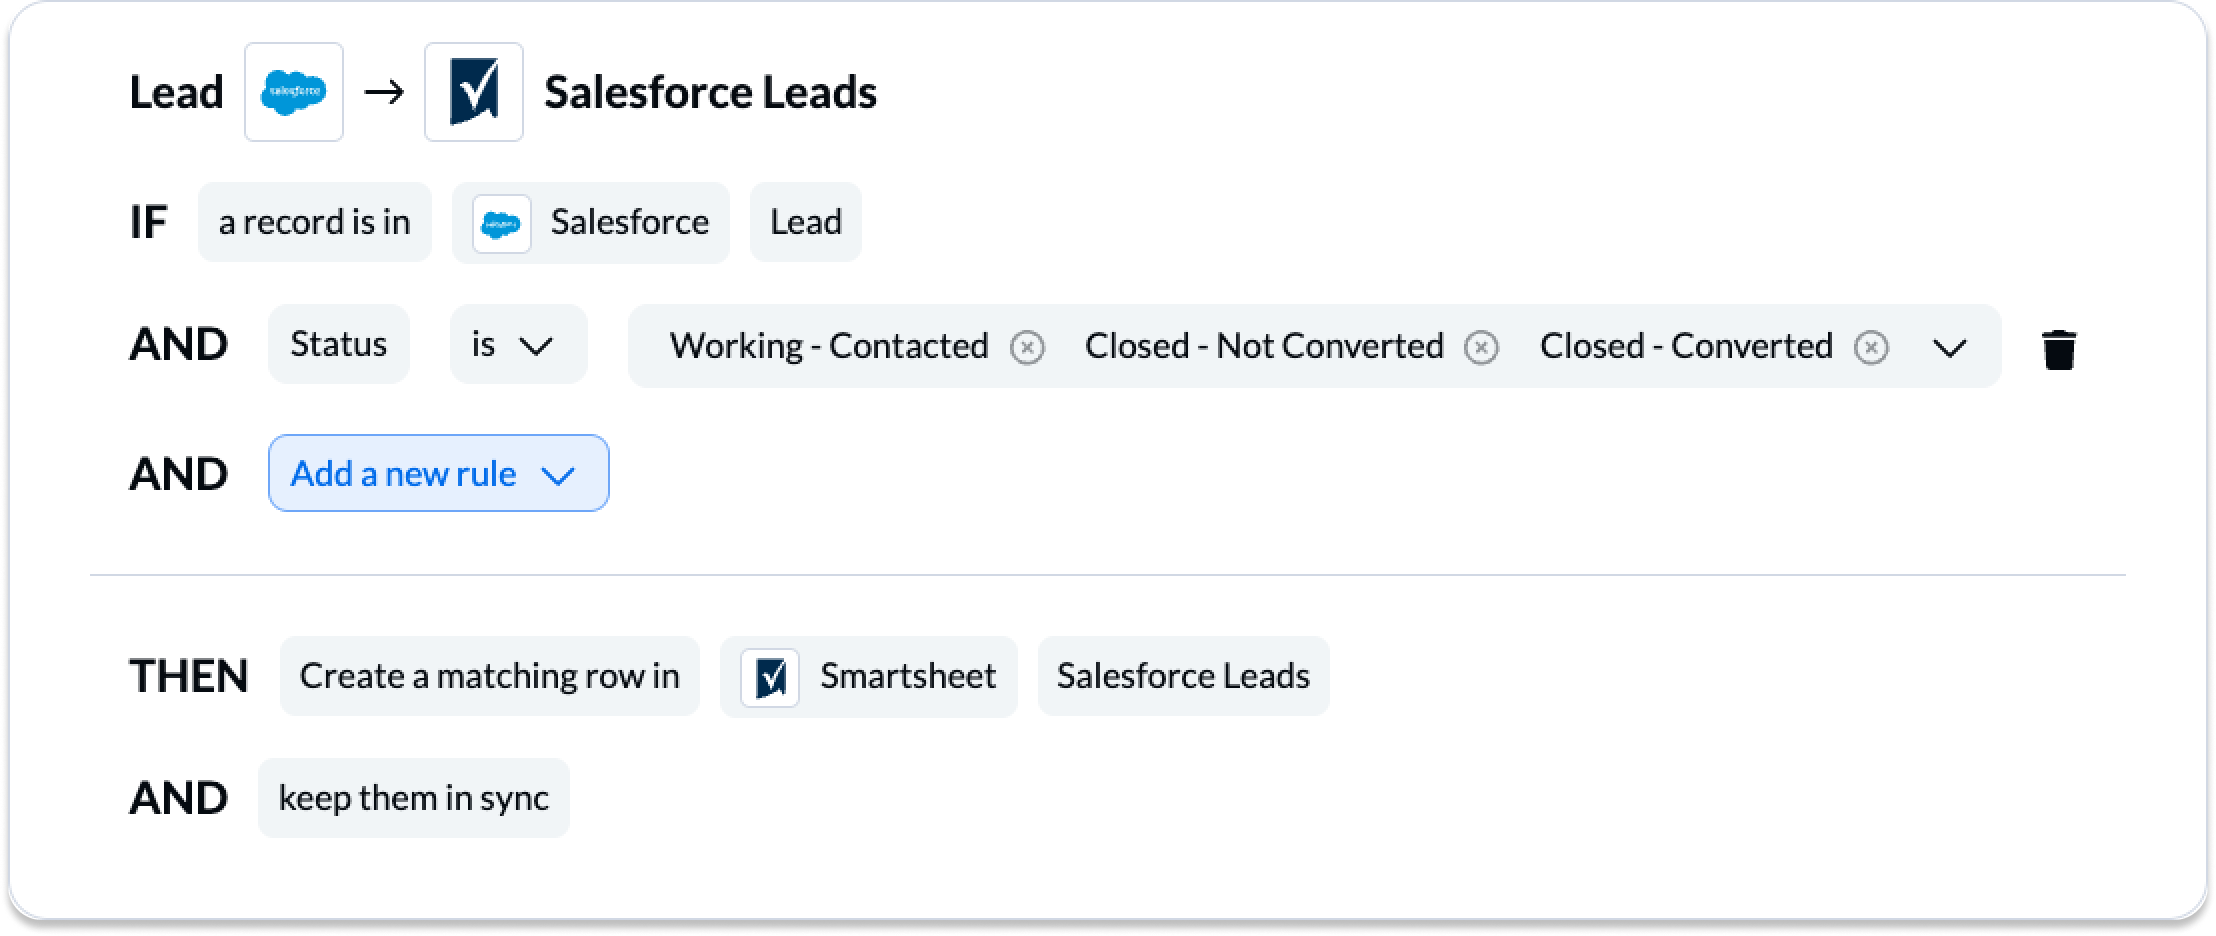
Step 3. Set rules to sync specific Smartsheet rows and Salesforce records
Next, we’ll apply a few rules to set conditions for which Smartsheet rows or Salesforce records will sync with Unito. This is useful if you don’t need every row to become a record or vice versa.
Select Add a new rule and to set the conditions related to your fields (including custom fields!):
NOTE: Rules are intended to help you keep only the most relevant information in sync to avoid oversharing unnecessary details. You can apply custom labels to your tasks or rows to be even more precise about what kind of data is shared.
Find out more about setting rules. Here’s information about Unito’s default rules.

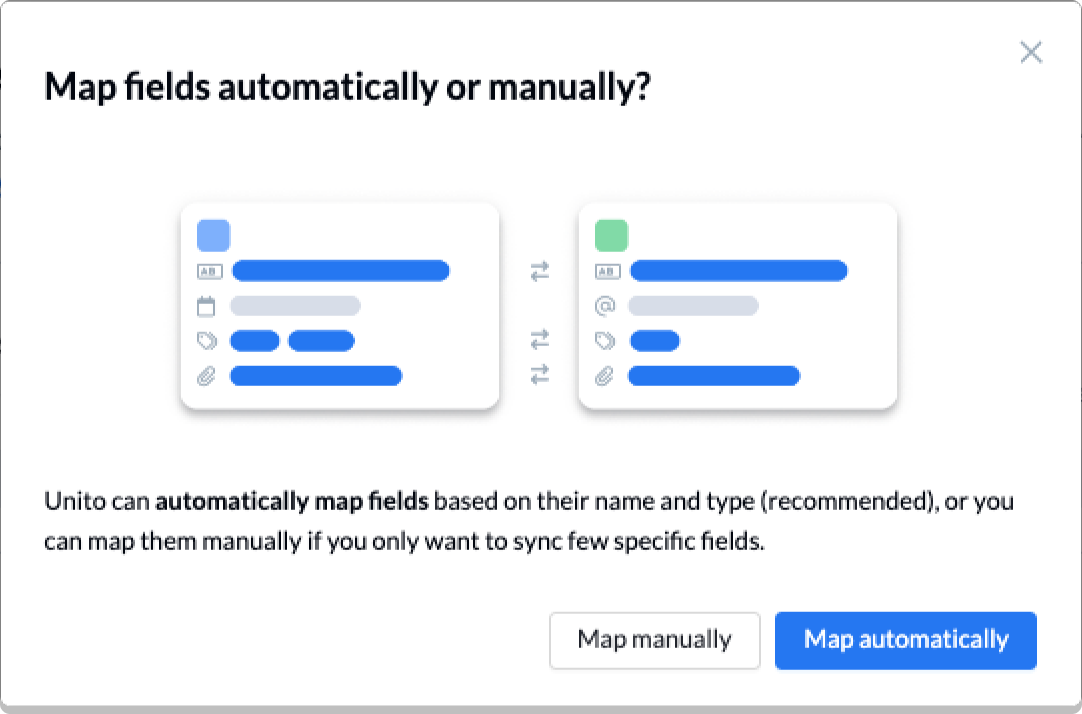
Step 4. Link fields between Salesforce and Smartsheet
Next, you can set individual relationships between fields in Salesforce and Smartsheet. Most fields can be assigned their own sync direction which determines how real-time updates occur.
But first, you can select Map automatically to begin your field mapping table with a prebuilt template.
How to add field mappings in Unito
- Click + Add mapping to add new pairs of fields.
- Then, Select a field for each tool, and find the appropriate field to map.
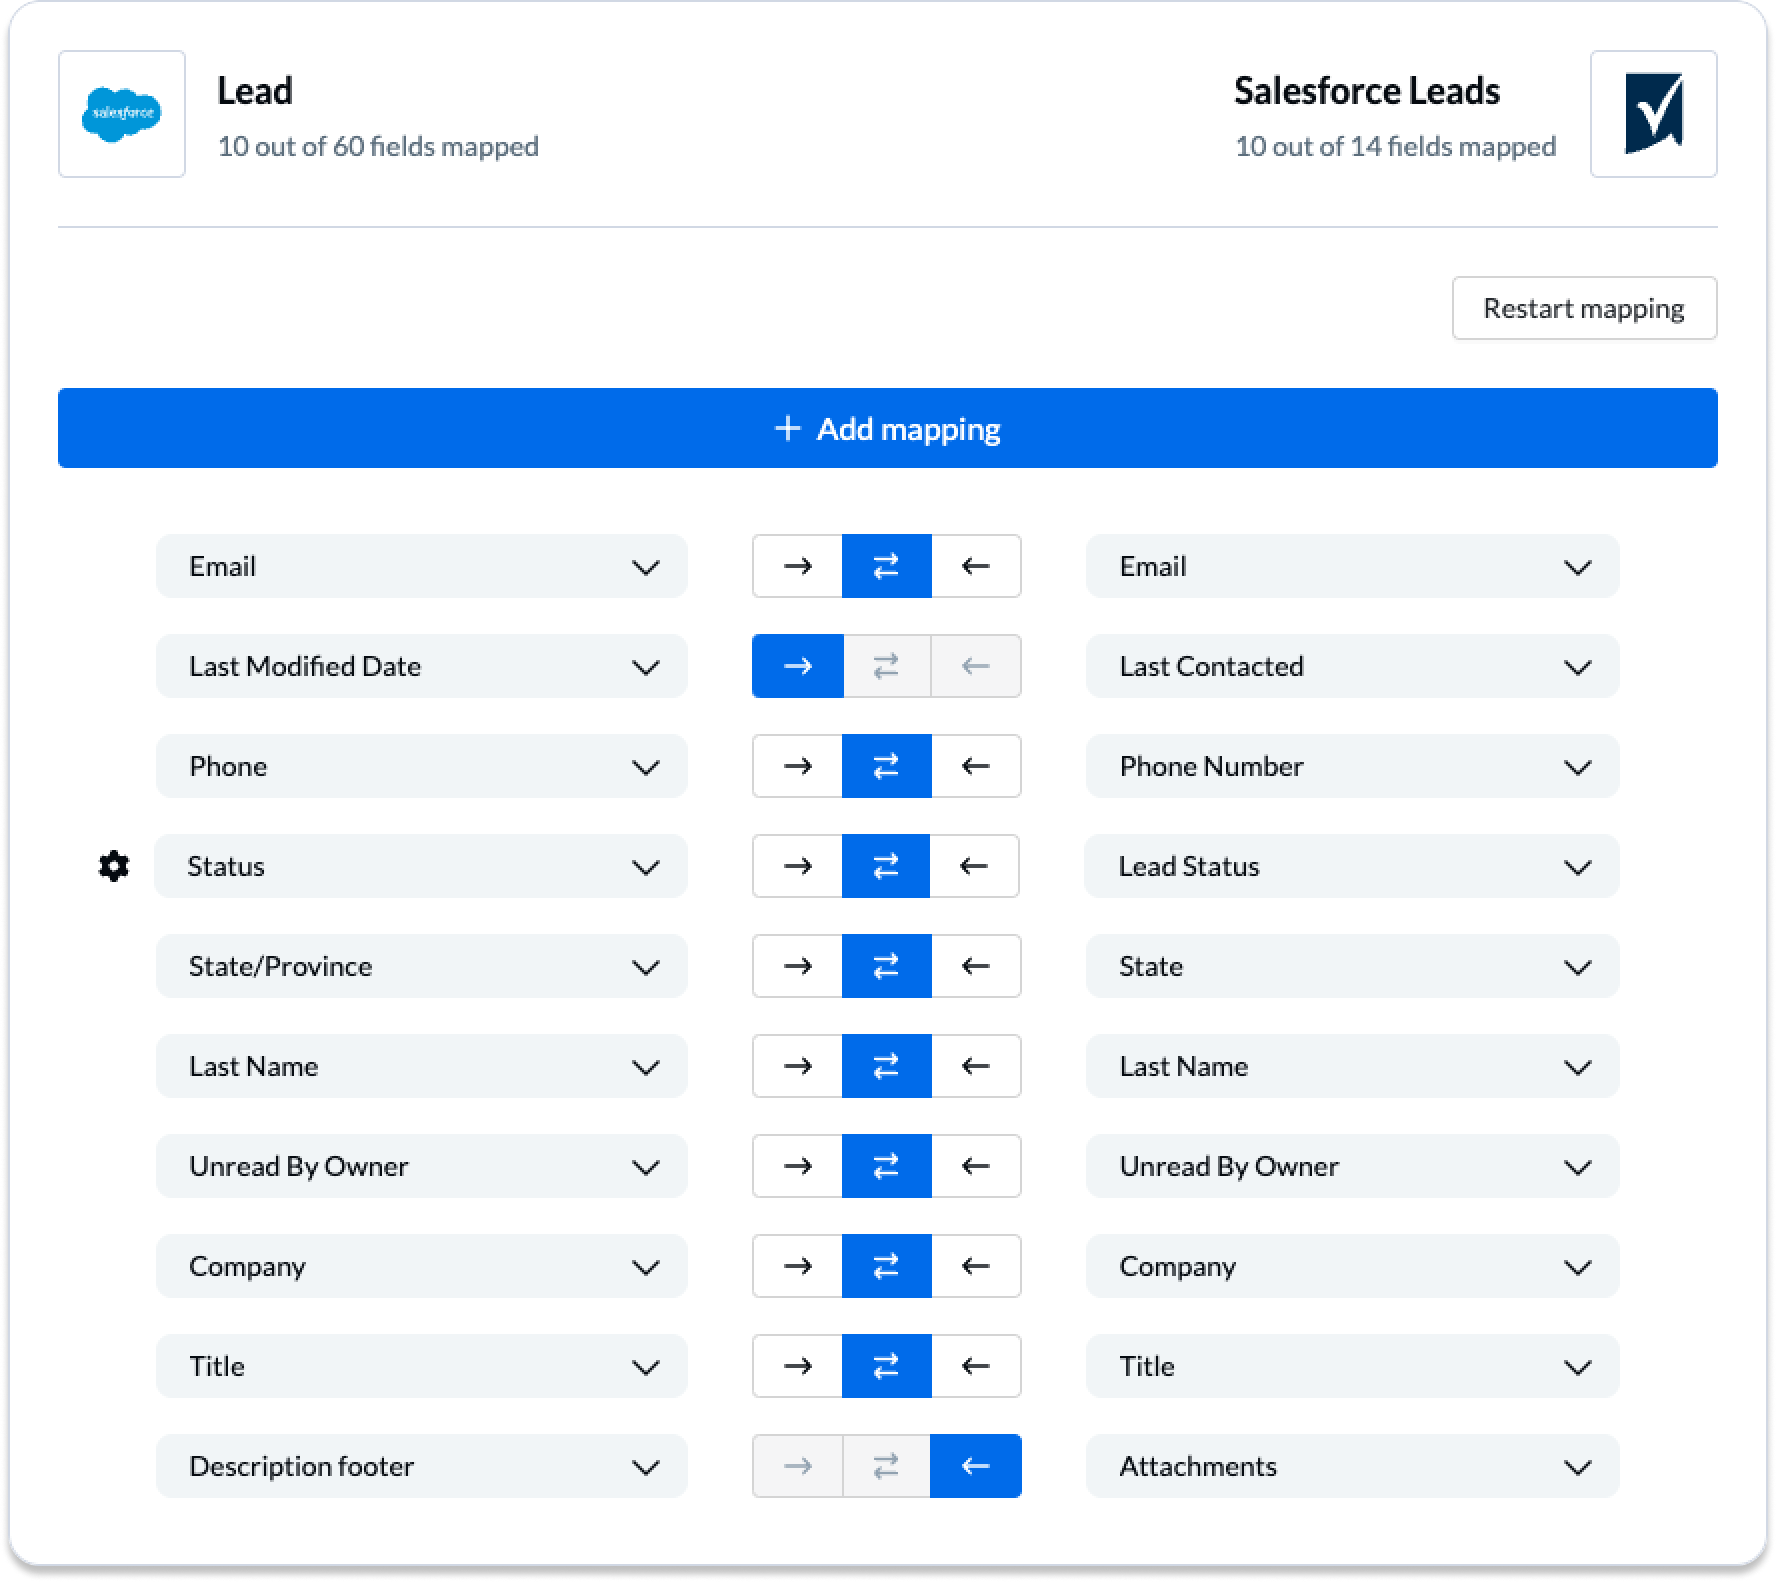
Most fields are automatically mapped for two-way updates, but you can adjust them as needed. With a one-way sync between fields, only the destination field will update automatically when you make changes in the source field.
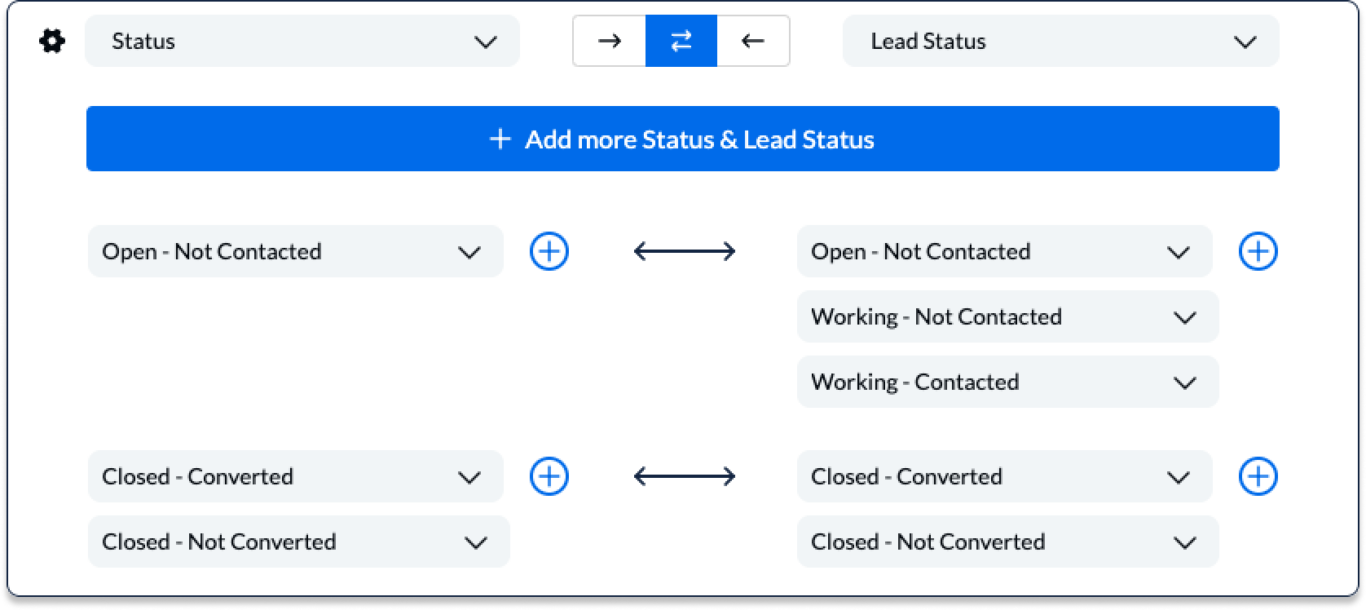
Configuring field mappings
Selecting the gear icon beside a field will allow you to configure the values or statuses within those fields to further customize your flow.
NOTE: If you’re syncing statuses, be sure to add every relevant status option for your Smartsheet row and Salesforce records. Here’s an overview of status syncing in Unito.
You can find general information about field mappings here.
Launch your new Salesforce Smartsheet integration
And that’s it! You’ve just completed a flow between Smartsheet and Salesforce. Congratulations!
If you’ve followed the steps above, your flow will now:
- Create a Salesforce record automatically for every Smartsheet row in your specified sheet.
- Create a sheet row for every record of the chosen Salesforce object type.
- Allow teams to collaborate between both tools without needing to leave their preferred interface, copy-paste data manually, or request information from the other team about these projects.
If you have any questions, don’t hesitate to reach out and let us know. Our live support team is ready to jump in and lend a hand to make sure your flows always function as intended.
Ready to optimize your pipeline?
Meet with our team to see what Unito can do for your workflows.

FAQ: Salesforce-Smartsheet integration
What workflows does this Salesforce-Smartsheet integration support?
Unito’s integration for Salesforce and Smartsheet supports a number of workflows, including:
- Ticket escalation
- Software development
- Project management
- AI agent integration
- Time tracking and billing
- Record syncing
What Salesforce objects can I sync with Smartsheet?
Unito can sync Salesforce opportunities, tasks, contacts, leads, and cases with Smartsheet rows and sheets. Each Unito flow syncs one type of object for each too.
What are the benefits of Unito’s 2-way Salesforce-Smartsheet integration?
- Improved communication: Sales and other teams are better aligned, with real-time visibility into projects and deals.
- Increased efficiency: Automated work item creation eliminates manual processes, reducing errors and saving time.
- Enhanced collaboration: All teams can work from their preferred tools while ensuring seamless communication and collaboration.
What is the best way to integrate Salesforce and Smartsheet?
When integrating Salesforce and Smartsheet, you have a few options:
- Automation platforms like Zapier can automate simple actions, like creating new work items and updating a single field.
- Built-in integrations, which are available in both Salesforce and Smartsheet. These integrations are easy to deploy but are more limited in what they can do.
- Two-way sync platforms like Unito build two-way relationships between work items, keep them up to date in real-time.
Not sure which one you should use? Think about the workflows you need to integrate. If they’re simple workflows with clear dependencies, then automation platforms may be your best bet. If these workflows have never seen an integration, then a built-in integration may be a good place to start. Finally, two-way sync platforms are a great fit for workflows that involve close, constant collaboration between teams.
What’s next after syncing Salesforce Smartsheet with Unito’s automated integration?
- If you’d like to see this flow in action, we encourage you to read this case study about a Smartsheet user who synced with Unito.
- Quickly duplicate this flow and tailor this connector workflow according to your use case.
- Or if you found this guide useful, you can find similar articles on syncing:
- Smartsheet to Jira Cloud
- Trello and Smartsheet
- Smartsheet to Asana
- Salesforce and Asana
- Salesforce and ServiceNow
- Salesforce and Jira
- Salesforce to Wrike
- Salesforce and Google Sheets
- Salesforce and monday.com
- Salesforce and Trello
- ServiceNow to Jira Service Management
- ServiceNow to Azure DevOps
- ServiceNow and monday.com
- ServiceNow with Google Sheets
- Smartsheet and Salesforce
- ServiceNow and Smartsheet
Unito can sync Salesforce or Smartsheet to any of our 50+ connectors, but our team of product specialists can’t always keep up with the demand for demos! If you’d like to see a specific guide or video demo for your use case, don’t hesitate to reach out and let us know.