
How to Export Notion Pages and Databases
Notion is a powerful, flexible tool, and it can support all kinds of work. Marketing teams can run entire campaigns without leaving Notion, project managers can keep track of their projects, managers can build a database of performance reviews, and more. But even though it’s so flexible, you’ll always need to export Notion pages to other tools, even occasionally.
Here are two methods for doing that.
TL;DR
First method: Go to what you want to export, hit the three dots in the top-right corner and hit Export.
Second method: Export Notion pages and get two-way updates with Unito.
First method: Use the built-in Notion export
Notion has built-in export features that allow you to turn a Notion page or database into a CSV (comma-separated values) file suited for a spreadsheet, a PDF, or even an HTML page (or you can export, merge and sync Notion pages with Unito). It’s simple enough that anyone can do it in a few clicks.
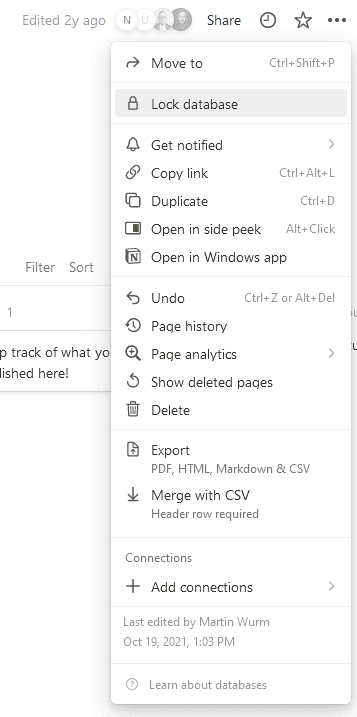
Step 1: Open the top-right menu on the Notion page you want to export
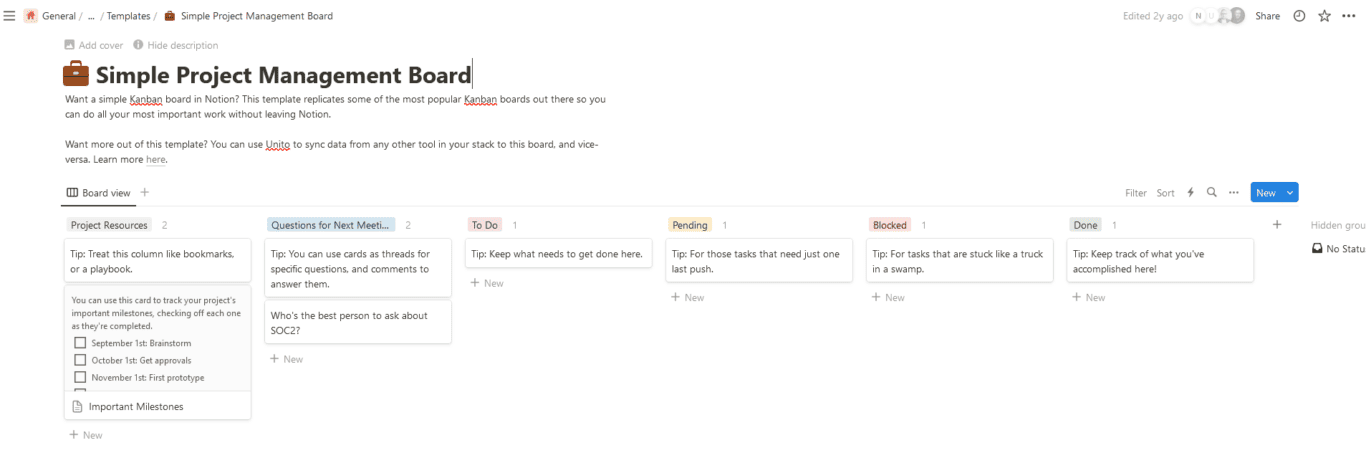
For this example, we’ll export cards from a Kanban board built in Notion using one of Unito’s Notion templates. Hit the three dots in the top-right to open Notion’s options menu.
Step 2: Customize your export
Pretty simple right? Click Export and you’ll bring up all the options you need to customize how you’ll be exporting Notion pages.
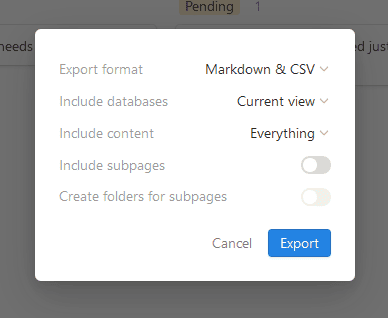
Here’s a rundown of the options you see here.
- Export format: Choose the format you want for your Notion export, whether that’s a PDF, HTML, or CSV. The latter is best if you’re exporting to a spreadsheet or similar tools. PDFs and HTML might be best for sharing Notion data with other tools.
- Include databases: Most Notion databases have multiple views, like Kaban boards, tables, and lists. This dropdown lets you select which view you want to export.
- Include content: This option lets you choose if you want to export files and images or just the text in your Notion pages.
- Include subpages: If some of the Notion pages you’re exporting have pages in them, you can choose to leave them out of your export with this option.
- Create folders for subpages: If you’re exporting subpages, you can replicate the hierarchy you have in Notion with folders.
Step 3: Confirm your choices and click export
Once you’ve set up your export exactly as you need it, hit Export. In this case, we’ll be exporting a Notion page as a CSV file, giving us the following.
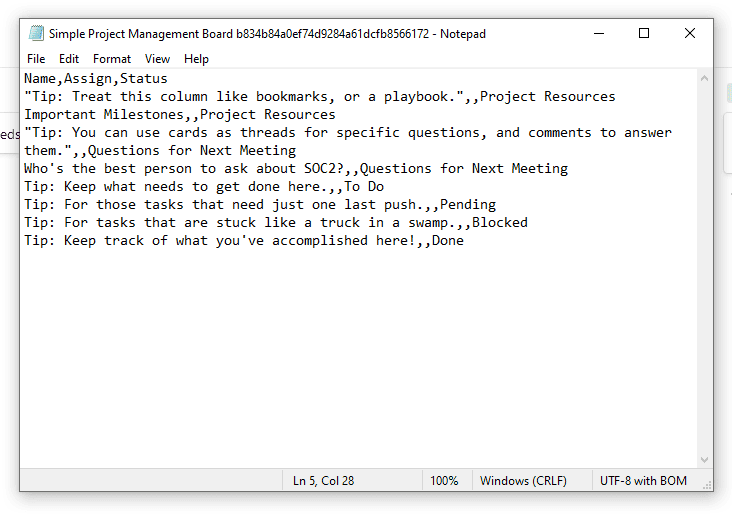
Since there wasn’t a lot of data to export, the final file doesn’t have much in it. But if you had exported a database you’d been using for months, you’d see line after line of text separated by commas. Pretty tough for you to work with, but you can import this Notion file into Google Sheets or Excel and have it laid out perfectly in your spreadsheet.
Limitations of this method
It’s hard to beat the simplicity of a single menu and a few clicks. But is this method for exporting your Notion data the best one for your needs? Here’s why that might not be the case.
- It’s completely manual: Every time you want data from Notion in other tools, you need to manually go through this process again. That means it’s not the best method when you need regular exports.
- It’s one-way: If you just need to plug data from Notion into documents or spreadsheets, then this method will work just fine. You can’t use this method to get data from other tools into Notion.
- It needs some cleanup: Exported Notion data will often need some kind of cleanup to fit with whatever documents you’re adding it to. While CSV files are fully compatible with spreadsheets, they won’t display dropdowns and similar fields properly unless you fix them manually.
Again, Notion’s built-in exports are about as simple as it gets, but simplicity is not always an advantage. If you have complex workflows that need a more robust solution, there’s a better way.
Second method: Export Notion to any tool with Unito
If you want to export Notion pages to other tools in a way that keeps everything up to date everywhere, you need Unito.
Unito is a no code, two-way syncing platform for Notion and tools like Google Sheets, Excel, Asana, Airtable, and Jira.
You could, for example, connect Notion with Excel, allowing you to send pages over to a spreadsheet, where they each become rows. Then, whether your team works in Notion or Excel, any changes they make get carried over.

This means everyone works with the same data, in either tool, without any extra manual work from anyone.
Here’s why Unito is the best way to export data from Notion:
- It’s automatic: Once you set up a Unito flow between Notion and another tool, you don’t need to do any extra manual work to keep your data up to date. Unito does it all for you.
- It’s two-way or one-way: Unito can sync changes back and forth between tools or from Notion to other tools.
- It’s automatically cleaned up: Unito automatically transforms your data between tools, meaning no one needs to spend time manually cleaning up data.
Building Unito flows takes only a few minutes and anyone can do it, no matter their level of technical skills.
How XRay.Tech uses Unito to export data from Notion

Xray.Tech is an automation services company that helps organizations streamline their workflows with custom-built automations. Xray.Tech uses Unito to optimize its onboarding process, bringing customers online faster. Here’s how:
- When a new client is added to Notion, onboarding tasks are automatically generated.
- These tasks are synced to Airtable, where custom-built workflows update records as needed.
- The outcome of these workflows is synced from Airtable to Notion, so the Xray.Tech team can smoothly onboard customers from that tool.
A complex workflow that would take hours to set up manually instead runs in minutes thanks to Unito’s integration for Notio and Airtable.
Want to build this for yourself?
Check out our detailed walkthrough for exporting Notion data to Airtable. Don’t worry, these instructions apply to other tools, too.
FAQ: Export Notion pages
Can you export a Notion page?
You absolutely can! All you need to do is hit the three dots in the top-right corner of the Notion page you want to export and hit Export. You can export your page as HTML code, a PDF, or a CSV file — which is best used with spreadsheets.
How can you export your entire Notion workspace?
As long as you’re a workspace admin, you can export your entire Notion workspace in one go. Here’s how:
- Find the Settings & members option in the left sidebar.
- Click Settings in the screen you’ve just opened (it’ll be in the bar on the left).
- Click the Export all workspace content button, which you’ll find under the Export content header.
- Files representing your entire Notion workspace will be sent to you by email, where you can download them. You’ll only have seven days to use that link.
You can export your workspace as HTML, Markdown, and CSV files on any Notion plan, including the free plan. However, you can only export your workspace as a PDF file if you have a Business or Enterprise plan.
Can I export a Notion page to Word or Google Docs?
Yes! If you export your Notion page as a PDF, you can then import that file into Word or Google Docs to continue working on it in your word processor of choice.