
A Beginner’s Guide to the HubSpot Sales Hub
The HubSpot Sales Hub is an amazing tool for keeping everyone on your sales team on the same page. They’re responsible for bringing in the revenue that will keep you going, so you want them to work like a well-oiled machine. HubSpot has a wealth of tools and information to keep them all doing their best work.
In this beginner’s guide to the HubSpot Sales Hub, we’ll cover the following:
- The Sales Dashboard
- An overview of HubSpot’s main tools
- Creating your first deal in HubSpot
Let’s do this.
The sales dashboard
The dashboard is the first thing you see when you sign in. This is your bird’s eye view of everything going on with your sales team. There are five chunks of information here, so let’s tackle each one in turn.
Team activity

The team activity section is where you can find out what your team is up to. By default, this view will show you the 20 most recent activities in the last 30 days. If you hover over the “Date Range” field, a “Report Settings” option will appear. Click on that option to change not only the duration of this report, but also whether you want rolling dates or specific times (eg. “This Quarter”). Click on any entry in this section to be taken directly to that activity.
Sales performance
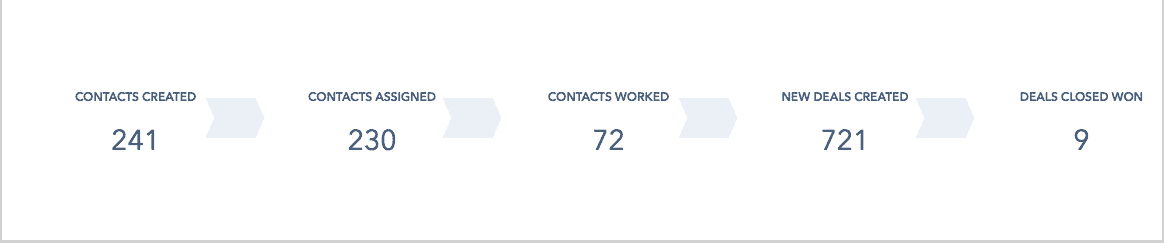
The Sales Performance section is where you can track your team’s performance using data. Pretty much everything your sales team can do on Hubspot is distilled into these numbers. The numbers funnel from left to right according to your sales process, from contacts created all the way to closed deals.
This report follows the same rolling date system as the Team Activity section, and you can modify the time period to suit your needs in the same way.
Here’s a high-level overview of each of these numbers:
- Contacts created: The number of contacts created during the period.
- Contacts assigned: Once a contact is assigned to a member of your team, they’ll be added to this tally.
- Contacts worked: Tallies the number of contacts engaged by your sales team (by email, phone or an in-person meeting).
- New deals created: Keeps track of how many deals were created by your team.
- Deals closed won: How many deals were finalized.
Clicking on any of these numbers will give you a quick overview of where they came from and who’s responsible. For example, clicking on “Deals” will show you the deal’s name, the date it was created, who created it, and how much money it represents.
Productivity
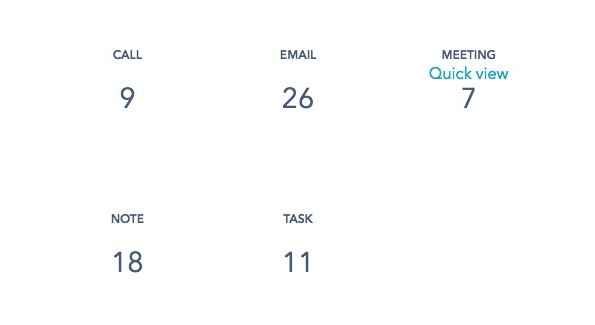
The productivity section shows you how much is getting done. Whenever your team logs a call, email or meeting, it gets logged here. Same goes for the notes and tasks left by your team whenever they’re working on a contact or a deal. Hovering over any number provide you with a quick view of everything going on behind it. With this tally, you can get a better idea of how your team is reaching out to your contacts, which can be useful for strategizing.
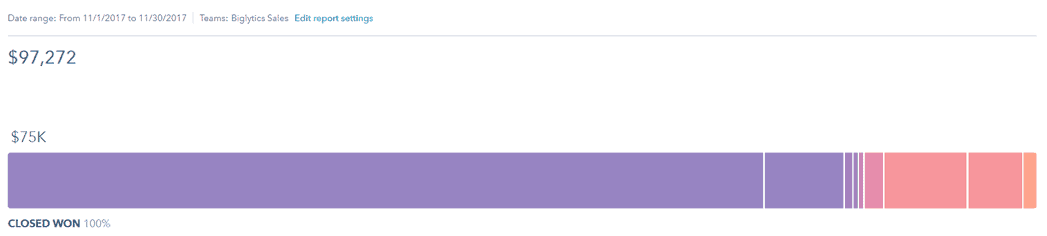
Deals closed vs. goal

Here’s where you can see if your team is on track to hit its sales goal. You can customize the date range, as well as whether you want fixed or rolling dates. You can also edit the frequency of the dots on the plot, from daily sales all the way to a yearly view. That way, you can get a granular look at the day-to-day of your sales team or a high-level summary you can use to plan your tactics and objectives.
Bonus: You can export the graph to slot it into your next slide deck.
Deal forecast
Here’s a fun feature of the HubSpot Sales Hub. The Deal Forecast tallies up the deals in your deal pipeline and calculates the amount of revenue you can expect from them. This is done by using the probability that the deal will result in a win (which changes depending on where the deal is in your pipeline). Here’s an example ripped right from the HubSpot knowledge base:
For example, there are three deals, each worth $1000. The probability of close for each deal is 100%, 90%, and 40%, respectively. The forecasted revenue is therefore calculated as follows: (1000 * 1) + (1000 * .9) + (1000 *.4) = 2300.
HubSpot’s tools
Now that we’ve covered the kitchen, let’s go over the tools you’ll use to cook up some sales.
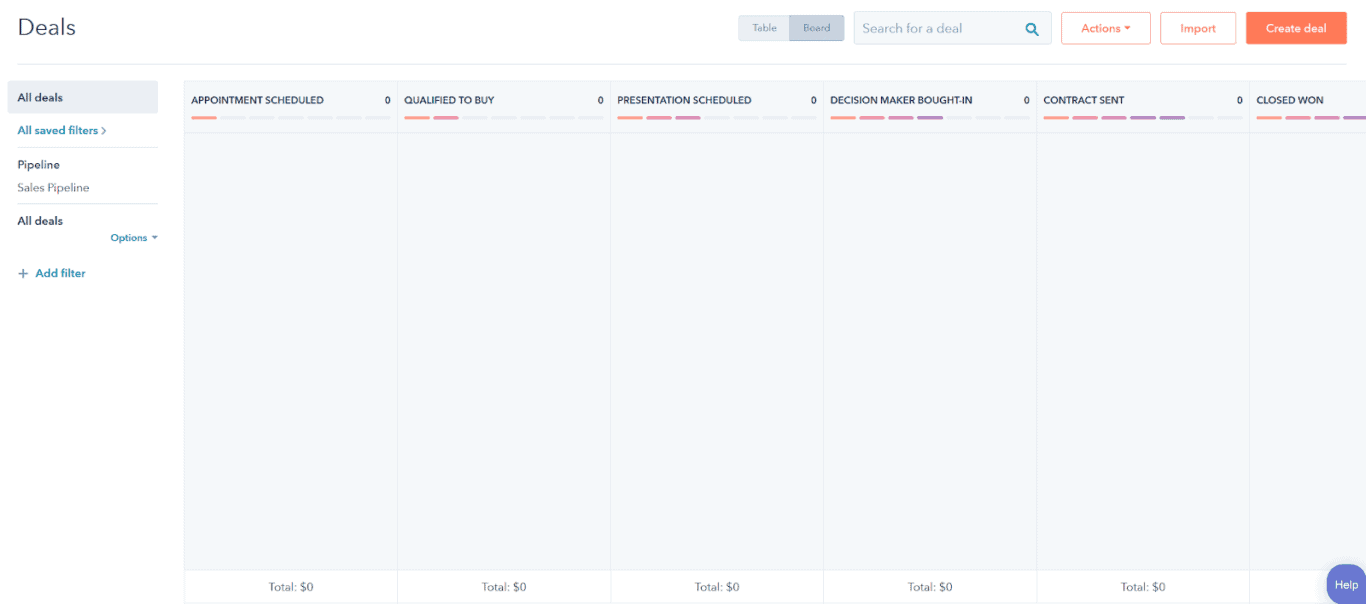
Deals
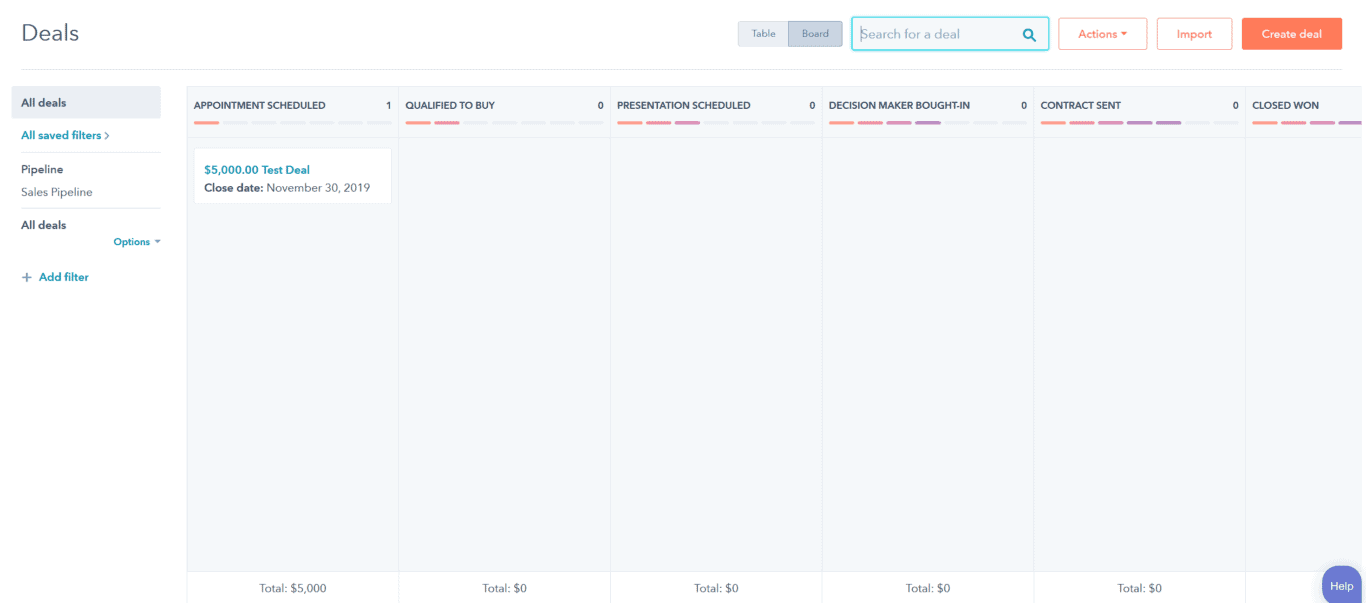
This is your deal pipeline, where you can keep track of every deal your team’s working on. You can see it’s organized in a nice Kanban-style, so you can quickly see where your teams’ deals are at (and get the satisfaction of sliding them along the path to your win). There are ways to filter the deals you want to see here (say by close probability). We’ll go over how to create a deal later in this guide so for now, let’s move on to our next tool.
Tasks
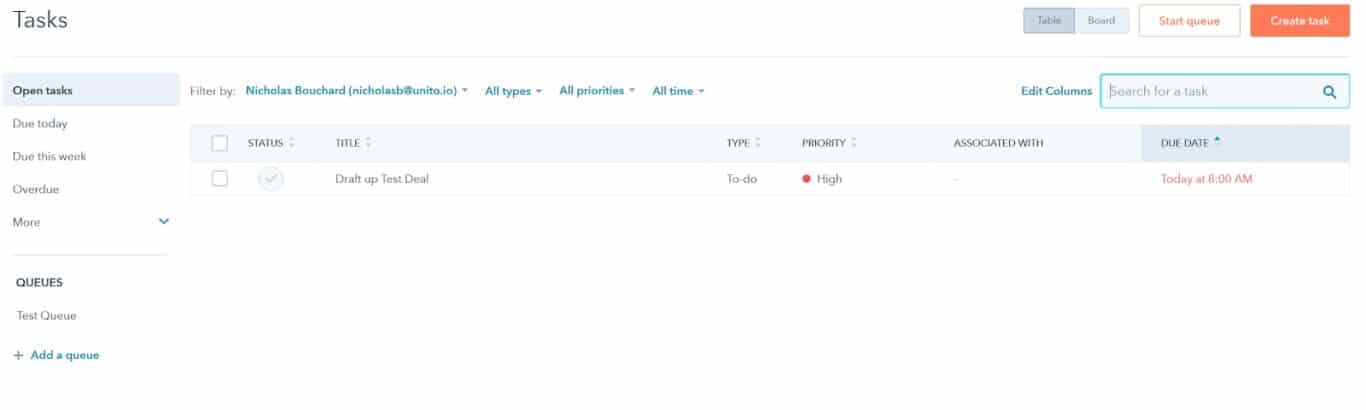
The HubSpot Sales Hub has a great task management system you can use to keep track of everything your sales team needs to do. Task types include Call, Email, and To-Do. HubSpot also allows you to organize tasks with the Queue system in a logical, sequential way to get things done in the right order.
Documents
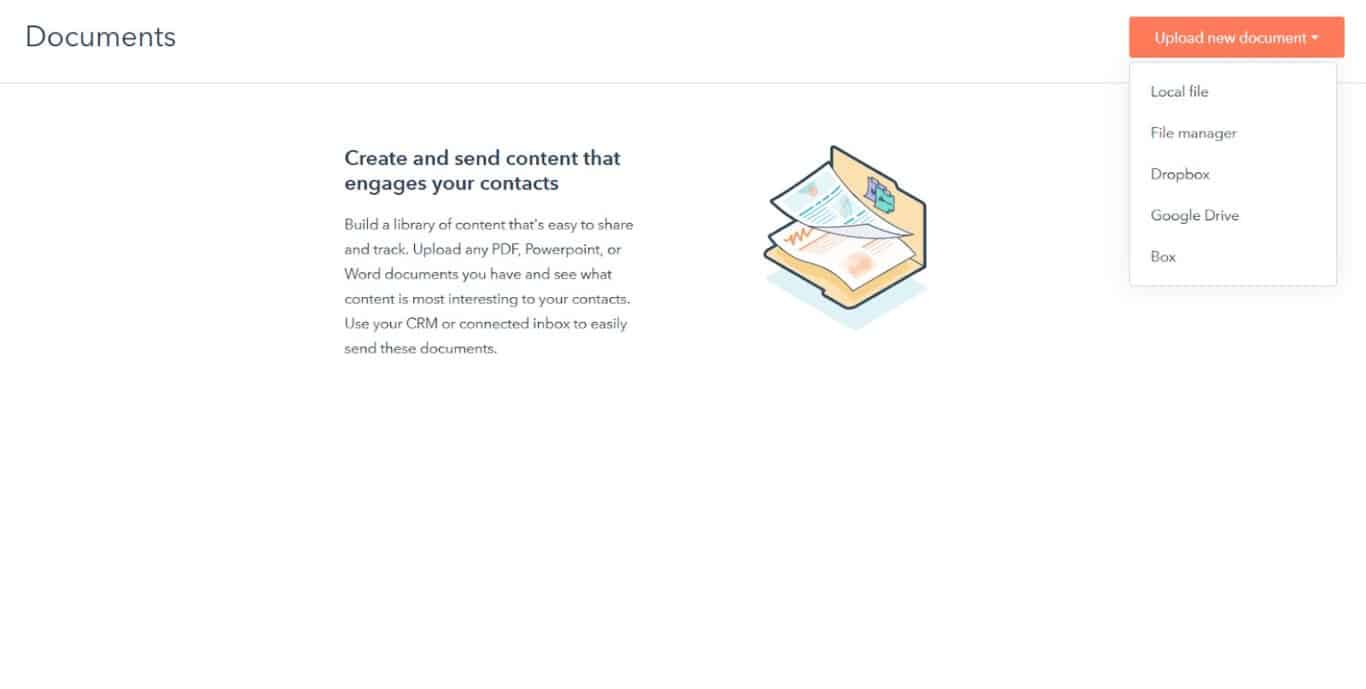
The documents tab is your hub for every document your sales team needs, like phone scripts, email templates, and objection management documents. No more piecing things together from emails and three separate desktops. You can upload local files or connect HubSpot with your cloud platform of choice (Dropbox, Google Drive or Box). You can also share documents from here with contacts — such as one-pagers — meaning this is more than just an internal tool.
Meetings
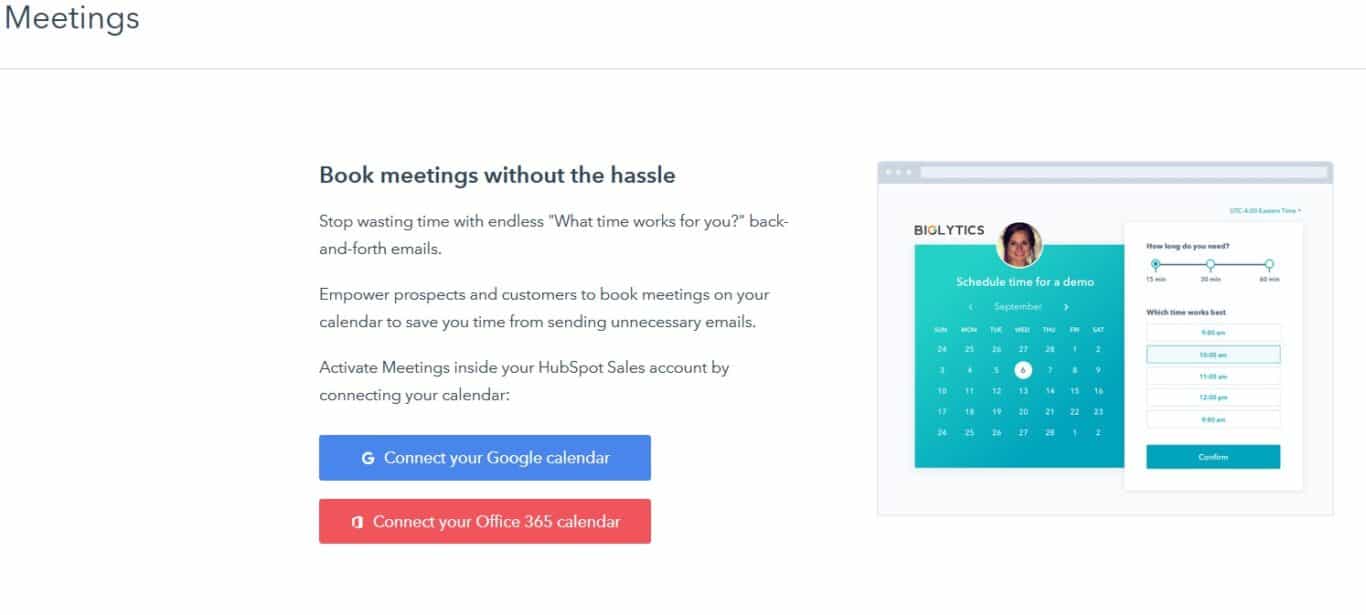
The meetings section lets you connect your calendar app directly to HubSpot and set up meetings directly in the tool, whether that’s with other people in your team or contacts. But where a Google Calendar just blocks your time into “available” and “not available,” the HubSpot meetings tool is built for the reality of sales meetings. It lets you set up a minimum notice time before you’ll take a meeting and automatic buffers between scheduled meetings.
Plus, the tool lets you write up pre-qualification questions so you get a headstart on qualifying your leads.
Playbooks

HubSpot’s playbooks are the answer to the difficulties of scaling a sales team. As long as your team stays small, it’s easy to make sure you’re personally involved in the training of each new agent. But that won’t always be the case. If your sales team is successful and productive, it will have to grow.
Writing a playbook lets you distill your experience — and that of your senior team members — into a document that streamlines training and gives your team something to reference in their day-to-day.
Creating a deal
Now that we’ve gone over HubSpot’s tools, let’s create our first deal. HubSpot’s sales pipeline is a fantastic way to keep track of your sales process and identify blockers. But for now, let’s focus on populating this pipeline with deals.
Start by clicking on “Deals” in the “Sales” drop-down menu at the top of your screen. This will take you to the sales pipeline we saw earlier.
The stages you see above (plus the “Closed Lost” stage just offscreen) are the default categories set by HubSpot. As you get more acquainted with the platform, you can customize them to fit your pipeline, but for now we’ll stick with the default.
Let’s start by clicking “Create Deal.”
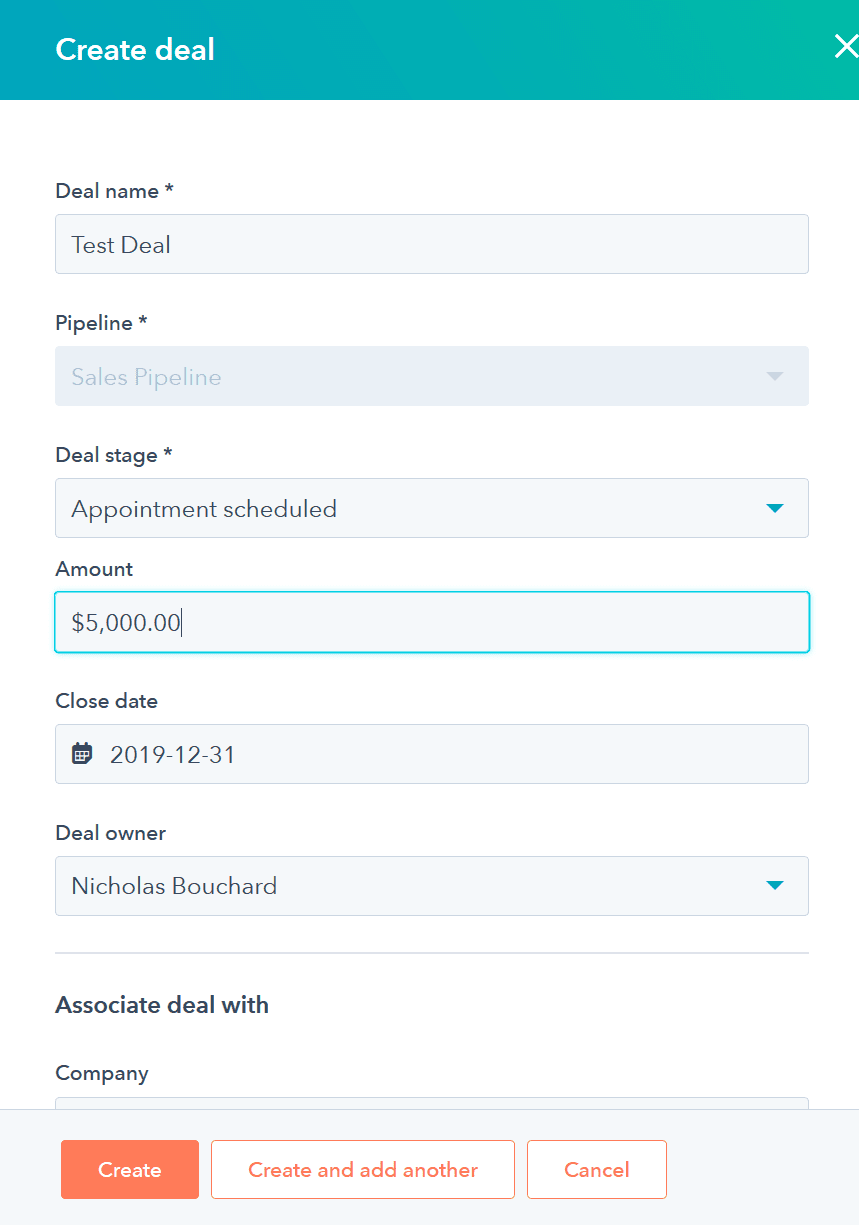
Here’s a rundown of each field in this pop-up:
- Deal name: I’m just using “Test Deal” here, but it’s best to use something that will distinguish your deals from each other.
- Pipeline: Here you choose the pipeline your deal will go through. Depending on your company, you might have multiple pipelines covering different products and services. I’m using HubSpot’s default Sales Pipeline.
- Deal stage: This dropdown menu is populated by the stages of your selected pipeline. The first stage is selected by default.
- Amount: How much is this deal worth?
- Close date: What’s the deadline for closing this deal?
- Deal owner: Who’s handling the deal?
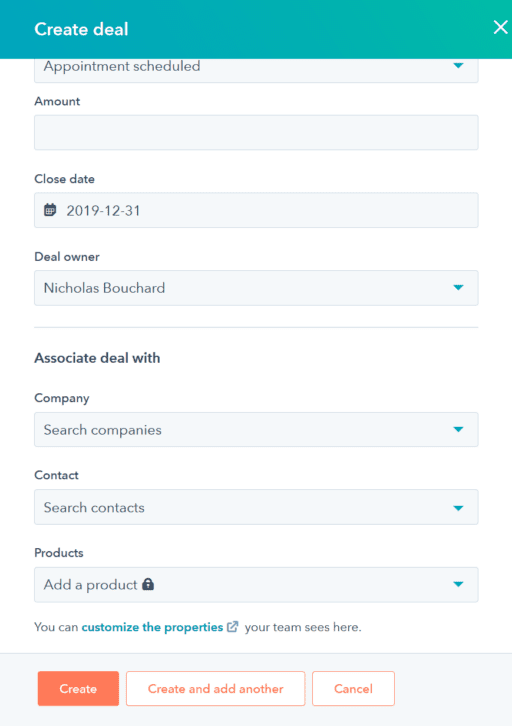
The “Associate deal with” section lets you connect your deals with companies, contacts, and products. We haven’t covered how to create these in this guide, but you can find out how to do so in HubSpot’s own guide.
After you’ve filled out each field, click on create, and you’re done!
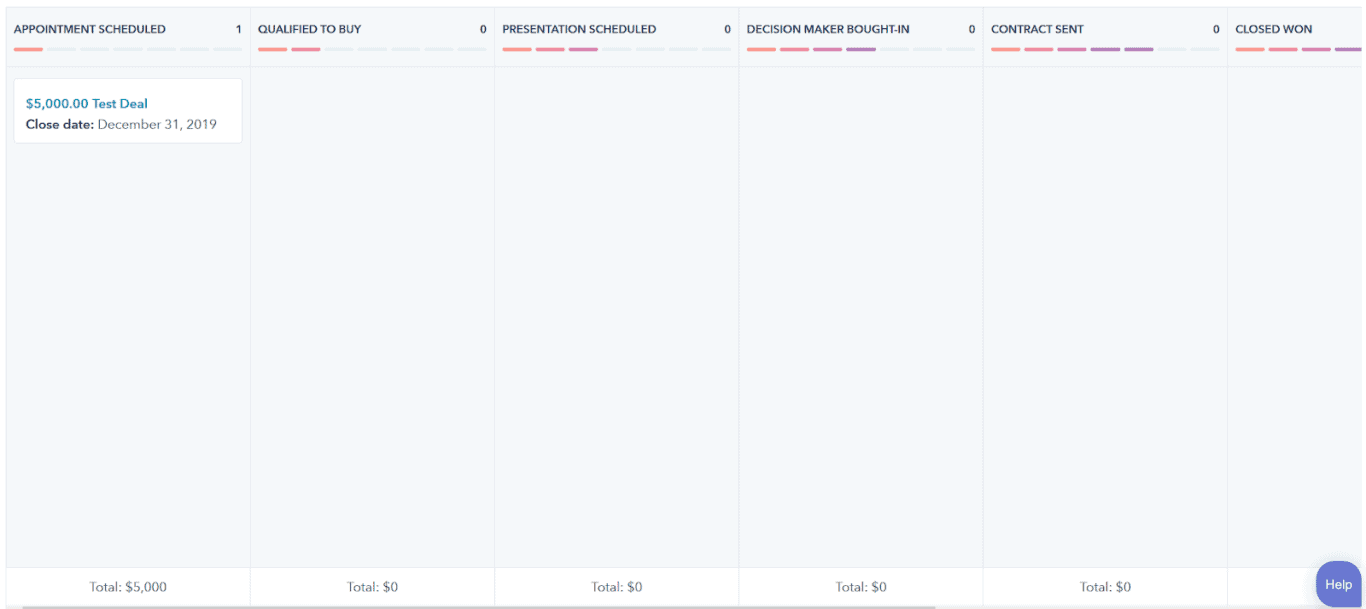
As you can see, my “Test Deal” is slotted in at the “Appointment Scheduled” end of the pipeline. I can click and drag the deal through the pipeline to reflect its progress towards a closed deal. But what happens when I click on my deal?
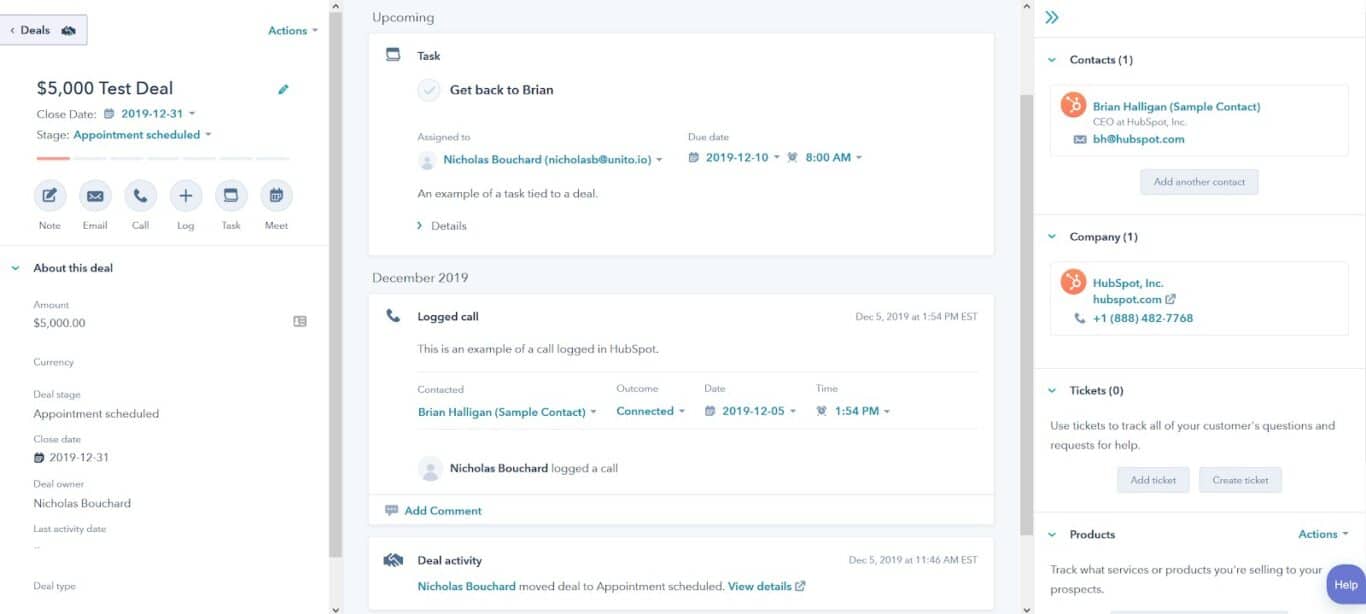
Once you go into a deal, the left panel will display all the information you entered when it was created. Additionally, you’ll find buttons that let you send emails and make phone calls directly through HubSpot, as well as logging conversations, creating tasks, and setting up meetings.
The central panel tracks everything that happens in a deal, from its movements along your pipeline to every communication with a contact.
The right panel is where you can see contacts, companies, and products associated with your deal.
With all this information at your fingertips, it’s a lot easier to tinker with your sales process and figure out where your blockers are. There’s also a section for tickets, connecting the Sales Hub to HubSpot’s support functionality.
This is just an overview of what the HubSpot Sales Hub can do for your sales team. Once you’ve implemented it, you’ll be able to integrate it into your team’s workflow and get everyone working at their peak. Once you hit that level, you might want to integrate HubSpot with a project management tool like Asana or Trello to collaborate with other teams in your organization.
How to integrate HubSpot with other tools
Learning how to use HubSpot is great, but what about slotting it in with your tool stack? Without the right integration, you can spend hours just copying and pasting information from tool to tool so everyone’s in the loop. Just because a tool is great for your needs doesn’t mean it works for another team. No one should be forced to use a tool that doesn’t fit their workflow.
Want to save time and effort? Try Unito. Unito has the deepest two-way integrations for some of the most popular tools on the market, including HubSpot, Asana, Trello, Google Sheets, and more.
Sync data across tools seamlessly, use rules to filter out irrelevant information, and map fields so everything ends up exactly where it needs to go. All of that in just a few minutes.