How To Set Up a ClickUp-Jira Integration (2 Methods)
Project management tools will never be a one-size-fits-all. Some are better suited for technical teams, and some cater more toward business teams. Take ClickUp and Jira for example. ClickUp is a great project management tool for the business side. Product managers, marketers, revenue operations, and human resources appreciate the simplicity and flexibility of a tool like ClickUp.
Jira, however, is a go-to for many technical departments. Engineers, software developers, data teams, and digital transformation teams get a lot of value from a more granular, in-depth tool.
Both ClickUp and Jira can support their respective departments and their needs, but what happens when these two teams need to collaborate?
Why a ClickUp→Jira integration?
Cross-departmental collaboration comes with constant communication and updating between multiple tools. That often means copying and pasting project information between ClickUp tasks and Jira issues to get full visibility on software projects. Alternatively, your company could purchase licenses for both tools and establish tool-hopping as a standard practice for everyone.
One route is tedious, and the other is costly and involves a steep learning curve. The best solution in this case is to introduce an integration between ClickUp and Jira. This way, data is automatically synced from one tool to the other, saving your team time, effort, and costly licenses.
But how should you go about integrating these tools? Let’s cover your options.
Method 1: Using built-in integrations.
ClickUp offers a built-in integration with Jira through Make, with pre-built scenarios in a template gallery. Here’s how you can set this up in ClickUp.
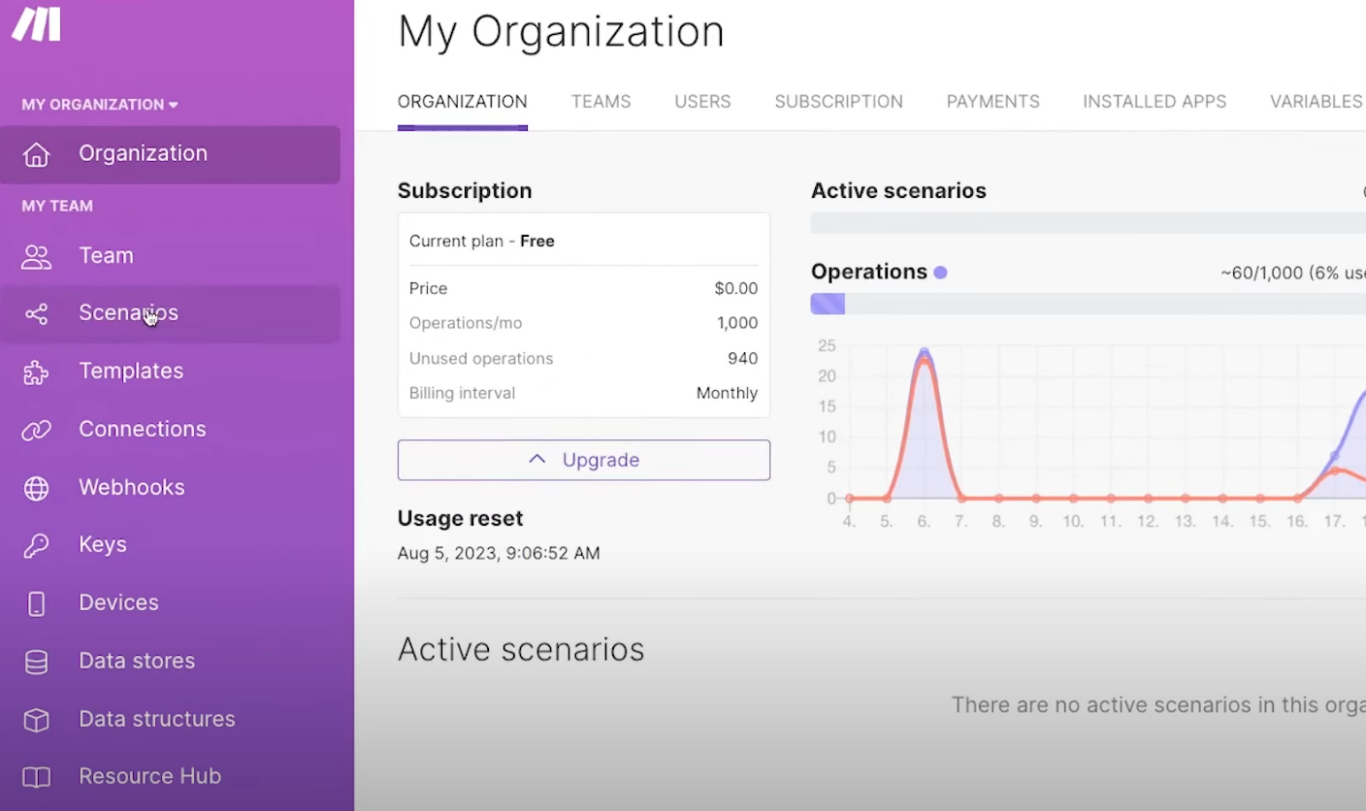
Step 1: Log in to your dashboard and select the Scenarios tab
Then, search for a template that best describes what you’re trying to accomplish. Trigger choices will be listed for you and vary depending on your chosen template.

Step 2: Save your scenario
Once you’ve picked a template, confirm which folder you’d like to save your scenario to. Then, choose the filter type and criteria. This will act as the condition your work items must meet to complete the action.

Step 3: Choose condition criteria

Use advanced search to find dozens of condition criteria to fit your scenario. Once you’ve selected the criteria, we recommend creating dummy data to test your scenario. You can edit the criteria if the test isn’t working as expected.
Step 4: Switch on your automation

You can switch on your automation at the bottom of the screen and determine how often it’s run.
And that’s it! Now, repeat the scenario steps as needed to achieve your desired integration.
Limitations of this method
This method looks like it’s a breeze, right? While it can be simple, note that some limitations come with this approach.
One-way automation
Each trigger and action is set to be completed in one direction. For example, if you follow a template that says “create an issue” from ClickUp, you must then go back to the template selection and find a “create a task” option to have work items automatically created in both tools. On top of that, for task creation templates, there are multiple choices, slowing down your integration build.
There are field mapping limitations
Updating individual fields will require you to set up multiple scenarios and actions. Also, the ClickUp and Jira scenarios don’t support every native and custom field, meaning your team will have to make sacrifices regarding which fields you’d like to keep updated.
It isn’t scalable
Setting up scenarios requires a lot of manual work. Sifting through dozens of templates to find a specific trigger and action that works for your team is time-consuming and requires constant re-training so the team knows how everything works. As your business grows and expands into more lists, projects, and tools, the time spent on integration setup multiplies.
Any of these a dealbreaker for you? Here’s a better option.
Method 2: Integrate ClickUp with Jira using Unito
Unito is a workflow management platform with native 2-way syncing that offers deep integrations with some of the most powerful SaaS tools on the market, from Asana to Jira, ClickUp to Google Sheets, and Google Analytics to HubSpot.
Unito is a no-code solution. With four simple setup steps, users can set work items in one tool to automatically sync and format properly in another. Here are a few more reasons why Unito might be a better fit for your team.
The sync is bi-directional
Most integration plaforms are built to sync in one direction. This means needing to configure the integration once from tool A to B, and then complete the setup process again from B to A — if that direction is even supported. This doubles the work involved in integrating tools.
With Unito, you can choose a one-way or two-way integration within the same flow. The setup process is streamlined this way, with a configuration the whole team can understand.
The field support is deeper
Integration solutions vary in terms of depth. Luckily, Unito supports all of the native fields teams look for in a ClickUp and Jira integration, and it also supports custom fields as well. Your field mappings can be set to update bi-directionally, and you can even filter your rules based on native or custom fields to suit your team’s workflow perfectly.
Unito goes above and beyond ClickUp and Jira
Not only does Unito offer a deeper, 2-way flow for your ClickUp and Jira instances, but it also supports syncing the other tools your organization uses. From reporting tools to ITSM tools and CRMs, Unito has you covered so your team doesn’t have to learn to use separate scenarios and actions for each use case.
Now that we understand the advantages that come with Unito, let’s look at just how simple the setup really is.
Step 1: Connect your tools

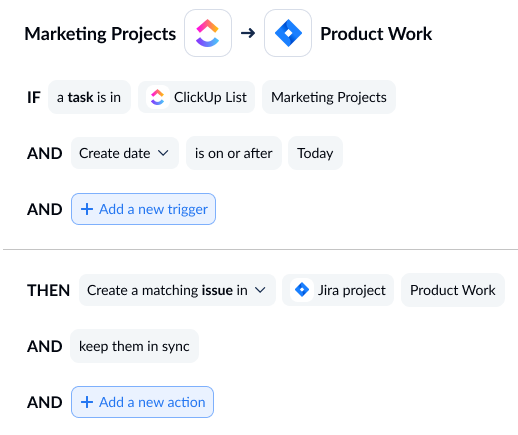
First, connect your tools. In this case, we’d be connecting a Jira project to a ClickUp list.
Step 2: Set flow direction

This will determine if new work items are automatically created in just one tool or both. It’s where Unito stands out as an integration solution because users can select either a one-way or bidirectional syncing.
Step 3: Build rules

Maybe you don’t want absolutely every item syncing over to the other tool. That’s perfectly fine. You can choose between filter options like “label is”, “status is,” or even filtering by custom fields.
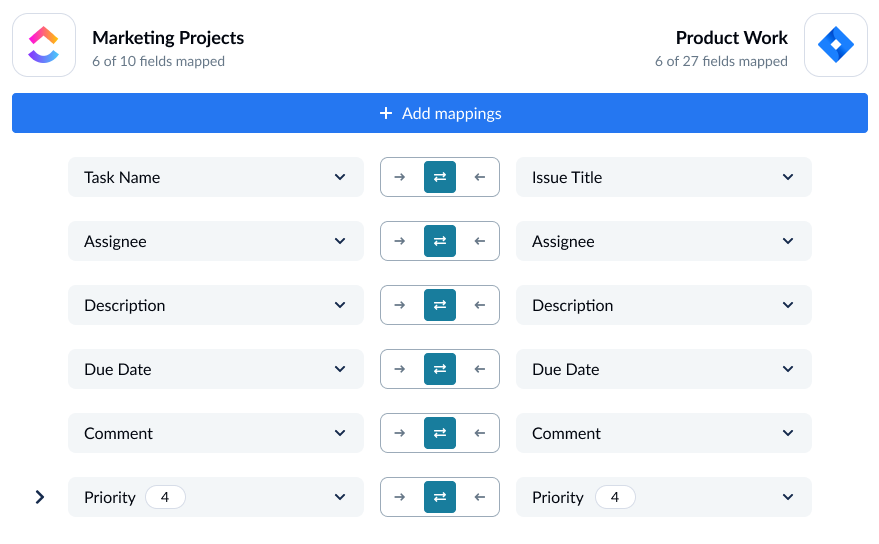
Step 4: Map your fields

Unito supports most field types so no details are missed. You can even “auto-map” this process to speed things along.
And that’s it! You’re ready to launch. Your ClickUp and Jira instances will be in sync, and you can save on manual work and licenses.
Both methods we looked at are viable ways to integrate Jira and ClickUp. However, it’s important to consider which method makes for a deeper integration that scales with your growing team. Consider whether building individual scenarios will still be an effective solution as you grow, or if your team will benefit more from the power of a live 2-way sync.
Want a more in-depth guide?
Get a full guide to syncing ClickUp with Jira using Unito.
FAQ
What’s the best way to set up a Jira-ClickUp integration?
ClickUp offers a built-in Jira integration through Make, an automation tool. This allows more technical users to push data from ClickUp into Jira through a sequence of automation steps.
But the best integration for Jira and ClickUp is a no-code two-way sync that automatically creates and updates both ClickUp tasks and Jira issues. With Unito, even non-technical users can set this up in minutes, making it the best platform to integrate Jira with ClickUp.
How do I import tasks from ClickUp to Jira?
You can export ClickUp tasks to Jira in one of three ways:
- Export ClickUp tasks as a CSV file and import that into Jira.
- Use ClickUp’s built-in automations to push data to Jira.
- Use Unito’s two-way sync for ClickUp to import tasks from ClickUp to Jira and keep them updated automatically.
Why is ClickUp attacking Jira?
In a recent ad campaign, ClickUp attacked Jira for being less efficient, less productive, and having poorer customer service. The two companies are direct competitors, so this is nothing but particularly aggressive marketing.


