How To Set up Bills and Invoices in Xero Accounting Software
Xero is, to put it simply, the gold standard in large or small business accounting. With a single dashboard, you get to manage and streamline almost anything related to cash flow and corporate finance. Whether you’re managing taxes, reconciling bank transactions, or preparing to create and send your first online invoices, Xero has you covered.
In this article:
- Key tools for Xero customers
- What to know about Xero invoices
- How to create an invoice in Xero
- Approving invoices in Xero
- Customizing your Xero invoice
- Why we love Xero invoicing
- How to sync your Xero invoice data
Xero accounting software offers the following key tools for customers:
- Invoicing and billing.
- Payroll.
- Financial reporting.
Invoicing, you could say, is Accounting Software 101 for accountants and finance workers. If you run a small business or large, you need to get paid. Xero’s services make sure that you get paid faster and through the payment method of your choosing. Your bank accounts will thank us for this step-by-step guide.
What to know about Xero invoices
There are two ways to utilize online invoicing services in Xero:
- Classic invoicing.
- New invoicing.
Xero is retiring classic invoicing on September 2, 2024
Classic invoicing is the legacy invoicing system that long-time users are familiar with. Features include:
- Ability to create and send overpayments.
- Editing the exchange rate on an invoice to be paid in a different currency.
New invoicing is a more streamlined way to set up invoices in Xero. This route comes with extra features including:
- Auto-saved drafts.
- One-click approval email.
- The optional addition of a credit limit.
If you’re used to using only one of these modes and would like to try out the other, simply click on the button that says Switch To Classic Invoicing or Switch To New Invoicing, depending on which mode you’re currently in.
We’ll be using a sample company to show you both ways to create invoices. This is a fictional small business, and you can test it as well with a free trial to access all Xero features – All you need is a login ID. You can decide which of Xero’s plans best suits your business needs later on.
How to create an invoice in Xero
Invoices in Xero Classic
The steps to create and send an invoice are pretty similar in both modes, but the interface looks a little different. Let’s break down the classic invoicing method.
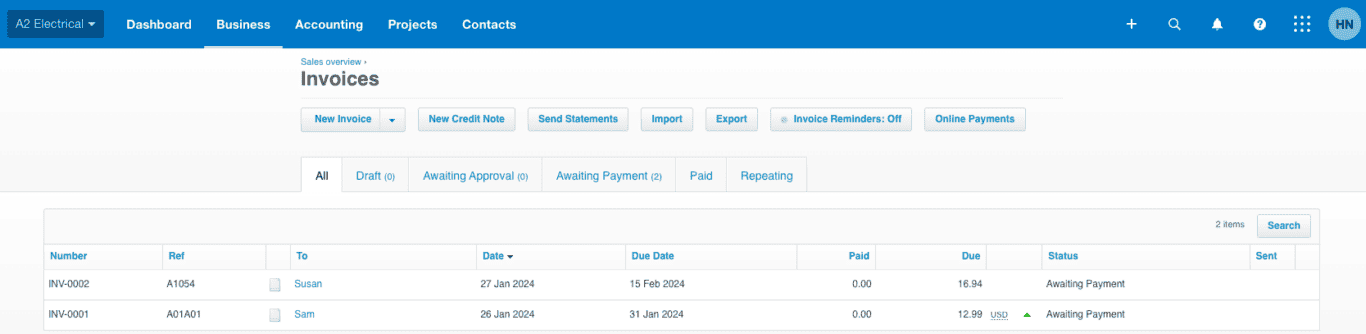
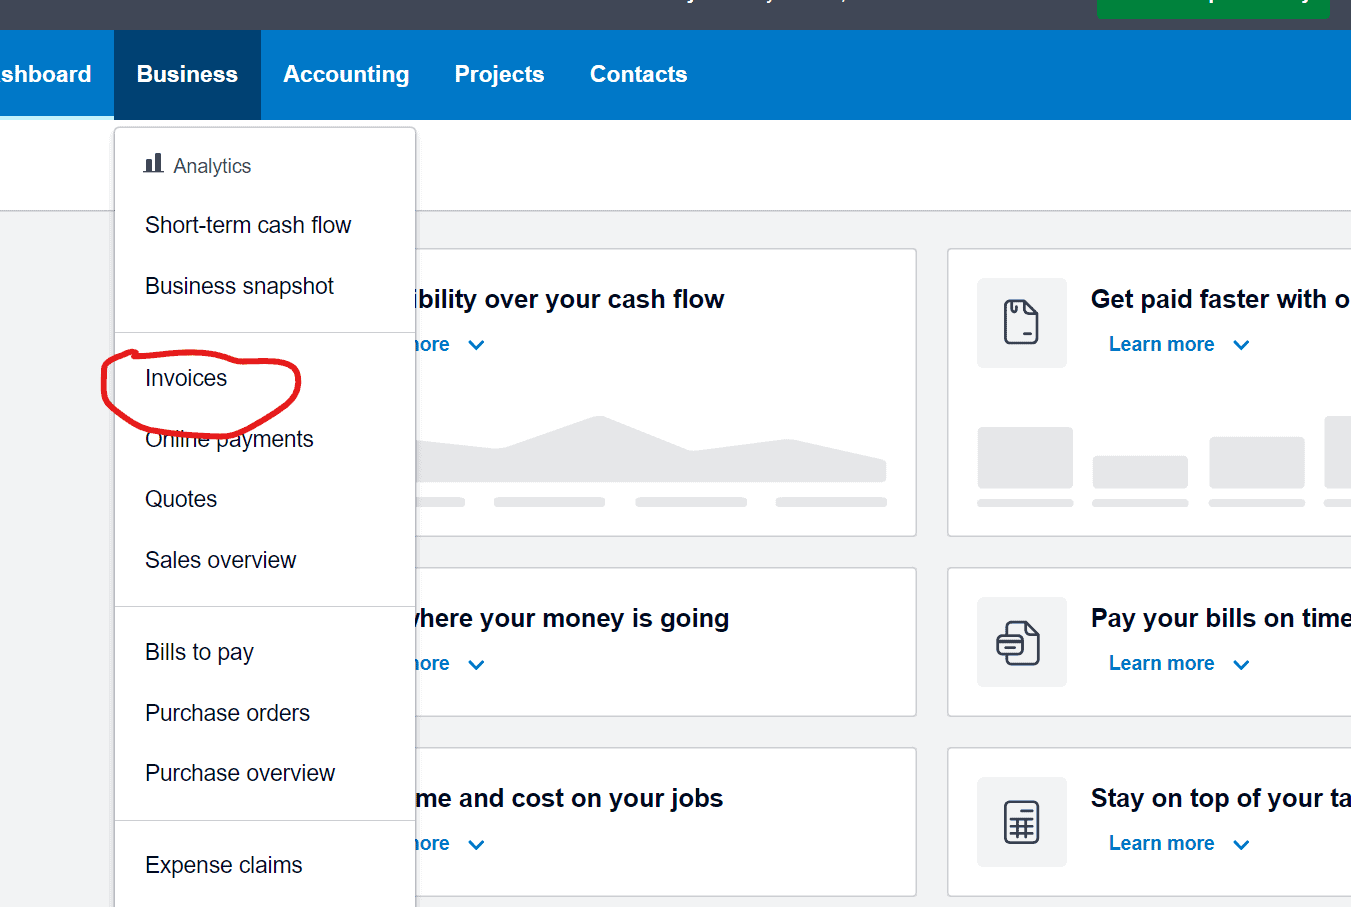
- From the Account menu, click the tab that says Business. From the drop-down menu, click Invoices.
- Here you can either create a one-time new invoice or a repeating invoice.
- By default, you’ll be taken to the New Invoicing mode. Use the Switch To Classic Invoicing button at the bottom.
- Fill in and review your details based on your needs. Don’t forget to include recipient, details of services rendered/products sold, amount due, payment due date, payment method, and any relevant taxes.
- Go to the Save menu to choose how you’d like to save your invoice in Xero.
- Attach any extra files your invoice needs by clicking the icon on the right and adding files from your Xero library or by uploading them from your device (phone or computer). These files could include payment information, pictures of the final product, terms and conditions, documents etc.
- Add the invoice to a Xero project, if needed.
- You’re all set! Time to hit the Approve button (we’ll cover approval in the next section).
Invoices in Xero
- Visit the Account menu, click Business, and Invoices and then choose whether to set up a one-time or a repeating invoice.
- You’ll be taken to the Classic invoicing page now since you last created an invoice in Classic mode. Go to the bottom and choose Switch To New Invoicing.
- As before, add your invoice details, ensuring everything is accurate.
- Add the payment method of your choice and set your preferred currency.
- Attach files by clicking the button in the bottom left corner.
- Click the Preview button to see how the invoice will look for your customer. You can click Save And Close if you plan to come back to the invoice later or choose Approve And Email.
- You’re all set to approve and send invoices! Time to get paid faster.
Approving invoices in Xero
Now that you understand how to get started with Xero invoicing, it’s time to approve, send, and have your customer pay. You might be approving an invoice you created yourself, or one that another member of your team has submitted for approval.
The steps to approve an invoice in Xero are pretty much the same in both classic and new invoicing modes.
- Go to the Business menu and select Invoices.
- Open the invoice that you wish to approve.
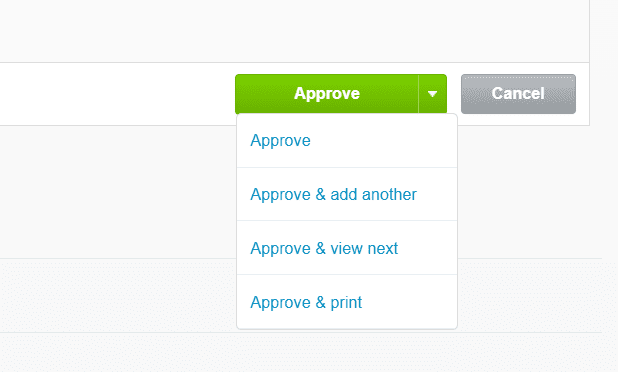
- Click on Approve. If you’re in New Invoicing mode, this will read as Approve And Email, since you can do both with a single click.
You have a range of additional options on how to approve your invoice. In Classic Mode, they include:
- Approve And Add Another – This lets you approve the current invoice and immediately open a new draft invoice.
- Approve And View Next – This lets you approve the current invoice and immediately open the next invoice that needs approval.
- Approve And Create PDF – This lets you approve the invoice and produce a PDF copy of it for printing.
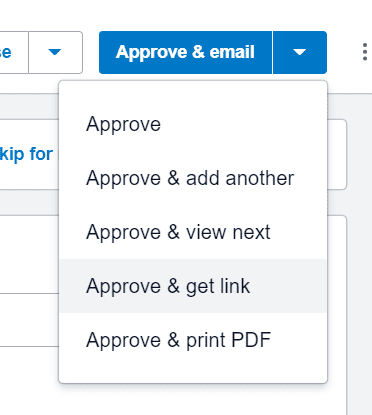
You get two additional options in the New Invoicing mode:
- Approve and get link – This lets you approve the invoice and get a link to an online copy of it.
- Approve – This lets you just approve the current invoice and then come back later to email it or get a PDF.
- Next, simply Send to your customers for them to pay.
To free up your schedule, you also have the option to approve multiple Xero invoices at the same time.
- Under the Business menu, scroll to Invoices. Go to the tab that says Draft or Awaiting Approval.
- Mark the check boxes next to all the invoices that need approval. Then, Approve, and then click on OK.
That’s it! Bills and invoices are now made easier.
Customizing your Xero invoice
Customization options allow your invoices to perfectly represent your business. Xero has you covered for making it simple.
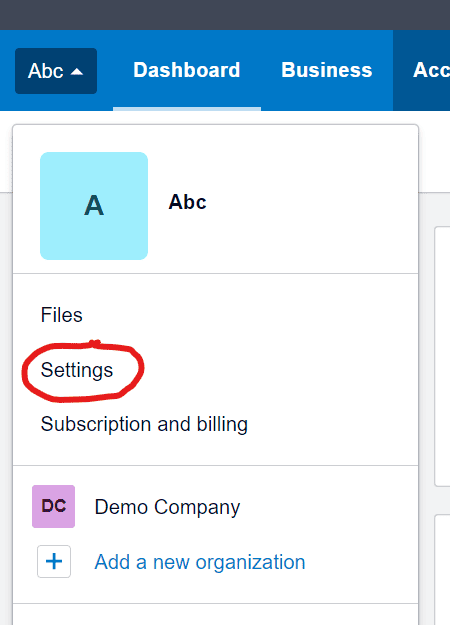
- Under your organization’s tab, click Settings, and then Invoice Settings.
- Select New Branding Theme. You’ll notice that you have a choice between Standard and Custom. The standard option is a basic invoice template with certain pre-filled criteria, like margins and paper size. If you’d like to keep it simple, we recommend picking this option. Then, pick a name for your theme.
- Customize and correct your invoice layout as you like based on a wide range of options.
- You can also directly edit the Standard Template and customize it that way.
- Click on Save. That’s all you need for stress-free customization.
Why we love Xero invoicing
At Unito, we’re big fans of Xero. It’s accounting software with invoicing that works. Whether you use the Classic or the New Invoicing style, it’s easier than ever, small business accounts or large, to get paid how you’d like. Let’s talk about some of the nifty general features that come with Xero accounting.
- Clean, professional look – The invoice templates give you a clean look that will suit any kind of business and industry. Plus, you can add your own company logo and branding to perfect it.
- Intuitive invoicing dashboard – Anyone can learn how to plan and send invoices in just a few clicks. For extra assistance, you have Xero Central, which gives you step-by-step walkthroughs on all topics related to cash flow and invoice creation.
- Multiple ways to pay – From credit and debit card payments to PayPal and Stripe, Xero lets you power up a small business in the way that the big players do.
How to sync your Xero invoice data
Once you’ve set up your Xero invoice and started receiving payments, it’s time to think about syncing all that data with the rest of your business stack. The thing is, Xero doesn’t come with a feature to automatically import your invoice data to a spreadsheet. You’ll have to do it manually, which can be a drag in your to-do list, and it leaves more room for human error. It’s a high-risk task for your business finances.
Start syncing Xero data with a free Unito trial
Luckily, Unito offers a free trial and flexible plans for new customers and a Xero to Google Sheets sync that does this for you in seconds. With every new invoice, you can automatically sync the data in a Google Sheet that you can then modify or share with other teams that don’t use Xero. What’s more, Unito syncs all your historical software data too, so your reports are updated at any given time. Whenever you make a change to an invoice created in Xero, the synced Google Sheet reflects the change too. Small business or large enterprise, Unito helps you protect your time, so you can get back to the important work.
You can visit our step-by-step article on how to sync Xero with Google Sheets. And it’s not just one tool. From Excel to Airtable to HubSpot, Unito lets you set up a workflow between Xero and any of your tools where you can view your invoicing in a handy spreadsheet. Taking charge of your tool stack has never been easier! Reach out to know more and start your free trial today.