
How to Connect Xero to Google Sheets with Automated Updates
Xero is a fantastic accounting tool for businesses, as it’s ideal for quickly processing bills, invoices, and all things finance from a single space. But, when you need to report on the latest financial data, there’s nothing like having a clearly detailed and accurate spreadsheet handy.
This guide will show you how to connect your Xero account to Google Sheets so that bills and invoices populate your spreadsheet rows automatically. This will apply to all historical data, as well as any new bills or invoices – once the integration is complete. From there, any changes made to those same invoices or bills in Xero will automatically update in your spreadsheet (but not the other way around).
In this guide:
- Tools: Xero and Google Sheets
- Use cases: Project reporting, data migration, account management
- Great for: Data analysts, project managers, stakeholders and executives
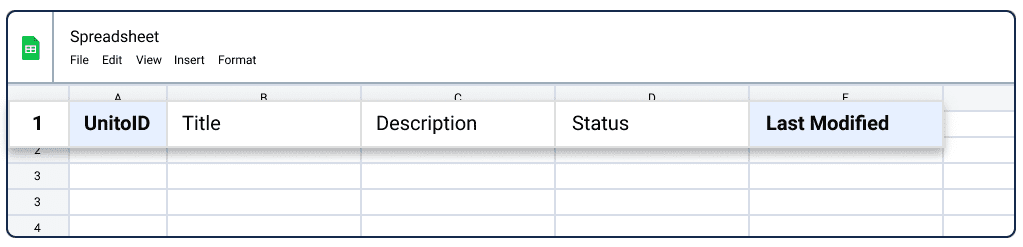
Each row in Google Sheets represents a Xero invoice or bill, while the columns represent the various fields (e.g., amount paid, invoice number, amount due, etc.). So you’ll need a header row at the top of each sheet you plan on syncing.
Why Connect Xero to Google Sheets with Unito?
This workflow is designed for a finance team that’s struggling to keep up with the constant flow of new documents that need to be added to a spreadsheet report. Or, perhaps you want to extend visibility to managers or executives without giving everyone access to Xero.
The idea is to simplify your day by getting your Xero data into specific spreadsheets automatically so that you don’t have to worry about exporting and importing CSVs or manually copy pasting details.
Instead, if anyone needs information about a specific time period’s worth of bills or invoices, you can sync them over instead and save yourself a lot of manual effort.
Is Unito secure?
Yes! All your financial data is encrypted when synced by Unito. We’re proud to be GDPR-Compliant and SOC 2 Type 2 Certified. You can find out more on Unito’s security page.
The process is simple, and the principles apply to any of Unito’s Google Sheets integrations from project management apps to software development tools and more. Before you can sync your spreadsheets though, you’ll need to visit the Google Workspace Marketplace to install Unito Spreadsheet Sync. This Google Sheets extension enables your data to flow back and forth between tables and your other data sources.
Preparing your spreadsheet to sync invoices and bills
So before you get started, you need to set up your spreadsheet in advance so that Unito knows where to sync your bills and invoices from Xero.
In other words, your rows will represent bills and invoices, while your columns represent the fields, or details, of each.
Add a header row to your spreadsheet
There are 17 fields Unito can sync from Xero, and each will need a column in your spreadsheet:
| Syncable Invoice Fields | Syncable Bill Fields |
| Amount Paid Contact email address Contact ID Contact name Currency Code Date Description Due date Invoice ID Invoice Number Status Sub total Total Total tax Updated Date UTC URL of the invoice | Amount due Amount paid Contact email address Contact id Contact name Currency code Date Due date ID Item names Number Subtotal Total Total tax Update date (UTC) URL of the invoice |
Install the Unito Spreadsheet Sync extension for Google Sheets
Head over to the Google Workspace Marketplace so you can install Unito Spreadsheet Sync, which is required in order to sync your spreadsheets.
Here’s a look at how Unito syncs Xero data to Google Sheets:

Step 1: Connect Google Sheets and Xero to Unito
Now you’re ready to start syncing.
- Login to Unito Sync Platform and click +Create Flow.
- Click Start Here.
- Select +Add a tool to this flow in either column, then Xero or Google Sheets.
- +Choose account to specify the account you want to use.
- Xero: Select the organization you’ll be connecting, then choose bills or invoices.
- Google Sheets:Pick the sheet you want to connect to Unito.
- Tip: You can copy-paste the URL of your Google Sheet into the search box to speed up this process.
- Click Confirm.
Here’s what our demo flow looks like after we connected Xero and Google Sheets:

When you’re ready, select Confirm.
Step 2: Filter data to export from Xero to Google Sheets
Here you can establish triggers to determine which Xero bills or invoices to sync over to Google Sheets. Since this is a new integration, the options are somewhat limited. For now you can only filter bills and invoices by fields that have “any value” or an “empty value”. In other words, if that field has been filled in in Xero or not.
Here’s an example of our basic rules after connecting Xero and Google Sheets

You can learn more about setting up rules here.
Step 3. Choose which Xero fields to sync to your spreadsheet
After opening this screen, you’ll have two options to choose from. Since we’re working with spreadsheets (which don’t have pre-defined fields), you’ll have to Start from scratch.
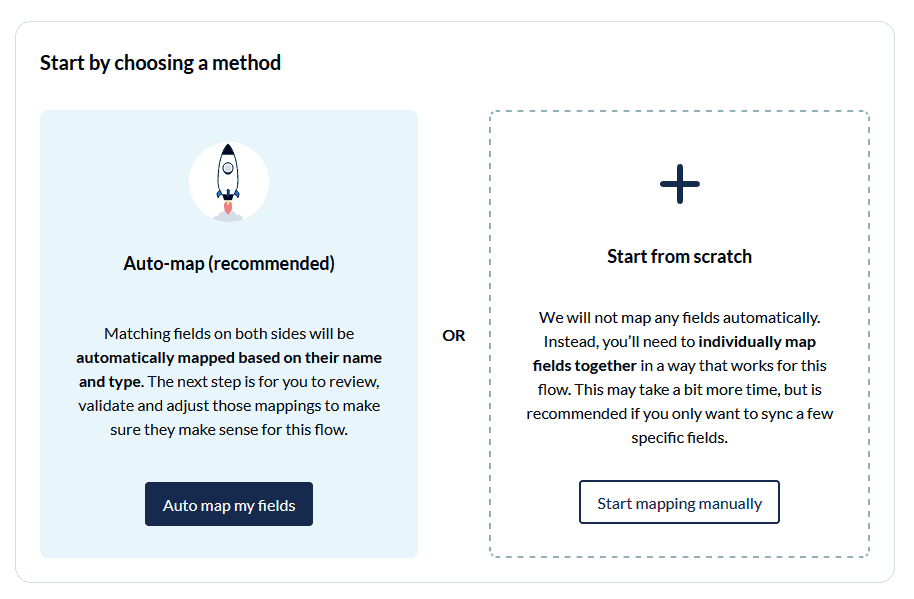
The field names you added to your Google Sheets header row will now appear here for you to pair them up individually with your fields in Xero. They don’t need to have exactly the same names, as long as you know which information from Xero should link to which columns in your spreadsheet.
Here’s an example:

Any time information is modified in Xero, those changes will be reflected in your spreadsheet.
If you forgot to include a specific field in Google Sheets when you get to this stage, you can modify your sheet (including adding new columns), but you won’t see those new field names appear in Unito unless you close your browser tab and re-open it.
Note: If you change a column name in a spreadsheet that is actively syncing, be sure to update your flow’s field mappings in Unito or else your flow will stop syncing.
Click Confirm when you’re satisfied with your field mappings.
Step 4: Save, launch, and export your Xero bills or invoices to Google Sheets!
And that’s it! You’ve just built a flow between Xero and Google Sheets! Congratulations!
If you followed the steps above, your flow will now:
- Automatically create new Google Sheets rows based on specific Xero bills or invoices.
- Keep your spreadsheet automatically updated as you modify details of your bills or invoices, or add new ones.
Here’s an example of our demo’s completed integration between Xero and Google Sheets:

If you have any questions, please don’t hesitate to reach out and let us know.
What’s next after connecting Xero and Google Sheets to Unito?
If you want to know what else you can do with Unito after you connect Xero and Google Sheets, here’s some inspiration to help you power up your workflows:
- Duplicate this flow to set up similar workflows with any number of spreadsheets. If you’ve just synced invoices, duplicating makes it easy to now sync bills!
- Read about the current limitations and capabilities of our Google Sheets integration.
- Click here for best practices and troubleshooting tips for Google Sheets flows.
- Try syncing Stripe to Google Sheets.
Best practices and troubleshooting for Unito’s Google Sheets integration
Common error messages
If you see either of the error messages below, it likely indicates that one or both of the columns: “UnitoID” and “Last Modified” have been deleted or modified from your sheet. You’ll need to re-insert them (either manually or with the add-on) before your data will sync again.
“We’ve detected that mandatory columns have been removed from your Google Sheet. Let’s get you back up and running.”
“The container configuration does not allow us to sync.”
Getting around with Google Sheets and Unito
You can find more information on the following topics in Unito’s knowledge base: