How to Connect Notion and GitHub with 2-Way Sync and Automated Updates
More than 15 years since its founding, GitHub is still an incredibly popular open source development tool with a thriving community of over 100 million users, according to Techcrunch. Notion, meanwhile, is another powerful productivity and database tool that can be used for a range of purposes, including project management, note-taking, reporting, and more.
It’s accessible, flexible and Notion pages are easy to use as templates for collaboration or, in this case, sharing key information about GitHub issues.
This guide will show you how to populate a Notion page with GitHub issues via Unito and keep your repository and pages current with automated 2-way updates.
New to Unito?
Check out our GitHub + Notion integration overview. Otherwise read on below to find out how you can sync GitHub issues to Notion pages and keep them updated automatically in real-time.
In this Notion GitHub article:
- Step 1: Connect Notion and GitHub to Unito
- Step 2: Set a flow direction between GitHub and Notion
- Step 3: Choose which issues to sync from GitHub to Notion
- Step 4: Pick fields to keep in sync
- Step 5: Launch your GitHub to Notion integration
- What’s next after you sync multiple GitHub projects with Unito?
Add Unito as a connection in Notion
You can sync pages from any Notion database in your account as long as you have “edit permission” in that database.
Click here for instructions on how to apply permissions to each Notion page
Here’s an example of how databases appear in Unito:

Add Unito 2-way Sync as a connection for each page you want to include in your flows.
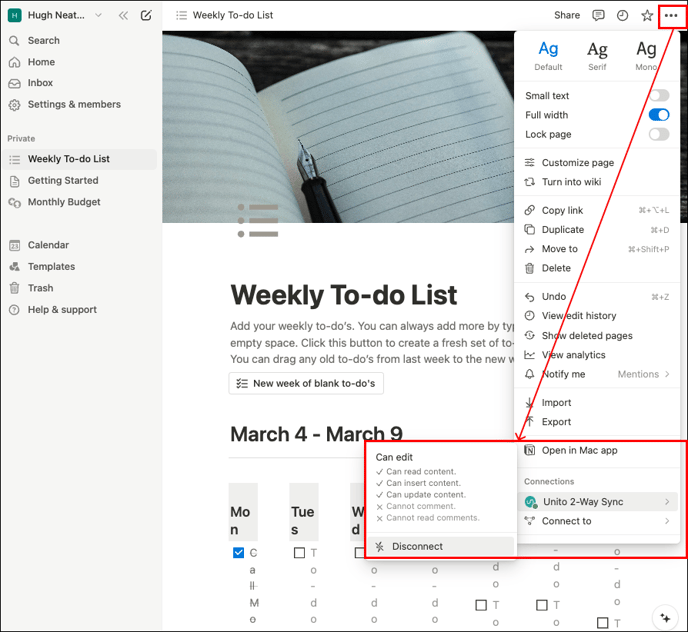
Otherwise, Unito won’t be able to detect your databases in Notion. Here’s more from Notion’s knowledge base on adding connections.
Troubleshooting your Notion integration
If you need help setting up your Notion integration, you can browse this guide on adding Notion to Unito or you can find a more general overview of this Notion integration here.
Note: Only one Notion user per workspace can connect to Unito. So make sure you create a Notion user specifically for Unito and give it access to all pages and databases in your workspace.
Step 1: Connect Notion and GitHub to Unito
- Login the Unito App and click + Create Flow.
- Now, click Start Here to connect your tools. Follow the on-screen instructions to authorize GitHub and Notion. If you need help with, here’s a breakdown of every permission needed by Unito.
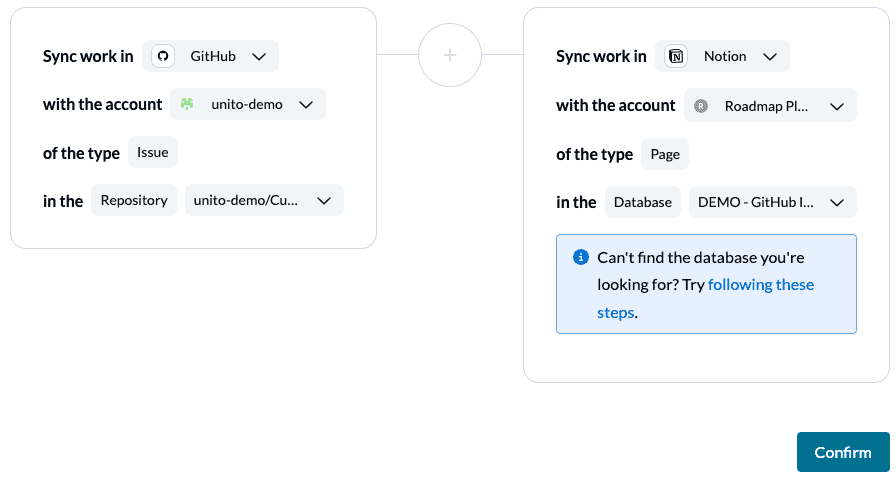
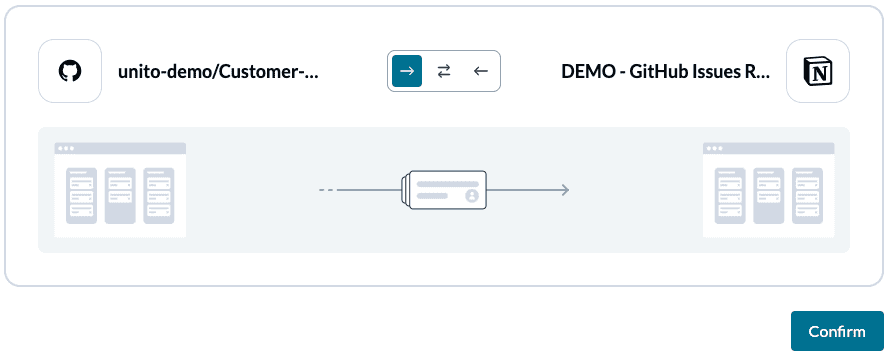
- Next, select +Add a tool to this flow in either column. Then, +Choose account to specify the GitHub repository and Notion page you plan on syncing. The order in which you connect them doesn’t matter.
- Click Confirm.
Connecting GitHub to Unito for the first time
If this is your first time connecting GitHub to Unito, you’ll need a GitHub admin or organization owner to complete a few extra steps to choose which GitHub organization(s) you wish to sync issues from.
Click to expand for GitHub setup instructions

- First, you’ll be prompted to select an organization or your personal GitHub account. Chooes the organization you plan on syncing.
- On the next screen, you can choose to sync issues from specific repos within that organization, or issues from all repos. Choose whichever option you prefer.

If you can’t complete this process for any reason, don’t hesitate to reach out to our live support team.
When you’re ready, select Confirm.
Step 2: Set a flow direction between GitHub and Notion
This step tells Unito where you want new work items (GitHub issues or Notion pages) to appear.
With a one-way flow, activity in your source tool will create new work items (GitHub issues or Notion pages) in the destination tool. If you set a two-way flow, you can create new work items in both tools.
Later, you’ll be able to set 2-way updates between your issues and pages regardless of flow direction.
In a reporting situation, you may not want new rows in your Notion page to create GitHub issues, so we’ll choose a one-way flow for our demo.
Step 3: Choose which issues to sync from GitHub to Notion
After setting a flow direction, you can set up rules to filter specific GitHub issues for your sync with Notion. You can do this by picking a trigger that Unito will look for in your tools.
This could be by assignee, issue type, labels you’ve created, etc. This part is entirely up to you, but in our demo, we kept things simple, opting to sync by issue type as you can see below.
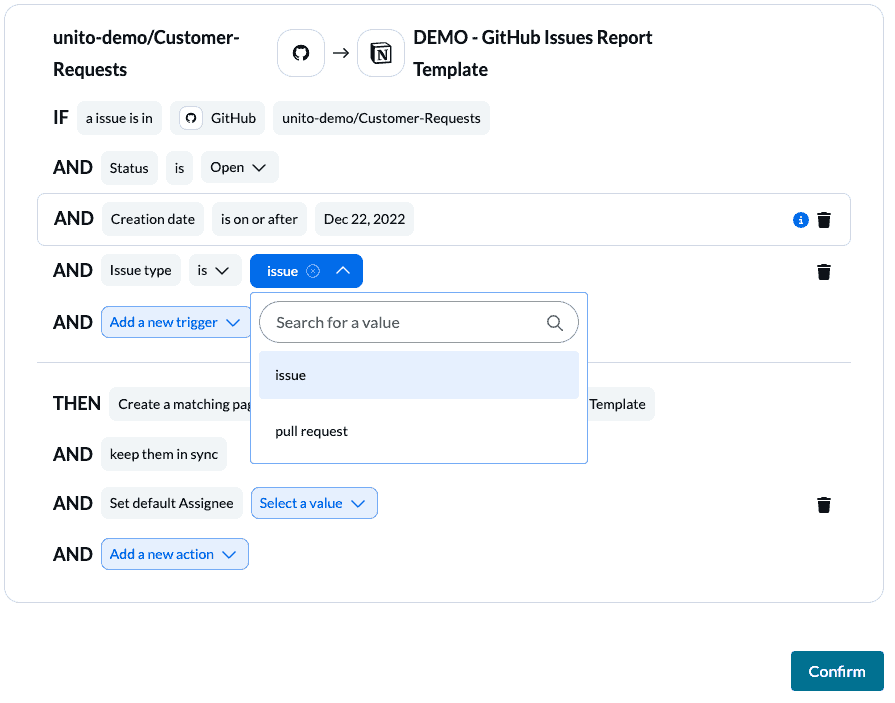
You can also decide if any actions should be automated after the row is added to your Notion page. This could include setting a default assignee, changing the label, and more.
Step 4: Link fields between GitHub and Notion
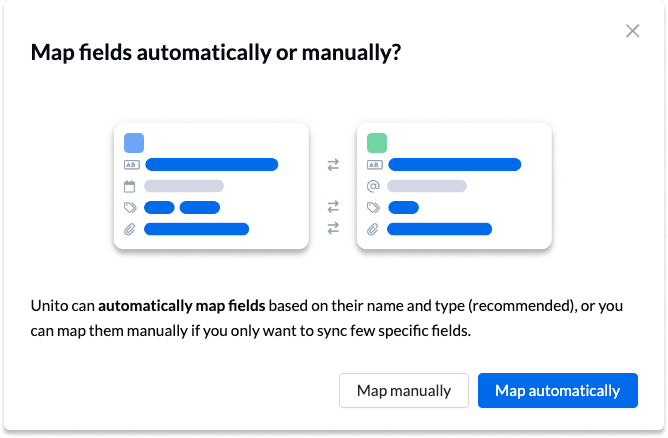
Fields represent the details of your GitHub issues and Notion rows: assignee, issue number, due dates, status, label, etc. Typically we can either auto-map our fields or go with a DIY approach. Due to limitations in Notion, we’ll need to map our fields manually.
Click on + Add mapping to pick individual fields in GitHub that will sync over to Notion. If you’re using our Notion template for GitHub, then your Notion fields are already named after their counterparts in GitHub. Here’s what our completed set of field mappings looks like:
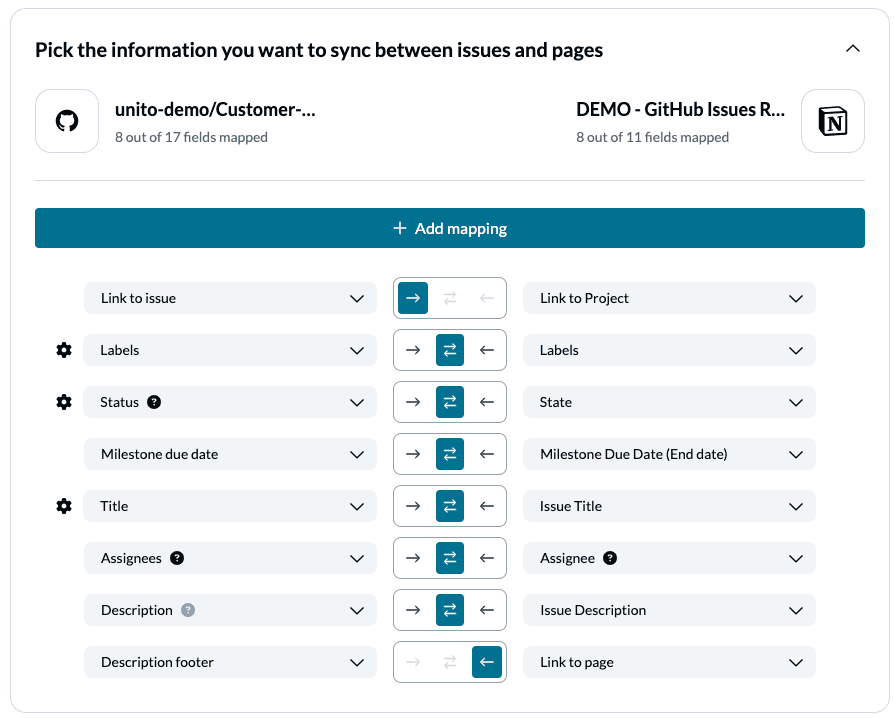
Any field with a gear (or cog) icon allows you to specify values for fields with multi- or single-select options. If the label names in Notion are identical to those in GitHub, Unito will auto-populate as many as it can.
We recommend mapping fields for 2-way updates, but feel free to customize according to your needs. With a 1-way field mapping, edits made in the source tool will appear in the destination but not vice versa.
You can learn more about field mappings here.
Step 5: Launch your GitHub Notion integration
And that’s it! Just like that, you’ve built a two-way flow to automate issue creation between GitHub projects with Unito!
If you’ve followed the steps above, your flow will now:
- Send your GitHub issues to Notion pages based on your set of rules.
- Keep those issues synced automatically between GitHub and Notion with live two-way updates.
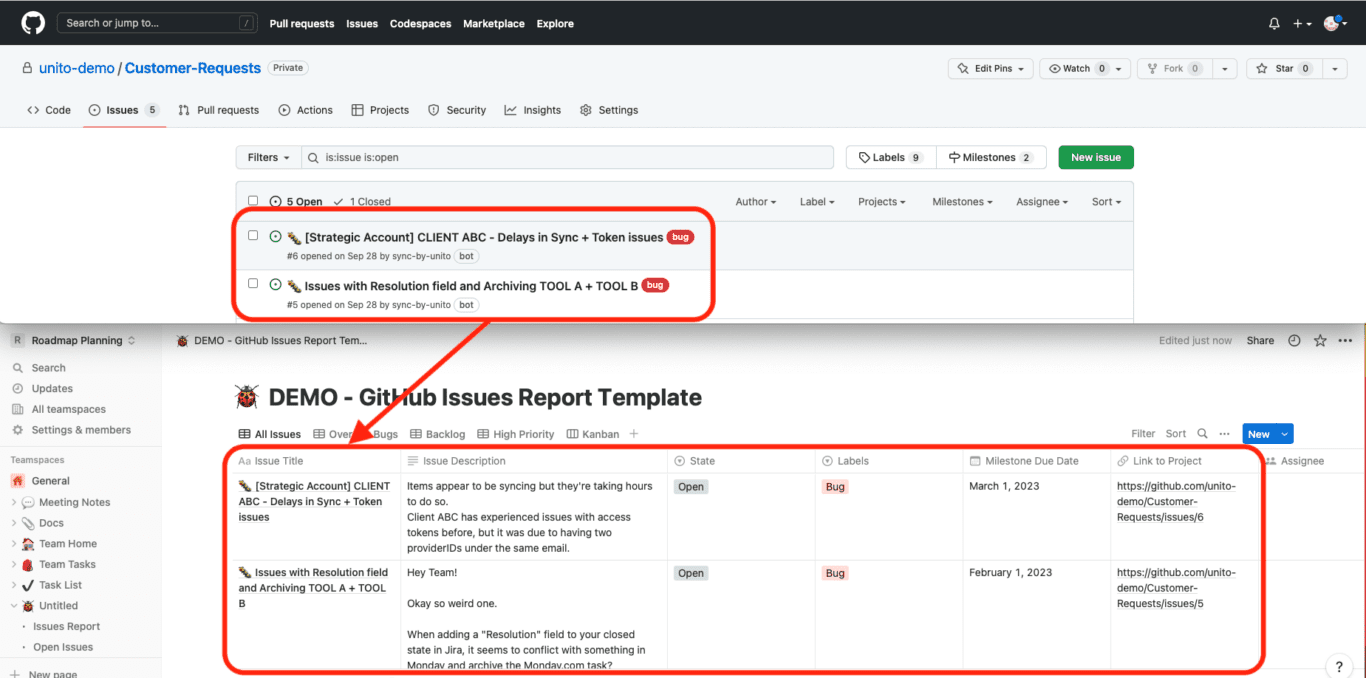
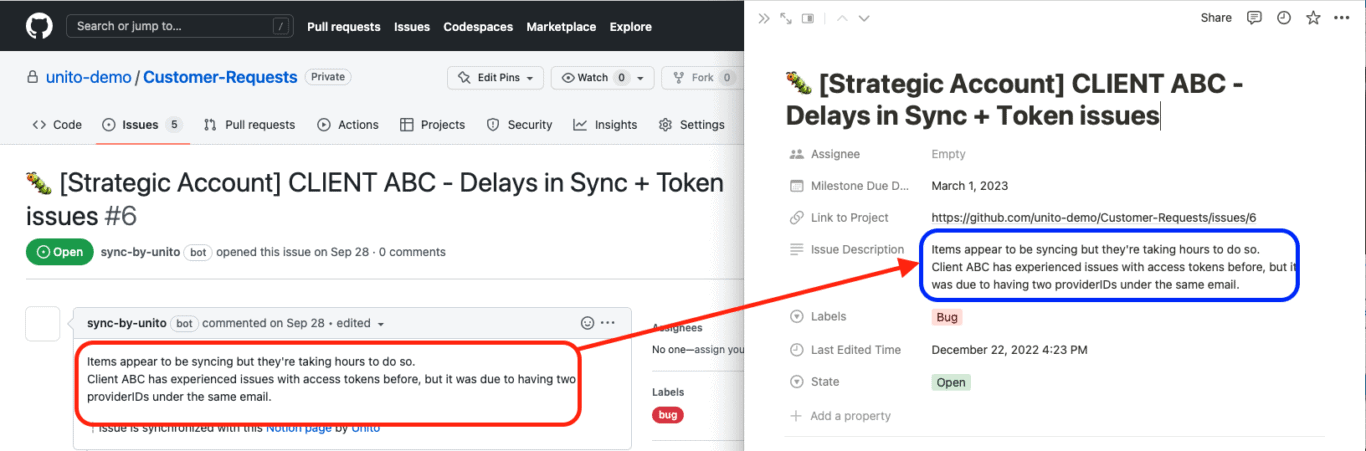
Here’s a side-by-side look at our GitHub issue synced to Notion based on the rules and field mappings above:
Once all your fields are mapped, you’re done! You can launch your flow and watch as GitHub issues get synced over to Notion. Build flows for other GitHub repos and you could have a single Notion database track all the work your development team is doing.
Essential Unito features for this Notion GitHub integration
One-way create, two-way update
Customizing your flow with this feature keeps your data updated across both tools without the creation of new work items. This is useful if you sync multiple GitHub repositories to a single Notion database or pull data from Notion to GitHub. Otherwise you’ll get GitHub issues moving from project to project.
Custom fields
GitHub uses custom fields to give users more control over their projects. Unito can sync these fields from GitHub to other apps and back so you don’t lose any customizability. Check Unito’s pricing page to see how many custom items you can sync.
Advanced mappings
For many integration solutions, you’re a bit stuck with what the tools give you. That makes it tough to truly recreate the environment from one tool in the other. Unito lets you customize your field mappings so that isn’t the case. When you’re using a flexible tool like Notion, that’s essential especially if you like the idea of generating GitHub pull requests from a Notion page.
What’s next after you sync multiple GitHub projects with Unito?
- Unito’s flow duplication feature lets you copy existing flows, keeping your rules, mappings, and many other settings intact. This allows you to sync multiple GitHub projects to a master without starting each flow from scratch.
- Browse some of the best free Notion templates and sync multiple Notion pages together.
- Connect Notion to Google Calendar, Notion and monday.com, Jira to Notion, Notion to Asana, or Notion and GitHub.
- Promote collaboration between technical and non-technical teams by syncing GitHub with Asana, GitHub to Trello, or GitHub and monday.com.
- Read a case study from a Unito user who did just that.
Why share development updates automatically from GitHub in Notion?
Some teams use Notion to manage their projects, while obviously developers or engineers need GitHub to manage version control, integrations, and access control.
In that case, both sides can become siloed, requiring someone to jump back and forth between GitHub and Notion to share updates. Or you use another tool, such as Slack, to communicate and stay in touch, but already you’re beginning to see the problem: too many tools, too many chances for information to fall between the cracks.
Skip manual processes to save time and mitigate human error
The more manual processes in place, the higher the likelihood that details get missed, miscommunications or misunderstandings occur, and work slows down.
It may not seem like much of an obstacle to jump between a few tabs, but the minutes you spend cross-referencing each tool can add up quickly over weeks and months or years.
Even if one person is highly organized and capable of following several overlapping conversations in multiple places, it’s only a matter of time before the dam breaks.
Streamline workflows and get information between teams or to stakeholders quickly
Connecting Notion and GitHub to Unito saves you from that hassle by seamlessly integrating issues with pages so that no one needs to stop what they’re doing to go on a fact-finding mission.
If you’re the CEO or a stakeholder with other major initiatives to keep track of, you don’t have time to skim through Slack channels or browse repos looking for updates from your dev team.
Sending issues into a Notion database is a simple way to collect information from GitHub and quickly put together a simple overview.
Who should sync Notion GitHub with Unito’s integration?
Whether you’re a solopreneur, freelance contractor, or leading a software development team, you’ll benefit from streamlining collaboration with contacts and teammates in other tools.
Syncing your issues to a Notion page saves you from having to copy-paste updates to multiple locations and, best of all, Unito’s 2-way sync keeps GitHub and Notion up-to-date in realtime with live updates as you work.
So as you make a change in one place, you’ll see it instantly reflected in the other. Alternatively, you can set it to 1-way updates if you prefer to control the flow of information.