How to Sync monday.com Tasks to GitHub Issues Automatically with 2-Way Updates
This guide will show you how to sync monday.com and GitHub with Unito’s automated 2-way integration for issues and tasks. This workflow can help you streamline software development projects; expedite ticket escalation; or align comments, assignees, custom fields, and more.
Our walkthrough will demonstrate a sync between monday.com tasks and GitHub issues specifically, but you can apply these same steps to sync other work items between either monday.com or GitHub and any other tool in your stack.
Why sync GitHub and monday.com with Unito?
Integrating GitHub and monday.com can help teams that aren’t familiar with GitHub collaborate more effectively with a development team.
It can save loads of time for engineers or project managers by eliminating the need to switch back and forth between GitHub and monday.com. You could triage development requests, project status, code bugs, feature requests and more.
This guide will highlight a specific monday.com GitHub integration use case with two primary goals:
- Enable a team in monday.com (product, marketing, customer support, etc.) to create tasks in monday.com that automatically become bug report issues in GitHub based on specific criteria in Unito.
- Set up a two-way sync between those selected issues and monday.com tasks so that as our dev team works on the assigned issues, the team in monday.com can see live updates.
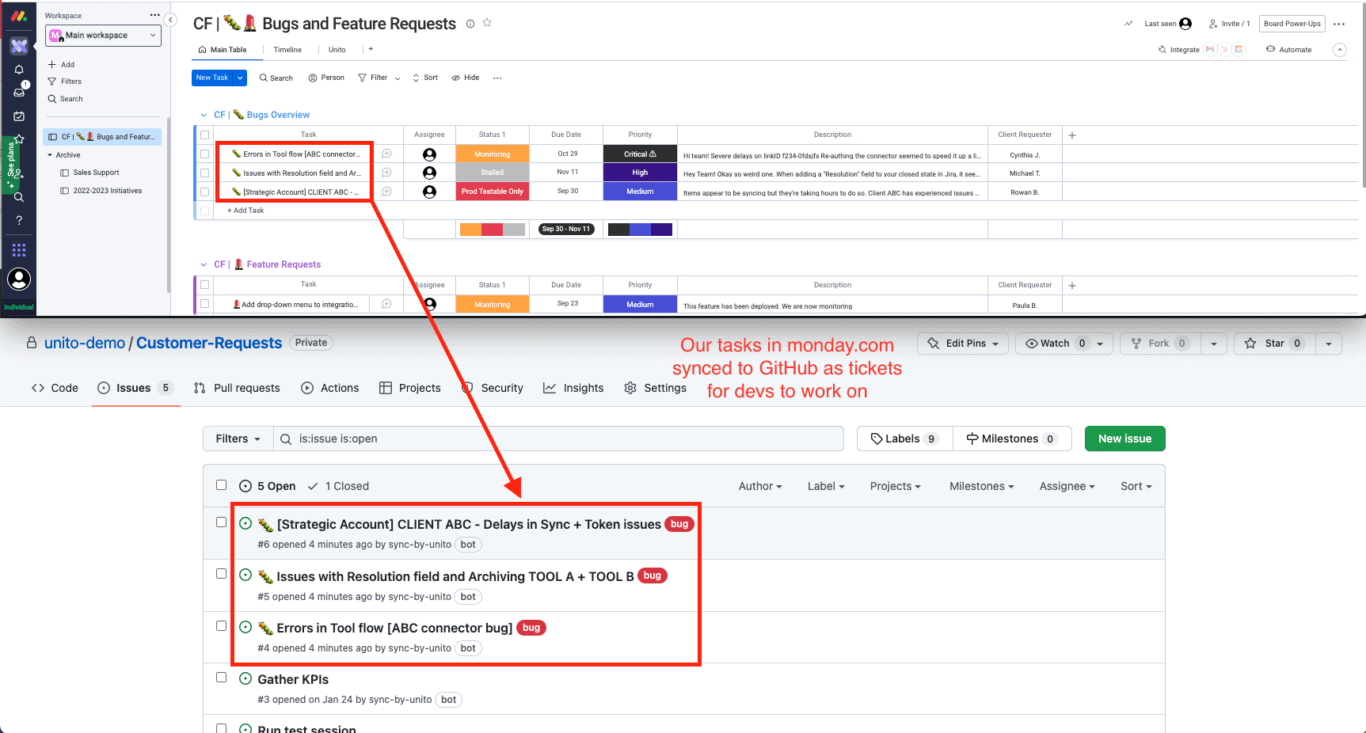
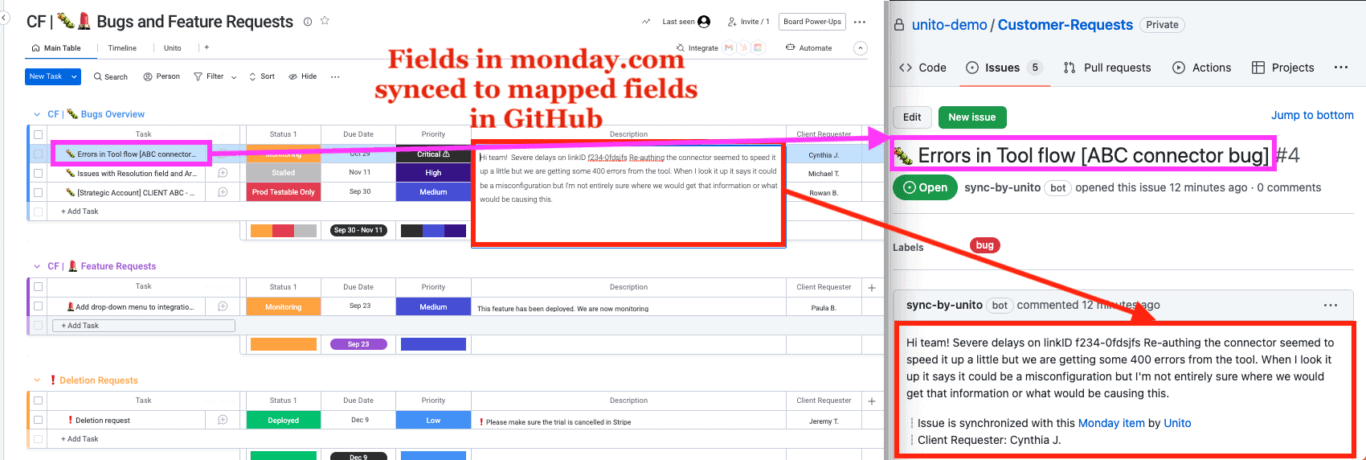
Here’s a screenshot from our fully synced monday.com board and GitHub repository:
Before you connect GitHub and monday.com to Unito:
Add Unito to your monday.com workspace
- Login to your monday.com account
- Then, select Board Power-Ups > Apps Marketplace
- Type Unito in the search field
- Click on the Unito app, then Add to your account
- Now, hit Install, verify your workspace and board and Add Feature
- Authorize monday.com then Authorize again (the first button authorizes monday.com in Unito, while the second authorizes Unito in monday.com)
- Click Got it.
Step 1. Connect GitHub and monday.com to Unito
- Continue from monday.com or navigate to the Unito App and select +Create Flow.
- Select Start Here to connect your monday.com board and GitHub.
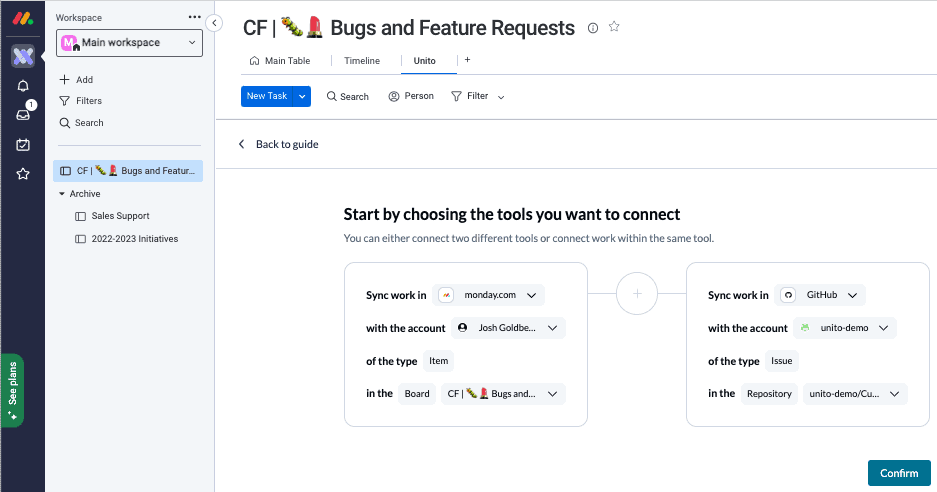
- Select +Add a tool to this flow in either column, then +Choose account to specify the GitHub repo and monday.com board you plan on syncing. The order in which you connect your tools doesn’t matter.
- Click Confirm.
Connecting GitHub to Unito for the first time
If this is your first time connecting GitHub to Unito, you’ll need a GitHub admin or organization owner to complete a few extra steps to choose which GitHub organization(s) you wish to sync issues from.
Click to expand for GitHub setup instructions

- First, you’ll be prompted to select an organization or your personal GitHub account. Chooes the organization you plan on syncing.
- On the next screen, you can choose to sync issues from specific repos within that organization, or issues from all repos. Choose whichever option you prefer.

If you can’t complete this process for any reason, don’t hesitate to reach out to our live support team.
When you’re ready, select Confirm.
Step 2. Set a flow direction for issue or item creation
Flow direction determines which of your tools will create new tasks or issues in the other. If you’re following our demo’s use case, select the arrow that points from monday.com to GitHub.
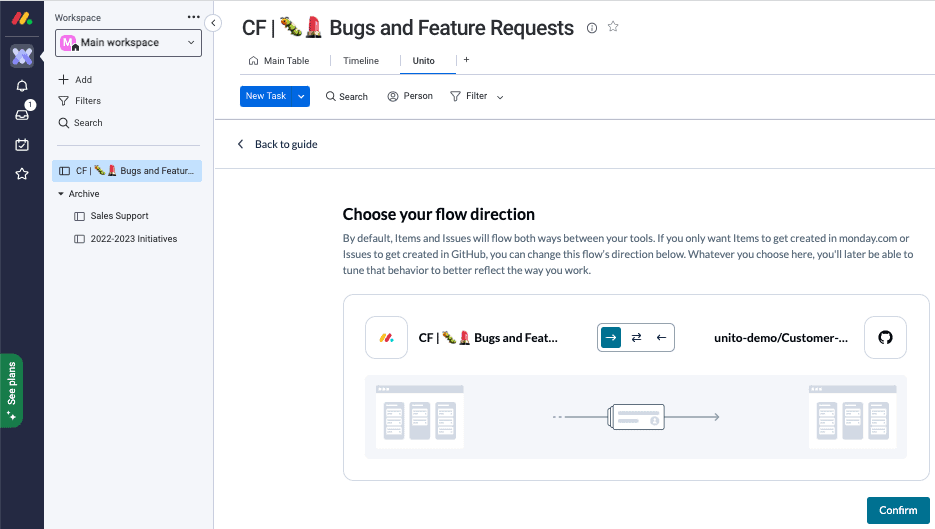
If we had chosen a two-way sync, new GitHub issues would create tasks in monday.com, in addition to new tasks creating issues. As you’ll see in Step 4, we’ll later use a two-way flow for individual fields in our tasks and issues so that information between.
Select Confirm when you’ve chosen a flow direction.
Step 3: Set rules for how issues and items sync in Unito
This is where we can set up triggers to determine what actions taken in monday.com will cause new issues to appear in GitHub, or vice versa if you selected a two-way flow direction in the previous step.
Select Add a new trigger to begin setting your rules. There can be some variability here depending on your particular setup in each tool.
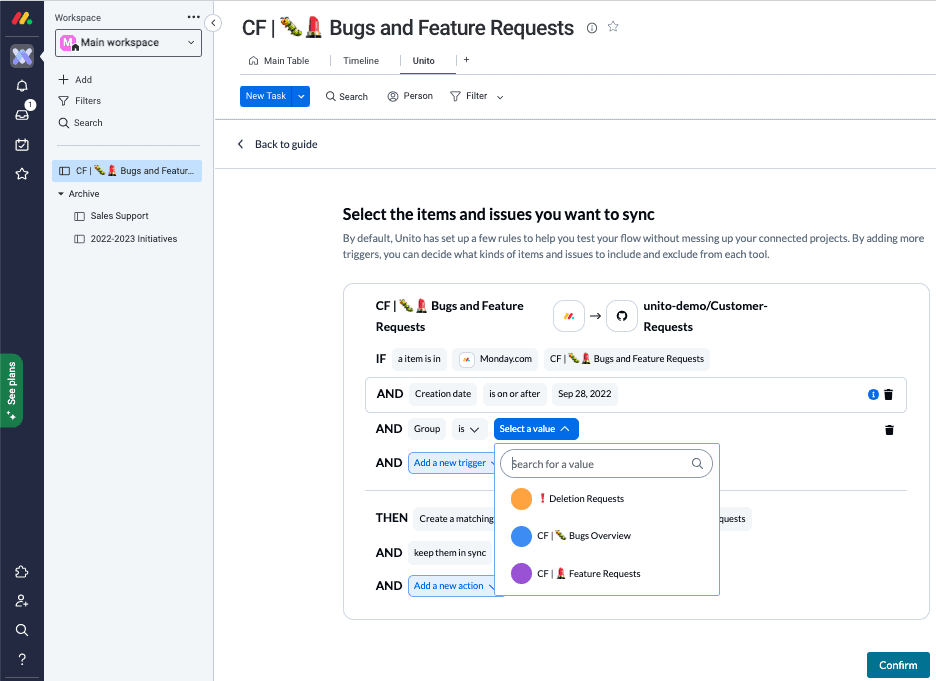
In the above example, we’ve told Unito to create GitHub issues based on monday.com tasks added to specific groups. In this case we can choose any or all of the groups above: Bugs Overview, Feature Requests, and Deletion Requests.
Below, you’ll see we’ve then told Unito to set a default label “bug” to any issue coming in from our Bugs Overview group in monday.com:

Find out more about setting rules.
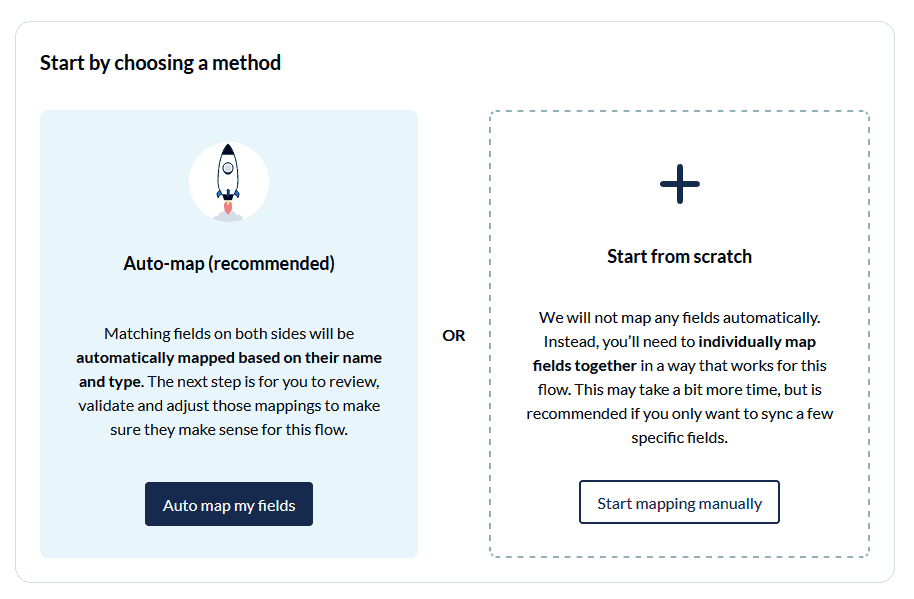
Step 4. Link fields between GitHub and monday.com
Fields represent the details of your GitHub issues and monday.com tasks. Text, single-select, priority, assignees, and emails are all examples of fields you can map with Unito.
First, you’ll be asked whether you want to set up field mappings from scratch or let Unito do this automatically. If you select the auto-map option, you can still change your mappings afterwards. If you prefer a DIY approach, you should start from scratch.
Select + Add mapping, then Select a field in both GitHub and monday.com to pair two fields together.
This is our basic set of field mappings synced between tasks and issues for the purposes of this demonstration:
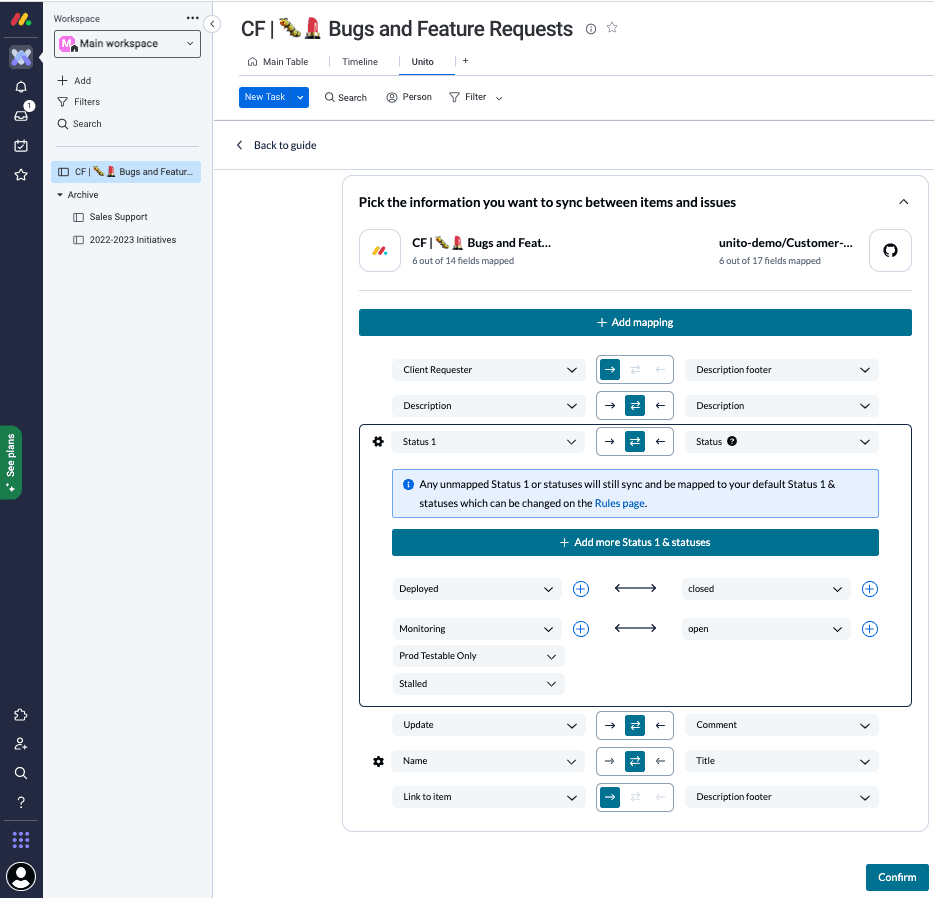
You can select the gear icon to modify the values of applicable fields. Above, we’ve told Unito that a GitHub issue should only be considered closed once the status changes to “deployed”. That way, our dev team will keep an eye on it until that point.
Learn more about field mappings and customization options for GitHub.
Click Confirm when you’re satisfied with your field mappings to proceed.
Step 5. Launch your monday.com GitHub integration
And that’s it! You’ve just completed a flow between monday.com and GitHub. Congratulations!
If you’ve followed the steps above, your flow will now:
- Create an issue in GitHub based on monday.com tasks labeled “Bug Reports” from our specified group and board.
- Enable technical and non-technical teams to collaborate between monday.com and GitHub with a view on ticket progress.
Here’s a closer look at a synced task and issue from our demo:
What’s next after a 2-way monday.com GitHub integration?
If you’re interested in seeing what else you can do with Unito, here are some articles to help you power up your workflows:
- You can duplicate this flow to also submit feature requests from monday.com simply by changing the “bug report” label in the rules section to “feature requests”.
- Automatically create follow-up tasks in monday.com from a Notion CRM.
- Sync Google Calendar events to your monday.com boards.
- Export monday.com data to Google Sheets
- Delegate tasks from monday.com to Asana, Trello, or HubSpot
- Sync Intercom conversations with monday.com tasks
- Having issues with your issues? Check out Unito’s Troubleshooting Guide for GitHub users.