How To Set Up a No-Code ServiceNow-Smartsheet Integration
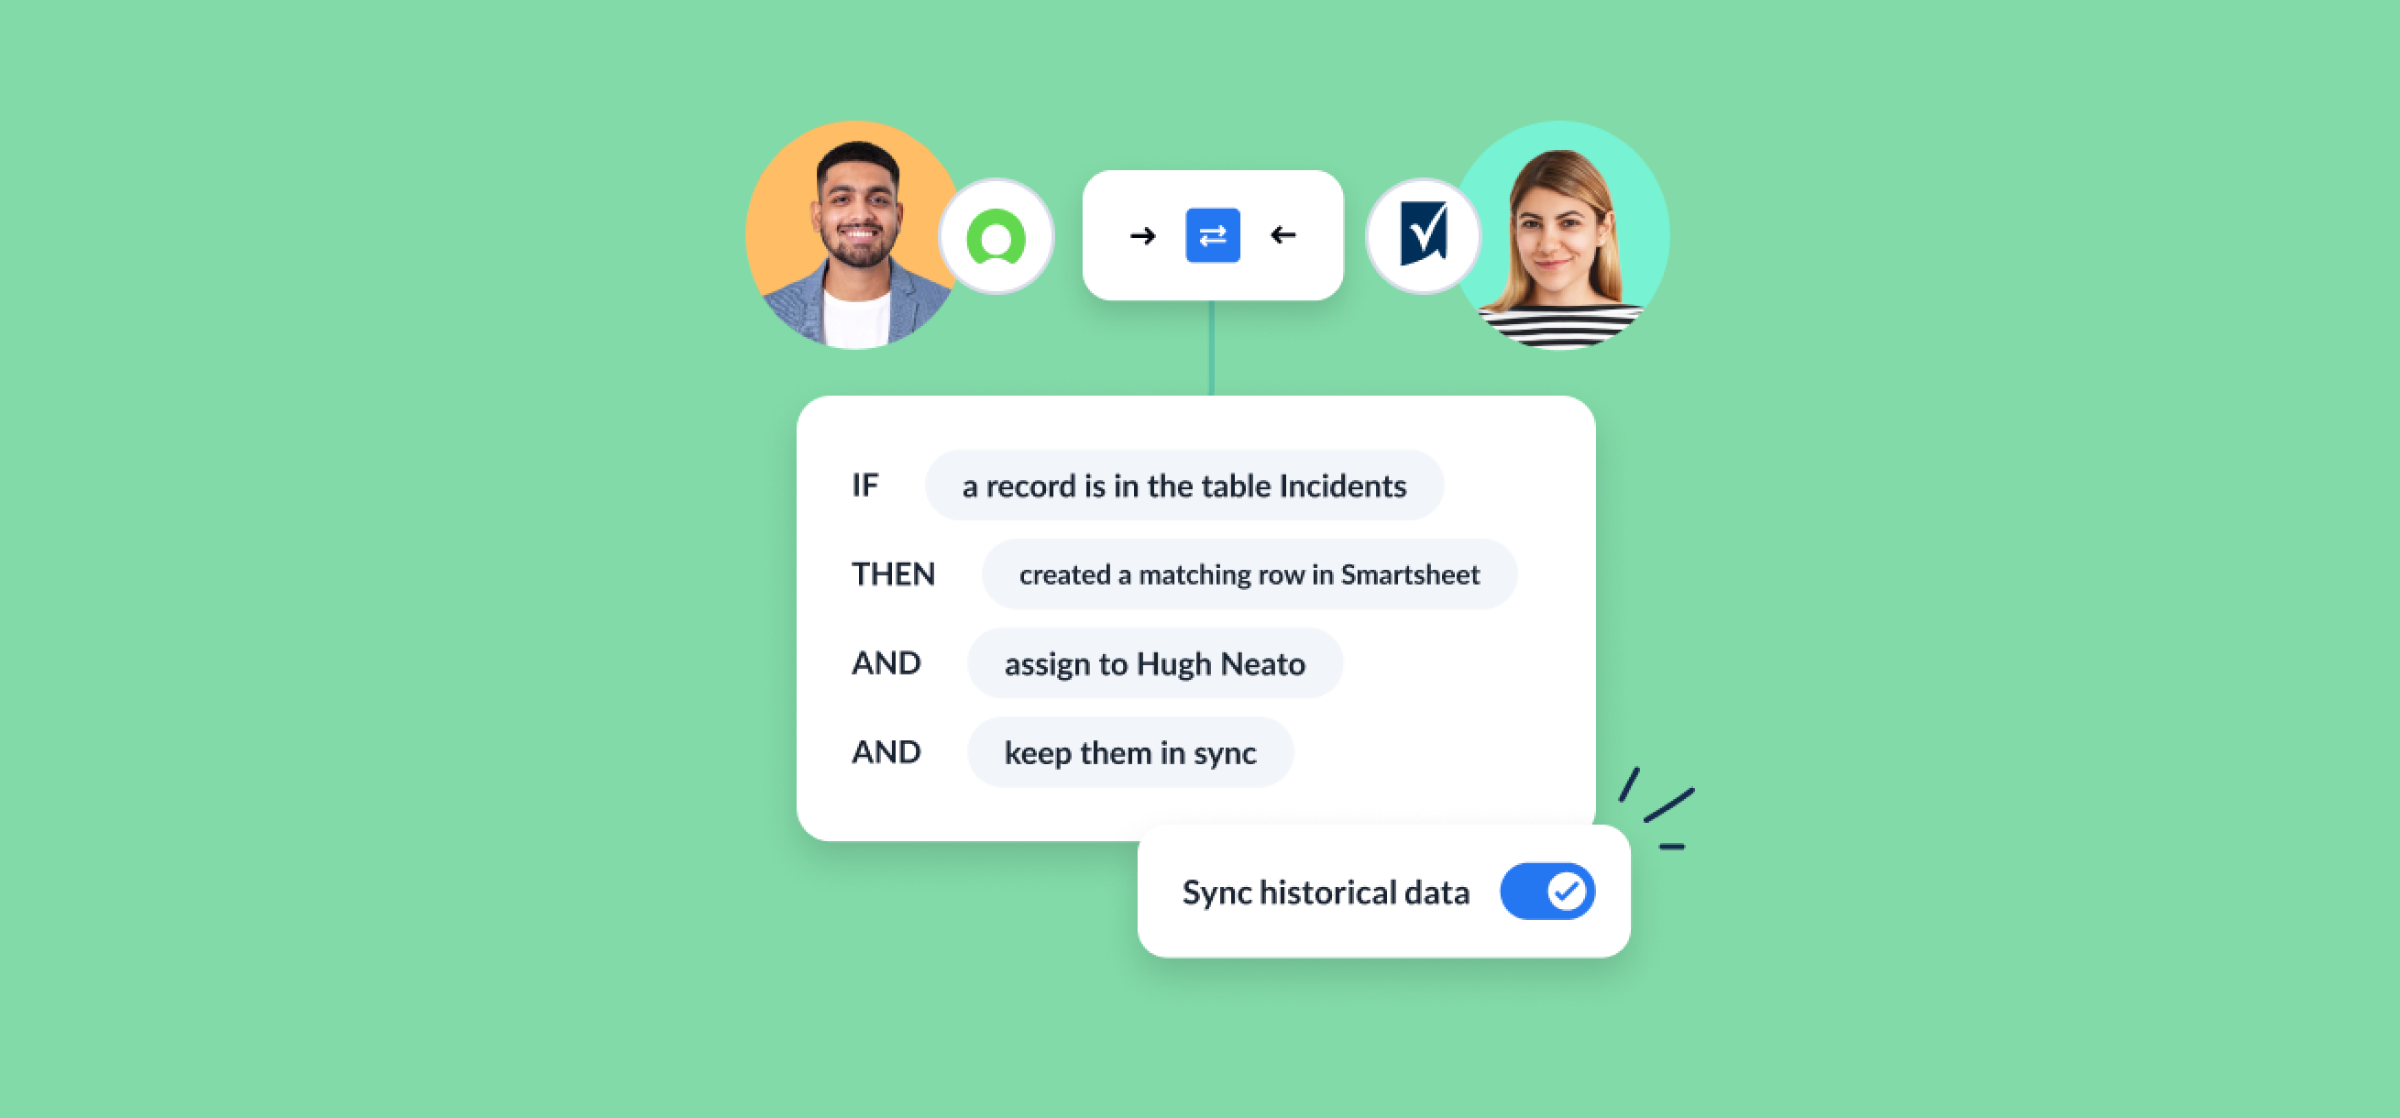
This tutorial will show you how to connect a ServiceNow instance to Smartsheet that works as effectively for one user as it does scaling for larger teams. The end goal here is to set up a no-code Unito flow that creates a new Smartsheet rows or tasks automatically whenever you add a new ServiceNow record and vice versa. So for an ITSM use case, any ServiceNow admin will be able to follow these steps to quickly dispatch assignments to a team in Smartsheet and share it with non-technical users outside the Now Platform.
Overview
- Tools: ServiceNow and Smartsheet
- Use cases: Ticket escalation, product management, task management, marketing reporting, account management
- Great for: Marketers, sales, customer success, RevOps
Unito’s two-way sync integration for ServiceNow and Smartsheet allows users of any technical background, from product managers to software developers and team leads, to sync ServiceNow records with Smartsheet rows and sheets. This integration syncs updates back and forth between both tools, creates new work items, and can even automate repetitive actions. This in-depth guide shows you how that’s done.
By the end of this ServiceNow Smartsheet integration guide, you’ll be able to:
- Create new Smartsheet rows automatically based on specific ServiceNow records.
- Create new ServiceNow records synced to Smartsheet rows.
- Update fields in real-time with 2-way sync whenever manual changes are made.
Setup in ServiceNow
In order to sync ServiceNow records, you must connect to Unito with a ServiceNow account that has CRUD rights (create, read, update and delete) for the records and tables you plan on syncing.
For example, if this is an ITSM use case, you’ll need an account with the ITIL role in ServiceNow. If you’re not an admin, you can ask your IT department’s ServiceNow admin to create a service account for you with the right permissions.
Connecting ServiceNow to Unito for the first time
You’ll need a ServiceNow admin to connect your account to Unito. From there, you’ll have two options: connecting by OAuth 2.0 or with your username and password. Here’s our guide to connecting by OAuth 2.0.
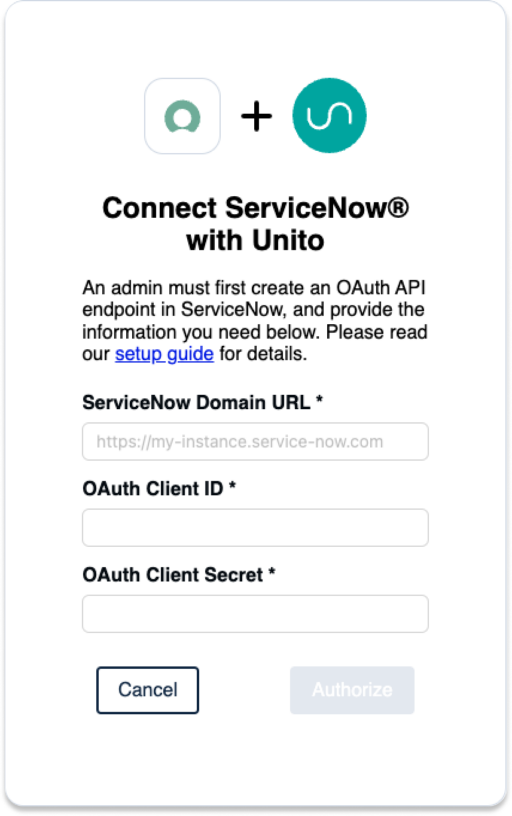
Make sure to have on-hand the following information:
- ServiceNow Domain URL: https://INSTANCENAME.service-now.com
- OAuth 2.0: An OAuth Client ID and Secret
- Username: Your ServiceNow username and password
Step 1. Connect ServiceNow and Smartsheet to Unito
- Sign up for Unito if you haven’t already!
- Navigate to the Unito App and select +Create Flow.
- Select Start Here to connect ServiceNow and Smartsheet.
- Then +Choose account for each tool and complete the authorization process.
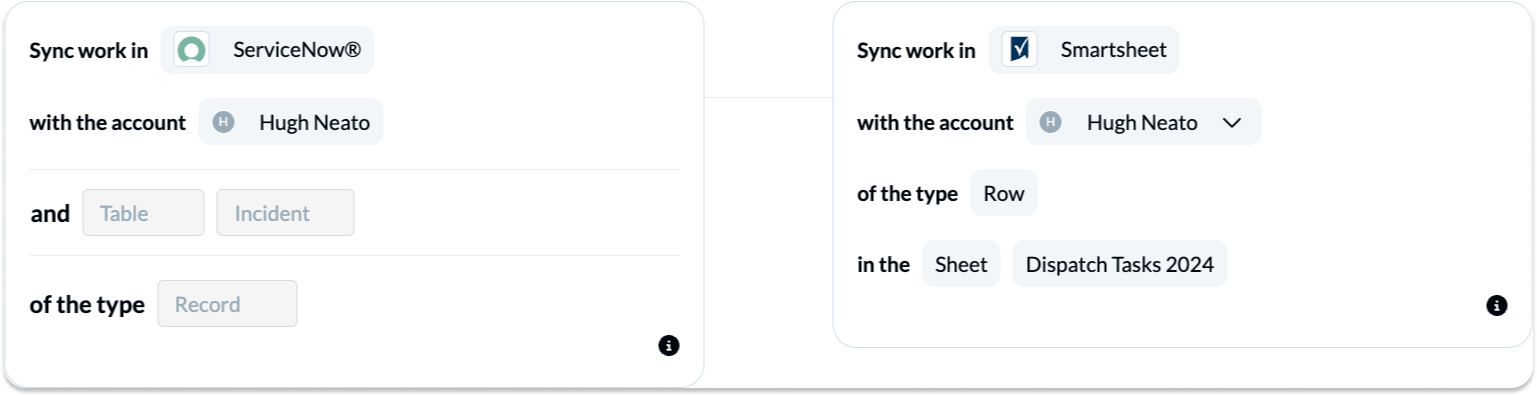
- Select a specific type of ServiceNow record to include in your flow.
- Click Confirm.
When you’re ready, click Confirm.
Here’s more information about connecting tools to Unito for the first time.
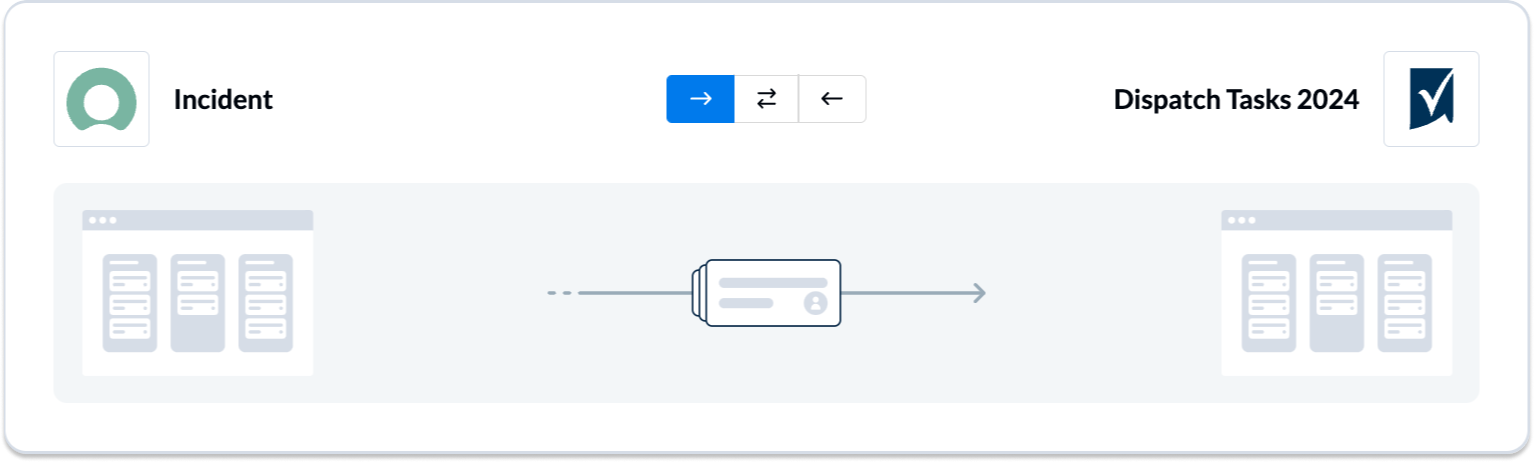
Step 2. Choose a flow direction for new records and rows
When you add new ServiceNow records or Smartsheet rows to your projects, Unito creates synced versions of those rows or records in your other connected tool automatically. Flow direction tells Unito where to do that: in Smartsheet, ServiceNow or both.
Here’s more information about flow directions in Unito.
Step 3. Set rules to sync specific Smartsheet rows and ServiceNow records
Next, we’ll apply a few rules to set conditions for which Smartsheet rows or ServiceNow records will sync with Unito. This is useful if you don’t need every row to become a record or vice versa.
Select Add a new rule and to set the conditions related to your fields (including custom fields!):
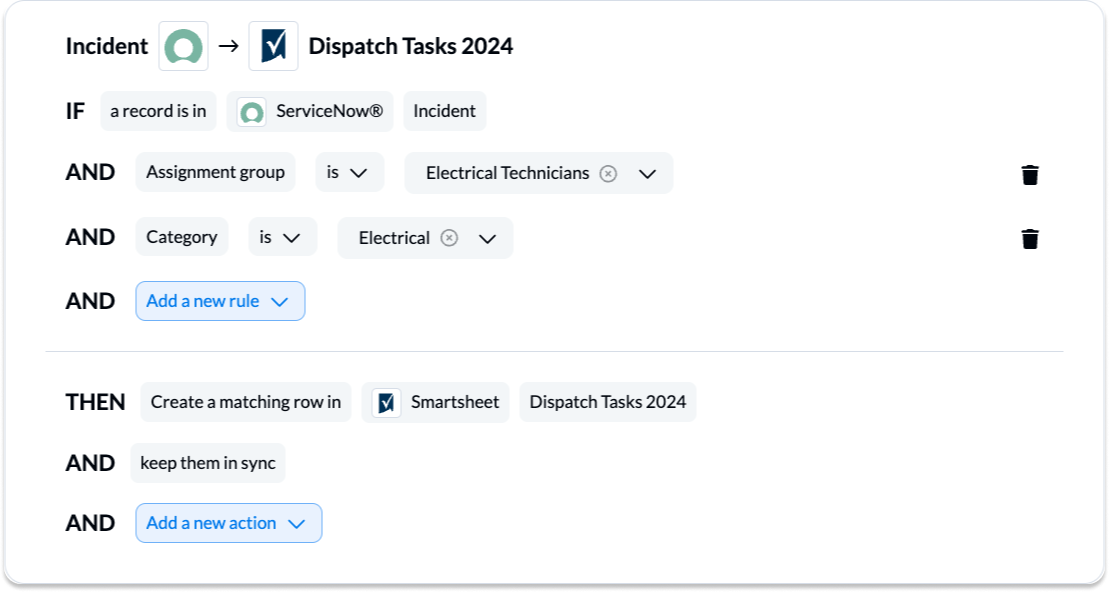
Find out more about setting rules. Here’s information about Unito’s default rules.

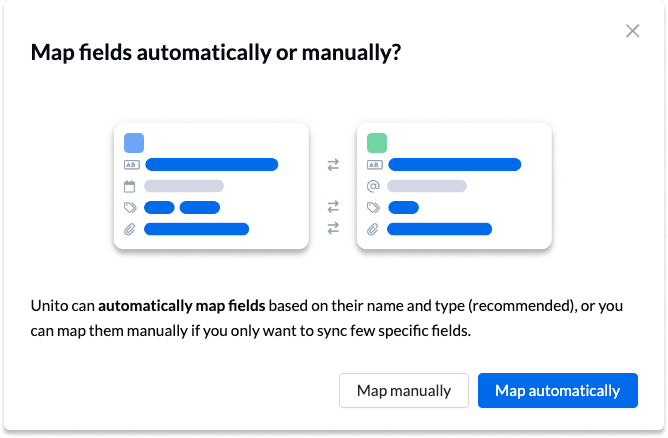
Step 4. Link fields between ServiceNow and Smartsheet
Next, you can set individual relationships between fields in ServiceNow and Smartsheet. Most fields can be assigned their own sync direction which determines how real-time updates occur.
But first, you can select Map automatically to begin your field mapping table with a prebuilt template.
How to add field mappings in Unito
- Click + Add mapping to add new pairs of fields.
- Then, Select a field for each tool, and find the appropriate field to map.
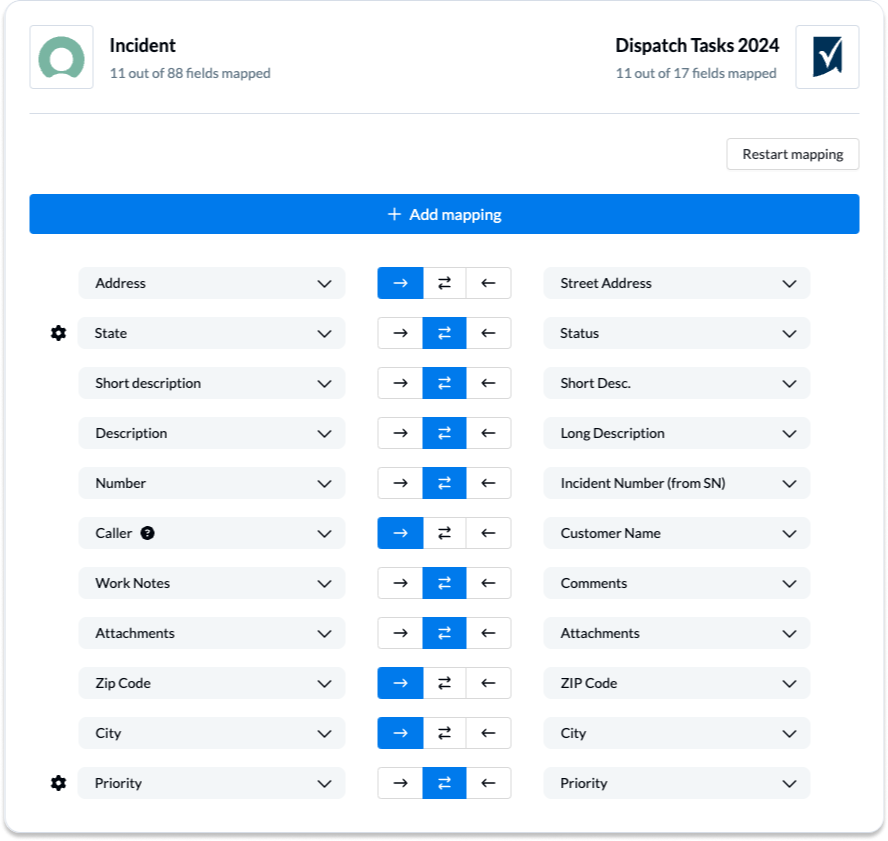
Most fields are automatically mapped for two-way updates, but you can adjust them as needed. With a one-way sync between fields, only the destination field will update automatically when you make changes in the source field.
Configuring field mappings
Selecting the gear icon beside a field will allow you to configure the values or statuses within those fields to further customize your flow.
NOTE: If you’re syncing statuses, be sure to add every relevant status option for your Smartsheet row and ServiceNow records. Here’s an overview of status syncing in Unito.

You can find general information about field mappings here.
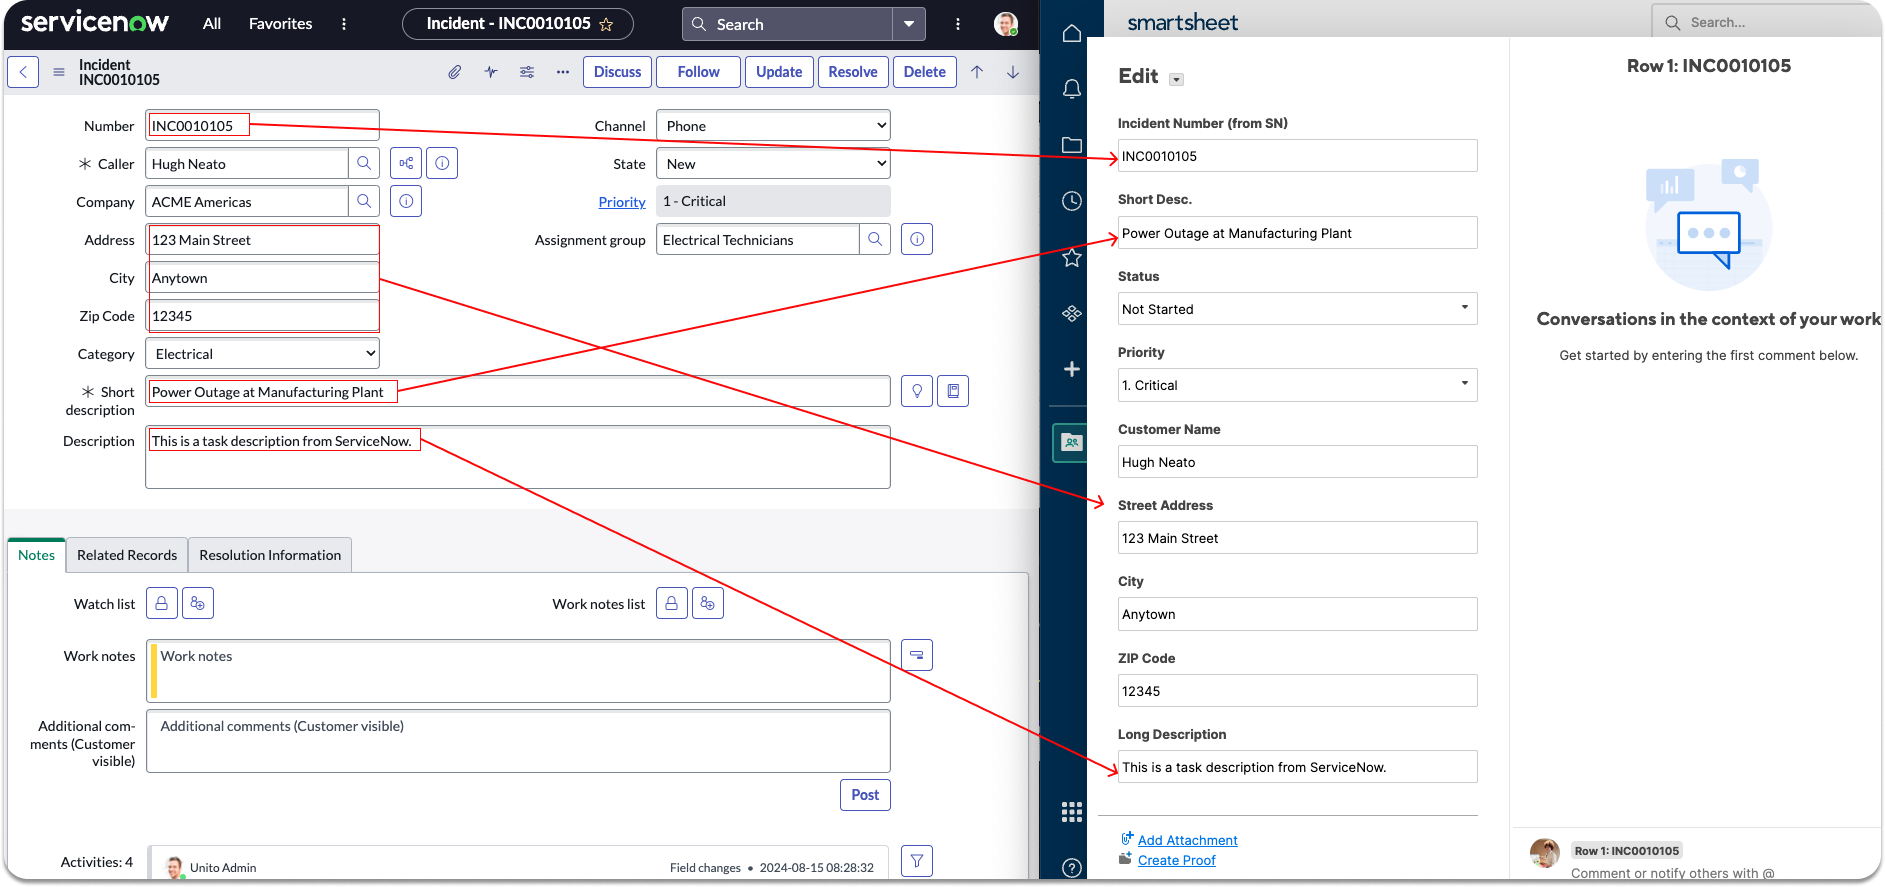
Launch your ServiceNow Smartsheet integration
And that’s it! You’ve just completed a flow between Smartsheet and ServiceNow. Congratulations!
If you’ve followed the steps above, your flow will now:
- Create a ServiceNow record automatically for every Smartsheet row in your specified sheet.
- Create a sheet row for every ServiceNow incident or record.
- Allow teams to collaborate between both tools without needing to leave their preferred interface, copy-paste data manually, or request information from the other team about these projects.
If you have any questions, don’t hesitate to reach out and let us know. Our live support team is ready to jump in and lend a hand to make sure your flows always function as intended.
Ready to optimize your support workflow?
Meet with our team to see what Unito can do for your workflows.
FAQ: ServiceNow-Smartsheet integration
How long does it take to set up a ServiceNow-Smartsheet integration?
Depending on the integration solution you choose, setting up a ServiceNow-Smartsheet integration can take anything from minutes to months. Unito’s integration, for example, typically takes just a few hours to set up.
What data can I sync between ServiceNow and Smartsheet?
Most integrations can create new work items in both ServiceNow and Smartsheet and, at the very least, offer users in one tool a look at the work items in the other. Integrations that support two-way syncing, however, can go much further. These integrations can sync most (if not all) fields in ServiceNow and Smartsheet, keeping everything in sync in real-time.
Do I need technical resources to maintain an integration between ServiceNow and Smartsheet?
Most integrations between ServiceNow and Smartsheet don’t require a significant amount of technical resources to maintain. Some automation platforms, however, can require these resources as simple automations are chained to replicate the functionality of more robust integration solutions.
Are ServiceNow-Smartsheet integrations secure?
Yes! Most ServiceNow-Smartsheet integrations use rigid security protocols to keep data secure as it’s synced across both tools. Unito, for example, is SOC 2 Type 2 certified, and complies with both GDPR and CCPA.
What’s next after syncing ServiceNow Smartsheet with Unito’s automated integration?
- If you’d like to see this flow in action, we encourage you to read this case study about a Smartsheet user who synced with Unito.
- Quickly duplicate this flow and tailor this connector workflow according to your use case.
- Read an overview of Unito’s ServiceNow integration
- How does Unito stack up against ServiceNow Integration Hub?
- How to run a ServiceNow export to Microsoft Excel.
- Or if you found this guide useful, you can find similar articles on syncing:
Unito can sync ServiceNow or Smartsheet to any of our 50+ connectors, but our team of product specialists can’t always keep up with the demand for demos! If you’d like to see a specific guide or video demo for your use case, don’t hesitate to reach out and let us know.