
How To Integrate ServiceNow and Wrike With Two-Way Updates
Here’s everything you need to know about setting up an integration to sync ServiceNow records with Wrike tasks using an automated 2-way sync from Unito. Since Unito is a no-code, completely customizable platform, you don’t need any IT resources to deploy your first integration. No troubleshooting scripts or hiring third-party consultants, either.
Overview
- Tools: ServiceNow and Wrike
- Use cases: Ticket escalation, product management, task management, marketing reporting, account management
- Great for: Marketers, sales, customer success, RevOps
Unito’s two-way sync integration for ServiceNow and Wrike allows users of any technical background, from product managers to software developers and team leads, to sync ServiceNow records with Wrike tasks. This integration syncs updates back and forth between both tools, creates new work items, and can even automate repetitive actions. This in-depth guide shows you how that’s done.
By the end of this guide, your ServiceNow-Wrike integration will:
- Create new Wrike tasks automatically based on ServiceNow records.
- Create new ServiceNow records synced with Wrike tasks.
- Update fields in real-time with a two-way sync whenever you update anything in both tools.
Before you sync
You need to connect a ServiceNow account with CRUD rights (create, read, update, and delete) for the records and tables you plan on syncing to Unito. If you’re not sure how to do this, contact your ServiceNow admin for guidance.
Connecting ServiceNow to Unito for the first time
A ServiceNow admin will need to set up the initial connection between Unito and your ServiceNow account. From there, you can either connect using OAuth 2.0 or sign in with a username and password.
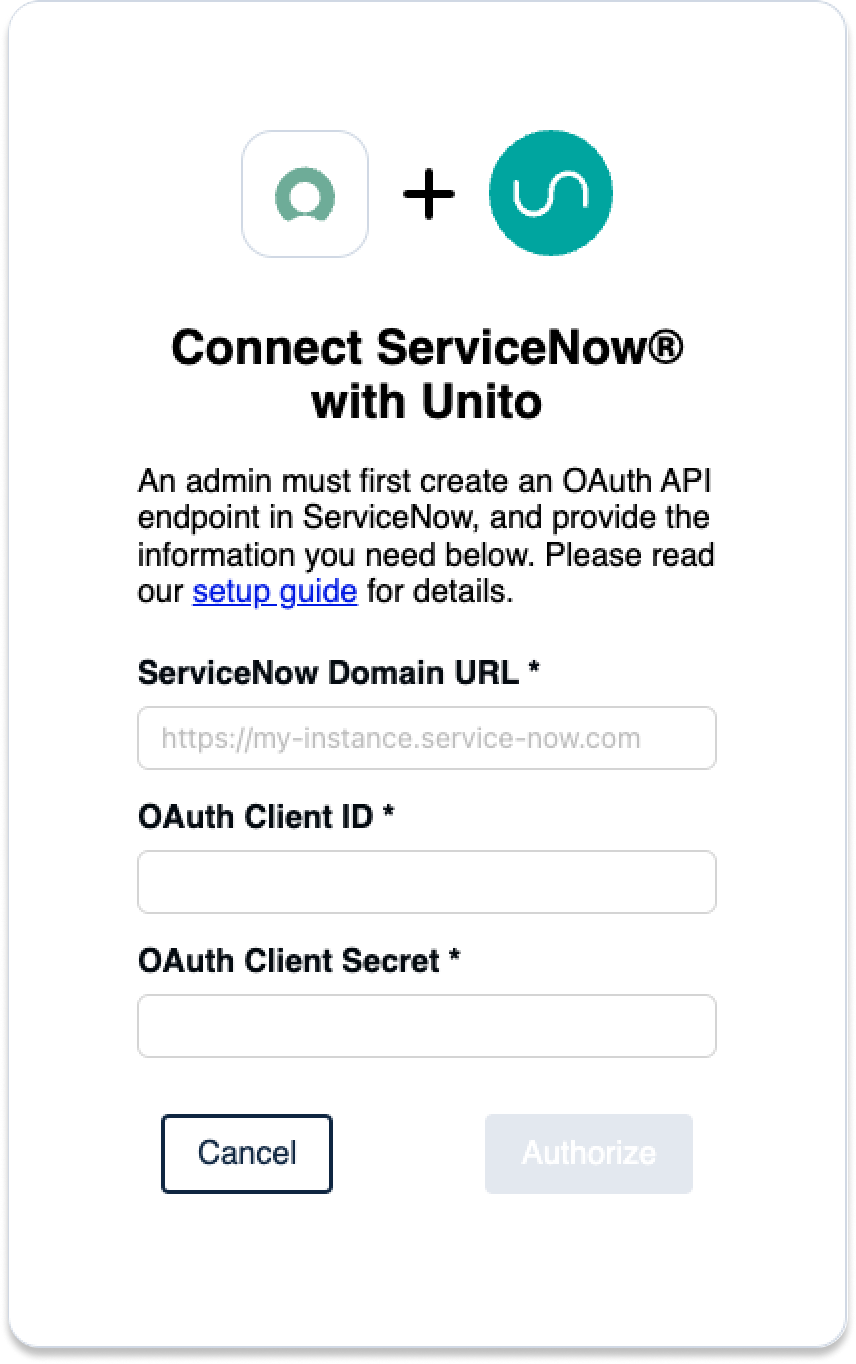
Make sure you have the following information on hand to connect your account:
- ServiceNow Domain URL: https://INSTANCENAME.service-now.com
- OAuth 2.0: An OAuth Client ID and Secret
- Username: Your ServiceNow username and password
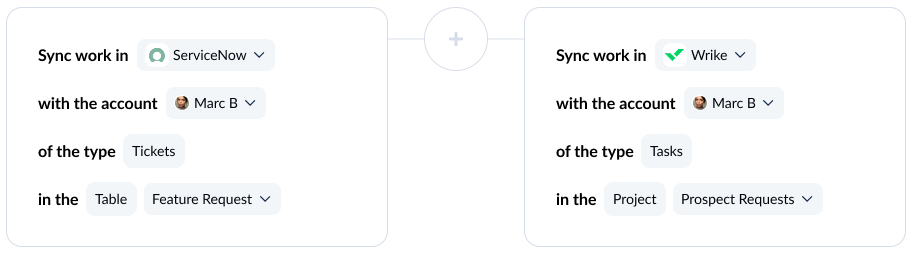
Step 1. Connect ServiceNow and Wrike to Unito
- Sign up for Unito.
- Click +Create Flow in the Unito App.
- Click Start Here to connect ServiceNow and Wrike.
- Click +Choose account for each tool and complete the authorization process.
- Choose the type of ServiceNow record you want to include in your flow.
- Unito supports all record types, including requests and incidents.
- Click Confirm.
First time connecting tools to Unito? Check out our in-depth guide.
Step 2. Choose flow direction
With flow direction, you determine where Unito automatically creates work items to match the records you create manually in ServiceNow or the tasks you open in Wrike. You have three flow direction options:
- 2-way: Both ServiceNow records and Wrike tasks are automatically created by your Unito flow to match the items you create manually in each tool.
- 1-way from ServiceNow to Wrike: Wrike tasks will be automatically created by Unito to match ServiceNow records you create manually. Unito won’t create new ServiceNow records.
- 1-way from Wrike to ServiceNow: ServiceNow records will be automatically created by Unito to match Wrike tasks you create manually. Unito won’t create new Wrike tasks.

Here’s a more detailed guide to how flow direction works in Unito.
Step 3. Build rules to sync specific work items
With Unito rules, you can customize your flows so that only some work items are synced between ServiceNow and Wrike. For example, you could decide to filter out ServiceNow records from certain categories or Wrike tasks with a specific assignee.
Rules also allow you to automatically push work items to specific sections, assign the right people to them, and more.
Start building your rule by clicking Add a new rule, then choose a trigger and an action for it.
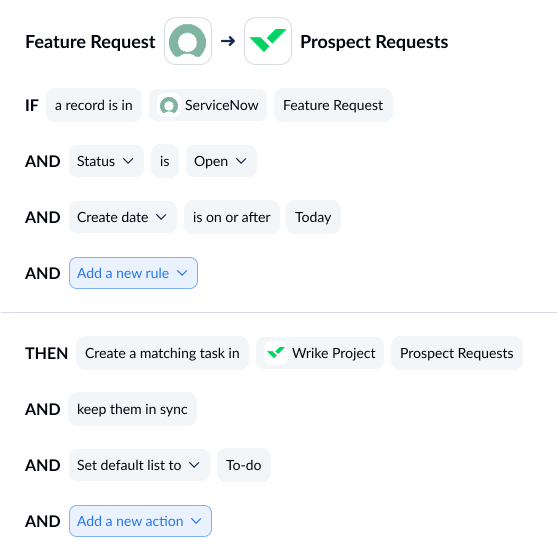
You can learn more about setting rules here.

Step 4. Map fields between ServiceNow and Wrike
By mapping fields, you tell Unito exactly where data from ServiceNow should land in Wrike, and vice versa. Unito can typically map most fields automatically, whether they have the same name (Assignee→Assignee) or not (Assignee→Owner). But if you want a bit more control over your flow, you can map your fields manually.
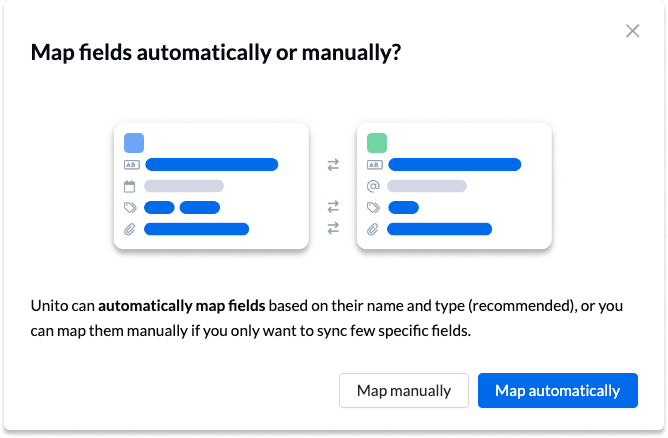
When you map your fields automatically, you’ll see this screen.
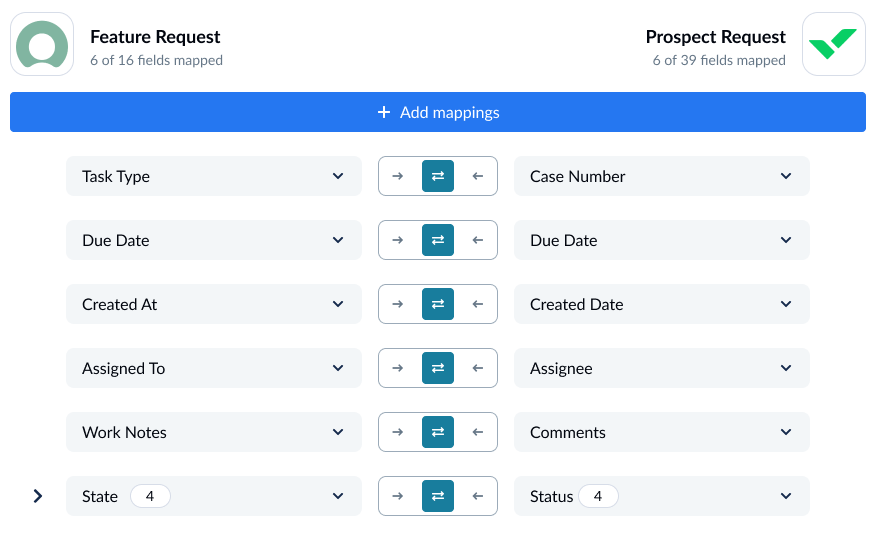
From here, you can add any other fields you want to sync by clicking +Add mapping then Select a field. Unito will automatically recommend compatible fields in a drop-down menu.
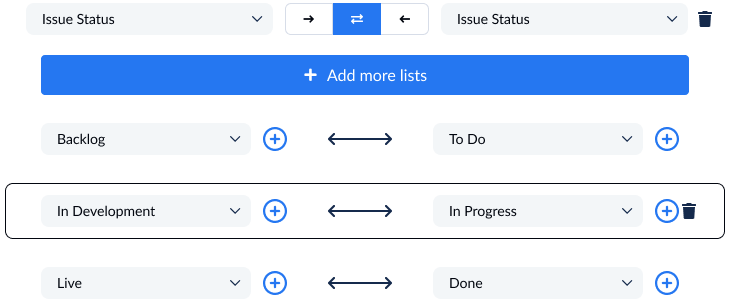
Some fields also have a cog icon, meaning you can customize them even further. For example, a Status field can be customized so its options match the specific options in another field.
Step 5. Launch your ServiceNow-Wrike integration
That’s it! You’re ready to launch your flow. Unito will automatically keep ServiceNow records and Wrike tasks in sync. From there, your teams can collaborate more closely without any extra manual work or switching back and forth between tools.
Ready to optimize your support workflows?
Meet with our team to see what Unito can do for your workflows.
FAQ: ServiceNow-Wrike integration
Why should I integrate ServiceNow with Wrike?
Syncing ServiceNow records with Wrike tasks allows your teams to work more effectively together without constantly switching back and forth between tools. This allows:
- Customer-facing teams that identify trends based on tickets from customers can share these trends with teams working in Wrike.
- Teams working in Wrike can sync updates to ServiceNow so customer-facing teams have up-to-date context on organization-wide work.
- Improving collaboration between customer-facing teams in ServiceNow and other teams in Wrike.
What workflows does Unito’s ServiceNow-Wrike integration support?
Unito’s ServiceNow-Wrike integration can support a number of workflows, including:
- Ticket escalation
- Software development
- Project management
- AI agent integration
- Time tracking and billing
- Record syncing
What are the benefits of Unito’s 2-way ServiceNow-Wrike integration?
- Improved communication: Customer-facing teams are better aligned with the rest of the organization, with real-time visibility into project progress.
- Increased efficiency: Automated task creation eliminates manual processes, reducing errors and saving time.
- Enhanced collaboration: Both teams can work in their preferred tools while ensuring seamless communication and collaboration.
Does Wrike offer any built-in integrations?
Wrike Sync is a built-in two-way sync solution, powered by Unito, which allows you to integrate Wrike with many other tools, including ServiceNow.
What’s next after integrating ServiceNow and Wrike?
Need to integrate ServiceNow or Wrike with other tools in your stack? Check out our other guides: