How To Import Asana to Clickup (2 Methods)
Migrating from Asana to ClickUp? Maybe you have two teams working in separate tools and you need to bring specific project information from one to the other? Let’s explore two methods for doing this.
First method: using ClickUp’s built-in importer
ClickUp has a built-in importing tool that can be used to pull tasks from Asana to your ClickUp lists. With this method, you’ll usually be able to kickstart your import within 10 minutes, and the full importing process can take up to a few hours. The exact time it takes to do this will vary, depending on how much data you’re importing.
Here’s how this method works.
Step 1: Prepare your ClickUp workspace
Before you start importing your Asana data into ClickUp, you need to make sure your ClickUp workspace is properly set up. That means you need to create ClickUp lists to match the Asana projects you’re importing data from. You might also want to create ClickUp spaces to group up the lists you’ll be importing data into.
Step 2: Prepare your Asana tasks
Now that you’ve set things up on the ClickUp side, it’s time to do the same in Asana. Here’s what you’ll need to do:
- Make sure all Asana tasks are in a project. Freestanding tasks can’t be imported with this method.
- Move nested subtasks (i.e. subtasks within subtasks) to parent tasks, otherwise they won’t be imported.
- Add notes to tasks that need to be in multiple projects so you can manually add them to relevant projects in ClickUp.
- Add notes to any recurring tasks so you can add recurring due dates after they’re imported.
- Add notes to private tasks so they can be made private once imported in ClickUp.
Step 3: Start the import
After preparing everything for your impending transfer, go kickstart the import in ClickUp:
- Click on your Workspace avatar and click Settings.
- Click Import/Export.
- Click Asana.
- In Asana, give ClickUp authorization to import your tasks.
- Choose the Asana workspace you want to import data from.
- Choose the projects and tasks you want to import.
- Map Asana sections with ClickUp statuses or lists.
- Map Asana users to ClickUp users.
- Customize your import, choosing if custom fields will be imported, milestones will be imported as tasks, and more.
Limitations of this method
One advantage of this method? It’s built right into ClickUp and it’s available with all ClickUp plans. But that doesn’t mean it’s the best option for every organization. Here’s why:
- Lots of manual work involved: Not only does the import itself need to be triggered manually, but you need to manually prepare Asana tasks before they’re imported. You’ll also need to structure your ClickUp workspace to match the structure in Asana.
- Cleanup work needed: Even if you carefully prepare both Asana and ClickUp for your imports, you’ll have to dedicate time to cleaning up your ClickUp workspace. That includes setting up recurring tasks or adding @ mentions manually.
- No updates: Once you trigger your import and move your data over, that’s it. There’s no built-in way to handle updates after your migration date. Any additional work happening in Asana has to be manually exported to ClickUp.
- Limited tool support: This method is great for importing data from Asana and a few other tools into ClickUp, like Jira, Notion, Slack, and Wrike. But with only 12 tools supported, you’ll need other integration options for the rest of your stack.
So how about trying a different method?
Second method: using Unito’s Asana-ClickUp integration
Unito is an integration platform with native 2-way syncing for some of the most powerful SaaS tools on the market, like ClickUp, Asana, Jira, ServiceNow, and Wrike. Its no-code interface makes it easy to build your first flow without sacrificing the depth and functionality you need.
Here’s why Unito is the best way to import Asana data into ClickUp:
- No manual work: Most Unito users set up their first flow in 12 minutes or less. From there, everything is imported automatically.
- No cleanup: Unito automatically maps fields in Asana to ClickUp and syncs subtasks without any extra work on your part.
- Automated updates: Once your Unito flow is set up, it will automatically update ClickUp tasks based on work happening in Asana, allowing you to migrate at your pace.
- More tool support: Unito supports over 60 tools, meaning it’s your one-stop-shop for importing data from any tool in your stack.
Want to see Unito’s integrations in action? Watch this video tutorial, where a Unito product expert integrates ClickUp and monday.com.
Here’s a step-by-step guide to connecting Asana and ClickUp for your import.
Step 1: Connect your tools
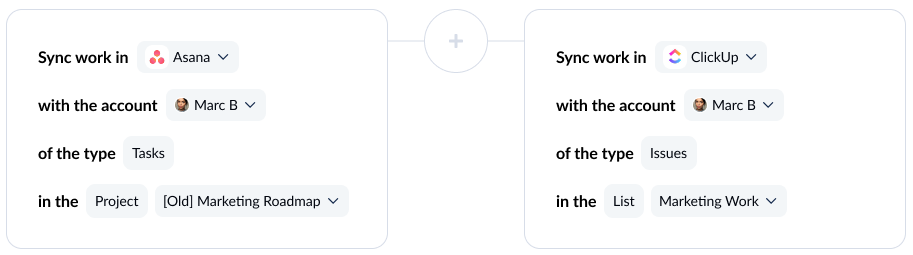
First, connect your tools. In this case, you’ll be connecting an Asana project to a ClickUp list.
Step 2: Pick flow direction
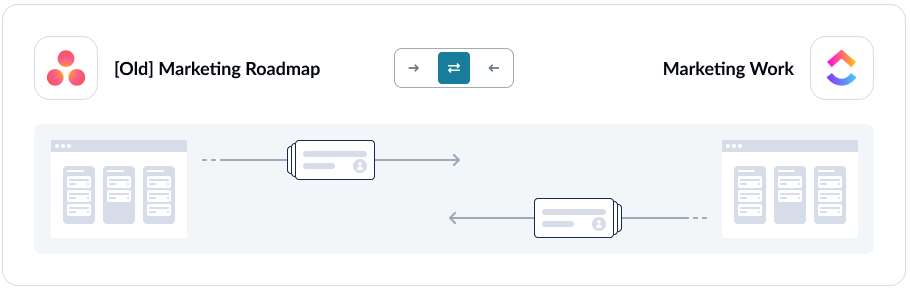
Flow direction determines where Unito creates new work items. In most flows, you’ll want a 2-way flow, but if you’re just importing data from Asana to ClickUp (or doing a full migration), then you’ll want a 1-way flow, here.
Step 3: Build rules
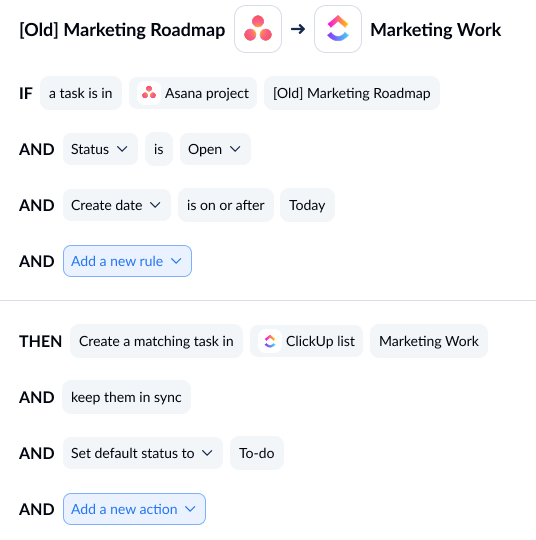
If you don’t want your entire Asana projects to be imported into ClickUp, you can use Unito rules to filter out Asana tasks that meet certain characteristics, like having a specific label or assignee.
Step 4: Map your fields

Unito supports most fields, including custom fields, so you don’t lose any data. You can have Unito map these automatically or fine-tune them yourself.
And that’s it! Your flow’s ready to launch. All Asana data will be imported into ClickUp and kept up to date automatically as you transition from one tool to the other.
Ready to see what Unito can do?
See how Digital Divide used Unito to migrate years of work from ClickUp to Asana.