How to Securely Sync ServiceNow Incidents with Google Sheets
This guide will show you how to connect a ServiceNow instance to Google Sheets so you can sync records and spreadsheet rows with a no-code, yet fully configurable workflow. In this tutorial, we’ll demonstrate an ITSM use case with Unito’s 2-way integration. So any ServiceNow admin will be able to follow these steps to quickly sync incident data to a spreadsheet and share it with non-technical users outside the ServiceNow ecosystem.
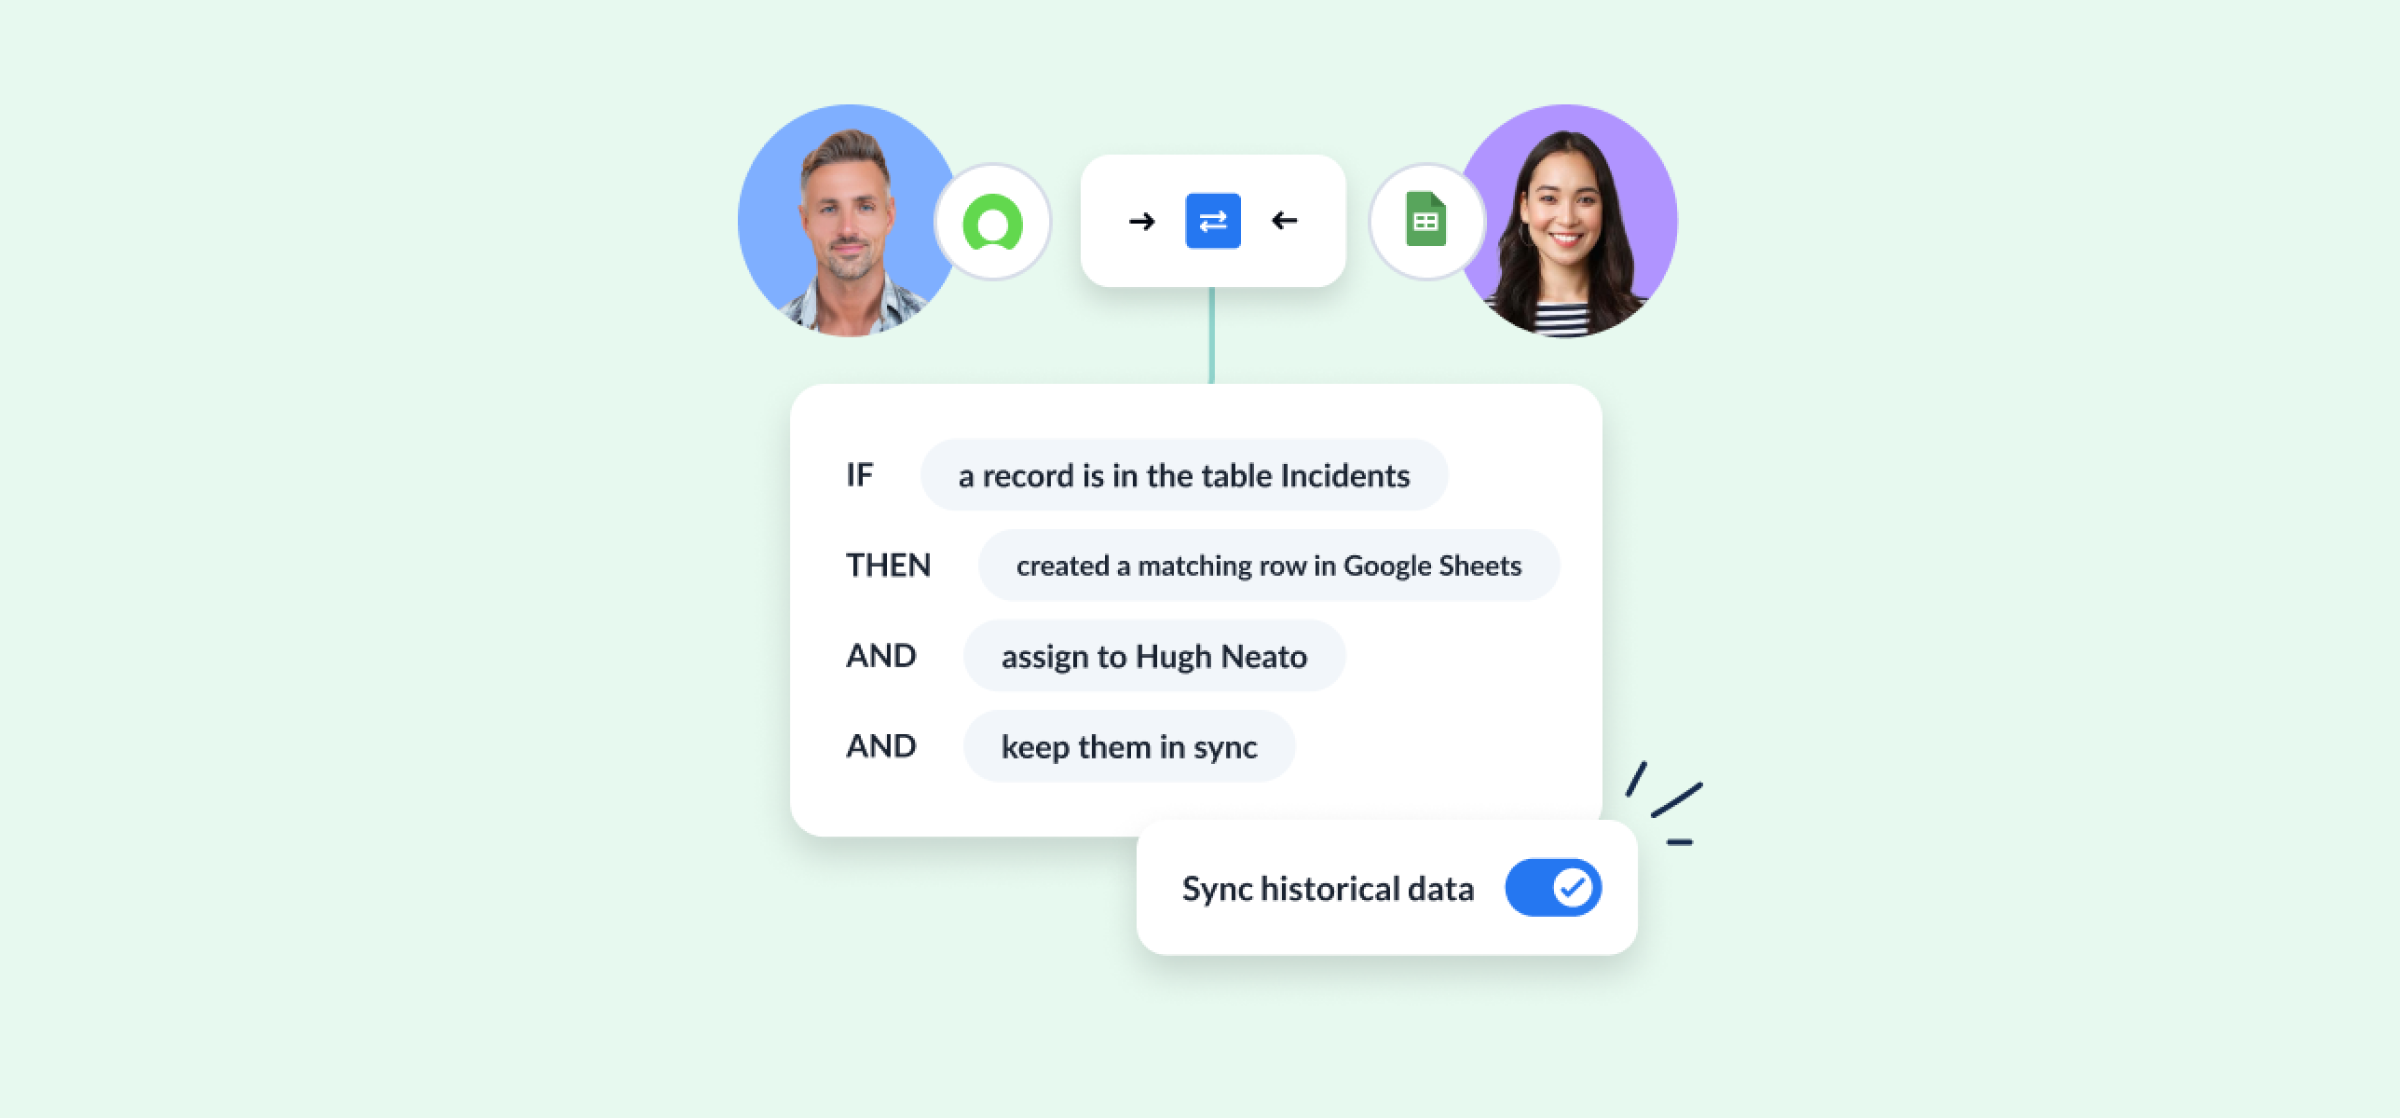
Here’s how it works:
In this guide:
- Tools: Google Sheets and ServiceNow
- Use cases: Ticket escalation, task management, project reporting, data migration, account management, project management
- Great for: Project managers, product managers, customer success, data analysts, stakeholders and executives

Setup in ServiceNow
In order to sync ServiceNow records, you must connect to Unito with a ServiceNow account that has CRUD rights (create, read, update and delete) for the records and tables you plan on syncing.
For example, if this is an ITSM use case, you’ll need an account with the ITIL role in ServiceNow. If you’re not an admin, you can ask your IT department’s ServiceNow admin to create a service account for you with the right permissions.
Connecting ServiceNow to Unito for the first time
You’ll need a ServiceNow admin to connect your account to Unito. From there, you’ll have two options: connecting by OAuth 2.0 or with your username and password. Here’s our guide to connecting by OAuth 2.0.
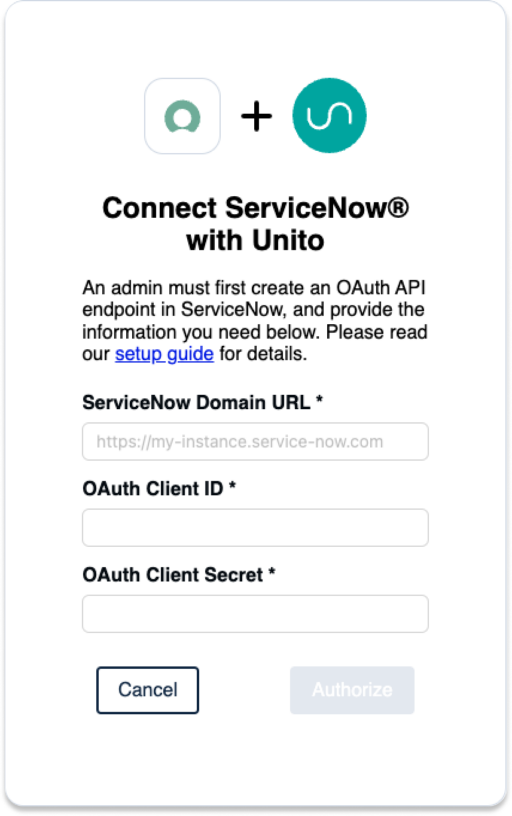
Make sure to have on-hand the following information:
- ServiceNow Domain URL: https://INSTANCENAME.service-now.com
- OAuth 2.0: An OAuth Client ID and Secret
- Username: Your ServiceNow username and password
Setup in Google Sheets
Before setting up a flow, you need to visit the Google Workspace Marketplace to add Unito Spreadsheet Sync, a Google Sheets add-on, to your sheet.
For Excel users: Unito also supports an integration for ServiceNow + Microsoft Excel Online with a separate add-in for Excel. The same steps outlined in this guide can be applied to Excel use cases with files stored on One Drive.
Once you’ve installed the add-on, the next step is to activate it. Click Extensions > Unito Spreadsheet Sync > Open Unito. Then, you’ll see this screen:
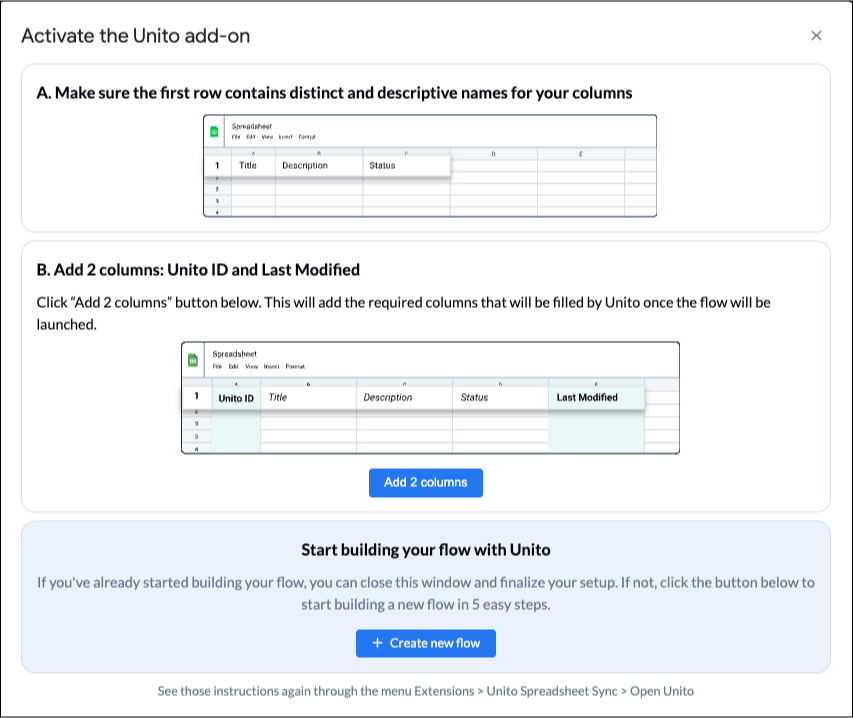
Click Add 2 columns. This inserts columns labelled Unito ID and Last Modified to your sheet. These tell Unito to sync data between these two columns.
You’ll also need a header row with the names of your incident fields.
Step 1. Connect ServiceNow and Google Sheets to Unito
- Sign up for Unito if you haven’t already!
- Navigate to the Unito App and select +Create Flow.
- Select Start Here to connect ServiceNow and Google Sheets.
- Then +Choose account for each tool and complete the authorization process.
- Select a specific type of Salesforce object to include in your flow.
- Click Confirm.
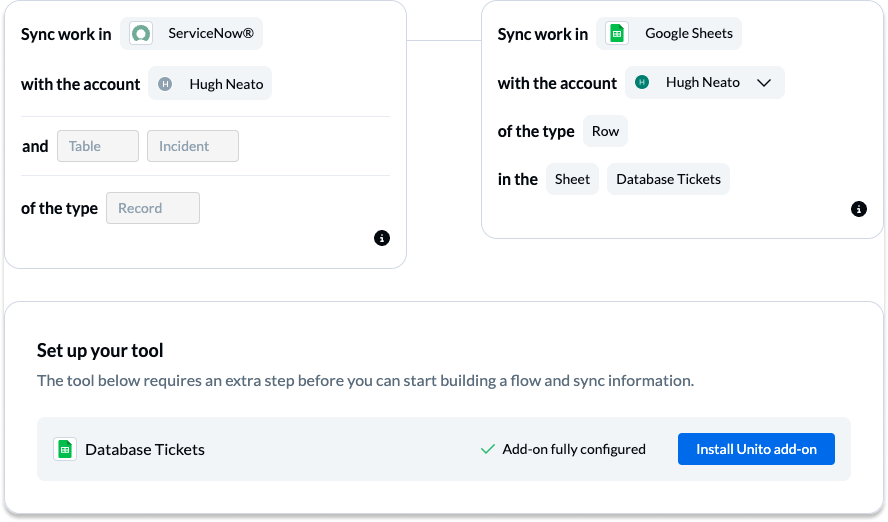
Choose a ServiceNow table to sync
Unito can support any ServiceNow record type. But each flow can only sync one table at a time. But make sure that whichever account you connect to Unito has CRUD access to the same records and tables you plan on syncing in each flow.
Here’s how to set up a service account with the right permissions (click to expand):
Here’s more information about connecting tools to Unito for the first time.
Step 2. Pick a flow direction for new records and rows
Your Unito flow automatically creates new ServiceNow records and spreadsheet rows whenever someone in your organization manually adds records or rows in the other connected instance.
Select a flow direction with one of the three directional arrows to indicate: from Google Sheets to ServiceNow, ServiceNow to Google Sheets, or both.

Learn more about flow direction.
Step 3. Set rules to keep specific records and rows in sync
Rules allow you to exclude specific ServiceNow records from syncing to Google Sheets. By default, Unito will sync all records created after you launch your flow. You can sync all historical data by removing the creation date filter.
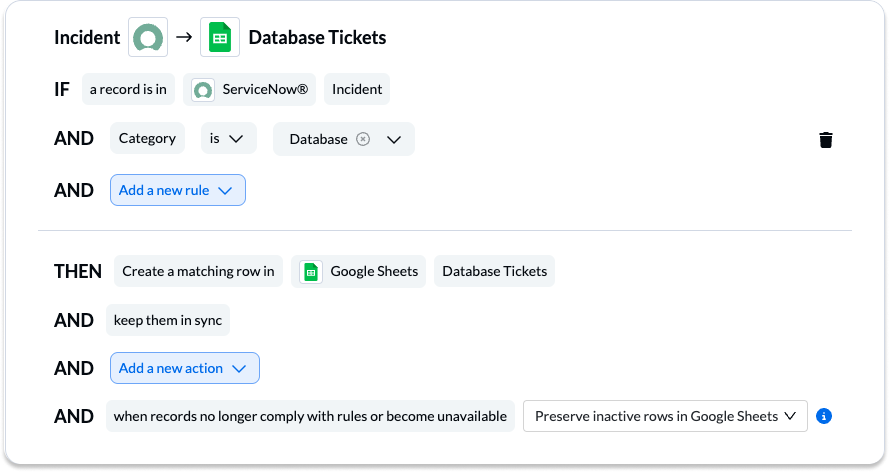
Find out more about setting rules.
Step 4. Configure fields between ServiceNow and Google Sheets
Next, you can set individual relationships between fields in ServiceNow and columns in Google Sheets. Most fields can be assigned their own update direction which determines how real-time changes occur.
If you haven’t already created a header row, Unito can auto-populate the first row of your sheet if you have fewer than 50 fields in your ServiceNow table. If not, you’ll have to add a header row manually.
How to add field mappings in Unito
- Click + Add mapping to add additional fields to be synced.
- Then, Select a field for each tool, and find the appropriate field to map.
Here is our demo’s completed set of field mappings:
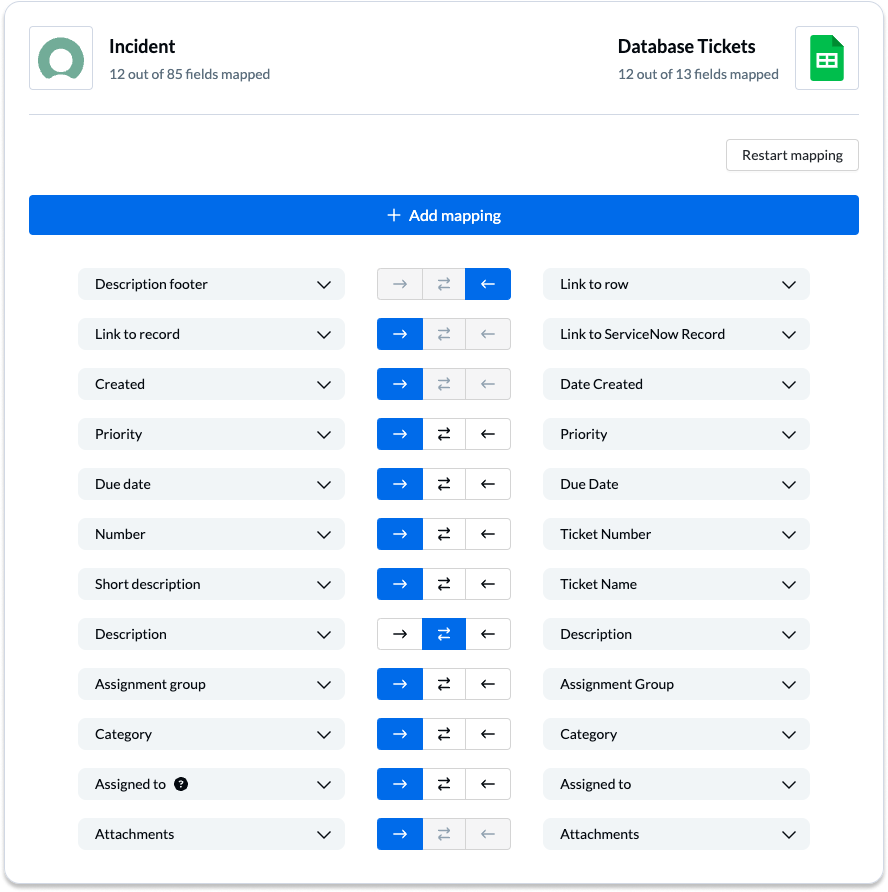
Click Confirm when you’re satisfied with your field mappings to proceed.
Learn more about Field Mappings
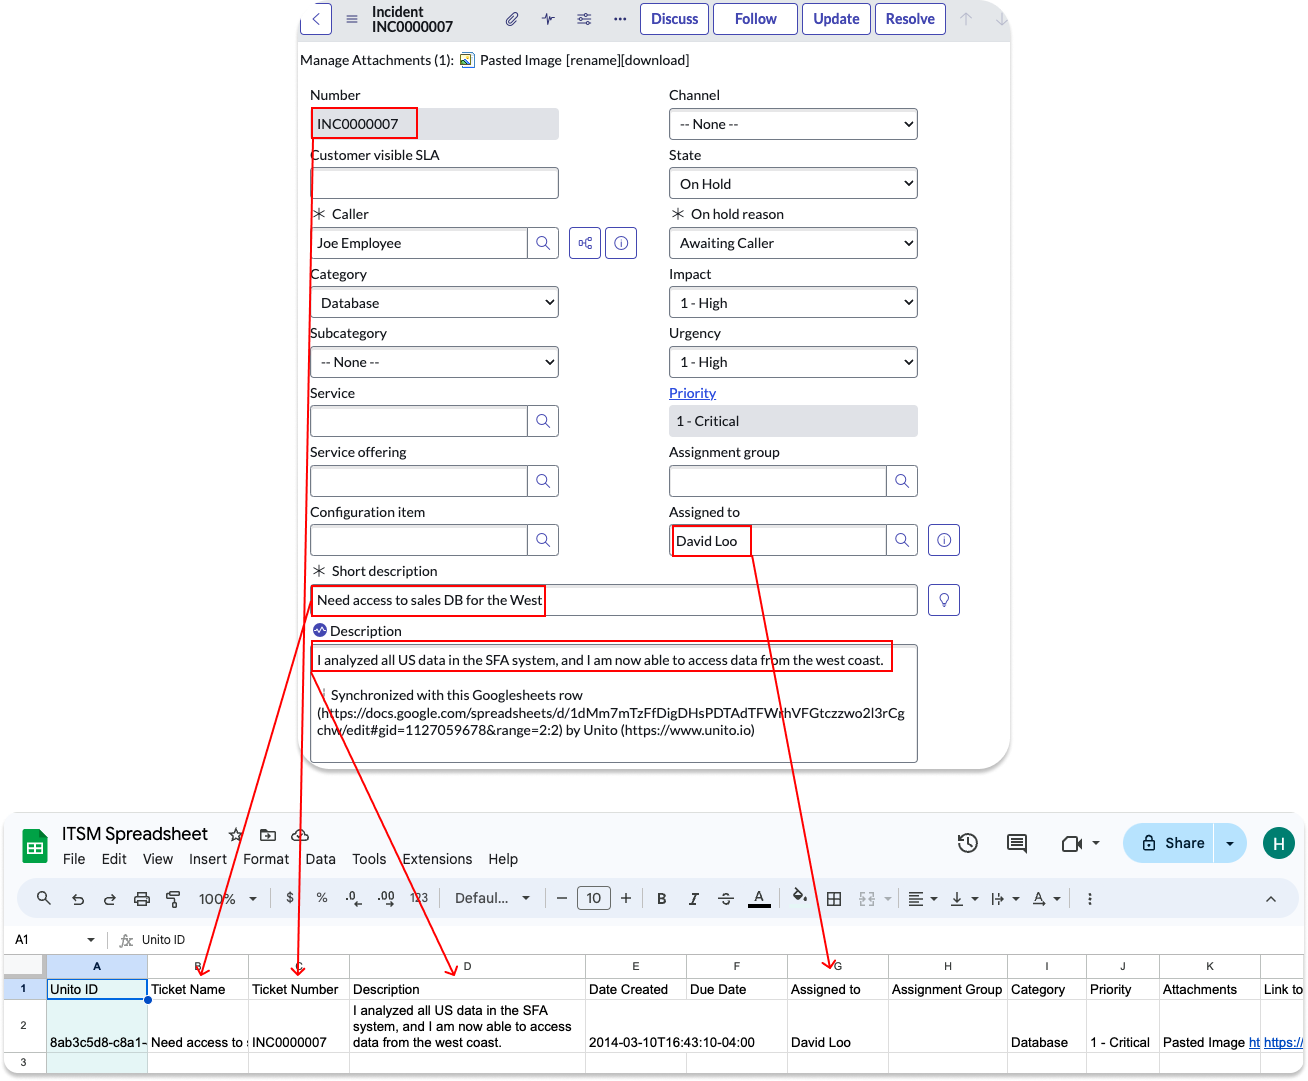
Step 5. Launch your Google Sheets ServiceNow integration
If you’ve followed the steps above, your flow will now:
- Create Google Sheets rows based on specific ServiceNow incidents;
- Keep synced incidents and rows updated in real-time with automatic updates.
If you have any questions, don’t hesitate to reach out and let us know.
Ready to optimize your support workflow?
Meet with our team to see what Unito can do for your workflows.
What’s next after you sync ServiceNow and Google Sheets with Unito?
- Learn how to duplicate this flow for additional use cases
- Read an overview of Unito’s ServiceNow integration
- How does Unito stack up against ServiceNow Integration Hub?
- How to run a ServiceNow export to Microsoft Excel.