
A Beginner’s Guide to GitHub
This guide to GitHub is for developers who are already familiar with Git. If you need more background, check out our simple guide to GitHub for non-developers.
It’s your first day at your new development job. Bright-eyed and bushy-tailed you get there early, only to log in and have your stomach drop. They don’t use the same git repository hosting platform you’re used to.
All developers have a favorite repository hosting tool and it’s never fun to ditch your comfort zone. But if you do have to make the switch from Bitbucket or GitLab over to GitHub, don’t fret: this beginner’s guide will have you onboarded and comfortable in no time.
First things first: what is GitHub? Simply put, it’s an online hosting hub for your git repositories and projects. It lets you and other team members work on a project together from anywhere. You can collaborate, learn new skills, and manage projects in one easy-to-use interface.
If you’re a developer who has never used the tool before, this guide to GitHub will help you get up and running. Read on to learn more about:
- Your GitHub dashboard and how to navigate it.
- How to create your first project.
Getting started with GitHub
We’ll start easy, and take a look at the dashboard (it is your first few days on the new job after all). Then we’ll show you how to set up your first project.
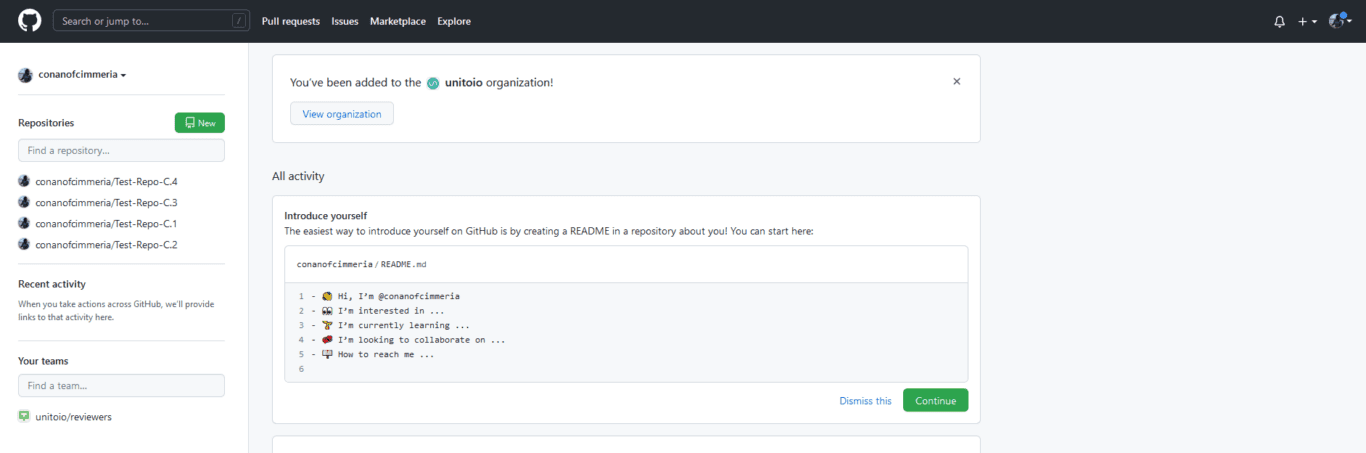
The GitHub dashboard
The dashboard is simple and easy to navigate. To access it, all you have to do is click on the GitHub logo in the top left corner of any GitHub page.
Here are the areas you need to know about to get up and running:
- Repositories
- Your teams
- Profile
- Settings
- Notifications
- Newsfeed
- Explore repositories
- Issues
Repositories and teams
From the dashboard, you’ll find all the repositories you have access to and your teams on the left-hand side. There’s also a handy search function if you have too many to list in the dashboard view.
Profile
You reach this by clicking on your profile picture in the top right corner. Here you can see all the stats about yourself, and help other Github users get to know you.
Settings
This is also reached by clicking on the dropdown menu from your profile picture in the top right corner. From here you’ll be able to make changes to all the normal settings you’d find, plus add ssh keys to allow remote access.
Notifications
This is the little bell icon in the top right corner of your dashboard. Here you’ll get notifications of comments and conversations on any projects you’re working on, or any you’ve starred or followed.
Newsfeed
Here you can see your latest updates. You can preview up to 12 updates, pull requests, or issues you’ve been working on in the last two weeks. You can also see what changes have been made in any other repositories you follow. If you want to learn from other developers or repositories, the newsfeed is a great place to start.
Explore repositories
This is on the right-hand side of your dashboard. Here you’ll find suggested repositories to follow — recommendations are made based on previous repositories you’ve starred or followed. It’s an easy way to discover new things happening in the GitHub community.
Issues
This is an important section if your projects require you to stay on top of problems and issues. In this section you can see tickets that have been assigned to you to help resolve.
A guide to GitHub: Getting started with your own project
Now that you’re all set up and ready to go, it’s time to start your own project.
Step 1: Create a repository
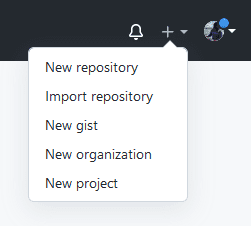
- In the upper right-hand corner, click on the plus button, then click on New repository.
- Give your repository a name that you or your team can easily recognize.
- Write a short description that helps people understand what the repository is for.
- Choose whether you want it to be public or private.
- Initialize the repository with a README.
- Click create repository.
Step 2: Create a branch
By default, your repository is initialized with a ‘master branch’. This is considered to be the definitive branch.
However, so you can make edits or changes before committing them to the master branch, you want to create a separate one. This means any live code will stay untouched before you decide to push an edit. Plus, when you create a branch off the master branch, it gives you a snapshot of what the master looked like at that time — useful if you ever need to revert.
Here’s how to create a branch:
- Make sure you’re in the repository you’ve just created.
- Click on the drop-down at the top that says branch: master.
- Begin to type in the name you want to give your branch, for instance I’ve used ‘Branch Two’ here.
- Then select create branch, and voilà! You now have two branches.
To navigate between your branches in a repository, use the branch drop-down menu mentioned above. All of your branches will be in there ready and waiting.
Step 3: Make and commit changes
So at the moment, your branches look identical. This is because you haven’t made any commits yet. Let’s make our first commit:
- Step one is to click the README.md file
- Next, click the pencil icon in the top right corner to edit.
- In the editor, write whatever you feel like or the code you want to add — in my example, I wrote a (very funny) joke.
- Write a commit message that describes the changes you made.
- Click the commit changes button.
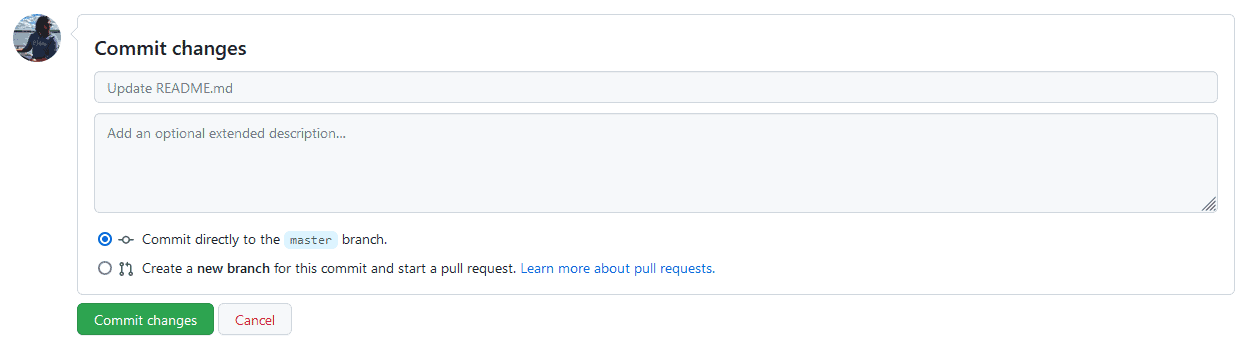
These changes will only be made to the secondary branch you created. The master branch is left untouched.
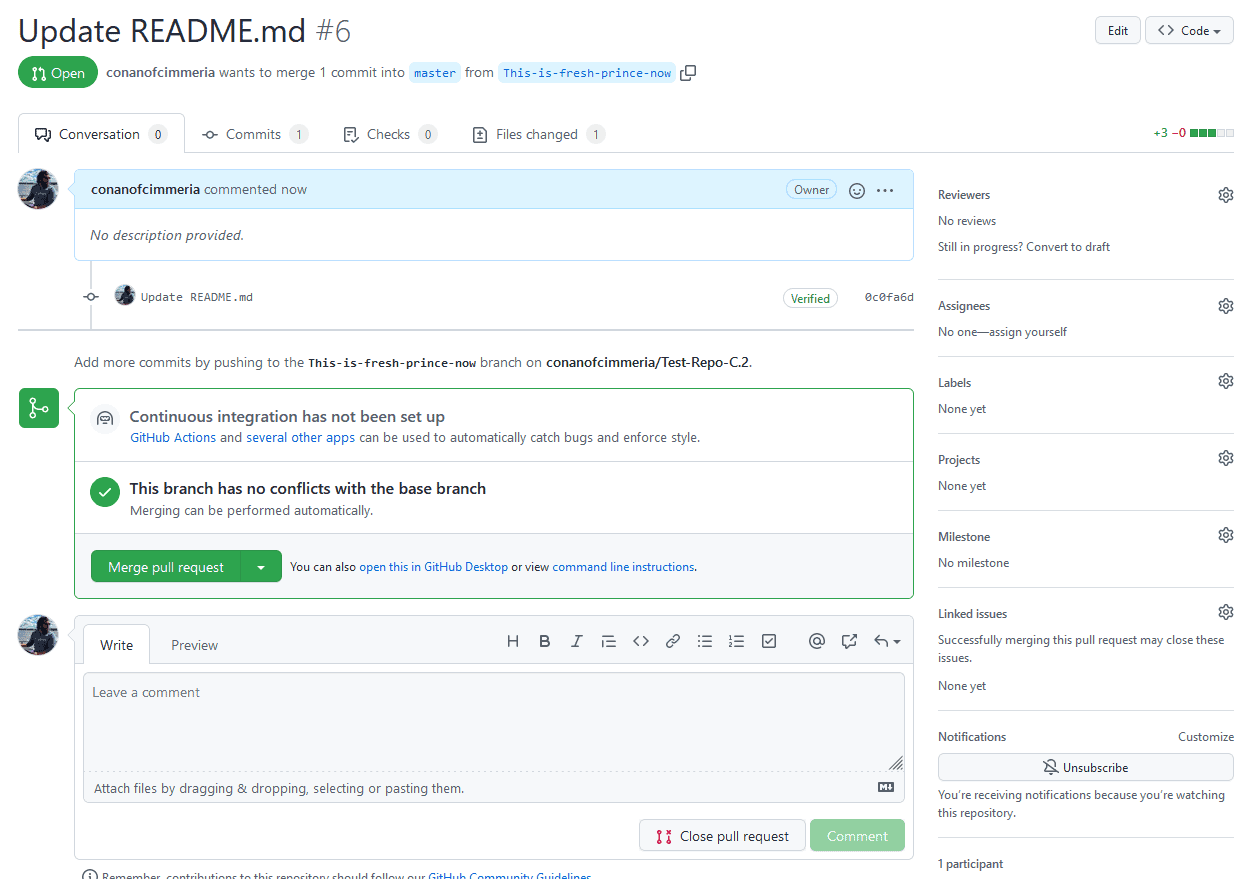
Step 4: Open a pull request
Now it’s time to open a pull request.
Pull requests are the main way that you collaborate on GitHub. By opening a pull request, you’re suggesting changes that you’ve made in your branch to your wider team. You’re also requesting that a team member reviews and “pulls” in your edits to merge them into their branch. You can also open pull requests in your own repository and merge them yourself. It’s an easy way to review code and workflow before changes are made.
When you make a pull request, it shows “diffs” — these are the differences between the content of both branches. The changes, subtractions, or additions are shown in green and red.
Here’s how to do a pull request:
- Click on the pull request button along the top, then from that page, click the green new pull request button.
- At the top, you’ll see your recently pushed branches. Here, select the branch you just made to compare it with the master.
- Next, check over the changes in the diffs on the compare page, and make sure they’re what you want to submit.
- When you’re happy with the changes, click the green create pull request button.
- Give your pull request a title and write a brief description of your changes — you can also add emojis in here.
- When you’re done with your message, click create pull request.
- Wait for your team members to see your changes.
Step 5: Merge your pull request
If you’re working on your own, you can merge to your own master branch.
There’s also an option to squash all your changes into one big save or commit. This makes it easy for collaborators looking at the project history to know what they’re looking at, and revert changes. Preferences for squashing differ from businesses to businesses, so be sure to double-check before you do this.
For now, we’ll show you how to merge your pull request:
- Click the merge pull request button (after completing step four) to merge the changes with the master branch.
- Confirm the merge.
- Delete the branch you created as its changes have been incorporated.
Step 6: Celebrate!
You’ve just created your first project in GitHub. Easy, right? Now you can start your new job with confidence!
How to integrate GitHub with other tools
Learning how to use GitHub is great, but what about slotting it in with your tool stack? Without the right integration, you can spend hours just copying and pasting information from tool to tool so everyone’s in the loop. Just because a tool is great for your needs doesn’t mean it works for another team. No one should be forced to use a tool that doesn’t fit their workflow.
Want to save time and effort? Try Unito. Unito has the deepest two-way integrations for some of the most popular tools on the market, including GitHub, Asana, Trello, Google Sheets, and more.
Sync data across tools seamlessly, use rules to filter out irrelevant information, and map fields so everything ends up exactly where it needs to go. All of that in just a few minutes.