How To Integrate Azure DevOps and Zendesk
This guide will show you how to easily create a 2-way sync between Azure DevOps and Zendesk that turns tickets into work items. The end result is a no-code integration that keeps your software development work up-to-date in real-time. Whether you’re a Zendesk support agent needing visibility into DevOps work, or a lead developer trying to enhance ticket management and escalation processes with customer success teams, Unito has you covered!
Here’s a look at this Zendesk Azure DevOps integration:
New to Unito? Here’s more information about this Zendesk Azure DevOps integration.
By the end of this guide you’ll have an Azure DevOps Zendesk integration that can:
- Create work items in Azure DevOps automatically whenever you manually add specific tickets in Zendesk, or vice versa.
- Maintain a real-time 2-way sync between tickets and work items with automated updates whenever changes are made in either tool.
In this article:
- Use Case: Ticket Management
- Connection setup
- Step 1. Connect Azure DevOps and Zendesk to Unito
- Step 2. Set a flow direction between ADO and Zendesk
- Step 3. Set rules to keep tickets in sync
- Step 4. Configure fields between tickets and items
- Step 5. Launch your Azure DevOps Zendesk integration
Use Case: Ticket management
Although this article will focus on a ticket management use case for DevOps, you can apply the same steps and principles to any workflow you have in mind that connects Zendesk and Azure DevOps.
Context: Setting up an internal ticket queue with 2-way sync
Imagine a large organization with more than 10,000 employees in different regions, countries, cities, etc. The company recently launched a new mobile analytics platform (MAP) which was used to track KPIs across various business units.
However, the influx of support tickets received was overwhelming the development team, who struggled to prioritize and track issue resolution effectively. So a project manager set up a Unito flow to sync specific support tickets from Zendesk to Azure DevOps.
Here’s how it works (once the flow is set up):
- Zendesk Group: A dedicated Zendesk group called “Level 3 – Mobile Analytics” was created to handle escalated support tickets specifically related to the analytics platform.
- ADO Project: A project called “Analytics Platform DevOps” was established in ADO as the central hub for all development and operational activities related to the MAP.
- One-Way Flow: A Unito flow was configured to automatically send new tickets from Zendesk to ADO. Changes to tickets or work items would appear in the other automatically, but manually created ADO work items would not appear in Zendesk.
Before connecting Azure DevOps and Zendesk to Unito:
Adjust your organization settings in ADO
Be sure to adjust your Organization Settings in Azure DevOps before building your flow. Just make sure that Third-party application access via OAuth is turned on and that your project is public.
Step 1. Connect Azure DevOps and Zendesk to Unito
- Sign up for Unito if you haven’t already.
- Open the Unito App and select +Create Flow.
- Then, select Start Here to connect Azure DevOps and Zendesk.
- Choose the accounts, a Zendesk group, and ADO project to sync.

When you’re ready, select Confirm.
Here’s more information about connecting tools to Unito for the first time.
Step 2. Set a flow direction between Azure DevOps and Zendesk
When you manually create new Zendesk tickets or work items in Azure DevOps, Unito can add synced copies of those items in your connected group or project automatically.
Flow direction tells Unito where to do that: in Zendesk, ADO, or both.

Select Confirm when you’ve chosen a flow direction.
Learn more about flow direction.
Step 3. Set rules to keep specific tickets in sync
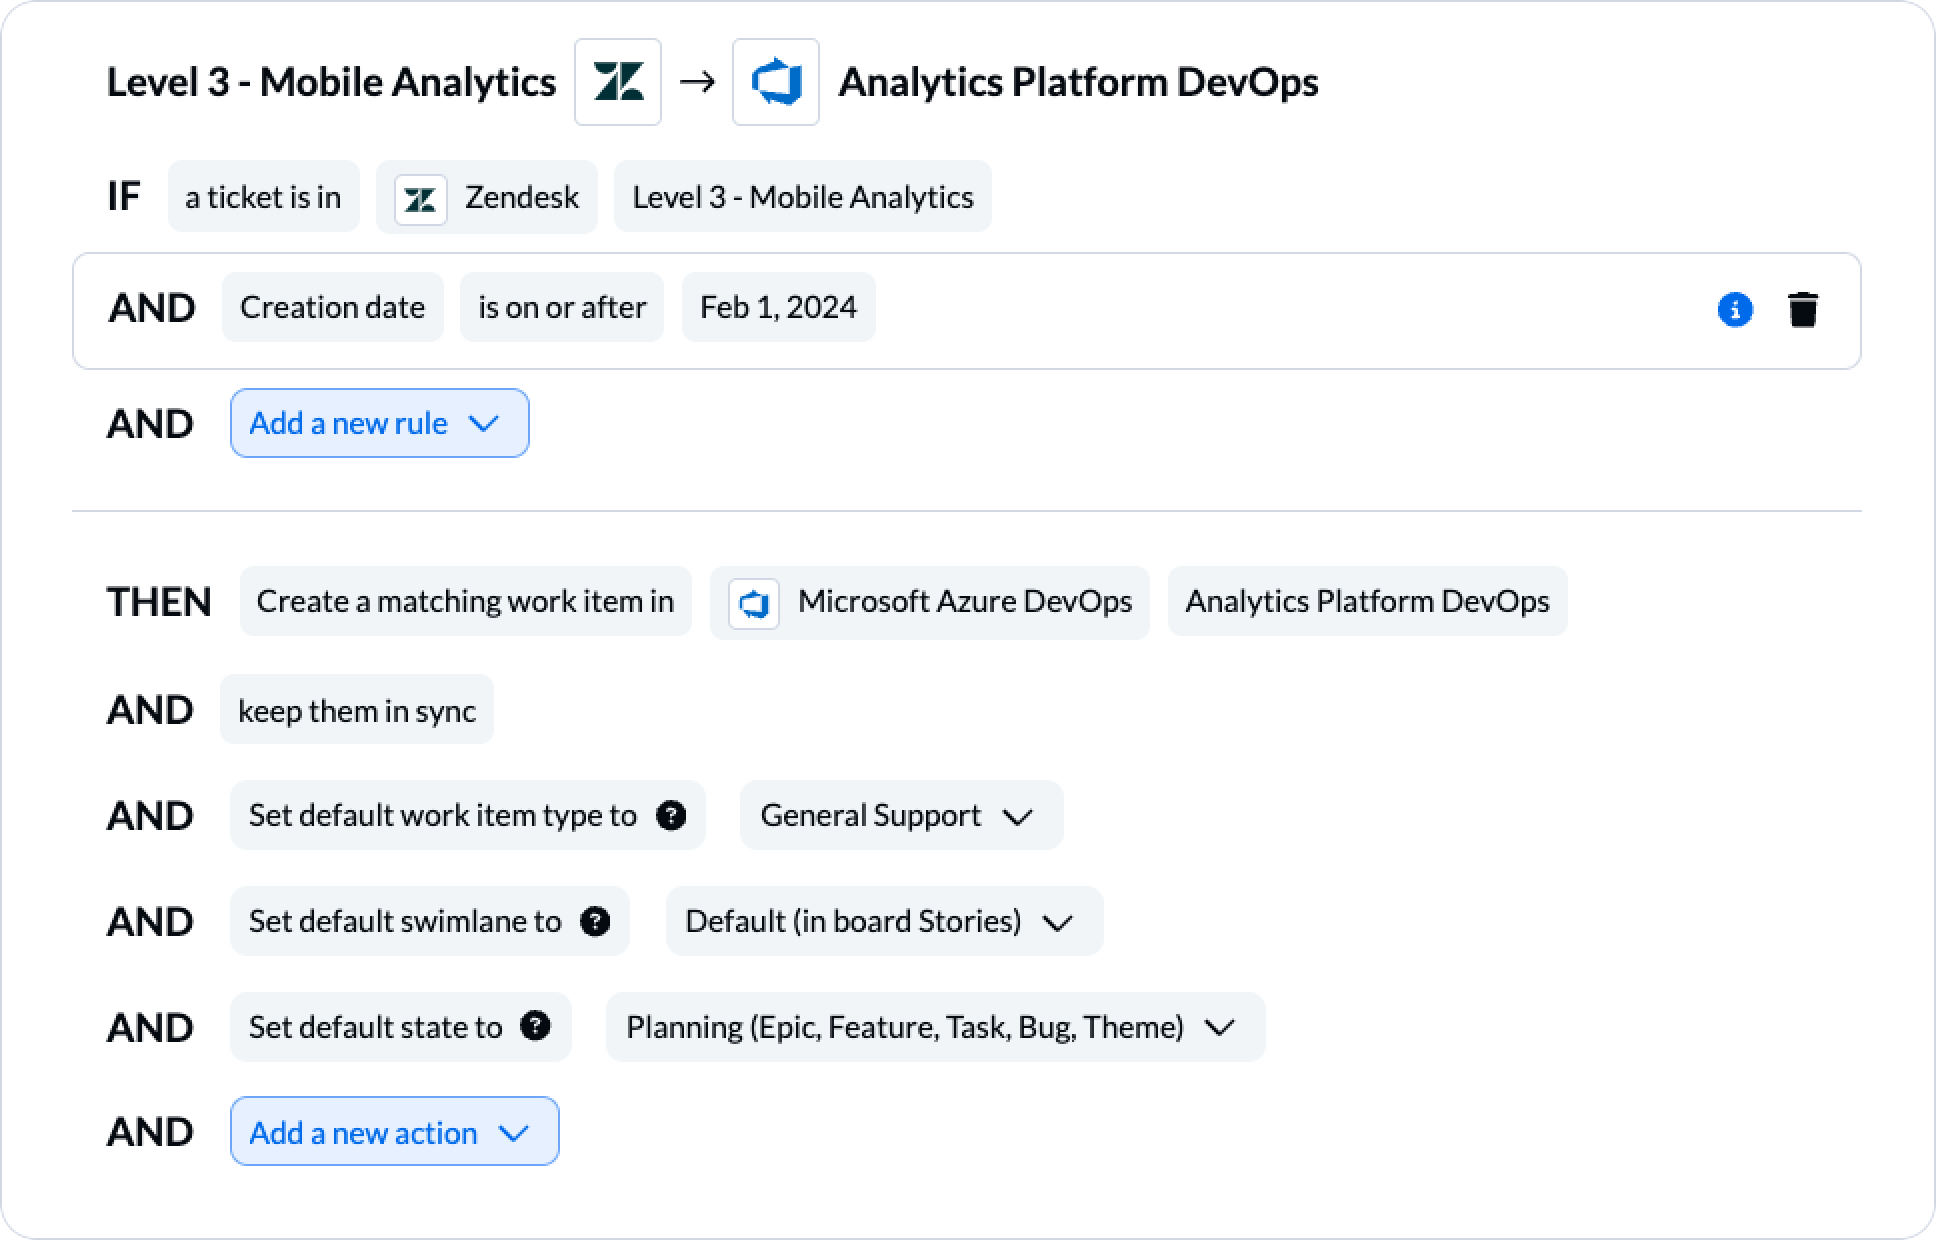
Rules allow us to decide whether or not to filter out specific tickets or work items from syncing to our other tool.
Select Add a new rule to begin setting your rules.

In this case, any tickets added to Zendesk after the date highlighted above will appear in ADO as a newly created work item.
Find out more about setting rules.
Step 4. Configure fields between Azure DevOps and Zendesk
Next, you can set individual relationships between fields in Azure DevOps and Zendesk. Most fields can be assigned their own sync direction which determines how real-time updates occur.
But first, you can select Map automatically to begin your field mapping table with a prebuilt template.
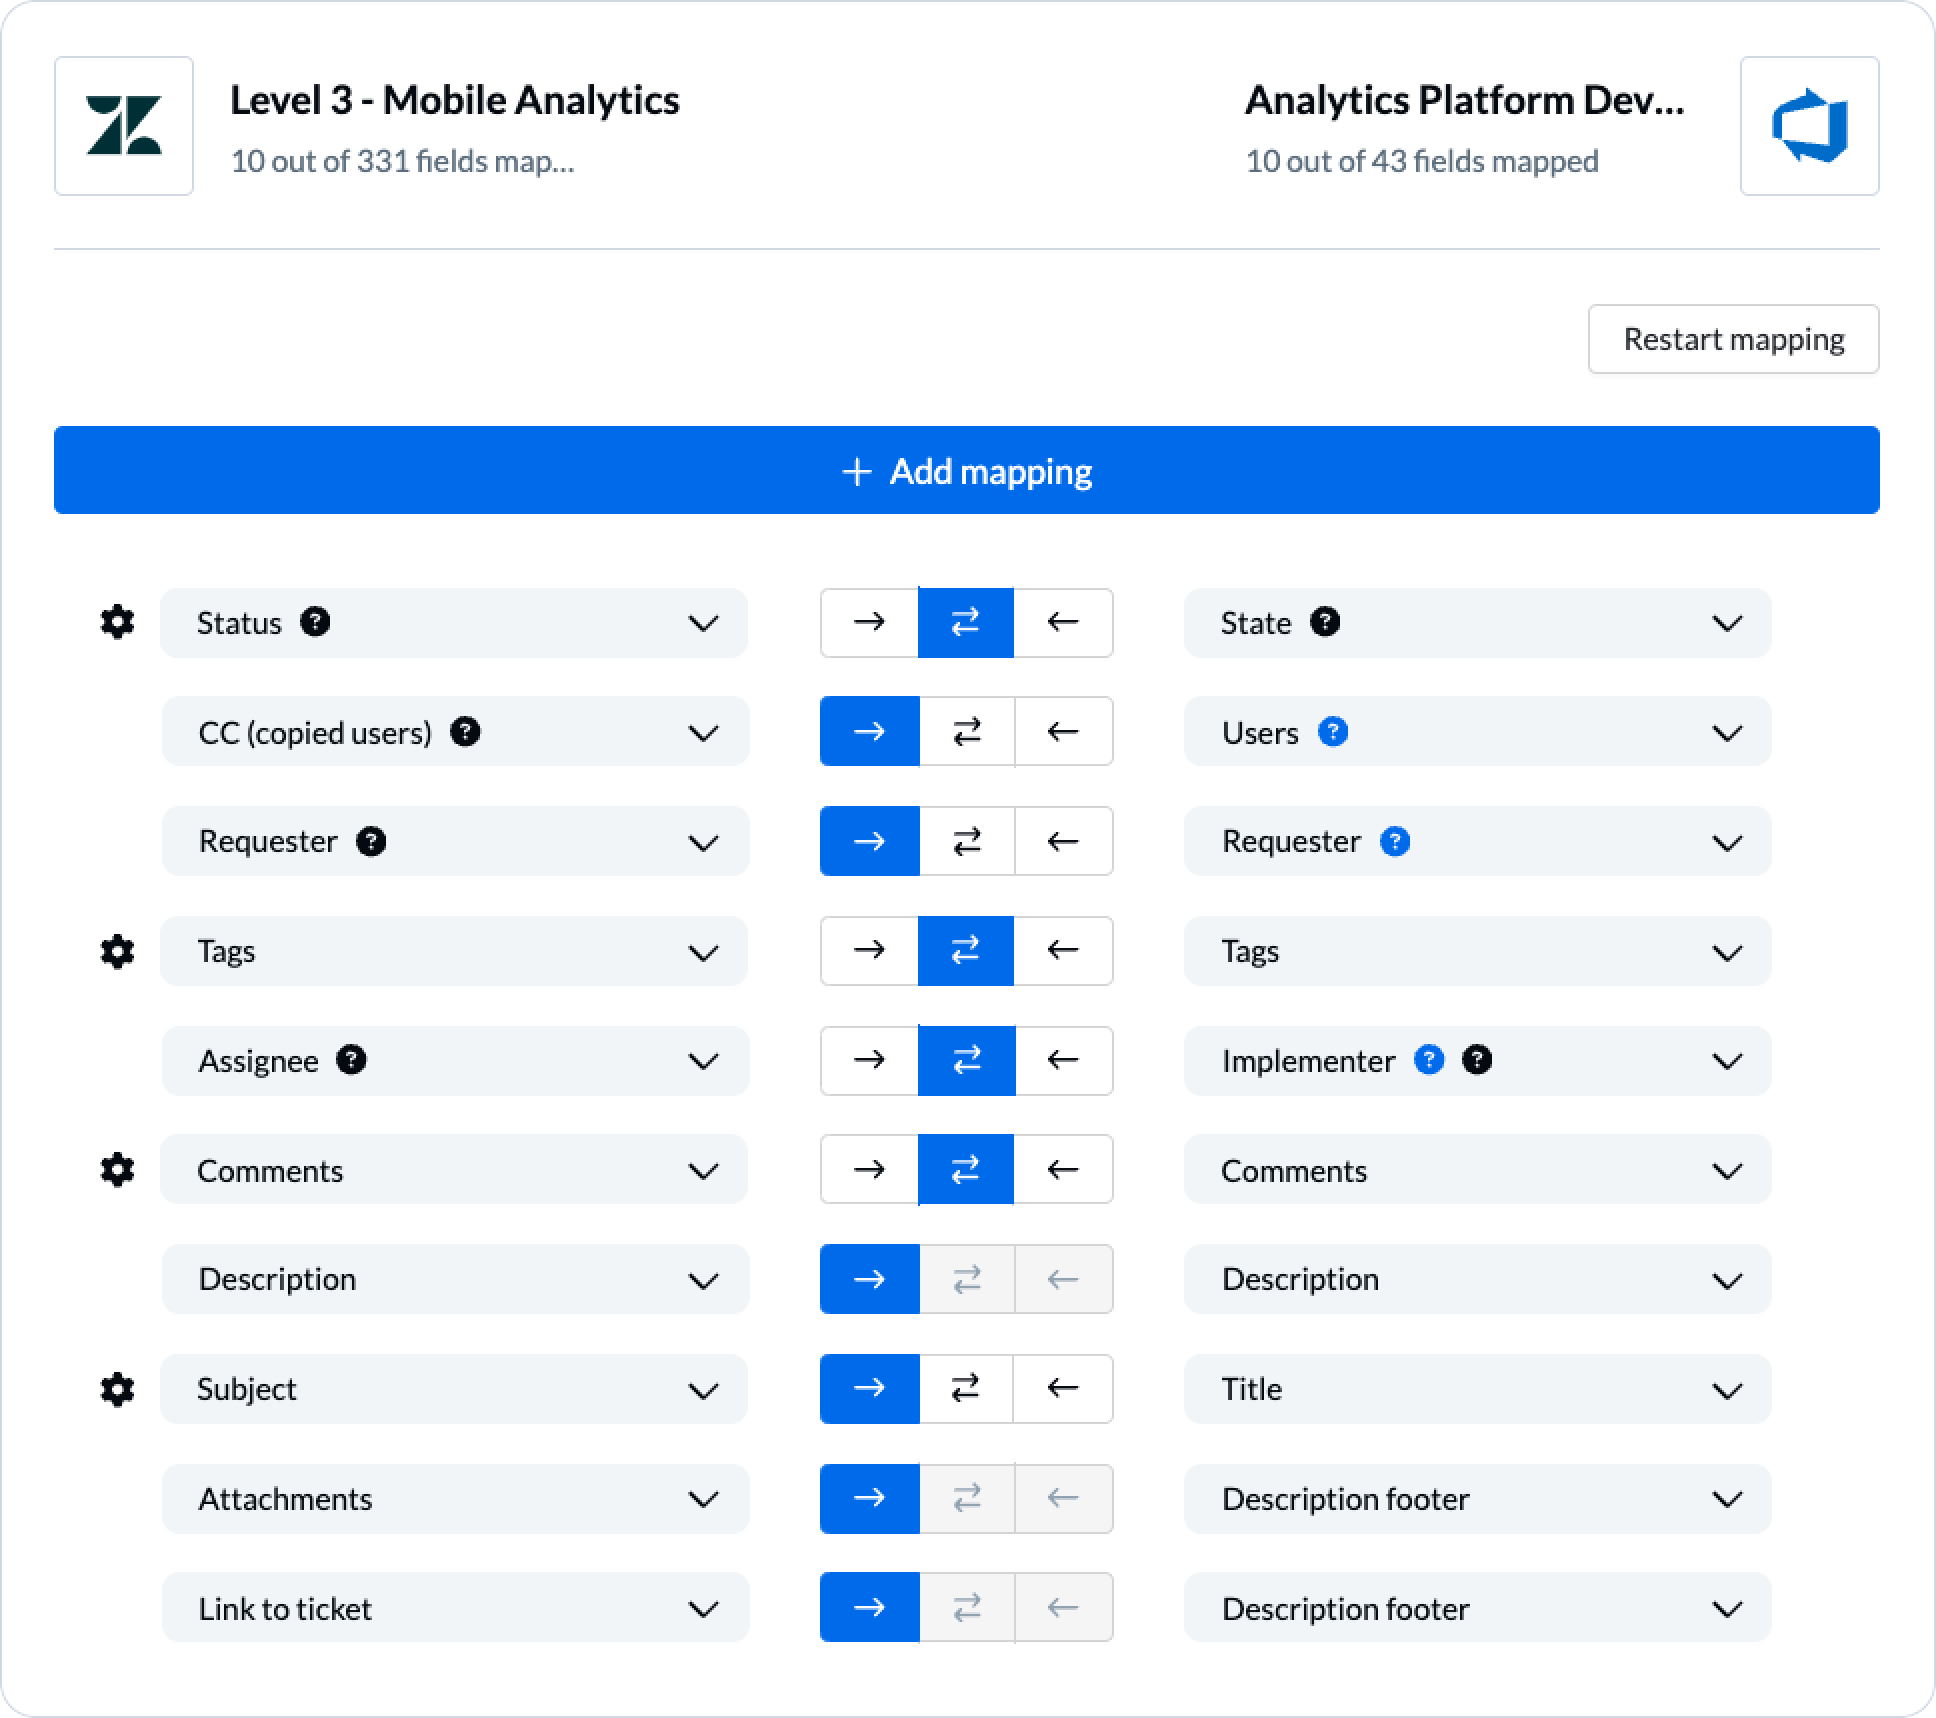
To add a new pair of fields, select + Add mapping, then Select a field in both Azure DevOps and Zendesk. Here is our demo’s completed set of field mappings:

The blue question mark icon indicates custom fields created in that tool. The gear (or cog) icon indicates configurable fields with additional options to match your use case.
Configuring field values in Azure DevOps and Zendesk
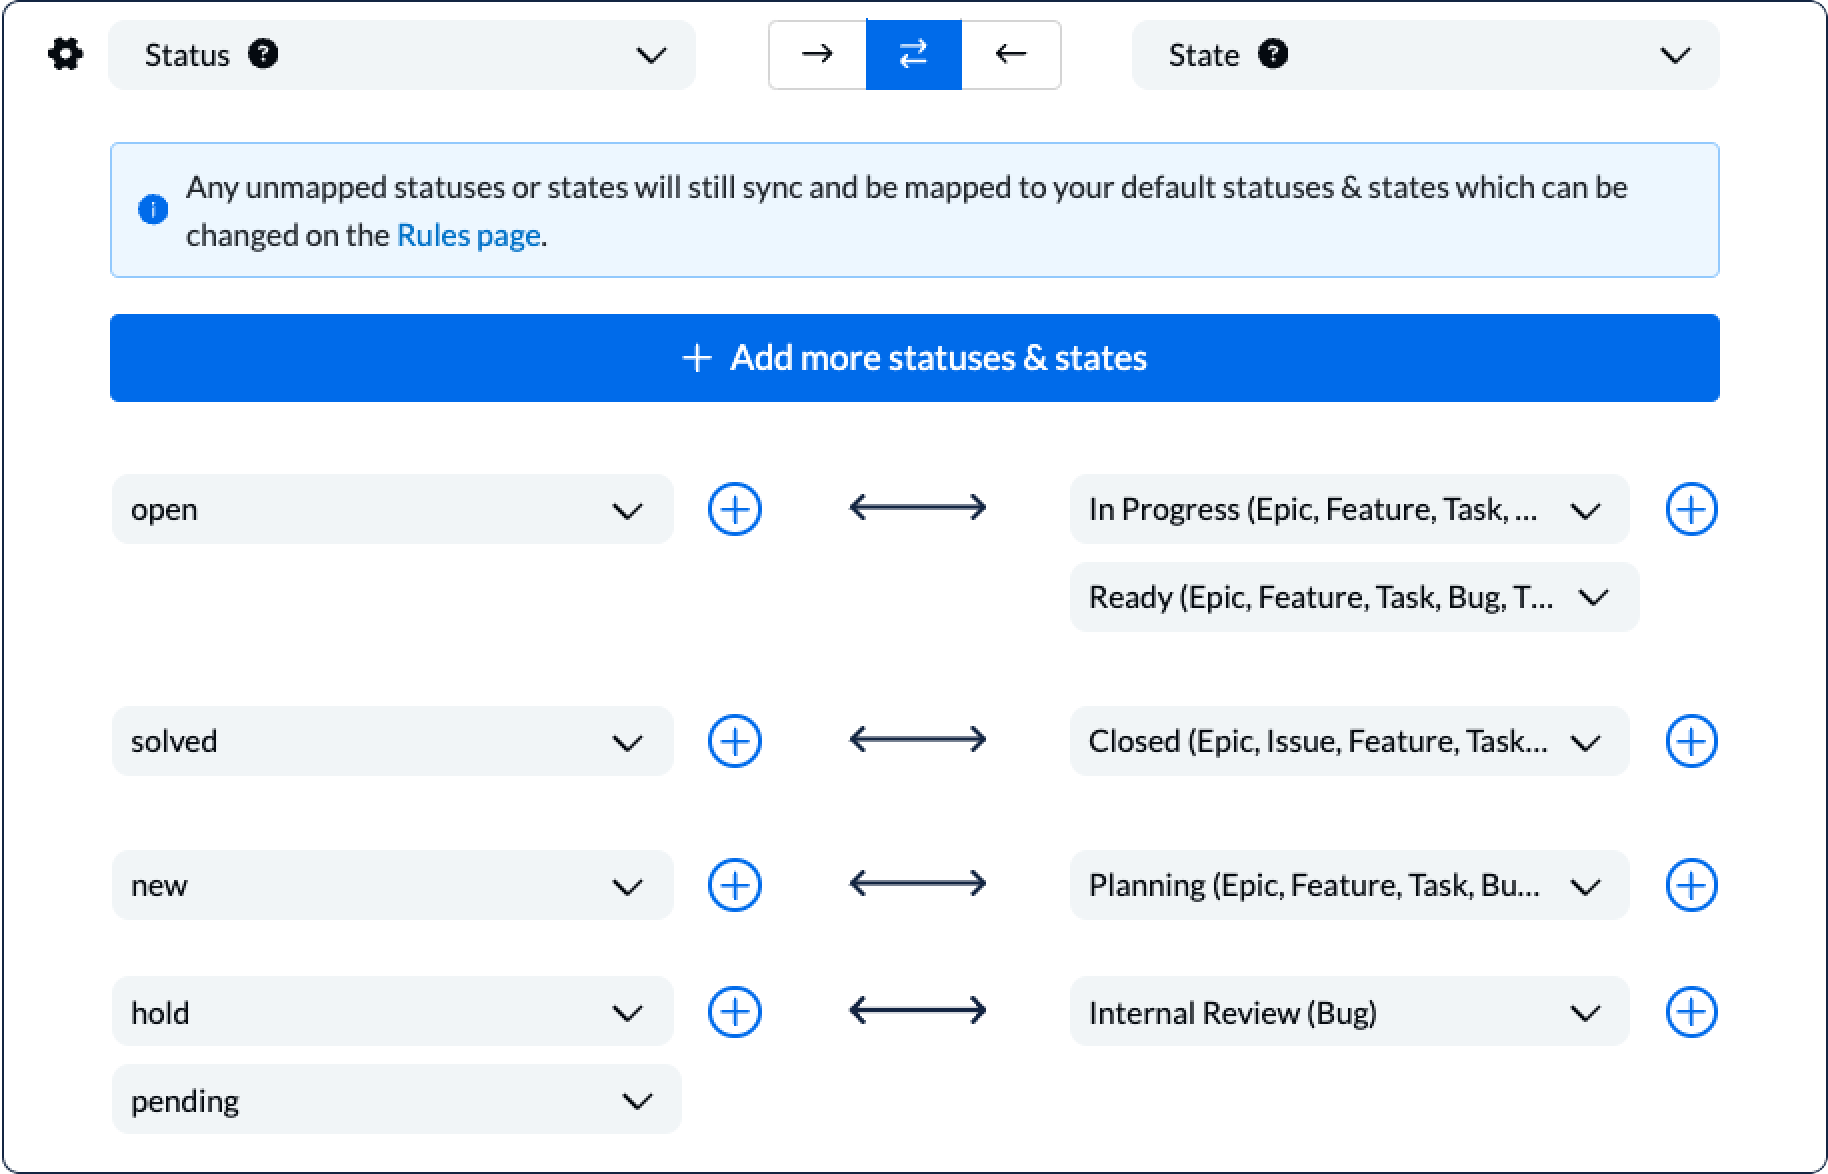
In the case of single select or multi select field (also known as picklist (string) in Azure DevOps, this option allows you to align specific statuses (or states) between tools.

Note: If you don’t configure your field values as pictured, then your flow will refer to your default rules when syncing.
Add Zendesk ticket number to ADO
You can also choose to add the Zendesk ticket number to your ADO work item title as pictured below:

Doing this will set a default prefix to all synced ADO work items created by Unito to include the Zendesk ticket number.
Click Confirm when you’re satisfied with your field mappings to proceed.
Learn more about Field Mappings
Step 5. Launch your Azure DevOps, Zendesk integration
The only thing left to do is decide whether or not to sync historical work items. You can make this decision from your flow’s overview page, or edit your rules as mentioned above.
And that’s it! You’ve just completed a flow between Azure DevOps and Zendesk. Congratulations!
If you’ve followed the steps above, your flow will now:
- Create an ticket in Zendesk based on a work item in Azure DevOps;
- Enable collaboration between Zendesk and Azure DevOps with a clear view on progress across tools.
Zendesk ADO Integration Outcome
Here are just a few of the benefits of syncing Zendesk and ADO with Unito:
- Centralized Tracking: All related tickets were funneled into a single project in ADO, providing the development team with a clear overview of pending tasks.
- Automated Workflow: The manual process of transferring tickets from Zendesk to ADO was integrated with 2-way sync, saving valuable time and reducing the risk of human error.
- Improved Prioritization: The “General Support” work item type allowed the team to quickly assess the severity and urgency of each issue, ensuring that critical problems were addressed first.
- Enhanced Visibility: While the flow was one-way, the development team could still use Zendesk (or other channels) to communicate with the original ticket submitter and provide updates on the issue’s status.
What’s next after connecting Azure DevOps and Zendesk with Unito?
Now that you’ve set up your integration between Zendesk and Azure DevOps, you can unify project management and improve cross-team visibility across tools with real time two way updates.
- Duplicate this flow to suit other use cases you may have in mind.
- Now that you’ve got the hang of Unito, you can try syncing
- Azure DevOps to Airtable
- Azure DevOps to Asana
- Azure DevOps to Wrike
- Asana and Azure DevOps
- Azure DevOps and Airtable
- Trello and Azure DevOps
- ClickUp and Azure DevOps
- Azure DevOps and ServiceNow or other database and project management tools.
- Or follow similar guides to sync:
- Looking for a guide not listed above? Book a live demo with our team and let us know! We can put one together in no time.
Why connect Azure DevOps with Zendesk?
Integrating Zendesk, your customer support hub, with Azure DevOps, your development powerhouse, can significantly streamline your issue resolution workflow.
Eliminate Manual Data Entry and Reduce Errors
Instead of manually transferring information between systems, the integration allows customer-reported issues (Zendesk tickets) to automatically trigger corresponding work items in Azure DevOps. This eliminates duplicate data entry, reduces the risk of errors, and frees up your team’s time for more valuable tasks.
Enhance Cross-Team Visibility
Integrating Zendesk and ADO provides a unified view of customer issues and their resolution status. Support teams can easily track the progress of reported bugs or feature requests within ADO, while development teams gain valuable insights into the real-world impact of their work. This transparency fosters better collaboration and a shared understanding of customer needs.
Streamline Communication
Integrating the two platforms allows for seamless communication between support and development teams. Comments and updates made in either system can be automatically synced, ensuring everyone stays informed without the need for constant status meetings or email exchanges.
Prioritize Effectively
With integrated workflows, you can easily prioritize customer issues based on severity, urgency, or business impact. This ensures that critical problems are addressed promptly, leading to faster resolution times and improved customer satisfaction.
Maintain a Single Source of Truth
By connecting Zendesk and ADO, you create a single source of truth for customer-reported issues and their corresponding development tasks. This eliminates confusion, reduces the risk of miscommunication, and ensures that everyone is working from the latest information.
Additional Considerations
- Customization: Depending on your specific workflow and requirements, you can tailor the integration to suit your needs. For example, you might choose to sync specific ticket types, map custom fields, or set up automated notifications.
- Bi-directional or One-Way Sync: You can choose to sync data in both directions (Zendesk to ADO and vice-versa) or opt for a one-way flow (e.g., from Zendesk to ADO) if that better suits your use case.

