How to Sync Multiple Google Sheets with Automated 2-Way Updates
Unito’s Google Sheets integration allows you to quickly populate tables with real-time information from your other apps or tools automatically. This can save a significant amount of time by cutting out copy-pasting between apps entirely. Instead, automated data syncing becomes a breeze, supporting you through various tasks including business reporting, project management, customer or contact tracking, and more.
The process is simple, and the principles apply to any of Unito’s Google Sheets integrations from project management apps to software development tools and more. Before you can sync your spreadsheets though, you’ll need to visit the Google Workspace Marketplace to install Unito Spreadsheet Sync. This Google Sheets extension enables your data to flow back and forth between tables and your other data sources.
In this article:
- Tools: Google Sheets
- Use cases: Project reporting, data migration
- Great for: Data analysts, project managers, stakeholders and executives
Each row in Google Sheets represents a work item (another row, task, ticket, issue, contact, etc.) while the columns represent the various fields (e.g., title, description, assignee, dates, etc.). So you’ll need a header row at the top of each sheet you plan on syncing.
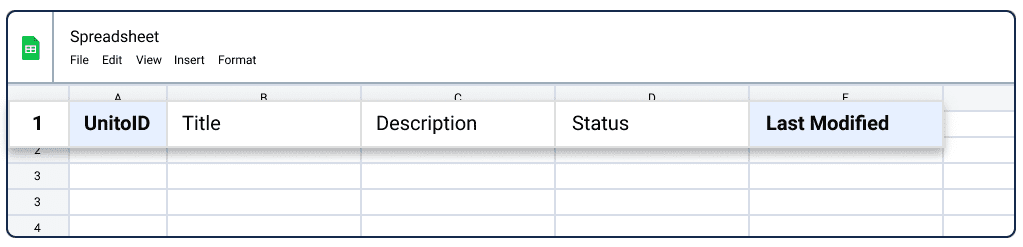
If you aren’t sure where to begin preparing your table, you can start with this Google Sheets template. But all you really need to do is give each column a name that matches with the fields in your other tool.
Step 1. Prepare your spreadsheet
IMPORTANT: Set up a header row in your spreadsheet. Unito syncs fields to and from your Google Sheets columns based on the titles in your header row.
Install Unito Spreadsheet Sync from the Google Workspace Marketplace
From the Google Workspace Marketplace you can install Unito Spreadsheet Sync, which is required in order to sync your spreadsheets. Here’s a guide if you need more help:
Add a header row to your spreadsheet
To ensure Unito is able to sync app fields to the rows of your Google Sheet, you must identify each column with a header that accurately reflects your work item data. The easiest way to do this? Name the columns after the fields you’re syncing from the other tool—think title, member, description, and more.
Option 1: Auto-populated header row
- Open a new sheet, install the add-on, and open Unito Spreadsheet Sync.
- Click “Add 2 columns” to create the necessary “UnitoID” and “Last Modified” columns.
- Open Unito and create a flow, then import data.
- During field mapping, choose to automatically populate your header row.

Option 1: Manual header row
Click to expand for instructions on how to set up a manual header row
You can also set up your header row manually. So be sure to give each column a name that’s intuitive and relates to whatever field you’re syncing over from an Asana task. As an example, the Asana fields: Task Name or Status should probably be synced to a sheet column with the same, or similar names.
If you aren’t sure where to begin, we created this Google Sheets template you can use to get started.

Set a date/time format for your spreadsheet (optional)
Click to expand for instructions on setting a date/time format
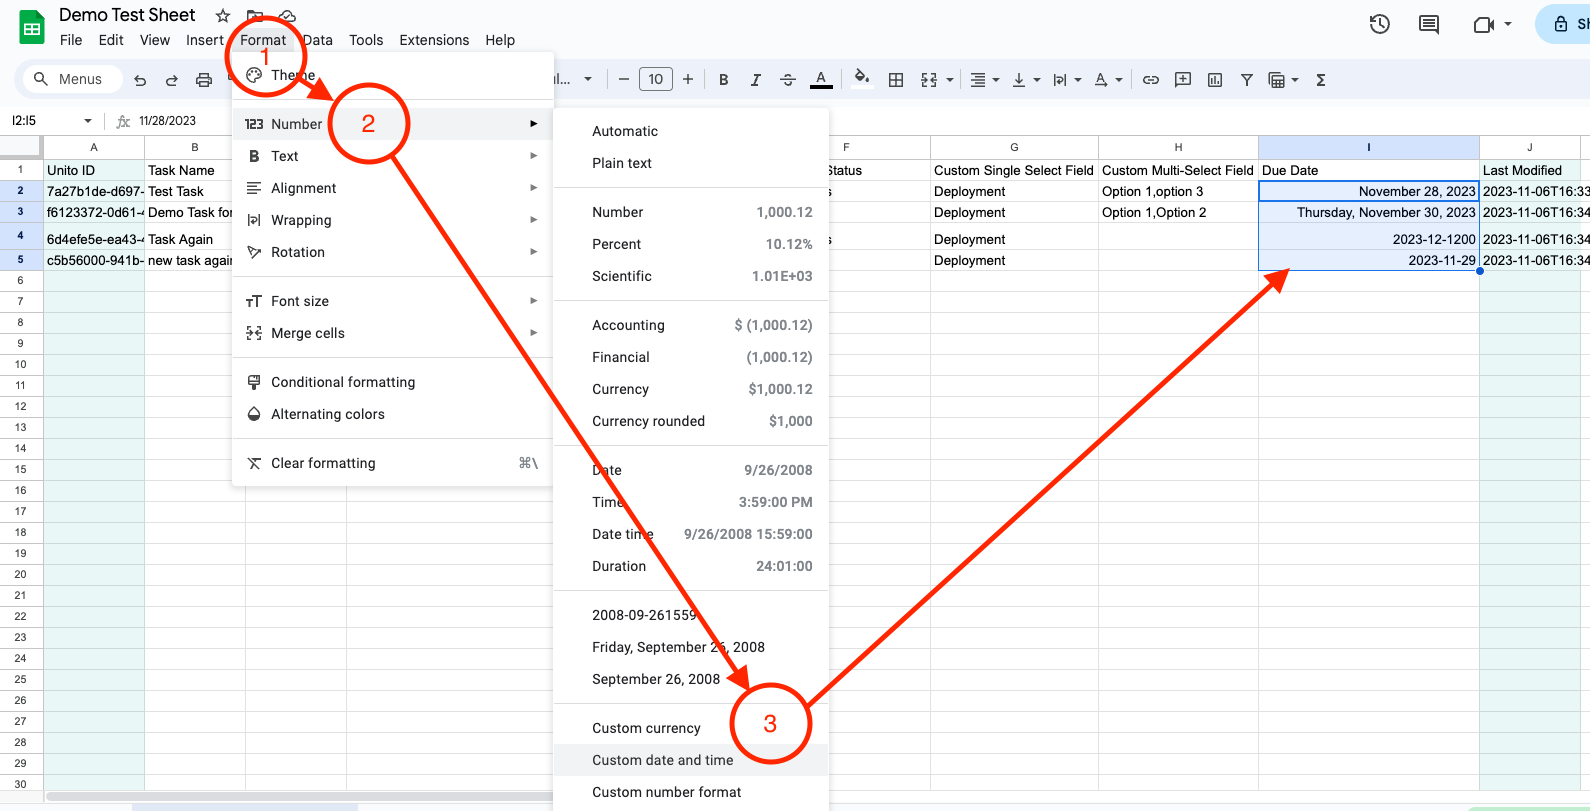
If you’re syncing data with dates, you can adjust the date-time format in your spreadsheet to any format you wish.
- Open your sheet and select the column with your dates.
- Then click Format > Number > Custom date and time.
- From there you can choose the format you wish and apply it to all the cells in your date columns.
Step 2: Connect Google Sheets and another tool to Unito
- Now you can either go to the Unito App and click +Create Flow, or choose whether to import or export from one of your sheets once Unito Spreadsheet sync is installed.
- Then, click Start Here to connect your tools.
- Select +Add a tool to this flow in either column and select Google Sheets.
- +Choose account to specify the Google account you want to use.
- Pick the sheet you want to connect to Unito.
- Repeat the above steps to connect your other tool with Unito.
- Click Confirm.
Here’s a list of permissions required by various tools to connect with Unito. If you run into any issues at this stage, don’t hesitate to contact Unito support for troubleshooting.
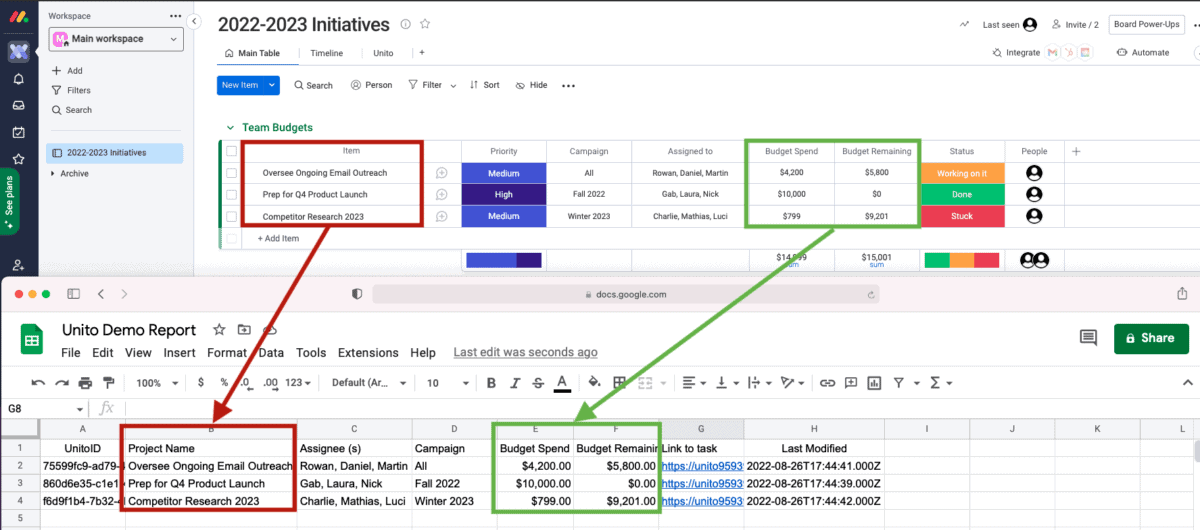
Here’s what our connected demo flow looks like between Airtable and Google Sheets:
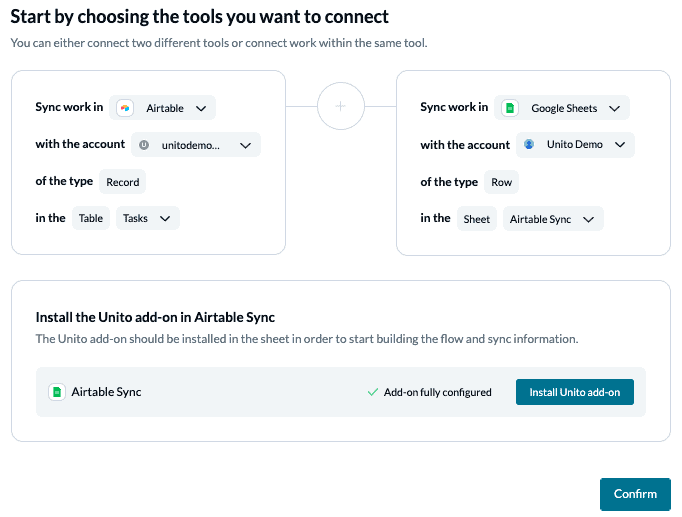
When you’re ready, select Confirm.
Step 3: Set a flow direction to populate Google Sheets automatically
Flow direction determines where new data should be created by Unito. With most Google Sheets use cases, you’ll want to create a one-way flow to your table. That means specific work items in your other tools will send data to your spreadsheet, but not the other way around.
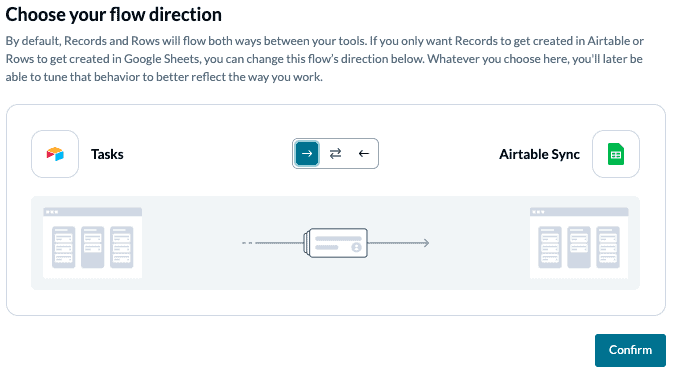
A flow from Google Sheets (either 1 or 2-way) would mean that specified rows in your table would create work items in your other tool. If you’re going to do this, we recommend setting rules at the next step requiring specific triggers for work item creation.
Click Confirm when you’ve chosen a flow direction.
Step 4: Filter data to export from your other tool to Google Sheets
Here you can establish triggers to determine which actions in your other tool will generate new rows in Google Sheets (or vice versa if you’ve chosen a 2-way flow direction). Since we’re demonstrating a one-way flow, we only need to set rules from our other tool to Google Sheets. To get started, select “Add a new trigger.”
Here’s an example of the types of triggers you can choose from, depending on your setup:
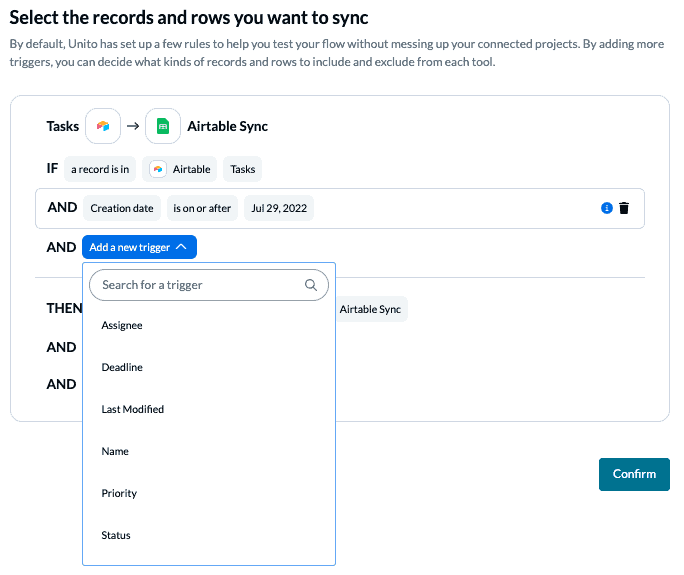
You can learn more about setting up rules here.
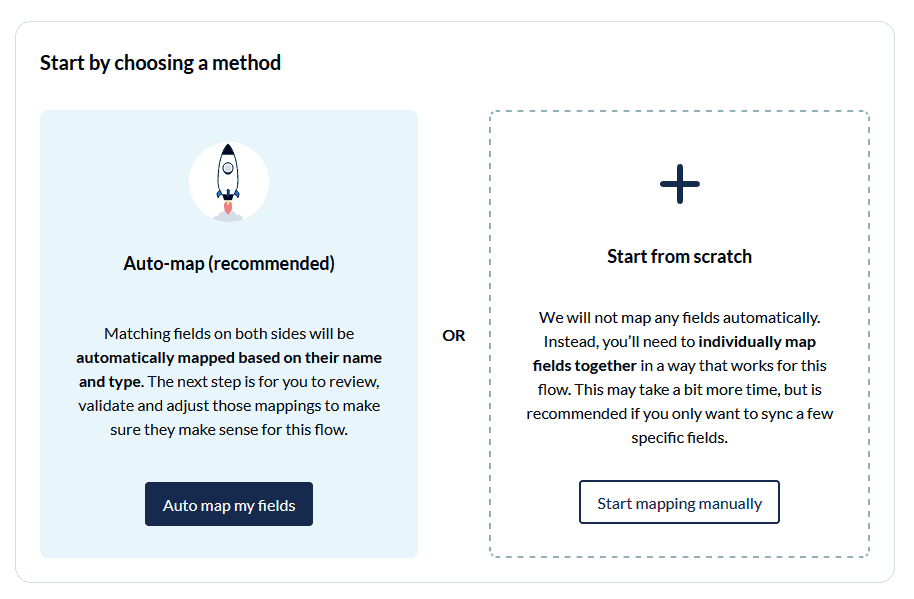
Step 5. Choose fields to automatically update in real-time
After opening this screen, you’ll have two options to choose from. Since we’re working with spreadsheets (which don’t have pre-defined fields), we’ll likely have to go with Start from scratch. But, if you name your Google Sheets fields after the exact fields in your other tool, in many cases Auto-map will be able to identify most of them. From there, you can add any that are missing.
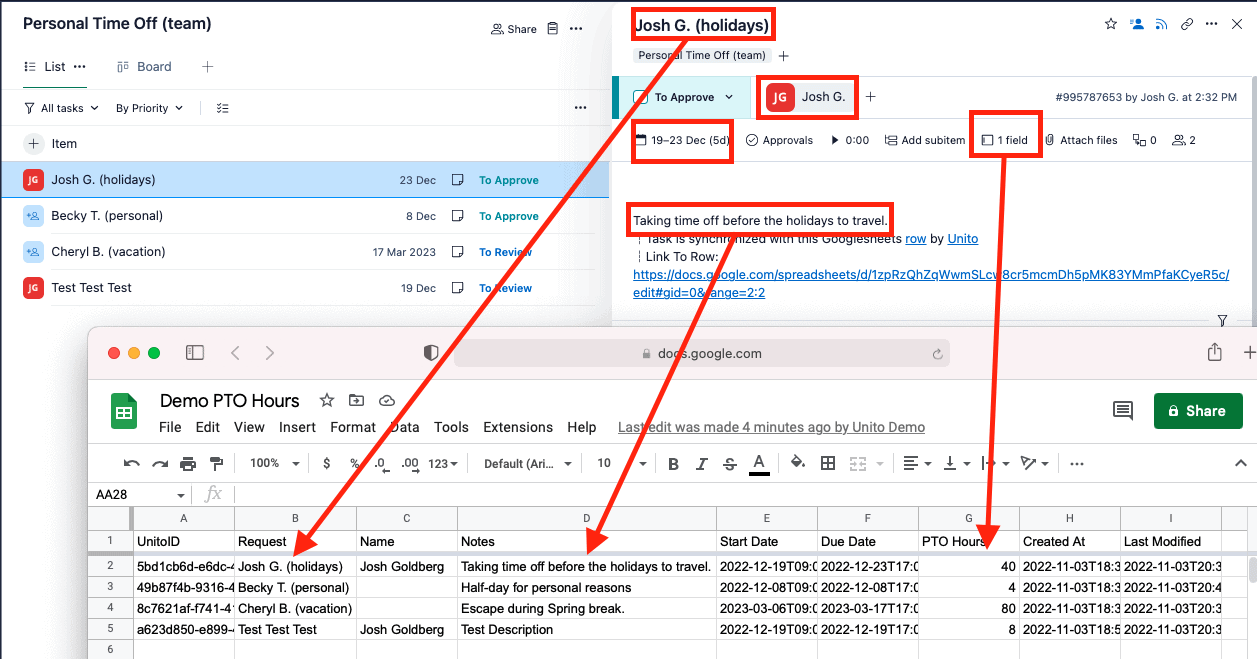
The top row in your sheet needs to be a table header for Unito to sync properly with other apps. The field names you choose in Google Sheets will then appear at this stage so you can pair them with fields in your other tool. If you edit the names of your fields while the Unito app is open, it won’t update with the latest names until you close your tab and re-launch Unito.
See below for an example:
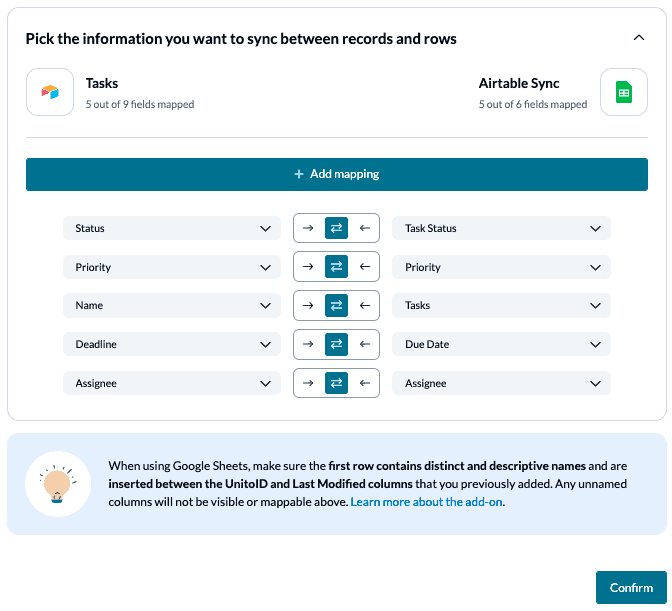
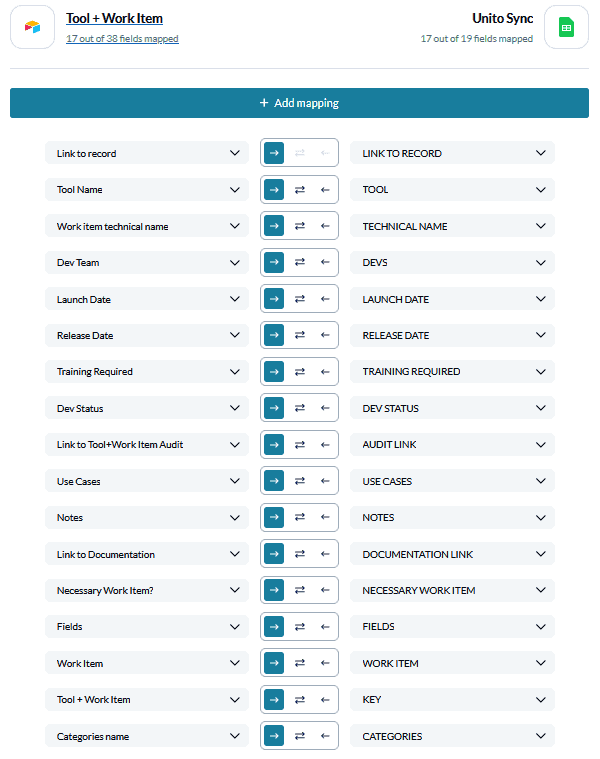
Here’s another example of completed field mappings used by our data and development teams at Unito:
Note: If you change a column name in a synced spreadsheet, be sure to update your flow’s field mappings in Unito or else your data will stop syncing.
Click Confirm when you’re satisfied with your field mappings.
Step 6: Save, launch, and export your data to Google Sheets!
And that’s it! You’ve just built a flow between Google Sheets and another tool. Congratulations!
If you followed the steps above, your flow will now:
- Automatically create new Google Sheets rows based on specific work items in another tool;
- Keep those work items and rows updated in real-time.
Here’s an example of another completed demo syncing Google Sheets with monday.com:
If you have any questions, please don’t hesitate to reach out and let us know.
What’s next after automating Google Sheets with Unito?
If you want to know what else you can do with Unito, here’s some inspiration to help you power up your workflows:
- Duplicate this flow to set up similar workflows with any number of spreadsheets.
- Read about the current limitations and capabilities of our Google Sheets integration.
- Click here for best practices and troubleshooting tips for Google Sheets flows.
- Try syncing an accounting tool like Xero or Stripe to Google Sheets.
Best practices and troubleshooting for Unito’s Google Sheets integration
Common error messages
If you see either of the error messages below, it likely indicates that one or both of the columns: “UnitoID” and “Last Modified” have been deleted or modified from your sheet. You’ll need to re-insert them (either manually or with the add-on) before your data will sync again.
“We’ve detected that mandatory columns have been removed from your Google Sheet. Let’s get you back up and running.”
“The container configuration does not allow us to sync.”
What data from my other tools can sync to Google Sheets with Unito?
Whichever tool you choose, you’ll need to think about the specific fields, or work item details, related to that tool. So if you’re integrating Favro or Trello cards to Google Sheets, which card details do you want to sync?The same considerations apply for connecting Google Sheets rows to issues in Bitbucket, Azure DevOps or GitLab; tasks in Mesitertask, Teamwork, Zoho Projects, or ClickUp; tickets in Zendesk; Outlook contacts, etc.
How does Unito sync app data with Google Sheets rows?
When using Unito, it’s essential to keep in mind that the platform needs to understand how to categorize your spreadsheet data in order to sync it with your desired app or tool. This is where field mapping comes into play. In Google Sheets, the fields come from the table header – the text in the first row of each spreadsheet. This means that your spreadsheet rows will become cards and your columns will become fields in the app or tool you are connecting to.
Getting around with Google Sheets and Unito
You can find more information on the following topics in Unito’s knowledge base:
- Supported fields in Google Sheets and other features
- Setting rules in Unito to manage your spreadsheets
- Creating spreadsheets with Unito
- Adjusting the date + time format in a spreadsheet
- Finding spreadsheets by their URL
Have other questions?
Can you link Google Sheets spreadsheets with other tools?
Absolutely! There are third-party solutions that can link data from Google Sheets to all sorts of tools. Unito is still the best way to do it. With Unito, you can import data from all sorts of tools into a Google Sheet, from project management platforms like Wrike, Jira, and Asana to go-to enterprise platforms like ServiceNow and Salesforce.
Can you sync two spreadsheets?
The IMPORTRANGE function is enough to keep a Google Sheets spreadsheet updated with imported data from multiple sheets, but it has its limits. A Unito integration is the best way to export data from one spreadsheet to another because you don’t have to worry about broken formulas. A single Unito flow can link data across two sheets, while multiple flows can turn a single spreadsheet into a master view of data across your organization.
How can you automate repetitive tasks in Google Sheets?
Automations and integrations are the best way to do this, especially when you’re looking to avoid manually copying and pasting data in different sheets. Platforms like Zapier and IFTTT are great for automating data entry or pulling data from other tools. The only problem? They don’t keep any of that data up to date. A two-way sync solution like Unito is the only way to do that without worrying about broken functions.