How To Build an Azure DevOps-Salesforce Integration With Unito
Here’s everything you need to know about setting up an integration to sync Azure DevOps and Salesforce work items with an automated 2-way sync using Unito. Since Unito is a no-code, completely customizable platform, you don’t need any IT resources to set up your first secure integration. You don’t need to troubleshoot scripts or bring in third-party consultants, either.
Overview
- Tools: Azure DevOps and Salesforce
- Use cases: Ticket escalation, product management, software development
- Great for: Sales, customer success, software developers, product managers, RevOps
Unito’s two-way sync integration for Azure DevOps and Salesforce allows users of any technical background, from product managers to software developers and team leads, to sync Azure DevOps work items with Salesforce objects. This integration syncs updates back and forth between both tools, creates new work items, and can even automate repetitive actions. This in-depth guide shows you how that’s done.
Step 1. Connect Azure DevOps and Salesforce to Unito
- Sign up for Unito if you haven’t already!
- Navigate to the Unito App and click +Create Flow.
- Click Start Here to connect Azure DevOps and Salesforce.
- Then click +Choose account for each tool and complete the authorization process.
- Click Confirm.
When you’re ready, click Confirm.
First time connecting tools to Unito and need extra help? Check out this guide.
Authorizing ADO to sync with Unito
Before you sync anything out of Azure DevOps, make sure Third-party application access via OAuth is on.
To adjust this setting, go to Organization Settings in Azure DevOps and click on Policies. Then, make sure the toggle for Third-party application access via OAuth is turned on. Without this, you won’t be able to connect Azure DevOps to Unito.

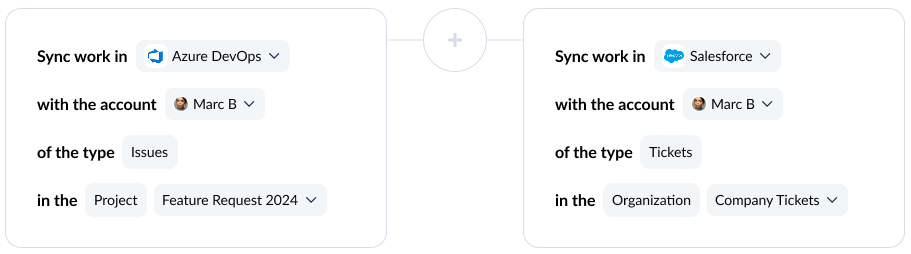
Step 2. Choose flow direction for new work items
When you create new Azure DevOps or Salesforce work items, Unito creates synced versions in the other tool automatically. With flow direction, you can determine where that happens:
- 2-way, meaning new AzureDevops items and Salesforce items will be created to match items in either tool.
- 1-way from Azure DevOps to Salesforce, which creates new Salesforce work items to match items you create manually in Azure DevOps. Creating items in Salesforce manually won’t create new Azure DevOps items.
- 1-way from Salesforce to Azure DevOps, creating new Azure DevOps work items to match items you create manually in Salesforce. Creating items in Azure DevOps manually won’t automatically create new Salesforce items.

Step 3. Set rules to sync specific Salesforce and ADO work items
Rules are part filter, part automation. They allow you to customize your flows so only some work items get synced between Salesforce and Azure DevOps. For example, you could decide to filter out any Salesforce tickets from before a specific date or Azure DevOps items with a specific assignee.
You can also use rules to automatically send work items to specific sections, assign people to them automatically, and more.
To start creating a rule, click Add a new rule. From there, you can choose what will trigger that rule and what happens when it’s triggered.
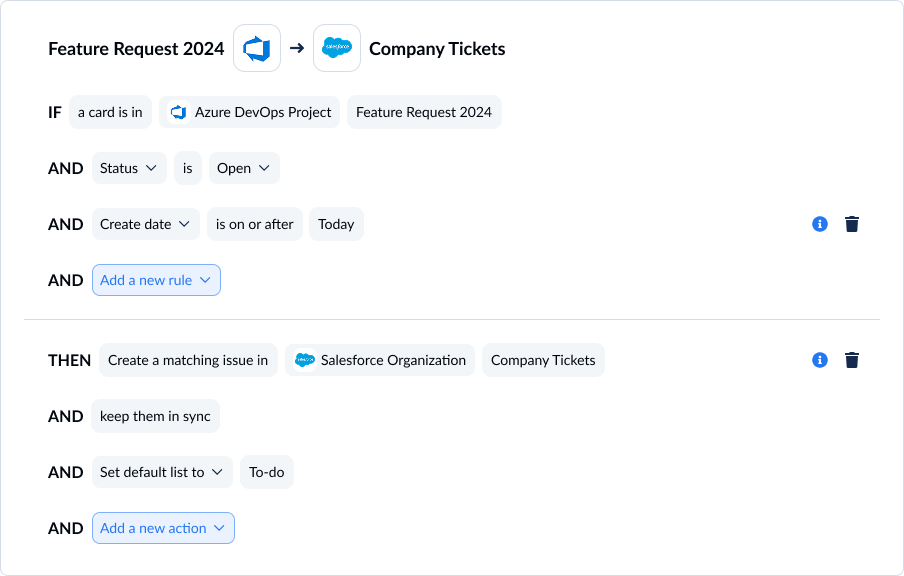
You can learn more about setting rules here.
Step 4. Map fields between Azure DevOps and Salesforce
Field mappings pair fields in Azure DevOps with fields in Salesforce so your data goes exactly where it needs to, whether these fields have the same name (e.g., Assignee to Assignee) or not (e.g., Priority to Picklist). When it’s time to map your fields, you can either let Unito do it for you by clicking Map automatically or click Map manually to customize them yourself. Even if you let Unito map your fields automatically, you can customize them afterward.
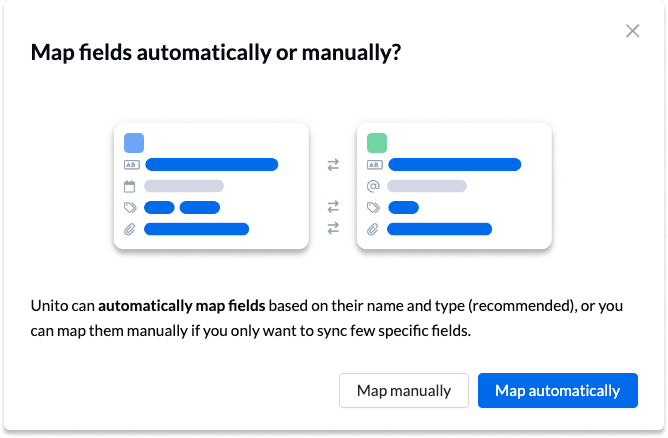
If you map your fields automatically, you’ll see something like this.
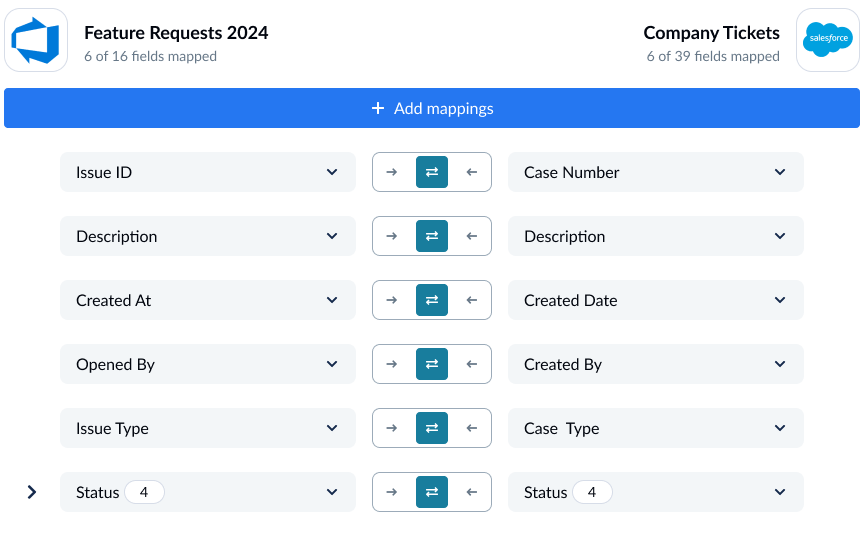
From here, click +Add mapping, then Select a field to sync additional fields. Unito automatically recommends compatible fields for any field you add here through a drop-down menu.
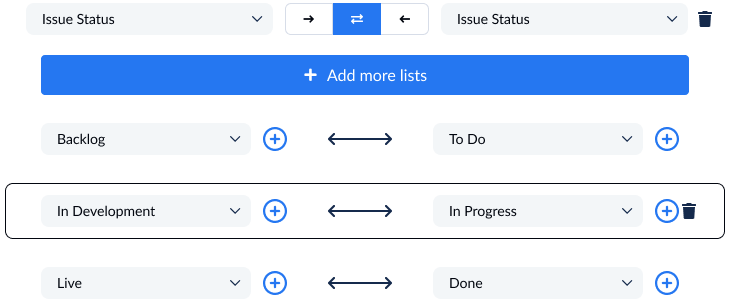
Some fields have a cog icon, meaning they can be customized further. For example, a Priority field can be customized to match specific options to those in another field.
Step 5. Launch your AzureDevOps-Salesforce integration
That’s it! You’re ready to launch your first flow. Once you do, Unito will automatically sync Azure DevOps and Salesforce items, keeping all fields up to date automatically.
Have any questions? Don’t hesitate to reach out to us by clicking on the chat bubble!
Ready to optimize your pipeline?
Meet with our team to see what Unito can do for your workflows.
FAQ: Azure DevOps-Salesforce integration
Why sync Azure DevOps and Salesforce?
Azure DevOps (or ADO) is a key tool for many software development teams, housing everything they need to get their most important work done. But ADO can quickly turn into a silo, keeping developers from collaborating effectively with the rest of the organization.
Salesforce, on the other hand, is often the nexus of every revenue-generating workflow in your organization. Sales deals move through a pipeline in Salesforce, marketers pull customer data from it to build better campaigns, and your customer success team might work entirely out of Salesforce. This is an environment completely alien to your software developers.
The problem? There are quite a few essential workflows that depend on collaboration between teams that never leave these two tools.
Streamlining support ticket escalation
With technical products, your customer success team can only handle so many requests. They’ll often need to escalate tickets to developers to get their expertise on a potential problem, flag a bug, or get an answer to a particular question.
With Unito’s Azure DevOps-Salesforce integration, support agents can create tickets in Salesforce that are automatically synced to Azure DevOps, giving developers all the information they need without any extra manual work.
Monitoring development on dealmaking features
Some deals come with strings attached. A prospect might not close until specific product features are built from scratch, upgraded, or customized to their needs. Sales teams need to send specific product information to software developers so they know what they should be working on.
Unito’s integration makes that happen automatically, with Salesforce deals flagged for development automatically pushed to Azure DevOps. Additionally, any questions from developers are automatically sent back to Salesforce.
Integrating product launches in marketing campaigns
A single product update can make or break a marketing campaign, giving marketers ammunition to raise awareness about their brand, generate leads, and create deals for the sales team to take on. But the back-and-forth between software developers and marketers can be clunky, leaving marketers unaware of important updates, critical to their campaigns.
This integration brings together marketers in Salesforce with developers in Azure DevOps, keeping everyone up to date without any extra manual work.
What Salesforce objects can I sync with Azure DevOps?
Unito can sync Azure DevOps work items with Salesforce opportunities, tasks, contacts, leads, and cases. Each Unito flow syncs one type of object for each tool.
How long does it take to implement an Azure DevOps-Salesforce integration?
Your implementation timeline will depend on the integration solution you choose. Pre-built connectors like Salesforce Connector can be configured and deployed in a few weeks, while more complex automation solutions can take weeks or months to deploy. A two-way sync solution like Unito, meanwhile, can be deployed within a few hours, even if you don’t have a technical background.
Why should I integrate Azure DevOps with Salesforce?
Syncing Azure DevOps work items with Salesforce objects allows your teams to work more effectively together without constantly switching back and forth between tools. This allows:
- Developers who plan sprints in Azure DevOps based on requests from the sales team to get those requests without any intermediaries or manual copying-and-pasting.
- Teams working in Azure DevOps to sync updates to Salesforce so stakeholders have up-to-date progress reports in the platform they use regularly.
- Improving collaboration between technical teams in Azure DevOps and customer-facing teams in Salesforce.
What workflows does Unito’s Azure DevOps-Salesforce integration support?
Unito’s Azure DevOps-Salesforce integration can support a number of workflows, including:
- Ticket escalation
- Software development
- Project management
- AI agent integration
- Time tracking and billing
- Record syncing
What’s next after integrating Azure DevOps and Salesforce?
Need to integrate Azure DevOps or Salesforce with other tools in your stack? Check out our other guides below: