How to Sync Issues Between GitHub Repositories
This walkthrough will guide you through the process of setting up a 2-way sync between multiple GitHub repositories with Unito. By the end of this article, you’ll learn how to establish a simple integration that duplicates issues in one repo to the other and keeps both automatically in sync based on rules and settings chosen by you.
Syncing issues between GitHub repositories is a smart next step for any professional who’s ready to up their workflow automation game. This integration will allow you to:
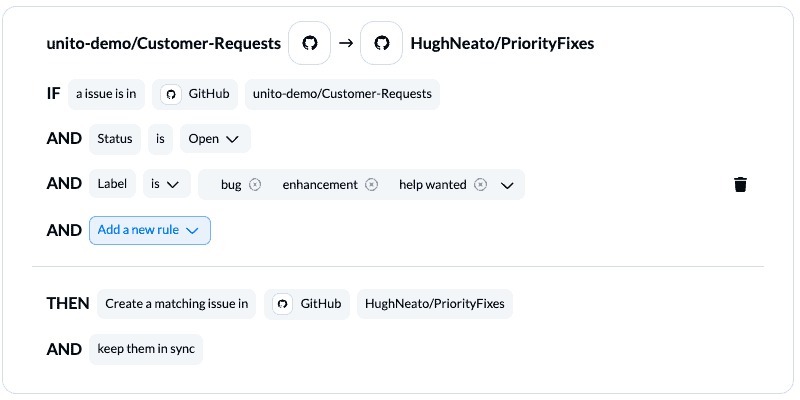
- Create a new issue in one GitHub repo based on open issues in another based on the labels you apply:
- Keep your synced issues up-to-date automatically.
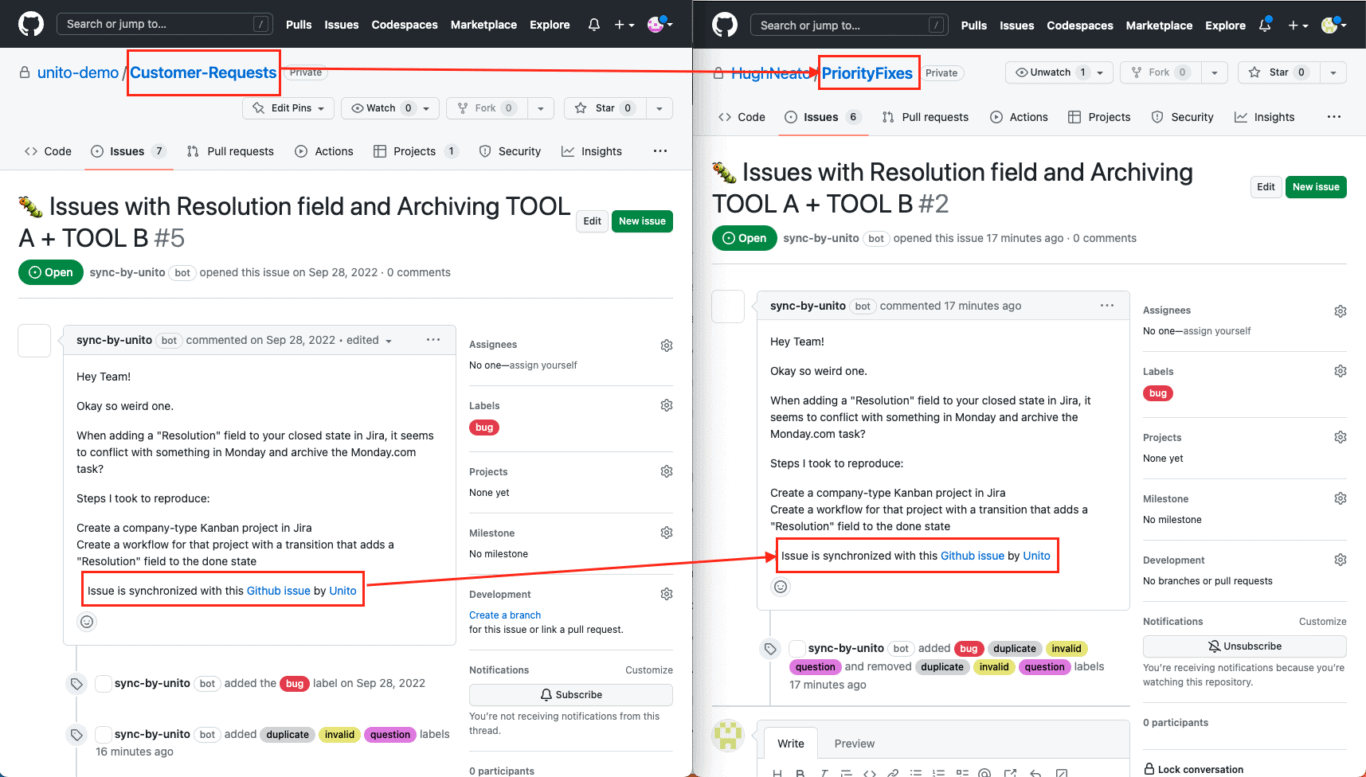
Here’s what our synced GitHub issues will look like after connecting them with Unito:
New to Unito? Learn more about our 2-way GitHub integration before proceeding with this guide.
In this guide:
- Tools: GitHub
- Use cases: Software development, product management, task management
- Great for: Developers, engineers, project managers, product managers
What are the challenges of working in multiple GitHub repos?
Operating in two separate GitHub repositories can sometimes be inconvenient, especially when it comes to ensuring that both repositories stay in sync. Since changes made in one repository are not automatically reflected in the other repository, there is a higher risk of inconsistency or conflicts between the two code bases.
Also, as outlined above, there are many situations and workflows that can benefit from syncing issues across GitHub repositories. For example, you may have one team responsible for developing a specific feature or module, while another may work on a separate module of your app.
Finally, there may be issues with dependencies. If both repositories have different dependencies, it can be difficult and time-consuming to ensure that all team members have the correct dependencies installed and are using the correct versions. This can lead to compatibility issues, which can be especially troublesome when merging changes between repositories.
How does 2-way sync improve collaboration in GitHub?
This is obviously most useful for teams that collaborate on projects that span multiple repositories, including:
- Large applications
- Web development
- Game development
- Mobile development
- Any app with a wide range of features or components
If you’d like to browse through more of our GitHub articles before you start automating, you can check out our guide to GitHub project management, or version control 101.
Before you connect GitHub to Unito:
- Ensure you have an account in both GitHub repositories with permission to create issues.
- Review the capabilities of Unito’s 2-way GitHub integration.
- You must be a GitHub admin or organization owner in order to connect GitHub to Unito.
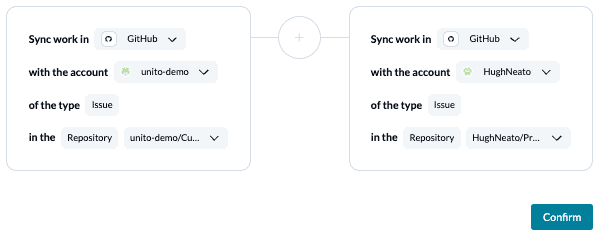
Step 1: Connect each GitHub account to Unito
- Login the Unito App and click + Create Flow.
- Now, click Start Here to connect your tools.
- Next, select +Add a tool to this flow in either column.
- Then, +Choose account to specify the GitHub repositories you plan on syncing. The order in which you connect them doesn’t matter.
- Click Confirm.
Connecting GitHub to Unito for the first time
If this is your first time connecting GitHub to Unito, you’ll need a GitHub admin or organization owner to complete a few extra steps to choose which GitHub organization(s) you wish to sync issues from.
Click to expand for GitHub setup instructions

- First, you’ll be prompted to select an organization or your personal GitHub account. Chooes the organization you plan on syncing.
- On the next screen, you can choose to sync issues from specific repos within that organization, or issues from all repos. Choose whichever option you prefer.

If you can’t complete this process for any reason, don’t hesitate to reach out to our live support team.
When you’re ready, select Confirm.
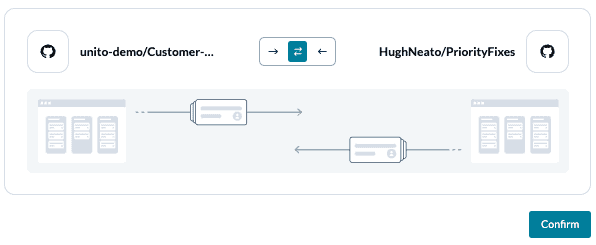
Step 2: Set a flow direction between GitHub repositories
This step tells Unito where to create new GitHub issues. Next, we’ll tell Unito when to create those issues. For now, simply choose the direction you prefer, and select confirm.
Step 3: Set rules to sync specific GitHub issues
This is where you can set up triggers to determine which actions taken in one GitHub repo will create new issues in another.
- Select Add a new trigger and search for the label you want Unito to look for when it syncs issues between projects.
- Select Confirm.
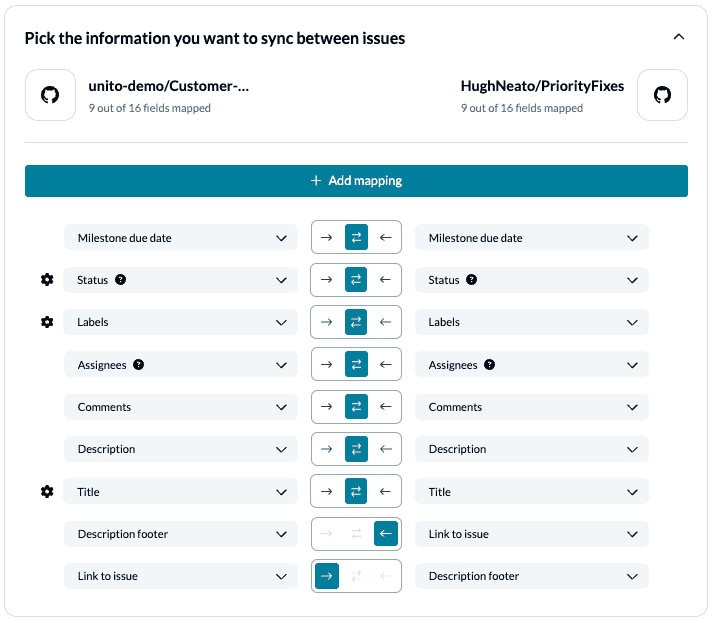
Step 4: Link fields between GitHub issues
Fields represent the details of each GitHub issue. This includes: assignee, description, label, milestone, comments, dates, status, etc. Unito can auto-map your fields if you prefer to begin with a template, or you can try a DIY approach.
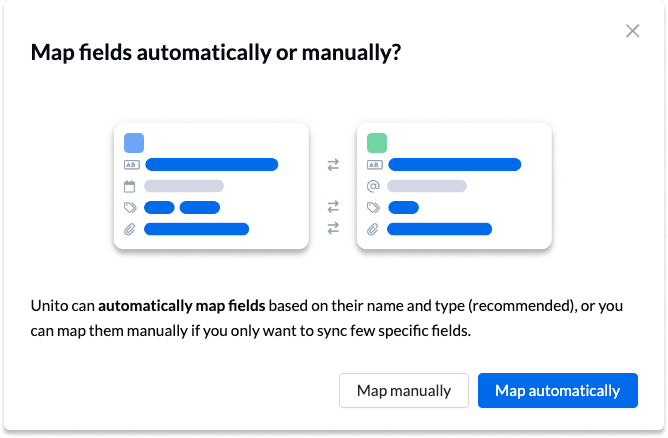
In most cases your fields will automatically be mapped for two-way updates, but you can modify each individually if you prefer one-way updates in some cases. In a one-way field mapping, only changes to the source field will affect the destination field in the other GitHub issue.
Select + Add mapping, then Select a field to set up a mapping. Here’s an example of Unito’s auto-mapped fields for GitHub:
Step 5: Launch your GitHub integration
And that’s it! You’ve just built a flow between GitHub repositories. Congratulations!
If you followed the steps above, your flow ill now:
- Automatically create GitHub issues in one repo based on issues in another.
- Keep GitHub issues synced in real-time.
What’s next after a 2-way GitHub integration?
If you’re interested in seeing what else you can do with Unito, here are some articles to help you power up your workflows:
- You can duplicate this flow to build a more powerful workflow by sending tasks to other GitHub repos for different purposes, perhaps one for bug fixes and another for feature requests.
- Having issues with your issues? Check out Unito’s Troubleshooting Guide for GitHub users.
- Need some inspiration? Here’s how we use this workflow to collaborate on dev work with external contractors.