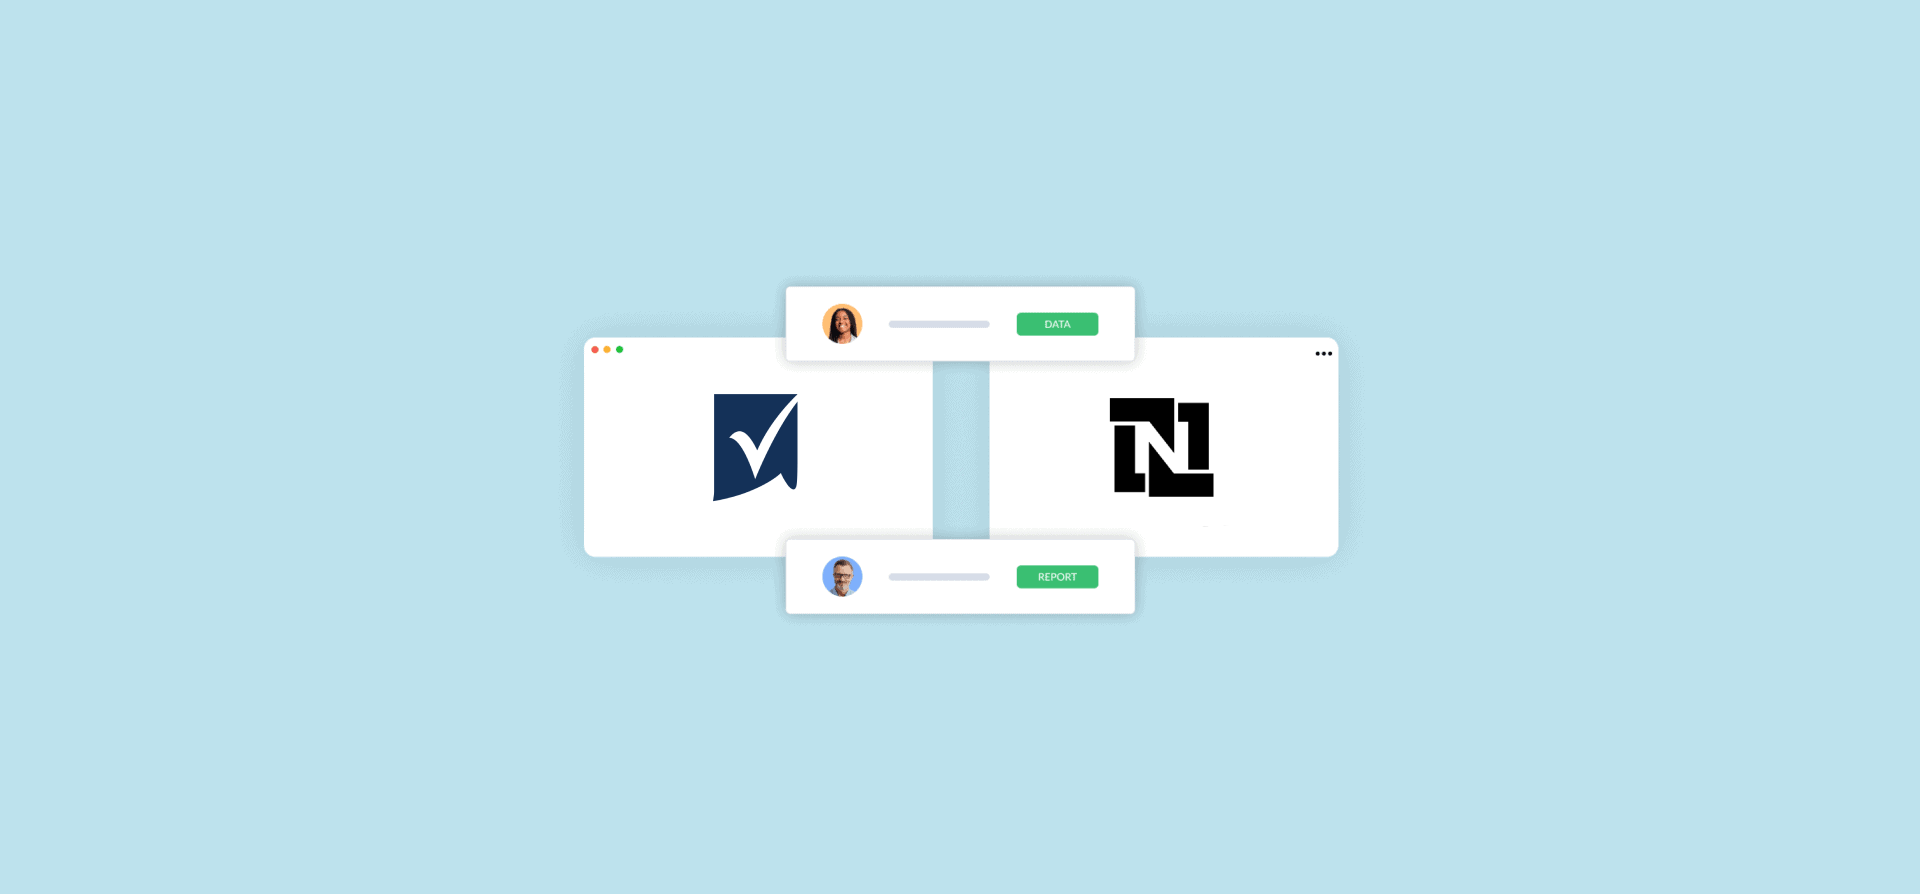
How to Connect Smartsheet with NetSuite (4 Methods)
Need to move data between NetSuite and Smartsheet? Maybe you have teams working primarily in Smartsheet, but need to see their work represented in NetSuite? Or is Smartsheet your reporting tool of choice for NetSuite work?
In this guide, you’ll find the following four methods for connecting Smartsheet with NetSuite:
- Manually exporting data between Smartsheet and NetSuite
- Using Smartsheet Data Shuttle
- Using automation tools
- Syncing Smartsheet and NetSuite with Unito
First method: Manually exporting data between Smartsheet and NetSuite

Both NetSuite and Smartsheet allow users to manually export data from specific parts of their workspace or the entire workspace in various formats. This can be the quickest way to get the data you need out of these tools, but it comes with some limitations.
Exporting data from Smartsheet to NetSuite
You can export data from Smartsheet to a PDF, a PNG (if it’s in a Gantt chart), an Excel workbook, a Microsoft Project, or a Google Sheets sheet.
You can export an entire Smartsheet workspace from the workspace panel by following these steps:
- Go to the workspace panel.
- Click the three-dot menu above the workspace name.
- Click Export.
- Pick the type of export you need.
If you want to export a folder, do the following:
- Go to the workspace panel.
- Right-click the folder you want to export.
- Click Export.
- Pick the type of export you need.
If you just want to export a single sheet or report, you can do it one of two ways:
- Click File in the top navigation bar, then click Export.
- Go to the workspace panel, right-click the sheet or report you want to export, then click Export.
Exporting data from NetSuite to Smartsheet
There are a few ways you can export data from NetSuite to a CSV file, depending on how much data you need to export.
If you need a full CSV export of your NetSuite data, follow these steps:
- Go to Setup.
- Click Import/Export.
- Click Export Tasks.
- Click Full CSV Export.
- Click Submit.
- Click Save this file to disk, then OK.
- You’ll see a Save As window. Give your export a file name ending in “.ZIP”
- Click Save.
- Open your ZIP file and find the CSV file for your export.
Instead of exporting everything from NetSuite, you can choose to export only the results of a saved search as a CSV, a PDF, or an XLS file. Here’s how:
- Go to a page with a search bar and search for something.
- Click Export.
- Choose whether you want to export your data as a CSV, PDF, or XLS file.
You can also export the results of a NetSuite report. Here’s how:
- Go to the Reports page and click on the name of the report you need.
- Scroll down to your report’s footer.
- Click on the export icon you need to export to an Excel file, a PDF, a CSV, or a Word doc.
Limitations of this method
While these methods are among the fastest ways to export data from Smartsheet or NetSuite, they do have the following limitations:
- Limited compatibility: The file types you can export from Smartsheet aren’t all compatible with NetSuite, meaning you might have to use a spreadsheet tool (i.e., Excel or Google Sheets) as an intermediary to convert your data.
- Limited data: The amount of data you can actually export from Smartsheet or NetSuite can be limited, depending on the method you’re using. This can be artificially limiting for some workflows.
- Clutter: Because these methods all involve exporting data to intermediary files like CSVs or PDFs, your computer will quickly get cluttered with files as your workflows demand up-to-date data. You’ll constantly have to chase down the latest version of these files to keep up.
- Manual work: Every time you need data from Smartsheet or NetSuite, you need to manually trigger an export in one tool and upload the tool to the other. While each export doesn’t demand much work on its own, it will quickly add up.
Second method: Using Smartsheet Data Shuttle
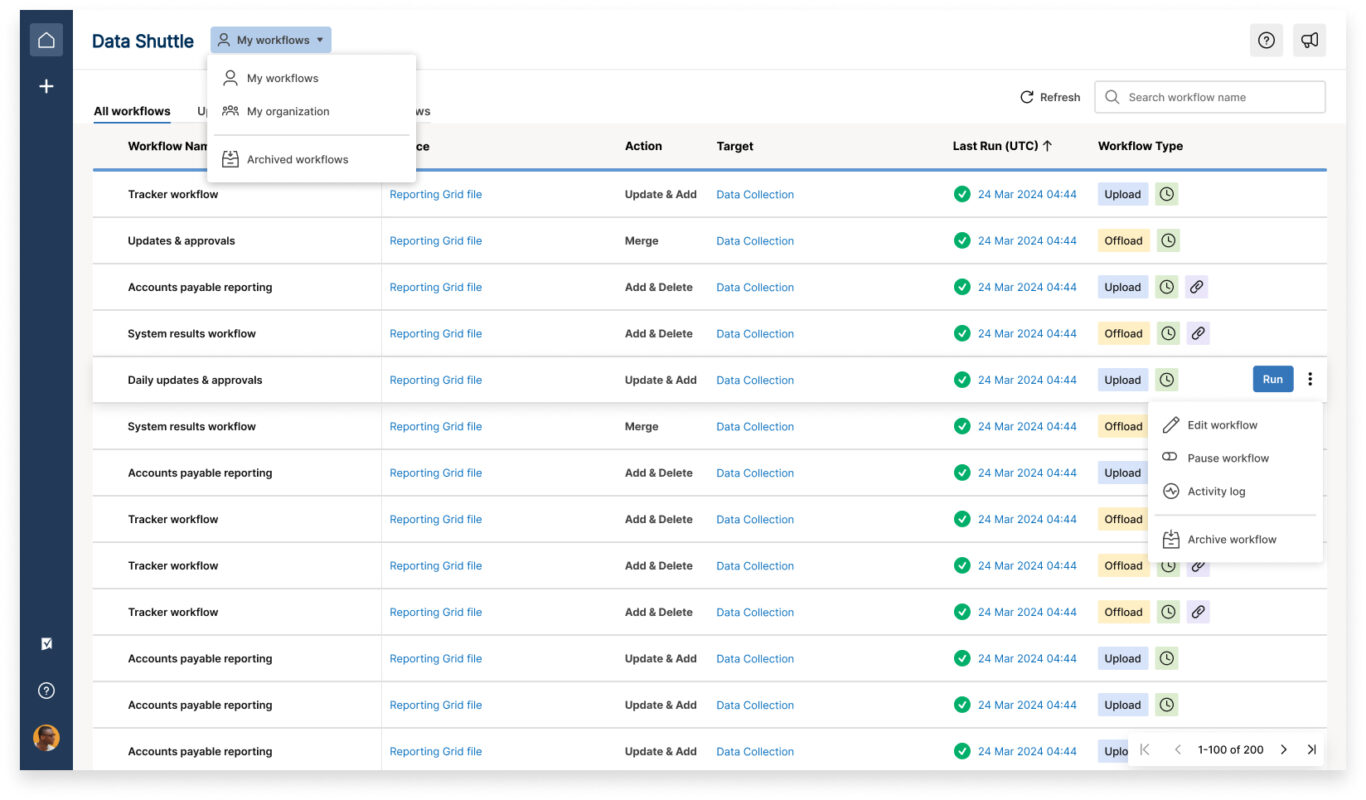
Smartsheet’s Data Shuttle is, essentially, a scheduler for data exports and imports. It makes Smartsheet compatible with any platform that can either export or import CSVs and Excel files — like NetSuite. Here’s how you can set this up for your workflows.
Step 1: Create a Data Shuttle workflow
- Log in to Data Shuttle.
- Click the + in the left navigation bar.
- Click Upload Data.
Step 2: Choose source file
- Choose the Source Location for your file. You can choose from the following:
- A Smartsheet Attachment.
- A OneDrive file.
- A SharePoint file.
- A Google Drive file.
- A Box file.
- Check the This file has column headers box if your file has column headers.
- If your data doesn’t start on row 1 or tab 1, fill in the First Row and Tab Number.
- Click Next.
Step 3: Choose target and workflow actions
The target is where your data needs to go. Essentially, you’ll pick a sheet where your data should go. From there, you’ll pick actions, which determine how your data will be imported. For example, you could:
- Replace all rows in your target sheet with the rows from your source file.
- Merge data into the target sheet.
- Update dropdowns for specific columns with imported data.
Step 4: Add filters
Filters allow you to choose the data you want to import. To build a filter, you need to choose:
- The column your filter should check.
- The logic your filter will use, such as “equals,” “greater than,” or “is not blank.”
- The variable your filter will look for, like a specific value.
Step 5: Map columns
Match the columns in your source file to the columns in your target sheet. You’ll get two columns in Smartsheet with dropdown menus that allow you to pair columns.
Step 6: Schedule your workflow
If your source file is a Smartsheet attachment, you can choose to Run on attachment, meaning Data Shuttle will export data from it as soon as a new attachment is detected. Run on schedule allows you to choose a regular interval at which your Data Shuttle will import data. You can choose specific days of the week, start times, or a timed frequency (e.g., 30 minutes).
If you don’t check either option, you’ll have to run your Data Shuttle export manually.
Limitations of this method
While Data Shuttle has the major advantage of being built right into Smartsheet, it does come with some limitations:
- Limited availability: Only Smartsheet’s Enterprise plan includes Data Shuttle. All other plans have to add it to their plan for an additional cost. That can make this method prohibitively expensive for some teams.
- No data sync: Once you’ve imported or exported data using Data Shuttle, it’s essentially frozen in time. If you make any changes in the original source, those changes aren’t synced over. That means you’ll need regular exports to keep your data somewhat accurate.
- Limited compatibility: This method will only export or import data from Smartsheet attachments, CSV files, Excel files, or Google Sheets. That means you won’t be able to move data directly out of Smartsheet or into NetSuite; you’ll need to use these files as intermediaries.
- Smartsheet-only: While this method can definitely help you get data moving between Smartsheet and NetSuite, it won’t help you with any workflows that don’t involve Smartsheet. That can seriously limit its usefulness.
Third method: Using automation tools

Automation tools like Zapier or Make allow you to set up simple, if-this-then-that automations that move data between tools. For example, you could build an automation that creates NetSuite records to match Smartsheet rows you create manually. Some automations will also update fields in each tool.
That simple logic gives automation tools a lot of flexibility. That’s why they typically support connections for thousands of tools.
Usually, automation tools allow you to chain multiple automations using this logic, managing the creation, updating, and archiving of work items across your workflows. These chains can be complex to set up and troubleshoot, but when built right, they can supercharge your productivity.
While the exact process for connecting Smartsheet with NetSuite will vary depending on the exact tool you use, it follows the same general steps.
Step 1: Identify your use case
Before you connect your tools, you should spend some time mapping out the workflow you’re trying to automate. Are you trying to export data from regular reports in Smartsheet to NetSuite? Pay special attention to:
- Your workflow’s trigger: This is the event that kickstarts what you’re looking to automate. Is it a report? An update from a particular team member? Or even just a specific date?
- The action you want to automate: This is the manual work you’re trying to avoid by using these tools. Usually, it’s the creation of a new work item or the updating of fields like dates and dropdowns.
Step 2: Set up your trigger
You’ll need to connect Smartsheet and NetSuite to the automation platform you’ve chosen. This usually requires authenticating a specific account in these platforms, and often requires admin permissions.
From there, you’ll pick the trigger that will kickstart your automation. Different tools will give you different options. Some experimentation may be needed to get the right trigger for your workflow.
Step 3: Pick your action
Once you have your trigger, you need to pick the action your tool will automate. Focus on the immediate next step in your workflow that will save you the most effort.
Step 4: Test your automation
Most automation tools will allow you to run an automation a single time, so you can see its impact with a limited amount of data. From there, you can refine your automation as needed to get it working just right.
Step 4: Add more automations
Once your first automation is live, you can start to experiment with more automations, chaining them with the first. Over time, this can automate an entire workflow, saving you tons of manual work.
Limitations of this method
Automation tools like Zapier and Make come with the following limitations:
- No data sync: Automation tools don’t create relationships between work items, they only automate individual actions. That means any updates made to work items in either tool after an automation has run won’t be carried over.
- Typically one-way: Automations typically only work in one direction, making them essentially a more advanced data export. If you wanted to automate actions back and forth, you’d have to manually chain multiple automations.
- Extensive maintenance and troubleshooting: A single automation between two tools doesn’t require much maintenance, and it will rarely break. If you want to automate an entire workflow, however, you can expect significant monthly maintenance.
- Variable difficulty: Automation tools aren’t all created equal. Some can be set up in minutes with little technical know-how, while others will require significant expertise.
Fourth method: Syncing Smartsheet and NetSuite with Unito
Unito is an enterprise integration platform with true two-way syncing for some of the most powerful SaaS tools on the market, including Smartsheet, NetSuite, Jira, Asana, and 60+ other connectors. Its no-code interface makes it easy to build your first flow without sacrificing the depth and functionality you need.
Here’s why Unito is the best way to connect Smartsheet with NetSuite:
- Faster deployment: Most Unito users set up their first integration in a few days. Most other integrations solutions demand weeks or months of time to properly deploy.
- No manual work: Exporting data from Smartsheet and NetSuite or setting up complex chains of automations requires significant manual work. Unito, once it’s deployed, completely eliminates that work.
- No cleanup: Unito automatically maps fields in Smartsheet and NetSuite, meaning you don’t have to clean up data exports to make them compatible across tools.
- Automated updates: Once you’ve set up your Unito flow, it will automatically update work items in Smartsheet and NetSuite based on the work happening in either tool.
- More tool support: Smartsheet and NetSuite’s built-in integrations only support a handful of tools. Unito supports over 60.
Want to see Unito’s integration in action? Watch this video tutorial, where a Unito product expert walks you through an example use case for a Smartsheet-NetSuite integration.
Here’s a step-by-step guide to connecting Smartsheet and NetSuite with Unito.
Step 1: Connect your tools
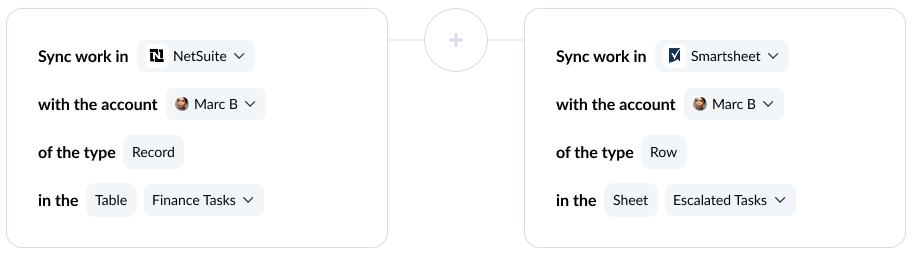
First, connect your tools. In this case, you’ll be connecting a Smartsheet sheet to a NetSuite table.
Step 2: Pick flow direction
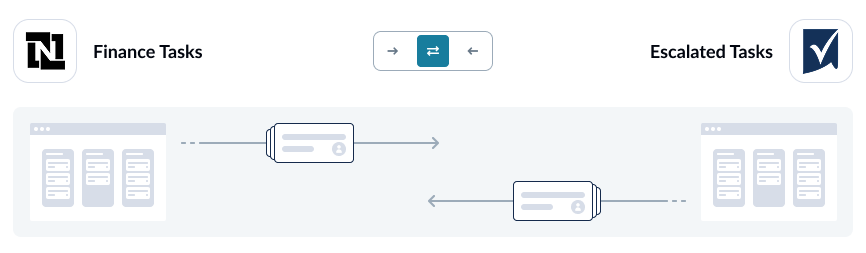
Flow direction determines where Unito creates new work items. If you build a two-way flow, for instance, Unito will automatically create new Smartsheet rows and new NetSuite work items to match what you create manually in each tool. If you build a one-way flow, say from Smartsheet to NetSuite, Unito will automatically create new NetSuite work items to match the rows you create in Smartsheet. It won’t create new Smartsheet records automatically.
Step 3: Build rules
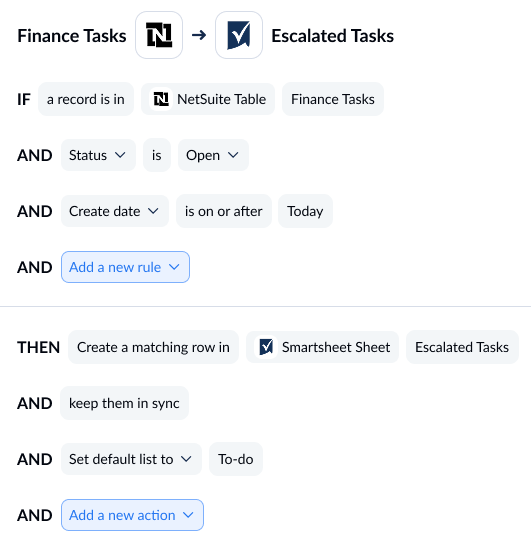
Unito rules allow you to do two things:
- Filter out work items you don’t want to sync.
- Automate certain actions.
Creating a Unito rule is as simple as adding the triggers you want the rule to look for and the actions you want it to take. For example, you could have a rule that filters out Smartsheet rows created before a specific date.
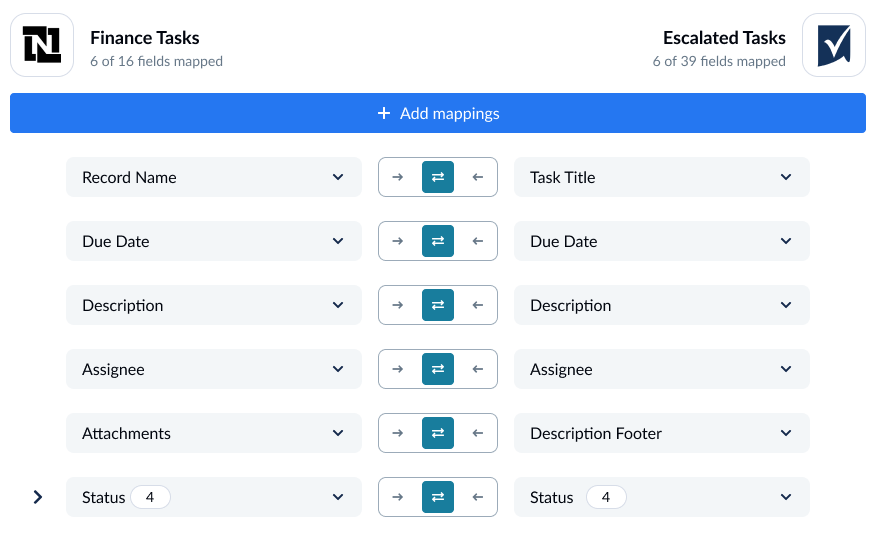
Step 4: Map your fields
Unito supports most fields, including custom fields, meaning you won’t lose any data. Unito can map these automatically in most situations. You can also customize them yourself.
And that’s it! Your flow is ready to launch. Smartsheet and NetSuite data will sync back and forth as you work, meaning you’ll never have to copy and paste reports again.
Want to see what Unito can do for your workflow?
Meet with a Unito product expert for a custom demo.
FAQ: Connecting Smartsheet with NetSuite
Can I integrate Smartsheet with NetSuite?
Yes, you can integrate Smartsheet with NetSuite in one of five ways:
- Manually exporting data from Smartsheet or NetSuite with CSV-style exports.
- Scheduling regular data exports between Smartsheet and NetSuite with Smartsheet Data Shuttle.
- Using automation tools like Zapier or Make.
- Sync data bidirectionally with a Unito integration.
Can I use Bridge by Smartsheet with NetSuite?
No. Bridge by Smartsheet only supports three integrations:
- ServiceNow
- Sharepoint
- Google Translate
You’ll need to use another integration solution to connect NetSuite with Smartsheet.
Is technical expertise required to set up this integration?
The amount of technical expertise required depends on the integration solution you use to connect Smartsheet and NetSuite. If you use Data Shuttle, Smartsheet’s built-in data exporter, you won’t need much technical knowledge. If you want to use Smartsheet or NetSuite’s APIs (application programming interfaces), you’ll need at least one software developer, several weeks, and a budget.
Two-way sync solutions like Unito give you the best of both worlds: the functionality of a custom integration with the ease of use of a data exporter.
How long does it take to implement a Smartsheet-NetSuite integration?
The time it takes to deploy a Smartsheet-NetSuite integration depends on the type of integration solution you use. Smartsheet’s built-in data exporter, Data Shuttle, can be deployed in minutes — but it’s more limited in what it can integrate. Meanwhile, a full two-way integration solution like Unito can take days to implement, but it’s much more robust.